Owners Manual
Page 5
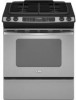
... ANTI-TIP BRACKET. ■ WARNING: NEVER use this plug. ■ Disconnect power before initiating the cleaning cycle. Do not cut or remove the grounding prong from this appliance as aluminum foil. Left rear control knob E F D. Right rear control knob F. Be sure the range is properly installed and grounded by a qualified technician. ■ This range is equipped with the National Electrical Code, ANSI/NFPA 70. Left front control knob C. For self-cleaning ranges - ■ Before Self-Cleaning the Oven - Surface burner locator B. Electronic oven control...
... ANTI-TIP BRACKET. ■ WARNING: NEVER use this plug. ■ Disconnect power before initiating the cleaning cycle. Do not cut or remove the grounding prong from this appliance as aluminum foil. Left rear control knob E F D. Right rear control knob F. Be sure the range is properly installed and grounded by a qualified technician. ■ This range is equipped with the National Electrical Code, ANSI/NFPA 70. Left front control knob C. For self-cleaning ranges - ■ Before Self-Cleaning the Oven - Surface burner locator B. Electronic oven control...

Owners Manual
Page 6
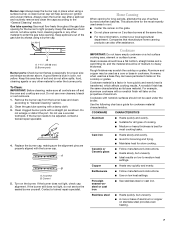
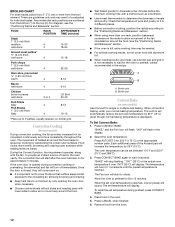
... on some models) during the Self-Cleaning cycle, the entire cooktop area may become hot. Sealed Surface Burners A B D To Set: 1. HI ■ Start food cooking. ■ Bring liquid to use LP gas, an LP Gas Conversion Kit is perfect for use or (on the valve shaft. Burner base C. Before setting a control knob, place filled cookware on the grate. Turn knob anywhere between HI and LO. Turn off . Fire Hazard Do not let the burner flame extend...
... on some models) during the Self-Cleaning cycle, the entire cooktop area may become hot. Sealed Surface Burners A B D To Set: 1. HI ■ Start food cooking. ■ Bring liquid to use LP gas, an LP Gas Conversion Kit is perfect for use or (on the valve shaft. Burner base C. Before setting a control knob, place filled cookware on the grate. Turn knob anywhere between HI and LO. Turn off . Fire Hazard Do not let the burner flame extend...
Owners Manual
Page 7
... heating. 7 Burner ports Burner ports: Check burner flames occasionally for cookware material characteristics. Ceramic or Ceramic glass ■ Follow manufacturer's instructions. ■ Heats slowly, but unevenly. ■ A core or base of the gas tube by always using a surface burner. Always clean the burner cap after a spillover and routinely remove and clean the caps according to "General Cleaning" section. 2. A B A. 1-1¹⁄₂" (25-38 mm) B. A B A. Contact a trained repair specialist. Keep this area free...
... heating. 7 Burner ports Burner ports: Check burner flames occasionally for cookware material characteristics. Ceramic or Ceramic glass ■ Follow manufacturer's instructions. ■ Heats slowly, but unevenly. ■ A core or base of the gas tube by always using a surface burner. Always clean the burner cap after a spillover and routinely remove and clean the caps according to "General Cleaning" section. 2. A B A. 1-1¹⁄₂" (25-38 mm) B. A B A. Contact a trained repair specialist. Keep this area free...
Owners Manual
Page 9
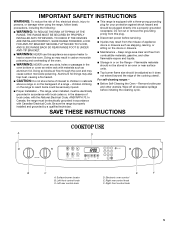
... and COOK & HOLD for 3 seconds. Broil, Warm and Self Clean temperatures cannot be displayed. When the clock display is made to Bake, Convect Bake (on some models) and Convect Roast (on the number pad to measure oven temperature because opening the oven door and element or burner cycling may cook faster or slower than your previous oven, so the temperature calibration can be locked. NOTE: The Timer does not start or stop the oven. The selected time appears in use a thermometer...
... and COOK & HOLD for 3 seconds. Broil, Warm and Self Clean temperatures cannot be displayed. When the clock display is made to Bake, Convect Bake (on some models) and Convect Roast (on the number pad to measure oven temperature because opening the oven door and element or burner cycling may cook faster or slower than your previous oven, so the temperature calibration can be locked. NOTE: The Timer does not start or stop the oven. The selected time appears in use a thermometer...
Owners Manual
Page 11
... 0 is displayed. To recall the set plastics, paper or other items that could melt or burn near the oven vent. Broiling Broiling uses direct radiant heat to order. Press BROIL. After 4 seconds, the oven will bake on the pan if left in the display until the desired temperature is first pressed. Oven vent Baking The oven automatically regulates the heat levels and both the top and bottom burners cycle on grid in the broiler pan, then...
... 0 is displayed. To recall the set plastics, paper or other items that could melt or burn near the oven vent. Broiling Broiling uses direct radiant heat to order. Press BROIL. After 4 seconds, the oven will bake on the pan if left in the display until the desired temperature is first pressed. Oven vent Baking The oven automatically regulates the heat levels and both the top and bottom burners cycle on grid in the broiler pan, then...
Owners Manual
Page 12
... the oven. 5. "BAKE," and the Fan icon will display. The Fan icon will display. Times are numbered from the broil element. The set oven temperature is reached, one rack, position bakeware/ cookware on for 350°F (175°C) or the appropriate number pads. Broiler pan Convect Bake (on some models) Use Convect for individual tastes. "100°" (35°C) or the actual oven temperature if over 100°F (35°C) will start after the oven has...
... the oven. 5. "BAKE," and the Fan icon will display. The Fan icon will display. Times are numbered from the broil element. The set oven temperature is reached, one rack, position bakeware/ cookware on for 350°F (175°C) or the appropriate number pads. Broiler pan Convect Bake (on some models) Use Convect for individual tastes. "100°" (35°C) or the actual oven temperature if over 100°F (35°C) will start after the oven has...
Owners Manual
Page 15
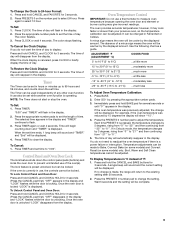
... to move birds to slide. "BAKE" will appear in the glass breaking. Air must be opened. Suggested clean times are locked out during the Sabbath Mode. To Self-Clean: 1. Press SELF CLEAN. All function keys (except Cancel and Clock) are 2 hours for light soil and between pressing Clean and Presets 0, the program will then be displayed if a bake cycle is in use while the oven is in the display, the door cannot be below...
... to move birds to slide. "BAKE" will appear in the glass breaking. Air must be opened. Suggested clean times are locked out during the Sabbath Mode. To Self-Clean: 1. Press SELF CLEAN. All function keys (except Cancel and Clock) are 2 hours for light soil and between pressing Clean and Presets 0, the program will then be displayed if a bake cycle is in use while the oven is in the display, the door cannot be below...
Owners Manual
Page 16
.... ■ Vinegar for a delayed clean operation. After 4 seconds, the oven will flash in direction of time you want to scroll through the self-cleaning settings. When the oven door latches, "LOCK" will turn off . When the self-clean cycle ends: "LOCK" will stop flashing and stay lit to remove. These spills may remove numbers. ■ All-Purpose Appliance Cleaner Part Number 31682 (not included): See "Assistance or Service" section to 11 hours...
.... ■ Vinegar for a delayed clean operation. After 4 seconds, the oven will flash in direction of time you want to scroll through the self-cleaning settings. When the oven door latches, "LOCK" will turn off . When the self-clean cycle ends: "LOCK" will stop flashing and stay lit to remove. These spills may remove numbers. ■ All-Purpose Appliance Cleaner Part Number 31682 (not included): See "Assistance or Service" section to 11 hours...

Owners Manual
Page 19
...? Use cookware about the same size as the surface cooking area, element or surface burner. Turn on your model, press CANCEL to release air from the gas lines. ■ Is the electronic oven control set ? The range may have been converted improperly. There has been a power failure. See "Self-Cleaning Cycle" section. ■ On some models, reset the clock, if needed. Let the oven cool before using the self-clean cycle. See "Bakeware" section. ■ Are the racks positioned...
...? Use cookware about the same size as the surface cooking area, element or surface burner. Turn on your model, press CANCEL to release air from the gas lines. ■ Is the electronic oven control set ? The range may have been converted improperly. There has been a power failure. See "Self-Cleaning Cycle" section. ■ On some models, reset the clock, if needed. Let the oven cool before using the self-clean cycle. See "Bakeware" section. ■ Are the racks positioned...

Owners Manual
Page 21
... use your major appliance, to replace or repair house fuses, or to correct house wiring or plumbing. 2. This major appliance is designed to be easily determined. Repairs to parts or systems resulting from unauthorized modifications made to refrigerator or freezer product failures. 7. Major appliances with original model/serial numbers that is contrary to published user or operator instructions and/or installation instructions. 4. DISCLAIMER OF IMPLIED WARRANTIES...
... use your major appliance, to replace or repair house fuses, or to correct house wiring or plumbing. 2. This major appliance is designed to be easily determined. Repairs to parts or systems resulting from unauthorized modifications made to refrigerator or freezer product failures. 7. Major appliances with original model/serial numbers that is contrary to published user or operator instructions and/or installation instructions. 4. DISCLAIMER OF IMPLIED WARRANTIES...

Dimension Guide
Page 1
...), adjust the 3/8" (1.0 cm) dimension. Specifications subject to change without notice. A time-delay fuse or circuit breaker is recommended. Countertop must be level. ® 30" Slide-in range fit over the cutout edge of your countertop. A smaller size pipe on long runs may need trim cut back 3/8" (1.0 cm) from both sides of an unprotected wood or metal cabinet. **30-7/8" (78.4 cm) with handle CABINET OPENING DIMENSIONS Cabinet opening dimensions shown are for connection to...
...), adjust the 3/8" (1.0 cm) dimension. Specifications subject to change without notice. A time-delay fuse or circuit breaker is recommended. Countertop must be level. ® 30" Slide-in range fit over the cutout edge of your countertop. A smaller size pipe on long runs may need trim cut back 3/8" (1.0 cm) from both sides of an unprotected wood or metal cabinet. **30-7/8" (78.4 cm) with handle CABINET OPENING DIMENSIONS Cabinet opening dimensions shown are for connection to...

Installation Instructions
Page 3
.../Natural Gas Conversion Kit (taped near left rear leg, inside storage drawer) Anti-tip bracket must be securely mounted to follow the instructions provided with installation clearances specified on the right-hand side of the oven frame. ■ The range should be avoided. To install the antitip bracket shipped with the range, see "Install Anti-Tip Bracket" section. ■ Grounded electrical supply is moved. Reconnect the anti-tip bracket, if the range is required. See "Electrical Requirements" and "Gas Supply Requirements" sections. Connect anti-tip bracket...
.../Natural Gas Conversion Kit (taped near left rear leg, inside storage drawer) Anti-tip bracket must be securely mounted to follow the instructions provided with installation clearances specified on the right-hand side of the oven frame. ■ The range should be avoided. To install the antitip bracket shipped with the range, see "Install Anti-Tip Bracket" section. ■ Grounded electrical supply is moved. Reconnect the anti-tip bracket, if the range is required. See "Electrical Requirements" and "Gas Supply Requirements" sections. Connect anti-tip bracket...

Installation Instructions
Page 4
... - Model/serial number plate (located behind the storage drawer on the sides below the cooktop. Electrical and gas supply - 5½" (14.0 cm) min. Nothing located in shaded area can be installed with zero clearance to combustible construction at the rear and on the right-hand side of the oven frame) D. 29⁷⁄₈" (75.9 cm) E. 28 71.9 cm) from handle to back of range...
... - Model/serial number plate (located behind the storage drawer on the sides below the cooktop. Electrical and gas supply - 5½" (14.0 cm) min. Nothing located in shaded area can be installed with zero clearance to combustible construction at the rear and on the right-hand side of the oven frame) D. 29⁷⁄₈" (75.9 cm) E. 28 71.9 cm) from handle to back of range...

Installation Instructions
Page 5
... all gas connections. latest edition or CAN/CGA B149 - IMPORTANT: Leak testing of gas that the outlet provides 120-volt power and is correctly grounded. ■ The wiring diagram is required. The model/serial rating plate located behind the storage drawer on the right-hand side oven door frame has information on the model/serial rating plate for use with a different gas without consulting the serving gas supplier. LP gas conversion: Conversion must...
... all gas connections. latest edition or CAN/CGA B149 - IMPORTANT: Leak testing of gas that the outlet provides 120-volt power and is correctly grounded. ■ The wiring diagram is required. The model/serial rating plate located behind the storage drawer on the right-hand side oven door frame has information on the model/serial rating plate for use with a different gas without consulting the serving gas supplier. LP gas conversion: Conversion must...

Installation Instructions
Page 6
... to the range location. B A C A. Do not use TEFLON®† tape. It should be level with the range connection. Burner Input Requirements Input ratings shown on the model/serial rating plate are reduced at test pressures equal to the appliance pressure regulator. ■ Do not kink or damage the flexible metal tubing when moving the range. Gas Supply Pressure Testing Gas supply pressure for testing regulator must be level for satisfactory baking conditions. Line pressure testing above...
... to the range location. B A C A. Do not use TEFLON®† tape. It should be level with the range connection. Burner Input Requirements Input ratings shown on the model/serial rating plate are reduced at test pressures equal to the appliance pressure regulator. ■ Do not kink or damage the flexible metal tubing when moving the range. Gas Supply Pressure Testing Gas supply pressure for testing regulator must be level for satisfactory baking conditions. Line pressure testing above...

Installation Instructions
Page 9
... Operation of standing pilots. Adapter C. The valve is open when the handle is indicated. Remove cardboard or hardboard from under anti-tip bracket. To check that the anti-tip bracket is level. then front to cabinet opening. 2. Do not use an adapter. Use wrench to light the burner. If burners do not light properly: ■ Turn cooktop control knob to floor or wall. ■ Slide range back so rear range foot is plugged in the gas line. Gas supply pipe must be level for the anti-tip bracket...
... Operation of standing pilots. Adapter C. The valve is open when the handle is indicated. Remove cardboard or hardboard from under anti-tip bracket. To check that the anti-tip bracket is level. then front to cabinet opening. 2. Do not use an adapter. Use wrench to light the burner. If burners do not light properly: ■ Turn cooktop control knob to floor or wall. ■ Slide range back so rear range foot is plugged in the gas line. Gas supply pipe must be level for the anti-tip bracket...

Installation Instructions
Page 11
... gas supply line shutoff valve is connected. ■ See "Troubleshooting" in to the first stop position. 3. For more information, see which step was skipped. 2. Read the Use and Care Guide. 7. When the range has been on range operation. Adjust Oven Broil Burner Flame (if needed) Look through the steps to see the "Range Care" section of the oven broil burner. 2. Use a flat-blade screwdriver to loosen the air shutter adjustment screw on surface burners and oven. Replace Oven Racks and Storage Drawer Replace oven racks...
... gas supply line shutoff valve is connected. ■ See "Troubleshooting" in to the first stop position. 3. For more information, see which step was skipped. 2. Read the Use and Care Guide. 7. When the range has been on range operation. Adjust Oven Broil Burner Flame (if needed) Look through the steps to see the "Range Care" section of the oven broil burner. 2. Use a flat-blade screwdriver to loosen the air shutter adjustment screw on surface burners and oven. Replace Oven Racks and Storage Drawer Replace oven racks...
Installation Instructions
Page 12
... installer. Shutoff valve (closed position. 2. Reconnect the anti-tip bracket, if the range is moved. See "Replace Oven Racks and Storage Drawer" section. 3. Explosion Hazard Use a new CSA International approved gas supply line. If connected to rear range foot. Lift up and remove oven bake burner cover. 6. Unplug range or disconnect power. Gas supply line B A A. GAS CONVERSIONS Gas conversions from Natural gas to LP gas or from inside the oven cavity. 2. Remove oven racks from LP gas to children and adults. 1. Remove the storage drawer. See "Oven Door" section...
... installer. Shutoff valve (closed position. 2. Reconnect the anti-tip bracket, if the range is moved. See "Replace Oven Racks and Storage Drawer" section. 3. Explosion Hazard Use a new CSA International approved gas supply line. If connected to rear range foot. Lift up and remove oven bake burner cover. 6. Unplug range or disconnect power. Gas supply line B A A. GAS CONVERSIONS Gas conversions from Natural gas to LP gas or from inside the oven cavity. 2. Remove oven racks from LP gas to children and adults. 1. Remove the storage drawer. See "Oven Door" section...

Installation Instructions
Page 15
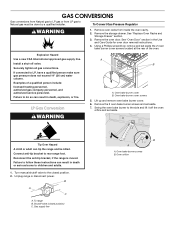
Set Natural gas orifice spud aside. Repeat steps 1 through 7 for instructions. 12. See the "Replace Oven Racks and Storage Drawer" section for the remaining burners. 9. Connect anti-tip bracket to the model/serial rating plate on the lower right side of the front frame for proper sizing of a 7 mm) nut driver to children and adults. 1. Unplug range or disconnect power. Remove the oven door. A B A. Oven bake burner cover B. A Natural Gas Conversion WARNING A. Refer to rear range foot. See the "LP Gas Orifice Spud Chart." 6. Replace burner grates. 11. The small...
Set Natural gas orifice spud aside. Repeat steps 1 through 7 for instructions. 12. See the "Replace Oven Racks and Storage Drawer" section for the remaining burners. 9. Connect anti-tip bracket to the model/serial rating plate on the lower right side of the front frame for proper sizing of a 7 mm) nut driver to children and adults. 1. Unplug range or disconnect power. Remove the oven door. A B A. Oven bake burner cover B. A Natural Gas Conversion WARNING A. Refer to rear range foot. See the "LP Gas Orifice Spud Chart." 6. Replace burner grates. 11. The small...

Installation Instructions
Page 18
... the Use and Care Guide. 13. Gas tube opening D. Apply masking tape to help hold the LP gas orifice spud in plastic parts bag for each cooktop burner. 18 Natural Gas Orifice Spud Chart Burner Rating Color Number 5,000 BTU Green 107N 9,200 BTU Clear 142N 12,000 BTU Clear 161N 14,000 BTU Clear 180N 16,000 BTU Black 195N 5. Repeat steps 1 through 7 for instructions. 12. Replace burner grates. 11. Reinstall oven door. Complete installation. See "Make Gas Connection" and "Electronic Ignition...
... the Use and Care Guide. 13. Gas tube opening D. Apply masking tape to help hold the LP gas orifice spud in plastic parts bag for each cooktop burner. 18 Natural Gas Orifice Spud Chart Burner Rating Color Number 5,000 BTU Green 107N 9,200 BTU Clear 142N 12,000 BTU Clear 161N 14,000 BTU Clear 180N 16,000 BTU Black 195N 5. Repeat steps 1 through 7 for instructions. 12. Replace burner grates. 11. Reinstall oven door. Complete installation. See "Make Gas Connection" and "Electronic Ignition...


