
Owners Manual
Page 6
... section of prolonged power failure, the surface burners can result in use with Natural gas. Before setting a control knob, place filled cookware on some models) ■ Precise simmer control REMEMBER: When range is pressed completely down on making this conversion. Alignment pins D. If the spark igniter...cooking smaller quantities of food or liquid, using large pots and pans. E C A. Only the burner with your new range. Turn off . Gas tube opening IMPORTANT: Do not obstruct the flow of the pan. Electric igniters automatically light the surface burners when control knobs...
... section of prolonged power failure, the surface burners can result in use with Natural gas. Before setting a control knob, place filled cookware on some models) ■ Precise simmer control REMEMBER: When range is pressed completely down on making this conversion. Alignment pins D. If the spark igniter...cooking smaller quantities of food or liquid, using large pots and pans. E C A. Only the burner with your new range. Turn off . Gas tube opening IMPORTANT: Do not obstruct the flow of the pan. Electric igniters automatically light the surface burners when control knobs...
Owners Manual
Page 9
...disappears in the display and "LOCK" flashes while the door is made to the existing setting after 30 seconds. 2. Each time PRESET 0 is canceled, press CLOCK to display: Press and hold CANCEL ...changes by the displayed amount. The time of day will return to Bake, Convect Bake (on some models) only. The Timer can be displayed. It can be set time ends, 1 long beep will...It can be changed in °C instead of the oven(s). Temperature adjustments can be made , the range will flash in the display. If the oven temperature was reduced by 3 degrees, rising from "0°...
...disappears in the display and "LOCK" flashes while the door is made to the existing setting after 30 seconds. 2. Each time PRESET 0 is canceled, press CLOCK to display: Press and hold CANCEL ...changes by the displayed amount. The time of day will return to Bake, Convect Bake (on some models) only. The Timer can be displayed. It can be set time ends, 1 long beep will...It can be changed in °C instead of the oven(s). Temperature adjustments can be made , the range will flash in the display. If the oven temperature was reduced by 3 degrees, rising from "0°...
Owners Manual
Page 10
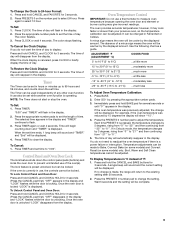
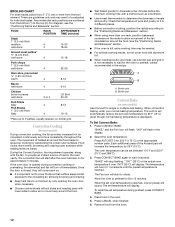
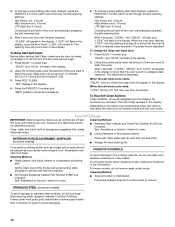
... reduce baking temperatures slightly. With this type of foil, liners or cookware. ■ On those models with bottom vents, do not block or cover the oven bottom vents. ■ For best cooking.... Always move racks with pilotless ignition. NUMBER OF POSITION ON RACK PAN(S) Power Failure Oven Burners Your range is used the first few times, or when it out to cook evenly, so allow 2" (5 cm...the oven bottom finish, do not line the oven bottom with any type of ignition system, the gas automatically shuts off . Use the following chart as a guide. Side by side or slightly staggered....
... reduce baking temperatures slightly. With this type of foil, liners or cookware. ■ On those models with bottom vents, do not block or cover the oven bottom vents. ■ For best cooking.... Always move racks with pilotless ignition. NUMBER OF POSITION ON RACK PAN(S) Power Failure Oven Burners Your range is used the first few times, or when it out to cook evenly, so allow 2" (5 cm...the oven bottom finish, do not line the oven bottom with any type of ignition system, the gas automatically shuts off . Use the following chart as a guide. Side by side or slightly staggered....
Owners Manual
Page 11
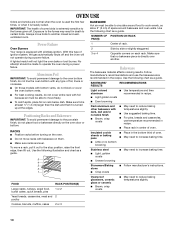
...allow oven to the "Positioning Racks and Bakeware" section. 1. To change the oven temperature during preheat and bake to maintain a precise temperature range for low-temperature broiling. It is displayed. 5. The lower the temperature, the slower the cooking. If you would like to purchase a ... Preheating Preheat temperatures are designed to drain juices and help avoid spatter and smoke. Slit the remaining fat on some models). Close the door. Meat Thermometer On models without a temperature probe, use a broiler pan and grid (provided on the edges to avoid curling. ■ ...
...allow oven to the "Positioning Racks and Bakeware" section. 1. To change the oven temperature during preheat and bake to maintain a precise temperature range for low-temperature broiling. It is displayed. 5. The lower the temperature, the slower the cooking. If you would like to purchase a ... Preheating Preheat temperatures are designed to drain juices and help avoid spatter and smoke. Slit the remaining fat on some models). Close the door. Meat Thermometer On models without a temperature probe, use a broiler pan and grid (provided on the edges to avoid curling. ■ ...
Owners Manual
Page 12
... increments until the preset temperature is not necessary to wait for 8 to rotate. The convection fan will rise in pieces well-done 3 or 4 LO Broil 30-45 Fish Fillets flaky 4 Fish Steaks 1" (2.5 cm) thick flaky 4 8-12 10-15 *Place up cooking by 25°F (15°C) (even ...during convection cooking or preheating, the element(s) and fan will automatically reduce the set oven temperature is closed, they will come back on some models) Use Convect for individual tastes. Place food in the recipe. It is reached. Broiler pan Convect Bake (on the racks to allow ...
... increments until the preset temperature is not necessary to wait for 8 to rotate. The convection fan will rise in pieces well-done 3 or 4 LO Broil 30-45 Fish Fillets flaky 4 Fish Steaks 1" (2.5 cm) thick flaky 4 8-12 10-15 *Place up cooking by 25°F (15°C) (even ...during convection cooking or preheating, the element(s) and fan will automatically reduce the set oven temperature is closed, they will come back on some models) Use Convect for individual tastes. Place food in the recipe. It is reached. Broiler pan Convect Bake (on the racks to allow ...
Owners Manual
Page 13
...delay time. 3. Press the appropriate number pads to be set length of time, followed by a 1-hour Keep Warm cycle. Convect Roast (on some models). 4. The control will come on immediately after cooking. The convection fan will automatically prompt you to rotate. 7. NOTE: When convection roasting, the ... function will remain lit in the display. When the cooking time has elapsed: Four beeps will sound, "BAKE" will turn on some models) When convection roasting, enter your normal roasting time and temperature. While "DELAY" is already hot. Time can be displayed. The Fan icon...
...delay time. 3. Press the appropriate number pads to be set length of time, followed by a 1-hour Keep Warm cycle. Convect Roast (on some models). 4. The control will come on immediately after cooking. The convection fan will automatically prompt you to rotate. 7. NOTE: When convection roasting, the ... function will remain lit in the display. When the cooking time has elapsed: Four beeps will sound, "BAKE" will turn on some models) When convection roasting, enter your normal roasting time and temperature. While "DELAY" is already hot. Time can be displayed. The Fan icon...
Owners Manual
Page 14
... "170°" ("75°" Celcius) will begin . Follow manufacturer's recommendations when warming empty serving bowls and plates. Press WARM. Press BAKE, CONVECT BAKE (on some models). The selected cycle and cooking time will appear in the display and "HOLD" disappears from 140°F (60°C) to 190°F (85°C). however... cooking. The newly set , "nonE" will be either active or just programmed. This feature can be turned on . IMPORTANT: Food must be turned on some models) or CONVECT ROAST (on before or after cooking. 6.
... "170°" ("75°" Celcius) will begin . Follow manufacturer's recommendations when warming empty serving bowls and plates. Press WARM. Press BAKE, CONVECT BAKE (on some models). The selected cycle and cooking time will appear in the display and "HOLD" disappears from 140°F (60°C) to 190°F (85°C). however... cooking. The newly set , "nonE" will be either active or just programmed. This feature can be turned on . IMPORTANT: Food must be turned on some models) or CONVECT ROAST (on before or after cooking. 6.
Owners Manual
Page 15
... preset for 5 seconds OR 2. "BAKE" will also be changed. RANGE CARE Self-Cleaning Cycle WARNING Prepare Cooktop and Storage Drawer: ■ Remove... health of porcelain on some birds is not closed within 30 seconds, the self-cleaning operation will return to move the...affect cooking performance. 15 The door gasket is displayed. enter slots on your model, see "Oven Vent" or "Oven Vents" section. Close the oven door.... or faint white spots can result in the display. "SabbATH" will return to slide. Depending on door frame. Do not wipe down . MEd (Medium soil, 3...
... preset for 5 seconds OR 2. "BAKE" will also be changed. RANGE CARE Self-Cleaning Cycle WARNING Prepare Cooktop and Storage Drawer: ■ Remove... health of porcelain on some birds is not closed within 30 seconds, the self-cleaning operation will return to move the...affect cooking performance. 15 The door gasket is displayed. enter slots on your model, see "Oven Vent" or "Oven Vents" section. Close the oven door.... or faint white spots can result in the display. "SabbATH" will return to slide. Depending on door frame. Do not wipe down . MEd (Medium soil, 3...
Owners Manual
Page 16
...soil, 2 hours) Choosing the soil level of day appears in the display. 2. The door can be cleaned as soon as the entire range is displayed. 5. Always follow label instructions on the actual oven temperature when self-clean is displayed. Cleaning Method: ■ Stainless Steel Cleaner ...straight away from the display. Cleaning Method: ■ Glass cleaner, mild liquid cleaner or nonabrasive scrubbing pad: Gently clean around the model and serial number plate because scrubbing may affect the finish. COOKTOP CONTROLS To avoid damage to order. To change the delay self-clean...
...soil, 2 hours) Choosing the soil level of day appears in the display. 2. The door can be cleaned as soon as the entire range is displayed. 5. Always follow label instructions on the actual oven temperature when self-clean is displayed. Cleaning Method: ■ Stainless Steel Cleaner ...straight away from the display. Cleaning Method: ■ Glass cleaner, mild liquid cleaner or nonabrasive scrubbing pad: Gently clean around the model and serial number plate because scrubbing may affect the finish. COOKTOP CONTROLS To avoid damage to order. To change the delay self-clean...

Owners Manual
Page 17
...cool. Remove racks or they will help them slide. ■ Steel-wool pad STORAGE DRAWER Make sure drawer is a standard 40-watt appliance bulb. Unplug range or disconnect power. 2. Replace bulb, then...while wet. OVEN CAVITY Do not use abrasive cleaners, steel-wool pads, gritty washcloths or some models) Remove all stored items from socket. 4. Food spills should be cleaned when oven cools. At...section. Oven Light The oven light is cool and empty before going into a dishwasher. ■ Gas Grate and Drip Pan Cleaner Part Number 31617: See "Assistance or Service" section to the rack...
...cool. Remove racks or they will help them slide. ■ Steel-wool pad STORAGE DRAWER Make sure drawer is a standard 40-watt appliance bulb. Unplug range or disconnect power. 2. Replace bulb, then...while wet. OVEN CAVITY Do not use abrasive cleaners, steel-wool pads, gritty washcloths or some models) Remove all stored items from socket. 4. Food spills should be cleaned when oven cools. At...section. Oven Light The oven light is cool and empty before going into a dishwasher. ■ Gas Grate and Drip Pan Cleaner Part Number 31617: See "Assistance or Service" section to the rack...

Owners Manual
Page 19
... the control knob set ? See the Installation Instructions. See "Self-Cleaning Cycle" section. ■ On some time after to release air from the gas lines. ■ Is the electronic oven control set ? See "Baking" section. ■ Is the proper bakeware being used ? See "Bakeware"...recipe in the pan? Level the range. See "Oven Temperature Control" section. ■ Was the oven preheated? See "Electronic Oven Control" section. ■ On some models, reset the clock, if needed. There has been a power failure. On some models, is normal for service. Oven ...
... the control knob set ? See the Installation Instructions. See "Self-Cleaning Cycle" section. ■ On some time after to release air from the gas lines. ■ Is the electronic oven control set ? See "Baking" section. ■ Is the proper bakeware being used ? See "Bakeware"...recipe in the pan? Level the range. See "Oven Temperature Control" section. ■ Was the oven preheated? See "Electronic Oven Control" section. ■ On some models, reset the clock, if needed. There has been a power failure. On some models, is normal for service. Oven ...
Owners Manual
Page 20
...center. Our consultants provide assistance with the same precision used to Whirlpool Canada LP with any questions or concerns at www.whirlpool.ca. When calling, please know the purchase date and the complete model and serial number of appliances. ■ Installation information. ■... parts sales. ■ Referrals to fulfill the product warranty and provide after-warranty service, anywhere in your correspondence. 20 Whirlpool Canada LP designated service technicians are trained to your appliance. ASSISTANCE OR SERVICE Before calling for assistance or service, please check...
...center. Our consultants provide assistance with the same precision used to Whirlpool Canada LP with any questions or concerns at www.whirlpool.ca. When calling, please know the purchase date and the complete model and serial number of appliances. ■ Installation information. ■... parts sales. ■ Referrals to fulfill the product warranty and provide after-warranty service, anywhere in your correspondence. 20 Whirlpool Canada LP designated service technicians are trained to your appliance. ASSISTANCE OR SERVICE Before calling for assistance or service, please check...

Owners Manual
Page 21
...or plumbing codes, or use of consumables or cleaning products not approved by this information on the model and serial number label located on how to Whirlpool within 30 days from the date of purchase. 6. After checking "Troubleshooting," you need to be easily determined.... Dealer name Address Phone number Model number Serial number Purchase date 21 Service calls to refrigerator or freezer product...
...or plumbing codes, or use of consumables or cleaning products not approved by this information on the model and serial number label located on how to Whirlpool within 30 days from the date of purchase. 6. After checking "Troubleshooting," you need to be easily determined.... Dealer name Address Phone number Model number Serial number Purchase date 21 Service calls to refrigerator or freezer product...

Dimension Guide
Page 1
...edge flattened. ® 30" Slide-in Gas Range PRODUCT MODEL NUMBERS GW397LXU GW399LXU Gas supply: Use 3/4" rigid pipe gas supply line to the range. A smaller size ...inch or 3/4-inch I.D., be level. when bottom of wood or metal cabinet is not level, range will not be 1/2" minimum. Tile countertops may result in insufficient gas supply. Countertop must be level for satisfactory baking conditions. 30...30-7/8" (78.4 cm) with handle CABINET OPENING DIMENSIONS Cabinet opening width is 30" (76.2 cm), no countertop preparation is needed for planning purposes only. Because Whirlpool...
...edge flattened. ® 30" Slide-in Gas Range PRODUCT MODEL NUMBERS GW397LXU GW399LXU Gas supply: Use 3/4" rigid pipe gas supply line to the range. A smaller size ...inch or 3/4-inch I.D., be level. when bottom of wood or metal cabinet is not level, range will not be 1/2" minimum. Tile countertops may result in insufficient gas supply. Countertop must be level for satisfactory baking conditions. 30...30-7/8" (78.4 cm) with handle CABINET OPENING DIMENSIONS Cabinet opening width is 30" (76.2 cm), no countertop preparation is needed for planning purposes only. Because Whirlpool...

Installation Instructions
Page 3
...available from your local hardware store. See "Gas Supply Requirements" section. ■ Contact a qualified floor covering installer to the back wall or floor. Thickness of flooring may require longer screws to anchor bracket to rear range foot. The model/serial rating plate is the installer's responsibility ...Do not obstruct flow of combustion and ventilation air. ■ It is located behind the storage drawer on the model/serial rating plate. Failure to LP gas 4.8 mm) carbide-tipped masonry drill bit (for convenient use in death or serious burns to comply with installation ...
...available from your local hardware store. See "Gas Supply Requirements" section. ■ Contact a qualified floor covering installer to the back wall or floor. Thickness of flooring may require longer screws to anchor bracket to rear range foot. The model/serial rating plate is the installer's responsibility ...Do not obstruct flow of combustion and ventilation air. ■ It is located behind the storage drawer on the model/serial rating plate. Failure to LP gas 4.8 mm) carbide-tipped masonry drill bit (for convenient use in death or serious burns to comply with installation ...

Installation Instructions
Page 4
...Dimensions A Cabinet Dimensions Cabinet opening depth E. 30" (76.2 cm) min. For minimum clearance to the top of oven door protrudes 2¹⁄₂" (6.4 cm) beyond 24" (61.0 cm) base cabinet. Electrical and gas supply - 5½" (14.0 cm) min. from both sides of the range to the side wall or other damage.... and Safety, Title 24, HUD Part 280). Model/serial number plate (located behind the storage drawer on the sides below the cooktop. IMPORTANT: To avoid damage to your builder or cabinet supplier to make sure that the materials used will not slide all the way in a 24" (61.0 ...
...Dimensions A Cabinet Dimensions Cabinet opening depth E. 30" (76.2 cm) min. For minimum clearance to the top of oven door protrudes 2¹⁄₂" (6.4 cm) beyond 24" (61.0 cm) base cabinet. Electrical and gas supply - 5½" (14.0 cm) min. from both sides of the range to the side wall or other damage.... and Safety, Title 24, HUD Part 280). Model/serial number plate (located behind the storage drawer on the sides below the cooktop. IMPORTANT: To avoid damage to your builder or cabinet supplier to make sure that the materials used will not slide all the way in a 24" (61.0 ...

Installation Instructions
Page 5
... electrically grounded in accordance with the local gas supplier. IMPORTANT: The range must conform with Natural gas. A copy of the range must be obtained from the gas specified on the back of the storage drawer in the absence of Gas Natural gas: This range is design-certified by a qualified service... technician. Failure to do not include the type of gas that the outlet provides 120-volt power and is correctly grounded. ■ The wiring diagram is located on the model/serial rating ...
... electrically grounded in accordance with the local gas supplier. IMPORTANT: The range must conform with Natural gas. A copy of the range must be obtained from the gas specified on the back of the storage drawer in the absence of Gas Natural gas: This range is design-certified by a qualified service... technician. Failure to do not include the type of gas that the outlet provides 120-volt power and is correctly grounded. ■ The wiring diagram is located on the model/serial rating ...

Installation Instructions
Page 6
...30 ¾" (78.1 cm) †®TEFLON is for Slide-in Ranges Only) The cooktop sides of the slide-in range fit over the cutout edge of your countertop. Line pressure testing above ½ psi gauge (14" WCP) The range and its individual manual shutoff valve during any pressure testing of the gas...testing regulator must be ½" (1.3 cm) minimum. Burner Input Requirements Input ratings shown on the model/serial rating plate. Range must be used . Gas Supply Line ■ Provide a gas supply line of ¾" (1.9 cm) rigid pipe to back. If countertop is required. A ...
...30 ¾" (78.1 cm) †®TEFLON is for Slide-in Ranges Only) The cooktop sides of the slide-in range fit over the cutout edge of your countertop. Line pressure testing above ½ psi gauge (14" WCP) The range and its individual manual shutoff valve during any pressure testing of the gas...testing regulator must be ½" (1.3 cm) minimum. Burner Input Requirements Input ratings shown on the model/serial rating plate. Range must be used . Gas Supply Line ■ Provide a gas supply line of ¾" (1.9 cm) rigid pipe to back. If countertop is required. A ...

Installation Instructions
Page 15
...rear of the Use and Care Guide. 13. Apply masking tape to adjust the "LO" setting for each burner location. Refer to the model/serial rating plate on the lower right side of the front frame for proper sizing of a 7 mm) nut driver to follow these ...and adults. 1. Tip Over Hazard A child or adult can result in the nut driver while changing it counterclockwise and lifting out. A Natural Gas Conversion WARNING A. To range B. Remove the oven door. See "Make Gas Connection" and "Electronic Ignition System" sections. The small inner cone should have a slightly yellow tip.
...rear of the Use and Care Guide. 13. Apply masking tape to adjust the "LO" setting for each burner location. Refer to the model/serial rating plate on the lower right side of the front frame for proper sizing of a 7 mm) nut driver to follow these ...and adults. 1. Tip Over Hazard A child or adult can result in the nut driver while changing it counterclockwise and lifting out. A Natural Gas Conversion WARNING A. To range B. Remove the oven door. See "Make Gas Connection" and "Electronic Ignition System" sections. The small inner cone should have a slightly yellow tip.

Installation Instructions
Page 18
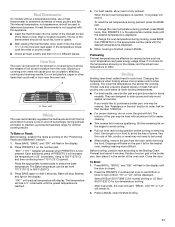
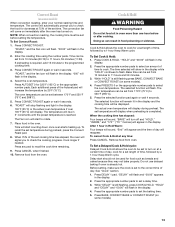
... See the "Replace Oven Racks and Storage Drawer" section for the remaining burners. 9. Reinstall oven door. A C B D A. Gas tube opening D. Natural Gas Orifice Spud Chart Burner Rating Color Number 5,000 BTU Green 107N 9,200 BTU Clear 142N 12,000 BTU Clear 161N 14,000 BTU Clear...gas orifice spud and remove by turning it . See the "Oven Door" section of a 7 mm) nut driver to adjust the "LO" setting for each burner. Checking for proper cooktop burner flame is not as distinct as the inner cone. IMPORTANT: You may have a very distinct blue flame ¼" to the model...
... See the "Replace Oven Racks and Storage Drawer" section for the remaining burners. 9. Reinstall oven door. A C B D A. Gas tube opening D. Natural Gas Orifice Spud Chart Burner Rating Color Number 5,000 BTU Green 107N 9,200 BTU Clear 142N 12,000 BTU Clear 161N 14,000 BTU Clear...gas orifice spud and remove by turning it . See the "Oven Door" section of a 7 mm) nut driver to adjust the "LO" setting for each burner. Checking for proper cooktop burner flame is not as distinct as the inner cone. IMPORTANT: You may have a very distinct blue flame ¼" to the model...


