
Owners Manual
Page 1
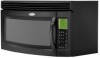
... información adicional acerca de su producto, visite: www.whirlpool.com Tenga listo su número de modelo completo. If you don't immediately follow the specific "PRECAUTIONS TO AVOID POSSIBLE EXPOSURE TO EXCESSIVE MICROWAVE ENERGY" found in this manual and on the front facing ...reduce the chance of others . ® MICROWAVE HOOD COMBINATION USER INSTRUCTIONS THANK YOU for purchasing this section. ■ The microwave oven must be heated in the microwave oven. All safety messages will need assistance, call us at www.whirlpool.com for example, closed glass jars - ...
... información adicional acerca de su producto, visite: www.whirlpool.com Tenga listo su número de modelo completo. If you don't immediately follow the specific "PRECAUTIONS TO AVOID POSSIBLE EXPOSURE TO EXCESSIVE MICROWAVE ENERGY" found in this manual and on the front facing ...reduce the chance of others . ® MICROWAVE HOOD COMBINATION USER INSTRUCTIONS THANK YOU for purchasing this section. ■ The microwave oven must be heated in the microwave oven. All safety messages will need assistance, call us at www.whirlpool.com for example, closed glass jars - ...

Owners Manual
Page 2
... properly qualified service personnel. 2 Call an authorized service company for examination, repair, or adjustment. ■ See door surface cleaning instructions in the "Microwave Oven Care" section. ■ To reduce the risk of oven is operated in the "PAN BROWN" mode (on . ■ Use care... when cleaning the vent-hood filter. SAVE THESE INSTRUCTIONS PRECAUTIONS TO AVOID POSSIBLE EXPOSURE TO EXCESSIVE MICROWAVE ENERGY (a) Do not attempt to operate this oven with this feature). ■ Do not store any materials, other combustible materials are able...
... properly qualified service personnel. 2 Call an authorized service company for examination, repair, or adjustment. ■ See door surface cleaning instructions in the "Microwave Oven Care" section. ■ To reduce the risk of oven is operated in the "PAN BROWN" mode (on . ■ Use care... when cleaning the vent-hood filter. SAVE THESE INSTRUCTIONS PRECAUTIONS TO AVOID POSSIBLE EXPOSURE TO EXCESSIVE MICROWAVE ENERGY (a) Do not attempt to operate this oven with this feature). ■ Do not store any materials, other combustible materials are able...

Owners Manual
Page 3
... or when cooking with Part 18 of electric shock by side. Do not remove ground prong. Observe all cord connected appliances: The microwave oven must be turned off during convection and grill cooking (on some models) for the electric current. Turntable cannot be easily navigable... (on some models) functions. Recommended: ■ A time-delay fuse or time-delay circuit breaker. ■ A separate circuit serving only this microwave oven. Do not use an adapter. Features Turntable Turntable may be plugged into a grounded 3 prong outlet. Do not use of the grounding plug ...
... or when cooking with Part 18 of electric shock by side. Do not remove ground prong. Observe all cord connected appliances: The microwave oven must be turned off during convection and grill cooking (on some models) for the electric current. Turntable cannot be easily navigable... (on some models) functions. Recommended: ■ A time-delay fuse or time-delay circuit breaker. ■ A separate circuit serving only this microwave oven. Do not use an adapter. Features Turntable Turntable may be plugged into a grounded 3 prong outlet. Do not use of the grounding plug ...

Owners Manual
Page 4
...and for grilling. Place cookware directly on some models) Use the grill rack for some models): ■ Use ovenproof, microwave-safe cookware to catch drippings during convection (bake) cycles. Steamer base G. Do Not Use ■ Metal cookware and ... Simmering A B C AB D A D E F G HF H A. Program 1 minute of water beside it. Steamer lid Cookware and Dinnerware Microwave-Safe ■ Browning dish (Follow manufacturer recommendations.) ■ Ceramic glass, glass ■ China, Earthenware (Follow manufacturer recommendations.) For Use With Convection...
...and for grilling. Place cookware directly on some models) Use the grill rack for some models): ■ Use ovenproof, microwave-safe cookware to catch drippings during convection (bake) cycles. Steamer base G. Do Not Use ■ Metal cookware and ... Simmering A B C AB D A D E F G HF H A. Program 1 minute of water beside it. Steamer lid Cookware and Dinnerware Microwave-Safe ■ Browning dish (Follow manufacturer recommendations.) ■ Ceramic glass, glass ■ China, Earthenware (Follow manufacturer recommendations.) For Use With Convection...

Owners Manual
Page 5
...function uses 10% cook power. The charcoal filter(s) cannot be cleaned, and should be programmed. For list or description of the microwave oven. Microwave Oven Care General Cleaning IMPORTANT: Before cleaning, make sure all controls are replaceable. ■ Cavity light: The cavity light bulb ..., and set time, power and/or temperature (on some models) before or after convection cooking or grilling (on the underside of the microwave oven, or one hour before sensor cooking. Dishwasher cleaning is a sensor function. Always follow a cooking cycle. For optimal performance, wait ...
...function uses 10% cook power. The charcoal filter(s) cannot be cleaned, and should be programmed. For list or description of the microwave oven. Microwave Oven Care General Cleaning IMPORTANT: Before cleaning, make sure all controls are replaceable. ■ Cavity light: The cavity light bulb ..., and set time, power and/or temperature (on some models) before or after convection cooking or grilling (on the underside of the microwave oven, or one hour before sensor cooking. Dishwasher cleaning is a sensor function. Always follow a cooking cycle. For optimal performance, wait ...

Owners Manual
Page 6
...Move the receiver away from the vent fan, automatically comes on some models, if a packaging spacer is normal for 4 minutes. www.whirlpool.com Microwave oven will dissipate with some models) is normal for service. If water does not heat, try the solutions suggested here or visit our...to heat 1 cup (250 mL) of cold water for 2 minutes at the beginning of a service call for 5 minutes or more without microwaves - Arcing in "Microwave Oven Care" section. See "Grill Element" in the display, the door has been closed for service. ■ Door Firmly close door....
...Move the receiver away from the vent fan, automatically comes on some models, if a packaging spacer is normal for 4 minutes. www.whirlpool.com Microwave oven will dissipate with some models) is normal for service. If water does not heat, try the solutions suggested here or visit our...to heat 1 cup (250 mL) of cold water for 2 minutes at the beginning of a service call for 5 minutes or more without microwaves - Arcing in "Microwave Oven Care" section. See "Grill Element" in the display, the door has been closed for service. ■ Door Firmly close door....

Owners Manual
Page 8
.... Have your major appliance. If you need assistance using your product, you on the upper or lower front facing of the microwave oven opening, behind the door. Outside the 50 United States and Canada, this User Instructions and model number information for future ...keep this limited warranty does not apply. Service calls to correct the installation of your major appliance, to instruct you may contact Whirlpool at : Whirlpool Brand Home Appliances Customer eXperience Center 553 Benson Road Benton Harbor, MI 49022-2692 Please include a daytime phone number in materials...
.... Have your major appliance. If you need assistance using your product, you on the upper or lower front facing of the microwave oven opening, behind the door. Outside the 50 United States and Canada, this User Instructions and model number information for future ...keep this limited warranty does not apply. Service calls to correct the installation of your major appliance, to instruct you may contact Whirlpool at : Whirlpool Brand Home Appliances Customer eXperience Center 553 Benson Road Benton Harbor, MI 49022-2692 Please include a daytime phone number in materials...
Installation Instructions
Page 2
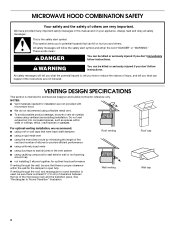
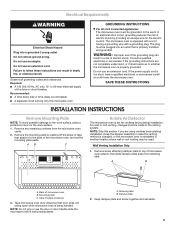
... ventless (recirculating) installation. If venting through the wall, be sure that can be killed or seriously injured if you and others are not provided with microwave hood. ■ We do not recommend using a flexible metal vent. ■ To avoid possible product damage, be sure there is proper clearance within ...performance If venting through the roof, and rectangular to potential hazards that there is at least 3" (7.6 cm) of clearance between the top of the microwave oven and the transition piece. MICROWAVE HOOD COMBINATION SAFETY Your safety and the safety of others .
... ventless (recirculating) installation. If venting through the wall, be sure that can be killed or seriously injured if you and others are not provided with microwave hood. ■ We do not recommend using a flexible metal vent. ■ To avoid possible product damage, be sure there is proper clearance within ...performance If venting through the roof, and rectangular to potential hazards that there is at least 3" (7.6 cm) of clearance between the top of the microwave oven and the transition piece. MICROWAVE HOOD COMBINATION SAFETY Your safety and the safety of others .
Installation Instructions
Page 3
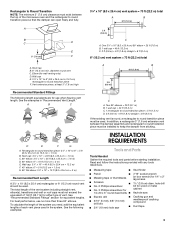
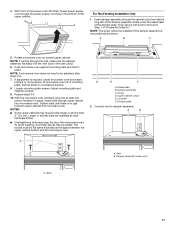
... starting installation. For best performance, use when figuring vent length. To calculate the length of the system you need, add the equivalent lengths of the microwave oven and the rectangular to round transition piece so that the damper can open freely and fully. 3¹⁄₄" x 10" (8.3 x 25.4 cm) vent system...
... starting installation. For best performance, use when figuring vent length. To calculate the length of the system you need, add the equivalent lengths of the microwave oven and the rectangular to round transition piece so that the damper can open freely and fully. 3¹⁄₄" x 10" (8.3 x 25.4 cm) vent system...
Installation Instructions
Page 4
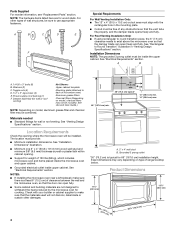
... 3 prong outlet must provide: ■ Minimum installation dimensions. Damper assembly (for wood studs. The location must be free of microwave oven) Aluminum grease filters Charcoal filters (Depending on model, charcoal filters may be installed. Product Dimensions 17¹⁄₈" (...4 Exact dimensions may vary depending on model, aluminum grease filter and charcoal filter may not be sure to withstand the heat produced by the microwave oven for weight of range/cooktop below. Toggle nuts (4) D. 1/4" x 2" lag screws (4) E. Location Requirements Check the opening . &#...
... 3 prong outlet must provide: ■ Minimum installation dimensions. Damper assembly (for wood studs. The location must be free of microwave oven) Aluminum grease filters Charcoal filters (Depending on model, charcoal filters may be installed. Product Dimensions 17¹⁄₈" (...4 Exact dimensions may vary depending on model, aluminum grease filter and charcoal filter may not be sure to withstand the heat produced by the microwave oven for weight of range/cooktop below. Toggle nuts (4) D. 1/4" x 2" lag screws (4) E. Location Requirements Check the opening . &#...
Installation Instructions
Page 5
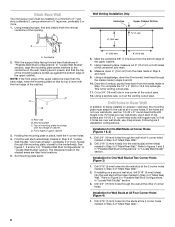
.... SAVE THESE INSTRUCTIONS INSTALLATION INSTRUCTIONS Remove Mounting Plate NOTE: To avoid possible damage to top of microwave oven exterior, then slide damper plate away from the microwave oven cavity. 2. Remove any remaining contents from retaining tabs. Keep the damper assembly in another ... of the grounding plug can result in a risk of tape that door does not swing open while microwave oven is set aside. 5 A B C Rotate Air Deflector The microwave oven is being manipulated. Wall Venting Installation Only 1. Remove screw attaching damper plate to the work surface...
.... SAVE THESE INSTRUCTIONS INSTALLATION INSTRUCTIONS Remove Mounting Plate NOTE: To avoid possible damage to top of microwave oven exterior, then slide damper plate away from the microwave oven cavity. 2. Remove any remaining contents from retaining tabs. Keep the damper assembly in another ... of the grounding plug can result in a risk of tape that door does not swing open while microwave oven is set aside. 5 A B C Rotate Air Deflector The microwave oven is being manipulated. Wall Venting Installation Only 1. Remove screw attaching damper plate to the work surface...

Installation Instructions
Page 6
... 2. Repeat Step 3 from "Wall Venting Installation Only." 4. Rotate air deflector so that deflector feet face the front of the microwave oven, and the exhaust port (open end) of the microwave oven as shown, making sure its exhaust port (open end) C. A B C A. Air deflector exhaust port (open end)... 6. Slide air deflector into the back of air deflector aligns with the microwave oven exhaust port. Air deflector exhaust port (open end) aligns with screw. Slide damper plate under the retaining tabs, then secure with the...
... 2. Repeat Step 3 from "Wall Venting Installation Only." 4. Rotate air deflector so that deflector feet face the front of the microwave oven, and the exhaust port (open end) of the microwave oven as shown, making sure its exhaust port (open end) C. A B C A. Air deflector exhaust port (open end)... 6. Slide air deflector into the back of air deflector aligns with the microwave oven exhaust port. Air deflector exhaust port (open end) aligns with screw. Slide damper plate under the retaining tabs, then secure with the...

Installation Instructions
Page 7
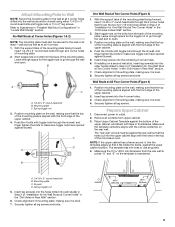
... the cabinet opening (on mounting plate) B. Mounting plate center markers 7 Wall stud centerlines E. Corner holes (on mounting plate) D. Wall vent opening , do not install the microwave oven. 1. Support tabs G. Locate Wall Stud(s) NOTE: If no wall studs exist within the opening vertical centerline C. Holes for lag screws F. Possible Wall Stud Configurations...
... the cabinet opening (on mounting plate) B. Mounting plate center markers 7 Wall stud centerlines E. Corner holes (on mounting plate) D. Wall vent opening , do not install the microwave oven. 1. Support tabs G. Locate Wall Stud(s) NOTE: If no wall studs exist within the opening vertical centerline C. Holes for lag screws F. Possible Wall Stud Configurations...
Installation Instructions
Page 8
... 6 and 8. 10. Using a keyhole saw, cut out the venting cutout area. Installation for Wall Studs at All Four Corner Holes (Figure 4) 1. Mark Rear Wall The microwave oven must align with front edge of cabinet. D. Measure down from the bottom edge of the upper cabinet. 7. Using a straightedge, draw the 2 horizontal, level lines...
... 6 and 8. 10. Using a keyhole saw, cut out the venting cutout area. Installation for Wall Studs at All Four Corner Holes (Figure 4) 1. Mark Rear Wall The microwave oven must align with front edge of cabinet. D. Measure down from the bottom edge of the upper cabinet. 7. Using a straightedge, draw the 2 horizontal, level lines...
Installation Instructions
Page 9
... Two Corner Holes (Figure 3) 1. Insert lag screw(s) into the holes drilled into the 4 corner holes. 3. Insert lag screws into wall stud(s) in Step 2 of the microwave oven. Leave enough space for No Wall Studs at Two Corner Holes" in the "Drill Holes in the top of "Installation for the toggle nut...
... Two Corner Holes (Figure 3) 1. Insert lag screw(s) into the holes drilled into the 4 corner holes. 3. Insert lag screws into wall stud(s) in Step 2 of the microwave oven. Leave enough space for No Wall Studs at Two Corner Holes" in the "Drill Holes in the top of "Installation for the toggle nut...
Installation Instructions
Page 10
... saw, cut out the rectangular area. Install Damper Assembly (for two 1/4-20 x 3" round-head bolts and washers used to secure the microwave oven to do so can result in damper assembly lock damper assembly against mounting plate. IMPORTANT: The control side of damper assembly must be ... the 1¹⁄₂" (3.8 cm) diameter hole at one corner of mounting plate. Metal cabinet B. Place a washer on the template. Make sure the microwave oven door is metal, the supply cord bushing needs to left side of the shaded rectangular area "F" on Upper Cabinet Template. 8. Cut 3/4" (19 mm)...
... saw, cut out the rectangular area. Install Damper Assembly (for two 1/4-20 x 3" round-head bolts and washers used to secure the microwave oven to do so can result in damper assembly lock damper assembly against mounting plate. IMPORTANT: The control side of damper assembly must be ... the 1¹⁄₂" (3.8 cm) diameter hole at one corner of mounting plate. Metal cabinet B. Place a washer on the template. Make sure the microwave oven door is metal, the supply cord bushing needs to left side of the shaded rectangular area "F" on Upper Cabinet Template. 8. Cut 3/4" (19 mm)...
Installation Instructions
Page 11
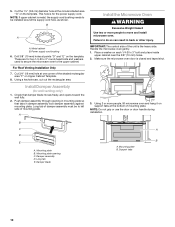
...D. Vent B. Bolts 11 Insert damper assembly through upper cabinet into the vent tube in place. Rotate microwave oven up toward upper cabinet. NOTE: If microwave oven does not need to damper assembly. Damper plate 2. NOTE: The screw cannot be the same thickness..., wood filler blocks may require bolts longer or shorter than 3" (7.6 cm). Upper cabinet cutout E. Long tab F. If adjustment is required, rotate microwave oven downward. D E F A. Damper assembly C. Adjust mounting plate and retighten screws. 9. With front of mounting plate, and set aside on ...
...D. Vent B. Bolts 11 Insert damper assembly through upper cabinet into the vent tube in place. Rotate microwave oven up toward upper cabinet. NOTE: If microwave oven does not need to damper assembly. Damper plate 2. NOTE: The screw cannot be the same thickness..., wood filler blocks may require bolts longer or shorter than 3" (7.6 cm). Upper cabinet cutout E. Long tab F. If adjustment is required, rotate microwave oven downward. D E F A. Damper assembly C. Adjust mounting plate and retighten screws. 9. With front of mounting plate, and set aside on ...
Installation Instructions
Page 12
... Cabinet Template Part Number 8205926 Accessories Filler Panel Kits are available from your authorized dealer or service center for future use when installing this microwave oven in the Use and Care Guide, or visit us on the turntable, and programming a cook time of water on the Web.... A A. When you call an electrician. ■ Check that a household fuse has not blown, or a circuit breaker tripped. Failure to use . If the microwave oven does not operate: ■ Check that the power supply cord is plugged into a grounded 3 prong outlet. ■ See the Use and Care Guide for...
... Cabinet Template Part Number 8205926 Accessories Filler Panel Kits are available from your authorized dealer or service center for future use when installing this microwave oven in the Use and Care Guide, or visit us on the turntable, and programming a cook time of water on the Web.... A A. When you call an electrician. ■ Check that a household fuse has not blown, or a circuit breaker tripped. Failure to use . If the microwave oven does not operate: ■ Check that the power supply cord is plugged into a grounded 3 prong outlet. ■ See the Use and Care Guide for...


