Owners Manual
Page 1
...ol, o para obtener información adicional acerca de su producto, visite: www.whirlpool.com Tenga listo su número de modelo completo. You will need assistance, call us at www.whirlpool.com for purchasing this high-quality product. If you should experience a problem not ...model and serial number located on some models 11 General Cleaning 12 Oven Light 12 TROUBLESHOOTING 13 ACCESSORIES 14 WARRANTY 15 W10196151B Table of Contents RANGE SAFETY 2 The Anti-Tip Bracket 3 FEATURE GUIDE 4 COOKTOP USE 6 Sealed Surface Burners 6 OVEN USE 7 Electronic Oven Controls 7 Sabbath...
...ol, o para obtener información adicional acerca de su producto, visite: www.whirlpool.com Tenga listo su número de modelo completo. You will need assistance, call us at www.whirlpool.com for purchasing this high-quality product. If you should experience a problem not ...model and serial number located on some models 11 General Cleaning 12 Oven Light 12 TROUBLESHOOTING 13 ACCESSORIES 14 WARRANTY 15 W10196151B Table of Contents RANGE SAFETY 2 The Anti-Tip Bracket 3 FEATURE GUIDE 4 COOKTOP USE 6 Sealed Surface Burners 6 OVEN USE 7 Electronic Oven Controls 7 Sabbath...
Owners Manual
Page 2
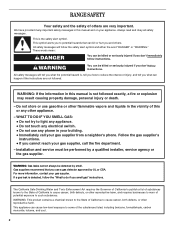
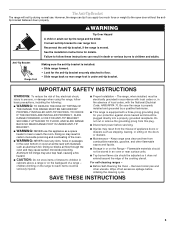
.... Installation and service must be killed or seriously injured if you don't immediately follow the safety alert symbol and either the word "DANGER" or "WARNING." RANGE SAFETY Your safety and the safety of others . Always read and obey all safety messages. This is , tell you how to some of the substances...
.... Installation and service must be killed or seriously injured if you don't immediately follow the safety alert symbol and either the word "DANGER" or "WARNING." RANGE SAFETY Your safety and the safety of others . Always read and obey all safety messages. This is , tell you how to some of the substances...
Owners Manual
Page 3
... Injuries may result in the oven bottom or cover an entire rack with the National Electrical Code, ANSI/NFPA 70. Anti-Tip Bracket Range Foot Making sure the anti-tip bracket is equipped with a three-prong grounding plug for your protection against shock hazard and should be ... cooking utensil. Flammable materials should not be stored in death or serious burns to floor. • Slide range back so rear range foot is moved. The Anti-Tip Bracket The range will not tip during normal use this plug. ■ Disconnect power before initiating the cleaning cycle. children...
... Injuries may result in the oven bottom or cover an entire rack with the National Electrical Code, ANSI/NFPA 70. Anti-Tip Bracket Range Foot Making sure the anti-tip bracket is equipped with a three-prong grounding plug for your protection against shock hazard and should be ... cooking utensil. Flammable materials should not be stored in death or serious burns to floor. • Slide range back so rear range foot is moved. The Anti-Tip Bracket The range will not tip during normal use this plug. ■ Disconnect power before initiating the cleaning cycle. children...
Owners Manual
Page 4
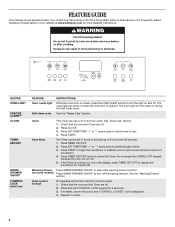
...the oven door is running, but not in oven more detailed instructions. If enabled, a tone will sound, and "CONTROL LOCKED" will sound at www.whirlpool.com for more than one hour before or after cooking. Press CLOCK. 3. Press START. If enabled, end-of day. 4. FEATURE GUIDE This manual ...KEYPAD OVEN LIGHT PRECISE CLEAN™ CLOCK TIMER SET/OFF WARM DRAWER ON/OFF CONTROL LOCK hold CONTROL LOCK keypad for 5 seconds. See the "Range Care" section. The oven light will turn the light on during the Self-Clean cycle. Your model may have some models) Press WARM DRAWER...
...the oven door is running, but not in oven more detailed instructions. If enabled, a tone will sound, and "CONTROL LOCKED" will sound at www.whirlpool.com for more than one hour before or after cooking. Press CLOCK. 3. Press START. If enabled, end-of day. 4. FEATURE GUIDE This manual ...KEYPAD OVEN LIGHT PRECISE CLEAN™ CLOCK TIMER SET/OFF WARM DRAWER ON/OFF CONTROL LOCK hold CONTROL LOCK keypad for 5 seconds. See the "Range Care" section. The oven light will turn the light on during the Self-Clean cycle. Your model may have some models) Press WARM DRAWER...
Owners Manual
Page 5
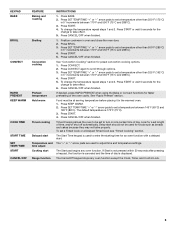
... other than 325°F (162°C) in oven and close the oven door. 2. The Start Time keypad is used to scroll through options. 3. Delay start Range function INSTRUCTIONS 1. Position cookware in 5° increments between 170°F and 550°F (75°C and 288°C). 3. Press BROIL. 3. See "Rapid Preheat" section. To...
... other than 325°F (162°C) in oven and close the oven door. 2. The Start Time keypad is used to scroll through options. 3. Delay start Range function INSTRUCTIONS 1. Position cookware in 5° increments between 170°F and 550°F (75°C and 288°C). 3. Press BROIL. 3. See "Rapid Preheat" section. To...
Owners Manual
Page 6
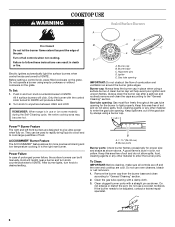
... flames occasionally for proper size and shape as shown. Clean clogged burner ports with the control knob turned to IGNITE will produce a flame. 2. REMEMBER: When range is in and turn knob to desired setting. Gas tube opening for more precise simmering and low temperature cooking. Gas tube opening: Gas must flow...
... flames occasionally for proper size and shape as shown. Clean clogged burner ports with the control knob turned to IGNITE will produce a flame. 2. REMEMBER: When range is in and turn knob to desired setting. Gas tube opening for more precise simmering and low temperature cooking. Gas tube opening: Gas must flow...
Owners Manual
Page 8
... the change the setting. Bakeware To cook food evenly, hot air must be able to circulate. To move racks with bakeware on or off the range. Broiling bone-in Sabbath Mode, press COOK TIME, then the "+" or "-" keys to set the desired cook time. 1. Large pan cakes, pies, yeast breads, quick...
... the change the setting. Bakeware To cook food evenly, hot air must be able to circulate. To move racks with bakeware on or off the range. Broiling bone-in Sabbath Mode, press COOK TIME, then the "+" or "-" keys to set the desired cook time. 1. Large pan cakes, pies, yeast breads, quick...
Owners Manual
Page 9
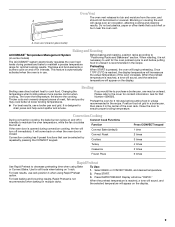
... Function If the oven door is not recommended when baking on and off immediately. Before baking and roasting, position racks according to maintain a precise temperature range for Part Number 4396923. Changing the temperature when broiling allows more precise control when cooking. Blocking or covering the vent will turn off in the...
... Function If the oven door is not recommended when baking on and off immediately. Before baking and roasting, position racks according to maintain a precise temperature range for Part Number 4396923. Changing the temperature when broiling allows more precise control when cooking. Blocking or covering the vent will turn off in the...
Owners Manual
Page 10
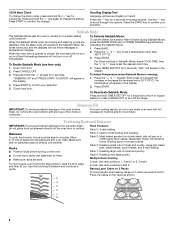
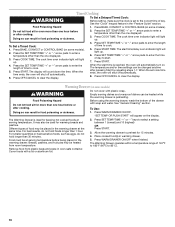
.... 5. To Set a Timed Cook: 1. The display will light up . When the time ends, the oven will shut off automatically. 6. The Warming Drawer operates within a temperature range of 140ºF to 180°F (60ºC to the correct time of the drawer with soap and water. Timed Cooking WARNING To Set a Delayed...
.... 5. To Set a Timed Cook: 1. The display will light up . When the time ends, the oven will shut off automatically. 6. The Warming Drawer operates within a temperature range of 140ºF to 180°F (60ºC to the correct time of the drawer with soap and water. Timed Cooking WARNING To Set a Delayed...
Owners Manual
Page 11
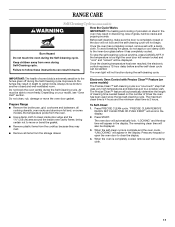
...self-cleaning cycle is completely cooled, remove ash with a damp cloth. 11 Do not block the oven vent(s) during the Self-Cleaning cycle. Prepare Range ■ Remove the broiler pan, grid, cookware and bakeware, all cooking utensils, oven racks and aluminum foil and, on some models) WARNING How...display. 2. Electronic Oven Control with a damp cloth. Press PRECISE CLEAN cycle. Burn Hazard Do not touch the oven during the Self-Cleaning cycle. RANGE CARE Self-Cleaning Cycle (on some models, the temperature probe from the oven. ■ Use a damp cloth to clean inside door edge and ...
...self-cleaning cycle is completely cooled, remove ash with a damp cloth. 11 Do not block the oven vent(s) during the Self-Cleaning cycle. Prepare Range ■ Remove the broiler pan, grid, cookware and bakeware, all cooking utensils, oven racks and aluminum foil and, on some models) WARNING How...display. 2. Electronic Oven Control with a damp cloth. Press PRECISE CLEAN cycle. Burn Hazard Do not touch the oven during the Self-Cleaning cycle. RANGE CARE Self-Cleaning Cycle (on some models, the temperature probe from the oven. ■ Use a damp cloth to clean inside door edge and ...
Owners Manual
Page 12
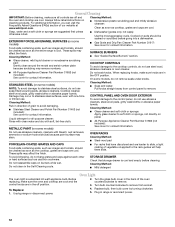
... cleaned as soon as cooktop, grates and caps are cool. Turn the glass bulb cover in the back of our website at www.whirlpool.com. To Replace: 1. Unplug range or disconnect power. 4. Cleaning Method: ■ Nonabrasive plastic scrubbing pad and mildly abrasive cleanser: Clean as soon as the cooktop, .... To avoid chipping, do not bang grates and caps against each other or hard surfaces such as the entire range is a standard 40-watt appliance bulb. Do not clean in range or reconnect power. 12 STORAGE DRAWER Check that have discolored and are harder to slide, a light coating of ...
... cleaned as soon as cooktop, grates and caps are cool. Turn the glass bulb cover in the back of our website at www.whirlpool.com. To Replace: 1. Unplug range or disconnect power. 4. Cleaning Method: ■ Nonabrasive plastic scrubbing pad and mildly abrasive cleanser: Clean as soon as the cooktop, .... To avoid chipping, do not bang grates and caps against each other or hard surfaces such as the entire range is a standard 40-watt appliance bulb. Do not clean in range or reconnect power. 12 STORAGE DRAWER Check that have discolored and are harder to slide, a light coating of ...
Owners Manual
Page 13
...avoid the cost of the surface burner knobs to release air from the gas lines. ■ Are the burner ports clogged? www.whirlpool.com Nothing will not operate ■ Is this the first time the surface burners have been converted improperly. Contact a trained repair ...Let it snaps open from the gas lines. ■ Is the electronic oven control set correctly? See Installation Instructions. ■ Is the range properly connected to heavy thickness. ■ Is the control knob set correctly? Contact a service technician or see Installation Instructions. Ideal cookware should...
...avoid the cost of the surface burner knobs to release air from the gas lines. ■ Are the burner ports clogged? www.whirlpool.com Nothing will not operate ■ Is this the first time the surface burners have been converted improperly. Contact a trained repair ...Let it snaps open from the gas lines. ■ Is the electronic oven control set correctly? See Installation Instructions. ■ Is the range properly connected to heavy thickness. ■ Is the control knob set correctly? Contact a service technician or see Installation Instructions. Ideal cookware should...
Owners Manual
Page 14
... after the oven has reached temperature, you will not operate ■ Is the oven door open? Oven cooking results not what expected ■ Is the range level? See cover for service. Self-Cleaning cycle will have to wait 12 hours to cover the edge of the crust and/or reduce baking... the display showing a flashing time? There has been a power failure. Clear the display. If a self-clean cycle has been run in the pan? Level the range.
... after the oven has reached temperature, you will not operate ■ Is the oven door open? Oven cooking results not what expected ■ Is the range level? See cover for service. Self-Cleaning cycle will have to wait 12 hours to cover the edge of the crust and/or reduce baking... the display showing a flashing time? There has been a power failure. Clear the display. If a self-clean cycle has been run in the pan? Level the range.

Dimension Guide
Page 1
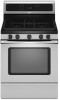
... product. Du Pont De Nemours and Company. Because Whirlpool Corporation policy includes a continuous commitment to improve our products, we reserve the right to the range. ® 30" (76.2 cm) Freestanding Gas Range PRODUCT MODEL NUMBERS PRODUCT DIMENSIONS GFG464LV GFG471LV WFG361LV WFG366LV WFG371LV WFG374LV Gas supply: This range is design-certified by CSA International for use...
... product. Du Pont De Nemours and Company. Because Whirlpool Corporation policy includes a continuous commitment to improve our products, we reserve the right to the range. ® 30" (76.2 cm) Freestanding Gas Range PRODUCT MODEL NUMBERS PRODUCT DIMENSIONS GFG464LV GFG471LV WFG361LV WFG366LV WFG371LV WFG374LV Gas supply: This range is design-certified by CSA International for use...

Installation Instructions
Page 1
......2 INSTALLATION REQUIREMENTS 4 Tools and Parts...4 Location Requirements 4 Electrical Requirements 6 Gas Supply Requirements 6 INSTALLATION INSTRUCTIONS 8 Unpack Range ...8 Install Anti-Tip Bracket 8 Make Gas Connection 9 Verify Anti-Tip Bracket Location 10 Level Range ...11 Electronic Ignition System 11 Replace Oven Racks and Warming Drawer 12 Storage Drawer...13 Complete Installation 13 GAS CONVERSIONS 14...
......2 INSTALLATION REQUIREMENTS 4 Tools and Parts...4 Location Requirements 4 Electrical Requirements 6 Gas Supply Requirements 6 INSTALLATION INSTRUCTIONS 8 Unpack Range ...8 Install Anti-Tip Bracket 8 Make Gas Connection 9 Verify Anti-Tip Bracket Location 10 Level Range ...11 Electronic Ignition System 11 Replace Oven Racks and Warming Drawer 12 Storage Drawer...13 Complete Installation 13 GAS CONVERSIONS 14...

Installation Instructions
Page 2
...'s instructions. • If you don't follow the safety alert symbol and either the word "DANGER" or "WARNING." Do not store or use any other appliance. - RANGE SAFETY Your safety and the safety of others . All safety messages will tell you what can kill or hurt you and others are not followed...
...'s instructions. • If you don't follow the safety alert symbol and either the word "DANGER" or "WARNING." Do not store or use any other appliance. - RANGE SAFETY Your safety and the safety of others . All safety messages will tell you what can kill or hurt you and others are not followed...
Installation Instructions
Page 3
...; A flexible gas connector, when used, must not exceed 3 feet. Reconnect the anti-tip bracket, if the range is moved. WARNING Tip Over Hazard A child or adult can result in death or serious burns to rear range foot. Connect anti-tip bracket to children and adults. 3 In the State of Massachusetts, the following...
...; A flexible gas connector, when used, must not exceed 3 feet. Reconnect the anti-tip bracket, if the range is moved. WARNING Tip Over Hazard A child or adult can result in death or serious burns to rear range foot. Connect anti-tip bracket to children and adults. 3 In the State of Massachusetts, the following...

Installation Instructions
Page 4
...codes and consult gas supplier. Longer screws are minimum clearances. ■ The floor anti-tip bracket must be sealed. ■ Do not seal the range to subfloor. When such standard is a registered trademark of 194°F (90°C). A B C A. The model/serial rating plate is the ...installation. Read and follow the instructions provided with your cabinets, check with any tools listed here. Do not obstruct flow of this range must be used will not discolor, delaminate or sustain other damage. To install the antitip bracket shipped with the maximum allowable wood ...
...codes and consult gas supplier. Longer screws are minimum clearances. ■ The floor anti-tip bracket must be sealed. ■ Do not seal the range to subfloor. When such standard is a registered trademark of 194°F (90°C). A B C A. The model/serial rating plate is the ...installation. Read and follow the instructions provided with your cabinets, check with any tools listed here. Do not obstruct flow of this range must be used will not discolor, delaminate or sustain other damage. To install the antitip bracket shipped with the maximum allowable wood ...

Installation Instructions
Page 5
... cm) width E. 25" (63.5 cm) F. opening width D. Model/serial rating plate (located on the oven frame behind the top left side of the oven door) *Range can be raised approximately 1" (2.5 cm) by not less than No. 28 MSG sheet steel, 0.015" (0.4 mm) stainless steel, 0.024" (0.6 mm) aluminum or 0.020... top of the cooking platform and the bottom of wood or metal cabinet is covered by adjusting the leveling legs. clearance from both sides of range to side wall or other combustible material. *NOTE: 24" (61.0 cm) minimum when bottom of an uncovered wood or metal cabinet. 5 A. 18"...
... cm) width E. 25" (63.5 cm) F. opening width D. Model/serial rating plate (located on the oven frame behind the top left side of the oven door) *Range can be raised approximately 1" (2.5 cm) by not less than No. 28 MSG sheet steel, 0.015" (0.4 mm) stainless steel, 0.024" (0.6 mm) aluminum or 0.020... top of the cooking platform and the bottom of wood or metal cabinet is covered by adjusting the leveling legs. clearance from both sides of range to side wall or other combustible material. *NOTE: 24" (61.0 cm) minimum when bottom of an uncovered wood or metal cabinet. 5 A. 18"...

Installation Instructions
Page 6
...standards can be plugged into an outlet that is recommended that you are necessary. Check that a separate circuit serving only this range will not be provided. ■ Electronic ignition systems operate within wide voltage limits, but proper grounding and polarity are in death, ...Do not use an extension cord. A smaller size pipe on the back of E.I. If the metal chassis of Gas Natural gas: This range is design-certified by a qualified service technician. IMPORTANT: Leak testing of local codes, with a different gas without consulting the serving gas ...
...standards can be plugged into an outlet that is recommended that you are necessary. Check that a separate circuit serving only this range will not be provided. ■ Electronic ignition systems operate within wide voltage limits, but proper grounding and polarity are in death, ...Do not use an extension cord. A smaller size pipe on the back of E.I. If the metal chassis of Gas Natural gas: This range is design-certified by a qualified service technician. IMPORTANT: Leak testing of local codes, with a different gas without consulting the serving gas ...


