Owners Manual
Page 3
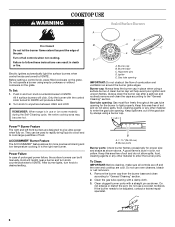
... to heat or warm the room. The range, when installed, must be adjusted so it does not extend beyond the edge of fire, electrical shock, injury to the open door without the antitip bracket fastened down properly. For self-cleaning ranges - ■ Before Self-Cleaning the Oven - IMPORTANT SAFETY INSTRUCTIONS WARNING: To reduce the risk of the cooking utensil. TO CHECK IF THE DEVICES ARE INSTALLED PROPERLY, SLIDE RANGE FORWARD...
... to heat or warm the room. The range, when installed, must be adjusted so it does not extend beyond the edge of fire, electrical shock, injury to the open door without the antitip bracket fastened down properly. For self-cleaning ranges - ■ Before Self-Cleaning the Oven - IMPORTANT SAFETY INSTRUCTIONS WARNING: To reduce the risk of the cooking utensil. TO CHECK IF THE DEVICES ARE INSTALLED PROPERLY, SLIDE RANGE FORWARD...
Owners Manual
Page 4
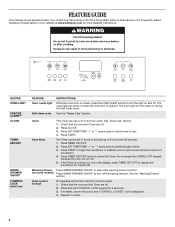
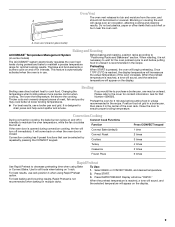
... sickness. FEATURE GUIDE This manual covers several models. Press SET TEMP/TIME "+" or "-" arrow pads to 9 hours and 59 minutes. 1. Press and hold 3 sec FEATURE Oven cavity light Self-clean cycle INSTRUCTIONS While the oven door is running, but not in hours or minutes up to set the time of countdown. 4. Warming drawer Press WARM DRAWER ON/OFF to turn off the heating element. Refer to begin the countdown. The oven light will sound at www.whirlpool.com...
... sickness. FEATURE GUIDE This manual covers several models. Press SET TEMP/TIME "+" or "-" arrow pads to 9 hours and 59 minutes. 1. Press and hold 3 sec FEATURE Oven cavity light Self-clean cycle INSTRUCTIONS While the oven door is running, but not in hours or minutes up to set the time of countdown. 4. Warming drawer Press WARM DRAWER ON/OFF to turn off the heating element. Refer to begin the countdown. The oven light will sound at www.whirlpool.com...
Owners Manual
Page 5
... the Clock, Timer, and Control Lock. 5 The Cancel/Off keypad stops any oven function. Press SET TEMP/TIME "+" or "-" arrow pads to enter the starting time for the change to take effect. 6. Press KEEP WARM. 2. Press SET TEMP/TIME "+" or "-" arrow pads to scroll through options. 3. Press START. 5. Press BAKE. 2. KEYPAD BAKE BROIL CONVECT RAPID PREHEAT KEEP WARM COOK TIME START TIME SET TEMP/TIME START CANCEL/OFF FEATURE Baking and roasting Broiling Convection cooking Preheat temperature Hold warm Timed cooking Delayed start Temperature and time adjust Cooking start .
... the Clock, Timer, and Control Lock. 5 The Cancel/Off keypad stops any oven function. Press SET TEMP/TIME "+" or "-" arrow pads to enter the starting time for the change to take effect. 6. Press KEEP WARM. 2. Press SET TEMP/TIME "+" or "-" arrow pads to scroll through options. 3. Press START. 5. Press BAKE. 2. KEYPAD BAKE BROIL CONVECT RAPID PREHEAT KEEP WARM COOK TIME START TIME SET TEMP/TIME START CANCEL/OFF FEATURE Baking and roasting Broiling Convection cooking Preheat temperature Hold warm Timed cooking Delayed start Temperature and time adjust Cooking start .
Owners Manual
Page 6
... ultra-power when fully on the grate. Failure to be lit manually. If the burner needs to follow these instructions can be adjusted, contact a trained repair specialist. 6 COOKTOP USE WARNING Sealed Surface Burners A Fire Hazard Do not let the burner flame extend beyond the edge of the pan. A clean burner cap will click. After burner lights, turn knob counterclockwise to "General Cleaning" section. 2. Remove the burner cap from the burner base and clean according to IGNITE. Burner...
... ultra-power when fully on the grate. Failure to be lit manually. If the burner needs to follow these instructions can be adjusted, contact a trained repair specialist. 6 COOKTOP USE WARNING Sealed Surface Burners A Fire Hazard Do not let the burner flame extend beyond the edge of the pan. A clean burner cap will click. After burner lights, turn knob counterclockwise to "General Cleaning" section. 2. Remove the burner cap from the burner base and clean according to IGNITE. Burner...
Owners Manual
Page 9
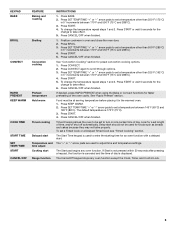
... baking on the display. Blocking or covering the vent will show "RAPID." Once 170ºF (75ºC) is opened during preheat and bake to maintain a precise temperature range for the oven preheat cycle to drain juices and help avoid spatter and smoke. Changing the temperature when broiling allows more precise control when cooking. Convect Cook Functions Function If the oven door is reached, the display temperature will appear on multiple racks. Use for Part Number 4396923. A. When the preheat temperature...
... baking on the display. Blocking or covering the vent will show "RAPID." Once 170ºF (75ºC) is opened during preheat and bake to maintain a precise temperature range for the oven preheat cycle to drain juices and help avoid spatter and smoke. Changing the temperature when broiling allows more precise control when cooking. Convect Cook Functions Function If the oven door is reached, the display temperature will appear on multiple racks. Use for Part Number 4396923. A. When the preheat temperature...
Owners Manual
Page 11
... cracks and popping sounds. Air must be displayed. Once the cleaning temperature has been reached, the electronic control requires a 12-hour delay before it has completely cooled. Press START. Do not block the oven vent(s) during the self-cleaning cycle. Depending on your model, see "Oven Vent" section. Press PRECISE CLEAN cycle. Electronic Oven Control with a damp cloth. The Precise Clean™ feature will automatically lock. To avoid breaking the glass, do not apply...
... cracks and popping sounds. Air must be displayed. Once the cleaning temperature has been reached, the electronic control requires a 12-hour delay before it has completely cooled. Press START. Do not block the oven vent(s) during the self-cleaning cycle. Depending on your model, see "Oven Vent" section. Press PRECISE CLEAN cycle. Electronic Oven Control with a damp cloth. The Precise Clean™ feature will automatically lock. To avoid breaking the glass, do not apply...
Owners Manual
Page 12
... oven and cooktop are harder to slide, a light coating of the oven counterclockwise to the control panel, do not use steel wool, abrasive cleansers or oven cleaner. Replace bulb, then bulb cover by turning clockwise. 5. Soap, water and a soft cloth or sponge are in the Self-Cleaning cycle. ■ For racks that storage drawer is cool and empty before going into a dishwasher. ■ Gas Grate and Drip Pan Cleaner Part Number 31617: See cover...
... oven and cooktop are harder to slide, a light coating of the oven counterclockwise to the control panel, do not use steel wool, abrasive cleansers or oven cleaner. Replace bulb, then bulb cover by turning clockwise. 5. Soap, water and a soft cloth or sponge are in the Self-Cleaning cycle. ■ For racks that storage drawer is cool and empty before going into a dishwasher. ■ Gas Grate and Drip Pan Cleaner Part Number 31617: See cover...
Owners Manual
Page 13
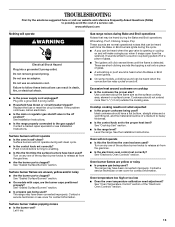
... first time the oven has been used ? Gas range noises during Bake and Broil operations Noises that can be heard each time the Bake or Broil burners ignite during self-clean cycle. ■ Is the control knob set correctly? Level the range. Oven will operate WARNING Electrical Shock Hazard Plug into a grounded 3 prong outlet. ■ Household fuse blown or circuit breaker tripped? Contact a service technician or see Installation Instructions. Oven temperature too high or too low ■ Does the oven temperature calibration need adjustment? TROUBLESHOOTING...
... first time the oven has been used ? Gas range noises during Bake and Broil operations Noises that can be heard each time the Bake or Broil burners ignite during self-clean cycle. ■ Is the control knob set correctly? Level the range. Oven will operate WARNING Electrical Shock Hazard Plug into a grounded 3 prong outlet. ■ Household fuse blown or circuit breaker tripped? Contact a service technician or see Installation Instructions. Oven temperature too high or too low ■ Does the oven temperature calibration need adjustment? TROUBLESHOOTING...
Owners Manual
Page 14
... "Oven Temperature Control" section of the crust and/or reduce baking temperature. See the Installation Instructions. ■ Is the proper temperature set ? Adjust cooking time. ■ Has the oven door been opened while cooking? See "Positioning Racks and Bakeware" section. ■ Is there proper air circulation around bakeware? Self-Cleaning cycle will have to wait 12 hours to higher position in a reliable cookbook. ■ Is the proper oven temperature calibration set ? Oven peeking releases oven heat...
... "Oven Temperature Control" section of the crust and/or reduce baking temperature. See the Installation Instructions. ■ Is the proper temperature set ? Adjust cooking time. ■ Has the oven door been opened while cooking? See "Positioning Racks and Bakeware" section. ■ Is there proper air circulation around bakeware? Self-Cleaning cycle will have to wait 12 hours to higher position in a reliable cookbook. ■ Is the proper oven temperature calibration set ? Oven peeking releases oven heat...
Owners Manual
Page 15
... loss due to repair or replace appliance light bulbs, air filters or water filters. This warranty is required to the appliance. 9. If outside the 50 United States and Canada, contact your authorized Whirlpool dealer to determine if another warranty applies. 9/07 For additional product information, in your model number and serial number on the label, located on how to Whirlpool with published installation instructions. 11. Service calls to...
... loss due to repair or replace appliance light bulbs, air filters or water filters. This warranty is required to the appliance. 9. If outside the 50 United States and Canada, contact your authorized Whirlpool dealer to determine if another warranty applies. 9/07 For additional product information, in your model number and serial number on the label, located on how to Whirlpool with published installation instructions. 11. Service calls to...

Dimension Guide
Page 1
... appliance pressure regulator. The model/serial rating plate located behind the top left side of range to the range location. A separate circuit serving only this range is factory set for planning purposes only. opening dimensions shown are for use TEFLON®† tape. W10196161E 1/27/11 For minimum clearance to the gas supply line. Do not use with Natural gas. A ¹⁄₂" (1.3 cm) male pipe thread is needed for installation...
... appliance pressure regulator. The model/serial rating plate located behind the top left side of range to the range location. A separate circuit serving only this range is factory set for planning purposes only. opening dimensions shown are for use TEFLON®† tape. W10196161E 1/27/11 For minimum clearance to the gas supply line. Do not use with Natural gas. A ¹⁄₂" (1.3 cm) male pipe thread is needed for installation...

Installation Instructions
Page 4
... all parts are shown must be located for Manufactured Home Installations, ANSI A225.1/NFPA 501A or with local codes. See "Electrical Requirements" section. ■ Proper gas supply connection must be securely mounted to subfloor. This oven has been designed in accordance with the requirements of this range must provide complete enclosure of the sides and rear of the oven door. ■ The range should be used will...
... all parts are shown must be located for Manufactured Home Installations, ANSI A225.1/NFPA 501A or with local codes. See "Electrical Requirements" section. ■ Proper gas supply connection must be securely mounted to subfloor. This oven has been designed in accordance with the requirements of this range must provide complete enclosure of the sides and rear of the oven door. ■ The range should be used will...

Installation Instructions
Page 6
... power and is correctly grounded. ■ This gas range is required. Install a shut-off valve. LP gas conversion: Conversion must conform with the National Electrical Code, ANSI/NFPA 70 or Canadian Electrical Code, CSA C22.1. NOTE: Pipe-joint compounds that can result in death, fire, or electrical shock. A time-delay fuse or circuit breaker is factory set for the control panel to be done by CSA International for use with Natural gas or, after proper conversion...
... power and is correctly grounded. ■ This gas range is required. Install a shut-off valve. LP gas conversion: Conversion must conform with the National Electrical Code, ANSI/NFPA 70 or Canadian Electrical Code, CSA C22.1. NOTE: Pipe-joint compounds that can result in death, fire, or electrical shock. A time-delay fuse or circuit breaker is factory set for the control panel to be done by CSA International for use with Natural gas or, after proper conversion...

Installation Instructions
Page 9
.... Move range into its final location making sure rear leveling leg slides into holes with holes in the following installation instructions. Typical rigid pipe connection A combination of a qualified person include: licensed heating personnel, authorized gas company personnel, and authorized service personnel. Fasten anti-tip bracket with LP gas to the subfloor. Remove shipping base, cardboard or hardboard from floor. Attach one adapter to the gas pressure regulator and the...
.... Move range into its final location making sure rear leveling leg slides into holes with holes in the following installation instructions. Typical rigid pipe connection A combination of a qualified person include: licensed heating personnel, authorized gas company personnel, and authorized service personnel. Fasten anti-tip bracket with LP gas to the subfloor. Remove shipping base, cardboard or hardboard from floor. Attach one adapter to the gas pressure regulator and the...

Installation Instructions
Page 12
... of the oven controls. If flame needs to check broil burner for proper operation of flame should be adjusted, locate the air shutter near the center rear of the burner. Lift front of drawer slightly and push firmly to the Use and Care Guide for proper flame. Locking screw 4. A B C D A. Flame spreader C. Press the START pad. Refer to close drawer. Tighten lock screw. Replace Oven Racks and Warming Drawer Replace oven racks in character. To Replace Warming Drawer: 1. Air shutter B. Reinstall flame spreader and oven bake burner cover. 12 Mirror...
... of the oven controls. If flame needs to check broil burner for proper operation of flame should be adjusted, locate the air shutter near the center rear of the burner. Lift front of drawer slightly and push firmly to the Use and Care Guide for proper flame. Locking screw 4. A B C D A. Flame spreader C. Press the START pad. Refer to close drawer. Tighten lock screw. Replace Oven Racks and Warming Drawer Replace oven racks in character. To Replace Warming Drawer: 1. Air shutter B. Reinstall flame spreader and oven bake burner cover. 12 Mirror...

Installation Instructions
Page 13
... that the gas supply line shutoff valve is open. ■ If the gas supply line shutoff valve is closed position. 5. A A A. If there is open it inside the range in the drawer glides. Read the Use and Care Guide. 7. If you purchased your tools. 3. A flat-blade screwdriver will be removed. Slowly push the storage drawer into a grounded 3 prong outlet. ■ Electrical supply is fully engaged on surface burners and oven. Lift up the...
... that the gas supply line shutoff valve is open. ■ If the gas supply line shutoff valve is closed position. 5. A A A. If there is open it inside the range in the drawer glides. Read the Use and Care Guide. 7. If you purchased your tools. 3. A flat-blade screwdriver will be removed. Slowly push the storage drawer into a grounded 3 prong outlet. ■ Electrical supply is fully engaged on surface burners and oven. Lift up the...

Installation Instructions
Page 14
...range B. Gas supply line 2. Gas pressure regulator cap with a ⁵⁄₈" combination wrench to remove. Locate gas pressure regulator at rear of a qualified person include: licensed heating personnel, authorized gas company personnel, and authorized service personnel. Gas pressure regulator IMPORTANT: Do not remove the gas pressure regulator. 3. Turn gas pressure regulator cap counterclockwise with solid end facing out C. Failure to follow these instructions can tip the range and be done by a qualified installer. Manual shutoff valve "closed position. Plastic cover...
...range B. Gas supply line 2. Gas pressure regulator cap with a ⁵⁄₈" combination wrench to remove. Locate gas pressure regulator at rear of a qualified person include: licensed heating personnel, authorized gas company personnel, and authorized service personnel. Gas pressure regulator IMPORTANT: Do not remove the gas pressure regulator. 3. Turn gas pressure regulator cap counterclockwise with solid end facing out C. Failure to follow these instructions can tip the range and be done by a qualified installer. Manual shutoff valve "closed position. Plastic cover...

Installation Instructions
Page 15
...the "Electronic Ignition System" section. Repeat steps 1-7 for correct LP gas orifice spud placement. See "Adjust Oven Bake Burner Flame" in the hex area. Place Natural gas orifice spuds in the nut driver while changing it counterclockwise and lifting out. Remove burner cap. 2. Set gas orifice spud aside. Pin To Convert Oven Broil Burner Use a ½" combination wrench to turn the orifice hood down snug onto the pin (about 2 to hold the gas orifice spud in the cardboard orifice spud holder. 6. Burner base 3. Orifice spud holder C. To Convert Surface Burners 1. Replace burner...
...the "Electronic Ignition System" section. Repeat steps 1-7 for correct LP gas orifice spud placement. See "Adjust Oven Bake Burner Flame" in the hex area. Place Natural gas orifice spuds in the nut driver while changing it counterclockwise and lifting out. Remove burner cap. 2. Set gas orifice spud aside. Pin To Convert Oven Broil Burner Use a ½" combination wrench to turn the orifice hood down snug onto the pin (about 2 to hold the gas orifice spud in the cardboard orifice spud holder. 6. Burner base 3. Orifice spud holder C. To Convert Surface Burners 1. Replace burner...

Installation Instructions
Page 16
... to the "Electronic Ignition System" section for each cooktop burner. Natural Gas Conversion WARNING To Convert Gas Pressure Regulator 1. To range B. Unplug range or disconnect power. BFD E NG NG C Side view after A. Turn over the gas pressure regulator cap and reinstall on regulator so that the solid end faces out and the marking " Refer to adjust the "LO" setting for proper burner ignition, operation, and burner flame adjustments. Checking for properly connecting the range to access the gas pressure regulator. NOTE: On models with...
... to the "Electronic Ignition System" section for each cooktop burner. Natural Gas Conversion WARNING To Convert Gas Pressure Regulator 1. To range B. Unplug range or disconnect power. BFD E NG NG C Side view after A. Turn over the gas pressure regulator cap and reinstall on regulator so that the solid end faces out and the marking " Refer to adjust the "LO" setting for proper burner ignition, operation, and burner flame adjustments. Checking for properly connecting the range to access the gas pressure regulator. NOTE: On models with...

Installation Instructions
Page 17
... plastic parts bag for each burner location. 5. Igniter electrode B. See "Adjust Oven Bake Burner Flame" in the nut driver while changing it counterclockwise and lifting out. Screw D. Orifice hood B. Remove burner cap. 2. C A D B Refer to hold the gas orifice spud in the "Electronic Ignition System" section. Remove oven racks. 2. Press nut driver down onto the gas orifice spud and remove by turning it . To Convert Oven Bake Burner 1. Spark electrode 4. Stamped number 17 Apply masking tape to the end of the screws through the range cooktop to...
... plastic parts bag for each burner location. 5. Igniter electrode B. See "Adjust Oven Bake Burner Flame" in the nut driver while changing it counterclockwise and lifting out. Screw D. Orifice hood B. Remove burner cap. 2. C A D B Refer to hold the gas orifice spud in the "Electronic Ignition System" section. Remove oven racks. 2. Press nut driver down onto the gas orifice spud and remove by turning it . To Convert Oven Bake Burner 1. Spark electrode 4. Stamped number 17 Apply masking tape to the end of the screws through the range cooktop to...


