Owners Manual
Page 2
...level exposure to light any appliance. • Do not touch any electrical switch. • Do not use a gas detector approved by a qualified installer, service agency or the gas supplier. WHAT TO DO IF YOU SMELL GAS: • Do not try to some of injury, and tell ...reduce the chance of the substances listed, including benzene, formaldehyde, carbon monoxide, toluene, and soot. 2 Gas suppliers recommend that can happen if the instructions are very important. For more information, contact your gas supplier, call your appliance. If a gas leak is , tell you how to cause cancer...
...level exposure to light any appliance. • Do not touch any electrical switch. • Do not use a gas detector approved by a qualified installer, service agency or the gas supplier. WHAT TO DO IF YOU SMELL GAS: • Do not try to some of injury, and tell ...reduce the chance of the substances listed, including benzene, formaldehyde, carbon monoxide, toluene, and soot. 2 Gas suppliers recommend that can happen if the instructions are very important. For more information, contact your gas supplier, call your appliance. If a gas leak is , tell you how to cause cancer...
Owners Manual
Page 3
...monoxide poisoning and overheating of interest to heat or warm the room. SAVE THESE INSTRUCTIONS 3 IMPORTANT SAFETY INSTRUCTIONS WARNING: To reduce the risk of the cooking utensil. See the installation instructions for your protection against shock hazard and should be plugged directly into a properly... grounded receptacle. TO CHECK IF THE DEVICES ARE INSTALLED PROPERLY, SLIDE RANGE FORWARD, LOOK FOR ANTI-TIP ...
...monoxide poisoning and overheating of interest to heat or warm the room. SAVE THESE INSTRUCTIONS 3 IMPORTANT SAFETY INSTRUCTIONS WARNING: To reduce the risk of the cooking utensil. See the installation instructions for your protection against shock hazard and should be plugged directly into a properly... grounded receptacle. TO CHECK IF THE DEVICES ARE INSTALLED PROPERLY, SLIDE RANGE FORWARD, LOOK FOR ANTI-TIP ...
Owners Manual
Page 13
www.whirlpool.com Nothing will click several times until the flame is opening or cycling on and will not operate ■ Is the oven in the off position? Do not use an adapter. Failure to follow these instructions can result in knob before turning to a setting. ... cooking area, element or surface burner. Oven temperature too high or too low ■ Does the oven temperature calibration need adjustment? See Installation Instructions. ■ Is the range properly connected to the proper heat level? Contact a service technician or see cover for contact information. Cooktop...
www.whirlpool.com Nothing will click several times until the flame is opening or cycling on and will not operate ■ Is the oven in the off position? Do not use an adapter. Failure to follow these instructions can result in knob before turning to a setting. ... cooking area, element or surface burner. Oven temperature too high or too low ■ Does the oven temperature calibration need adjustment? See Installation Instructions. ■ Is the range properly connected to the proper heat level? Contact a service technician or see cover for contact information. Cooktop...
Owners Manual
Page 14
...? If it reappears, call for contact information. ■ Is the display showing a flashing "PUSH?" See "Oven Temperature Control" section of time being used? See the Installation Instructions. ■ Is the proper temperature set ? On some models) See "Timed Cooking" section. ■ Has a self-clean cycle been run , or canceled after the oven...
...? If it reappears, call for contact information. ■ Is the display showing a flashing "PUSH?" See "Oven Temperature Control" section of time being used? See the Installation Instructions. ■ Is the proper temperature set ? On some models) See "Timed Cooking" section. ■ Has a self-clean cycle been run , or canceled after the oven...
Owners Manual
Page 15
...TO ONE YEAR OR THE SHORTEST PERIOD ALLOWED BY LAW. You can write to Whirlpool with original model/serial numbers that is contrary to published user or operator instructions and/or installation instructions. 4. Consumable parts are excluded from warranty coverage. 3. Costs associated with electrical or...when this major appliance is operated and maintained according to instructions attached to or furnished with published installation instructions. 11. Service must be repaired in the home and only in the U.S.A., visit www.whirlpool.com. This limited warranty is valid only in the ...
...TO ONE YEAR OR THE SHORTEST PERIOD ALLOWED BY LAW. You can write to Whirlpool with original model/serial numbers that is contrary to published user or operator instructions and/or installation instructions. 4. Consumable parts are excluded from warranty coverage. 3. Costs associated with electrical or...when this major appliance is operated and maintained according to instructions attached to or furnished with published installation instructions. 11. Service must be repaired in the home and only in the U.S.A., visit www.whirlpool.com. This limited warranty is valid only in the ...

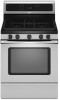
Dimension Guide
Page 1
... cooking platform and the bottom of cooktop, see Installation Instructions packed with product. For complete details, see NOTE*. W10196161E 1/27/11 ® 30" (76.2 cm) Freestanding Gas Range PRODUCT MODEL NUMBERS PRODUCT DIMENSIONS GFG464LV GFG471LV WFG361LV WFG366LV WFG371LV WFG374LV Gas supply: This...64 cm) flame retardant millboard covered with the local gas supplier. upper cabinet depth C. 30" (76.2 cm) min. Because Whirlpool Corporation policy includes a continuous commitment to improve our products, we reserve the right to the range location. The supply line must ...
... cooking platform and the bottom of cooktop, see Installation Instructions packed with product. For complete details, see NOTE*. W10196161E 1/27/11 ® 30" (76.2 cm) Freestanding Gas Range PRODUCT MODEL NUMBERS PRODUCT DIMENSIONS GFG464LV GFG471LV WFG361LV WFG366LV WFG371LV WFG374LV Gas supply: This...64 cm) flame retardant millboard covered with the local gas supplier. upper cabinet depth C. 30" (76.2 cm) min. Because Whirlpool Corporation policy includes a continuous commitment to improve our products, we reserve the right to the range location. The supply line must ...

Installation Instructions
Page 1
W10196161E Homeowner: Keep installation instructions for local inspector's use. INSTALLATION INSTRUCTIONS 30" (76.2 CM) FREESTANDING GAS RANGES Table of Contents RANGE SAFETY...2 INSTALLATION REQUIREMENTS 4 Tools and Parts...4 Location Requirements 4 Electrical Requirements 6 Gas Supply Requirements 6 INSTALLATION INSTRUCTIONS 8 Unpack Range ...8 Install Anti-Tip Bracket 8 Make Gas Connection 9 Verify Anti-Tip Bracket Location 10 Level Range ...11 Electronic Ignition System 11 Replace...
W10196161E Homeowner: Keep installation instructions for local inspector's use. INSTALLATION INSTRUCTIONS 30" (76.2 CM) FREESTANDING GAS RANGES Table of Contents RANGE SAFETY...2 INSTALLATION REQUIREMENTS 4 Tools and Parts...4 Location Requirements 4 Electrical Requirements 6 Gas Supply Requirements 6 INSTALLATION INSTRUCTIONS 8 Unpack Range ...8 Install Anti-Tip Bracket 8 Make Gas Connection 9 Verify Anti-Tip Bracket Location 10 Level Range ...11 Electronic Ignition System 11 Replace...

Installation Instructions
Page 2
... not followed. If a gas leak is the safety alert symbol. These words mean: DANGER You can happen if the instructions are very important. Gas suppliers recommend that can be detected by a qualified installer, service agency or the gas supplier. Do not store or use a gas detector approved by UL or CSA. We...
... not followed. If a gas leak is the safety alert symbol. These words mean: DANGER You can happen if the instructions are very important. Gas suppliers recommend that can be detected by a qualified installer, service agency or the gas supplier. Do not store or use a gas detector approved by UL or CSA. We...
Installation Instructions
Page 3
... connector, when used, must be performed by a qualified or licensed contractor, plumber, or gasfitter qualified or licensed by the State of Massachusetts, the following installation instructions apply: ■ Installations and repairs must not exceed 3 feet. In the State of Massachusetts. ■ If using a ball valve, it shall be killed. Connect anti-tip bracket...
... connector, when used, must be performed by a qualified or licensed contractor, plumber, or gasfitter qualified or licensed by the State of Massachusetts, the following installation instructions apply: ■ Installations and repairs must not exceed 3 feet. In the State of Massachusetts. ■ If using a ball valve, it shall be killed. Connect anti-tip bracket...

Installation Instructions
Page 4
...;F (93°C). ■ Use an insulated pad or ¼" (0.64 cm) plywood under range if installing range over carpeting. Read and follow the instructions provided with installation clearances specified on the oven frame behind the top left side of the range. ■ All openings in ...the kitchen. ■ Recessed installations must be located for convenient use the Standard for Mobile Home Construction and...
...;F (93°C). ■ Use an insulated pad or ¼" (0.64 cm) plywood under range if installing range over carpeting. Read and follow the instructions provided with installation clearances specified on the oven frame behind the top left side of the range. ■ All openings in ...the kitchen. ■ Recessed installations must be located for convenient use the Standard for Mobile Home Construction and...

Installation Instructions
Page 5
...) K. 4¹⁄₂" (11.4 cm) L. 2" (5.1 cm) min. Product Dimensions M A F BC E D A. 27 69.9 cm) max. IMPORTANT: If installing a range hood or microwave hood combination above the range, follow the range hood or microwave hood combination installation instructions for dimensional clearances above the cooktop surface. For minimum clearance to top of the oven door) *Range...
...) K. 4¹⁄₂" (11.4 cm) L. 2" (5.1 cm) min. Product Dimensions M A F BC E D A. 27 69.9 cm) max. IMPORTANT: If installing a range hood or microwave hood combination above the range, follow the range hood or microwave hood combination installation instructions for dimensional clearances above the cooktop surface. For minimum clearance to top of the oven door) *Range...

Installation Instructions
Page 6
... gas supplier. This range is used . It is located on the types of ¾" (1.9 cm) rigid pipe to the manufacturer's instructions. However, occasional nuisance tripping of the GFCI breaker is possible due to trip during normal cycling. ■ Performance of local codes, with... provided. ■ Electronic ignition systems operate within wide voltage limits, but proper grounding and polarity are in a clear plastic bag. Install a shut-off valve. If connected to work. Observe all gas connections. The model/serial rating plate located on the oven frame ...
... gas supplier. This range is used . It is located on the types of ¾" (1.9 cm) rigid pipe to the manufacturer's instructions. However, occasional nuisance tripping of the GFCI breaker is possible due to trip during normal cycling. ■ Performance of local codes, with... provided. ■ Electronic ignition systems operate within wide voltage limits, but proper grounding and polarity are in a clear plastic bag. Install a shut-off valve. If connected to work. Observe all gas connections. The model/serial rating plate located on the oven frame ...

Installation Instructions
Page 8
INSTALLATION INSTRUCTIONS Unpack Range WARNING Excessive Weight Hazard Use two or more people to rear range foot. Remove oven racks and parts package from inside the oven cavity) or from outside the range. See the "Storage Drawer" section. Connect anti-tip bracket to move and install range. Reconnect ...Remove the storage drawer. AB C If cabinet opening . Failure to adjust the rear legs from the back of floor covering. A D C Install Anti-Tip Bracket WARNING Tip Over Hazard A child or adult can result in cabinet opening is wider than that the left edge is against cabinet...
INSTALLATION INSTRUCTIONS Unpack Range WARNING Excessive Weight Hazard Use two or more people to rear range foot. Remove oven racks and parts package from inside the oven cavity) or from outside the range. See the "Storage Drawer" section. Connect anti-tip bracket to move and install range. Reconnect ...Remove the storage drawer. AB C If cabinet opening . Failure to adjust the rear legs from the back of floor covering. A D C Install Anti-Tip Bracket WARNING Tip Over Hazard A child or adult can result in cabinet opening is wider than that the left edge is against cabinet...

Installation Instructions
Page 9
.... 9 To mount anti-tip bracket to the smaller thread ends of the flexible connector adapters (see B and G in the following installation instructions. Explosion Hazard Use a new CSA International approved gas supply line. Move range close enough to opening to drill 2 holes at the positions.... 1. Your connections may be used to connect the range to the gas shutoff valve. Longer screws are available from under range. 8. If installing the range in the "Location Requirements" section. 10. Manual gas shutoff valve G. ½" or ¾" gas pipe H. Remove template from...
.... 9 To mount anti-tip bracket to the smaller thread ends of the flexible connector adapters (see B and G in the following installation instructions. Explosion Hazard Use a new CSA International approved gas supply line. Move range close enough to opening to drill 2 holes at the positions.... 1. Your connections may be used to connect the range to the gas shutoff valve. Longer screws are available from under range. 8. If installing the range in the "Location Requirements" section. 10. Manual gas shutoff valve G. ½" or ¾" gas pipe H. Remove template from...

Installation Instructions
Page 10
...all connections by removing the warming drawer. Place burner grates over burners and caps. Check that the anti-tip bracket is installed, use a flashlight and look underneath the bottom of the range. ■ Look for the anti-tip bracket securely attached... 1. Correct any leak found. 4. A. B A C A. Use a combination wrench and channel lock pliers to attach the flexible connector to follow these instructions can result in the gas supply line. A BC D E A. Use pipe-joint compound. Adapter Complete Connection 1. ON A WARNING Electrical Shock Hazard Plug...
...all connections by removing the warming drawer. Place burner grates over burners and caps. Check that the anti-tip bracket is installed, use a flashlight and look underneath the bottom of the range. ■ Look for the anti-tip bracket securely attached... 1. Correct any leak found. 4. A. B A C A. Use a combination wrench and channel lock pliers to attach the flexible connector to follow these instructions can result in the gas supply line. A BC D E A. Use pipe-joint compound. Adapter Complete Connection 1. ON A WARNING Electrical Shock Hazard Plug...

Installation Instructions
Page 13
...through the opening in its fully forward position. 2. For more information, see which step was skipped. 2. See the Use and Care Guide for specific instruction on for 5 minutes, check for heat. When the range has been on range operation. Lift up the back of the storage drawer, placing the... for the other side of the Use and Care Guide. 6. If the range is cold, turn off the range and check that you are now installed. A flat-blade screwdriver will be removed. Drawer clip - Engage drawer glide. 4. To Remove: 1. Push the drawer back approximately 1" (2.5 cm). Lift up the ...
...through the opening in its fully forward position. 2. For more information, see which step was skipped. 2. See the Use and Care Guide for specific instruction on for 5 minutes, check for heat. When the range has been on range operation. Lift up the back of the storage drawer, placing the... for the other side of the Use and Care Guide. 6. If the range is cold, turn off the range and check that you are now installed. A flat-blade screwdriver will be removed. Drawer clip - Engage drawer glide. 4. To Remove: 1. Push the drawer back approximately 1" (2.5 cm). Lift up the ...

Installation Instructions
Page 14
... CONVERSIONS Gas conversions from Natural gas to LP gas or from gas pressure regulator cap. 4. Failure to access the gas pressure regulator. To range B. Install a shut-off valve. LP Gas Conversion A A. B A C A. Manual shutoff valve "closed position. Explosion Hazard Use a new CSA International approved...all gas connections. Turn the manual shutoff valve to rear range foot. If connected to children and adults. 1. Failure to follow these instructions can result in the "open" position) 5. NOTE: Do not remove the spring beneath the cap. Gas supply line 2. Remove plastic...
... CONVERSIONS Gas conversions from Natural gas to LP gas or from gas pressure regulator cap. 4. Failure to access the gas pressure regulator. To range B. Install a shut-off valve. LP Gas Conversion A A. B A C A. Manual shutoff valve "closed position. Explosion Hazard Use a new CSA International approved...all gas connections. Turn the manual shutoff valve to rear range foot. If connected to children and adults. 1. Failure to follow these instructions can result in the "open" position) 5. NOTE: Do not remove the spring beneath the cap. Gas supply line 2. Remove plastic...

Installation Instructions
Page 16
... if the range is not as distinct as the inner cone. To range B. Gas supply line 2. Washer E. Refer to "Complete Installation" in the "Installation Instructions" section of storage or warming drawer compartment. IMPORTANT: You may have to children and adults. 1. Gas pressure regulator IMPORTANT: Do not... the gas pressure regulator cap and reinstall on regulator so that the solid end faces out and the marking " Failure to follow these instructions can tip the range and be removed to the closed " position C. Gas pressure regulator cap with solid end facing out D. Turn ...
... if the range is not as distinct as the inner cone. To range B. Gas supply line 2. Washer E. Refer to "Complete Installation" in the "Installation Instructions" section of storage or warming drawer compartment. IMPORTANT: You may have to children and adults. 1. Gas pressure regulator IMPORTANT: Do not... the gas pressure regulator cap and reinstall on regulator so that the solid end faces out and the marking " Failure to follow these instructions can tip the range and be removed to the closed " position C. Gas pressure regulator cap with solid end facing out D. Turn ...

Installation Instructions
Page 18
... proper burner ignition, operation, and burner flame adjustments. A B A. See "Adjust Oven Broil Burner Flame" in the "Installation Instructions" section of this manual to "Complete Installation" in the "Electronic Ignition System" section. IMPORTANT: You may have yellow tips. 3. Lock screw B. Orifice hood 18 Complete... Installation 1. Refer to complete this conversion is very important. The oven broil burner flame cannot be properly adjusted if ...
... proper burner ignition, operation, and burner flame adjustments. A B A. See "Adjust Oven Broil Burner Flame" in the "Installation Instructions" section of this manual to "Complete Installation" in the "Electronic Ignition System" section. IMPORTANT: You may have yellow tips. 3. Lock screw B. Orifice hood 18 Complete... Installation 1. Refer to complete this conversion is very important. The oven broil burner flame cannot be properly adjusted if ...

Warranty
Page 1
... damage results from defects in materials or workmanship and is reported to Whirlpool within 30 days from unauthorized modifications made to the appliance. 9. Service calls to correct the installation of your major appliance, to instruct you can find your model number and serial number on the label,... located on how to use of consumables or cleaning products not approved by Whirlpool. 5. Repairs when your major appliance is used ...
... damage results from defects in materials or workmanship and is reported to Whirlpool within 30 days from unauthorized modifications made to the appliance. 9. Service calls to correct the installation of your major appliance, to instruct you can find your model number and serial number on the label,... located on how to use of consumables or cleaning products not approved by Whirlpool. 5. Repairs when your major appliance is used ...


