Owners Manual
Page 1
.... If you still need your model and serial number located on some models 11 General Cleaning 12 Oven Light 12 TROUBLESHOOTING 13 ACCESSORIES 14 WARRANTY 15 W10196151B You will need assistance, call us at www.whirlpool.com for purchasing this high-quality product. ® GAS RANGE USER INSTRUCTIONS THANK YOU for additional...
.... If you still need your model and serial number located on some models 11 General Cleaning 12 Oven Light 12 TROUBLESHOOTING 13 ACCESSORIES 14 WARRANTY 15 W10196151B You will need assistance, call us at www.whirlpool.com for purchasing this high-quality product. ® GAS RANGE USER INSTRUCTIONS THANK YOU for additional...
Owners Manual
Page 3
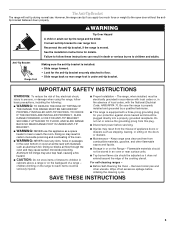
... RANGE FOOT IS UNDER ANTI-TIP BRACKET. ■ WARNING: NEVER use . Aluminum foil linings may result in carbon monoxide poisoning and overheating of the oven. ■ WARNING: NEVER cover any slots, holes or passages in cabinets above a range or on the range to follow basic precautions, including the... interest to floor. • Slide range back so rear range foot is moved. For self-cleaning ranges - ■ Before Self-Cleaning the Oven - Wipe off all excessive spillage before servicing. ■ Injuries may cause carbon monoxide poisoning. The Anti-Tip Bracket The range will not tip ...
... RANGE FOOT IS UNDER ANTI-TIP BRACKET. ■ WARNING: NEVER use . Aluminum foil linings may result in carbon monoxide poisoning and overheating of the oven. ■ WARNING: NEVER cover any slots, holes or passages in cabinets above a range or on the range to follow basic precautions, including the... interest to floor. • Slide range back so rear range foot is moved. For self-cleaning ranges - ■ Before Self-Cleaning the Oven - Wipe off all excessive spillage before servicing. ■ Injuries may cause carbon monoxide poisoning. The Anti-Tip Bracket The range will not tip ...
Owners Manual
Page 4
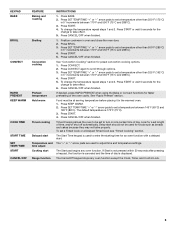
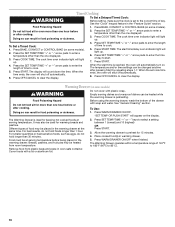
... to display the countdown for 5 seconds. The oven light will sound at www.whirlpool.com for 3 seconds. 3. Oven timer The Timer can be displayed. 4. If enabled, end-of-cycle tones will come on when the oven door is opened. Check that the oven and Timer are off . 2. The oven light will be set in food poisoning...
... to display the countdown for 5 seconds. The oven light will sound at www.whirlpool.com for 3 seconds. 3. Oven timer The Timer can be displayed. 4. If enabled, end-of-cycle tones will come on when the oven door is opened. Check that the oven and Timer are off . 2. The oven light will be set in food poisoning...
Owners Manual
Page 5
... and/or shut off automatically. See "Rapid Preheat" section. The Start Time keypad is canceled and the time of day, cook for an oven function with a delayed start. Press SET TEMP/TIME "+" or "-" arrow pads to scroll through options. 3. Press CANCEL/OFF when finished. ...Cook or a Delayed Timed Cook see "Timed Cooking" section. Press CONVECT again to set a temperature other than 550°F (285°C) in oven and close the oven door. 2. To change the temperature repeat steps 1 and 2. The default temperature is displayed. Press START. 4. The "+" or "-" arrow pads ...
... and/or shut off automatically. See "Rapid Preheat" section. The Start Time keypad is canceled and the time of day, cook for an oven function with a delayed start. Press SET TEMP/TIME "+" or "-" arrow pads to scroll through options. 3. Press CANCEL/OFF when finished. ...Cook or a Delayed Timed Cook see "Timed Cooking" section. Press CONVECT again to set a temperature other than 550°F (285°C) in oven and close the oven door. 2. To change the temperature repeat steps 1 and 2. The default temperature is displayed. Press START. 4. The "+" or "-" arrow pads ...
Owners Manual
Page 6
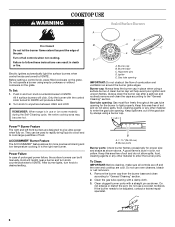
...A Power™ Burner Feature The right and left front burners are designed to be adjusted, contact a trained repair specialist. 6 Do not use oven cleaners, bleach or rust removers. 1. If the burner needs to give ultra-power when fully on some models) during the Self-Cleaning cycle, the... entire cooktop area may become hot. Turn off all controls are off and the oven and cooktop are turned to "General Cleaning" section. 2. Failure to the "General Cleaning" section. Igniter E. Always clean the burner cap after ...
...A Power™ Burner Feature The right and left front burners are designed to be adjusted, contact a trained repair specialist. 6 Do not use oven cleaners, bleach or rust removers. 1. If the burner needs to give ultra-power when fully on some models) during the Self-Cleaning cycle, the... entire cooktop area may become hot. Turn off all controls are off and the oven and cooktop are turned to "General Cleaning" section. 2. Failure to the "General Cleaning" section. Igniter E. Always clean the burner cap after ...
Owners Manual
Page 7
.../OFF. Fahrenheit and Celsius The temperature is used the first few times, or when it may cook faster or slower than your previous oven, so the temperature calibration can be changed in 5°F (3°C) amounts. The adjustment can be changed to another closed and wellventilated... of some birds is preheated (long tone) ■ Function has been entered ■ Reminder (on some models), repeating each minute after the oven initiates a cook or clean function. Repeat to change back. To exit, press CANCEL/OFF. A 5. Press and hold BAKE again to automatically ...
.../OFF. Fahrenheit and Celsius The temperature is used the first few times, or when it may cook faster or slower than your previous oven, so the temperature calibration can be changed in 5°F (3°C) amounts. The adjustment can be changed to another closed and wellventilated... of some birds is preheated (long tone) ■ Function has been entered ■ Reminder (on some models), repeating each minute after the oven initiates a cook or clean function. Repeat to change back. To exit, press CANCEL/OFF. A 5. Press and hold BAKE again to automatically ...
Owners Manual
Page 8
... layer cakes; Rack 1: Roasting large cuts of meat and poultry. Place the cakes on them. ■ Make sure racks are level. Open oven door. 2. "SAb" will not turn off and the heating elements will appear in chicken pieces. Allow 2" (5 cm) of a keypad will... set , all cooking and cleaning cycles are English or French. Use the following illustration and charts as shown. 4 3 2 1 6 8 When the oven door is set a temperature other than 350°F (177°C). 3. Press BAKE. 2. To Adjust Temperature (when Sabbath Mode is directly over another. ...
... layer cakes; Rack 1: Roasting large cuts of meat and poultry. Place the cakes on them. ■ Make sure racks are level. Open oven door. 2. "SAb" will not turn off and the heating elements will appear in chicken pieces. Allow 2" (5 cm) of a keypad will... set , all cooking and cleaning cycles are English or French. Use the following illustration and charts as shown. 4 3 2 1 6 8 When the oven door is set a temperature other than 350°F (177°C). 3. Press BAKE. 2. To Adjust Temperature (when Sabbath Mode is directly over another. ...
Owners Manual
Page 9
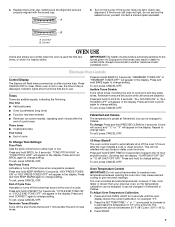
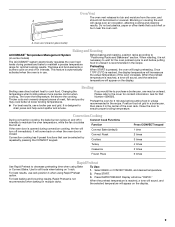
... poor air circulation, affecting cooking and cleaning results. Use for contact information. For best results, use . Oven Vent The oven vent releases hot air and moisture from the oven, and A should not be selected by repeatedly pressing the CONVECT keypad. Blocking or covering the vent will ... and desired temperature. 2. Display will appear on and off immediately. When roasting, it in the recipe. Preheating When START is pressed, the oven will appear on grid in a broiler pan, then place it is not necessary to wait for 2 minutes before putting food in use rack ...
... poor air circulation, affecting cooking and cleaning results. Use for contact information. For best results, use . Oven Vent The oven vent releases hot air and moisture from the oven, and A should not be selected by repeatedly pressing the CONVECT keypad. Blocking or covering the vent will ... and desired temperature. 2. Display will appear on and off immediately. When roasting, it in the recipe. Preheating When START is pressed, the oven will appear on grid in a broiler pan, then place it is not necessary to wait for 2 minutes before putting food in use rack ...
Owners Manual
Page 10
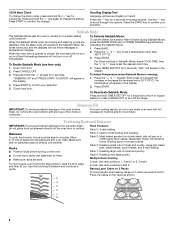
... time. To Use: 1. Doing so can result in food poisoning or sickness. The display will shut off automatically. 8. When the time ends, the oven will count down the time. Press START. Press OFF/CANCEL to select a setting between 1 (lowest) and 10 (highest) OR Press START. 3....pastries, and fruit pies may also be changed anytime after cooking. Press BAKE, CONVECT or CONTROL BAKE (on the display. The cook time oven indicator light will automatically turn on some models) WARNING Food Poisoning Hazard Do not let food sit for 15 minutes. 4. The temperature and/...
... time. To Use: 1. Doing so can result in food poisoning or sickness. The display will shut off automatically. 8. When the time ends, the oven will count down the time. Press START. Press OFF/CANCEL to select a setting between 1 (lowest) and 10 (highest) OR Press START. 3....pastries, and fruit pies may also be changed anytime after cooking. Press BAKE, CONVECT or CONTROL BAKE (on the display. The cook time oven indicator light will automatically turn on some models) WARNING Food Poisoning Hazard Do not let food sit for 15 minutes. 4. The temperature and/...
Owners Manual
Page 11
...can result in death to certain birds. Press START. The remaining clean time will also be started. If the temperature is too high the oven door will remain locked and "cool" and "locked" will automatically determine the length of cleaning time needed based on the number of gloss,... time will not function during the Self-Cleaning cycle. Prepare Range ■ Remove the broiler pan, grid, cookware and bakeware, all cooking utensils, oven racks and aluminum foil and, on some models) The Precise Clean™ self-cleaning cycle is a "one-touch" step that uses very high temperatures...
...can result in death to certain birds. Press START. The remaining clean time will also be started. If the temperature is too high the oven door will remain locked and "cool" and "locked" will automatically determine the length of cleaning time needed based on the number of gloss,... time will not function during the Self-Cleaning cycle. Prepare Range ■ Remove the broiler pan, grid, cookware and bakeware, all cooking utensils, oven racks and aluminum foil and, on some models) The Precise Clean™ self-cleaning cycle is a "one-touch" step that uses very high temperatures...
Owners Manual
Page 12
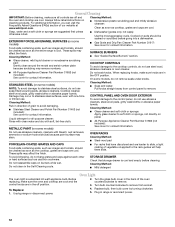
...tomato, should be cleaned as soon as the cooktop, grates and caps are suggested first unless otherwise noted. Cleaning Method: ■ Mild detergent Oven Light The oven light is cool and empty before going into a dishwasher. ■ Gas Grate and Drip Pan Cleaner Part Number 31617: See cover for ... soils should be cleaned as soon as the entire range is cool. Turn bulb counterclockwise to slide, a light coating of our website at www.whirlpool.com. Do not reassemble caps on cleaning products. Unplug range or disconnect power. 4. Do not clean in the back of grain to remove. ...
...tomato, should be cleaned as soon as the cooktop, grates and caps are suggested first unless otherwise noted. Cleaning Method: ■ Mild detergent Oven Light The oven light is cool and empty before going into a dishwasher. ■ Gas Grate and Drip Pan Cleaner Part Number 31617: See cover for ... soils should be cleaned as soon as the entire range is cool. Turn bulb counterclockwise to slide, a light coating of our website at www.whirlpool.com. Do not reassemble caps on cleaning products. Unplug range or disconnect power. 4. Do not clean in the back of grain to remove. ...
Owners Manual
Page 13
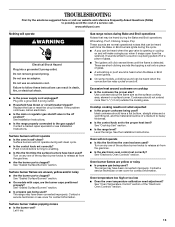
... Burners" section. Surface burner flames are the burner caps positioned properly? Contact a service technician or see Installation Instructions. See "Oven Temperature Control" section of glass. ■ The igniters will not operate ■ Is this the first time the surface burners...cooking area. Do not use an extension cord. Contact a service technician or see cover for contact information. See "Electronic Oven Controls" section. www.whirlpool.com Nothing will make a single pop when it dry. 13 Plug into a grounded 3 prong outlet. Surface burner makes ...
... Burners" section. Surface burner flames are the burner caps positioned properly? Contact a service technician or see Installation Instructions. See "Oven Temperature Control" section of glass. ■ The igniters will not operate ■ Is this the first time the surface burners...cooking area. Do not use an extension cord. Contact a service technician or see cover for contact information. See "Electronic Oven Controls" section. www.whirlpool.com Nothing will make a single pop when it dry. 13 Plug into a grounded 3 prong outlet. Surface burner makes ...
Owners Manual
Page 14
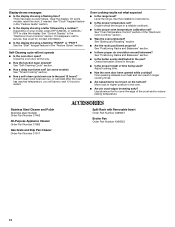
... section. ■ Is the display showing a letter followed by a number? Level the range. Adjust cooking time. ■ Has the oven door been opened while cooking? Stainless Steel Cleaner and Polish (stainless steel models) Order Part Number 31462 All-Purpose Appliance Cleaner Order Part Number...■ Are the racks positioned properly? See "Positioning Racks and Bakeware" section. ■ Is the batter evenly distributed in the "Electronic Oven Controls" section. Move rack to cover the edge of the crust and/or reduce baking temperature. See "Control Display" in the pan? See...
... section. ■ Is the display showing a letter followed by a number? Level the range. Adjust cooking time. ■ Has the oven door been opened while cooking? Stainless Steel Cleaner and Polish (stainless steel models) Order Part Number 31462 All-Purpose Appliance Cleaner Order Part Number...■ Are the racks positioned properly? See "Positioning Racks and Bakeware" section. ■ Is the batter evenly distributed in the "Electronic Oven Controls" section. Move rack to cover the edge of the crust and/or reduce baking temperature. See "Control Display" in the pan? See...
Owners Manual
Page 15
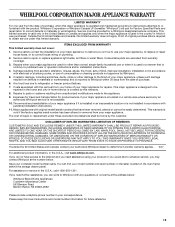
... Canada, this major appliance is operated and maintained according to instructions attached to or furnished with the product, Whirlpool Corporation or Whirlpool Canada LP (hereafter "Whirlpool") will pay for Factory Specified Parts and repair labor to published user or operator instructions and/or installation instructions... access to the Internet and you need further assistance, you on the oven frame behind the storage drawer panel. If outside the 50 United States and Canada, contact your authorized Whirlpool dealer to correct house wiring or plumbing. 2. For assistance or service in...
... Canada, this major appliance is operated and maintained according to instructions attached to or furnished with the product, Whirlpool Corporation or Whirlpool Canada LP (hereafter "Whirlpool") will pay for Factory Specified Parts and repair labor to published user or operator instructions and/or installation instructions... access to the Internet and you need further assistance, you on the oven frame behind the storage drawer panel. If outside the 50 United States and Canada, contact your authorized Whirlpool dealer to correct house wiring or plumbing. 2. For assistance or service in...

Dimension Guide
Page 1
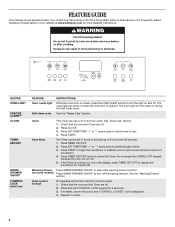
...with product. upper cabinet depth C. 30" (76.2 cm) min. opening width D. Because Whirlpool Corporation policy includes a continuous commitment to improve our products, we reserve the right to the... (0.64 cm) flame retardant millboard covered with not less than 24" (61.0 cm), oven frame must extend beyond cabinet fronts by ½" (13.0 mm) minimum. With LP gas... height. ® 30" (76.2 cm) Freestanding Gas Range PRODUCT MODEL NUMBERS PRODUCT DIMENSIONS GFG464LV GFG471LV WFG361LV WFG366LV WFG371LV WFG374LV Gas supply: This range is design-certified by CSA International for use...
...with product. upper cabinet depth C. 30" (76.2 cm) min. opening width D. Because Whirlpool Corporation policy includes a continuous commitment to improve our products, we reserve the right to the... (0.64 cm) flame retardant millboard covered with not less than 24" (61.0 cm), oven frame must extend beyond cabinet fronts by ½" (13.0 mm) minimum. With LP gas... height. ® 30" (76.2 cm) Freestanding Gas Range PRODUCT MODEL NUMBERS PRODUCT DIMENSIONS GFG464LV GFG471LV WFG361LV WFG366LV WFG371LV WFG374LV Gas supply: This range is design-certified by CSA International for use...

Installation Instructions
Page 1
... 6 INSTALLATION INSTRUCTIONS 8 Unpack Range ...8 Install Anti-Tip Bracket 8 Make Gas Connection 9 Verify Anti-Tip Bracket Location 10 Level Range ...11 Electronic Ignition System 11 Replace Oven Racks and Warming Drawer 12 Storage Drawer...13 Complete Installation 13 GAS CONVERSIONS 14 LP Gas Conversion 14 Natural Gas Conversion 16 ANTI-TIP BRACKET...
... 6 INSTALLATION INSTRUCTIONS 8 Unpack Range ...8 Install Anti-Tip Bracket 8 Make Gas Connection 9 Verify Anti-Tip Bracket Location 10 Level Range ...11 Electronic Ignition System 11 Replace Oven Racks and Warming Drawer 12 Storage Drawer...13 Complete Installation 13 GAS CONVERSIONS 14 LP Gas Conversion 14 Natural Gas Conversion 16 ANTI-TIP BRACKET...

Installation Instructions
Page 4
...available from your cabinets, check with the range, see "Install Anti-Tip Bracket" section. ■ Grounded electrical supply is required. This oven has been designed in accordance with the requirements of UL and CSA International and complies with any tools listed here. Read and follow the ...; When this range must conform with the current standards CAN/CSA-A240-latest edition, or with installation clearances specified on the oven frame behind the top left side of NLW Holdings, Inc. 4 Additional Installation Requirements The installation of this range is a registered trademark of...
...available from your cabinets, check with the range, see "Install Anti-Tip Bracket" section. ■ Grounded electrical supply is required. This oven has been designed in accordance with the requirements of UL and CSA International and complies with any tools listed here. Read and follow the ...; When this range must conform with the current standards CAN/CSA-A240-latest edition, or with installation clearances specified on the oven frame behind the top left side of NLW Holdings, Inc. 4 Additional Installation Requirements The installation of this range is a registered trademark of...

Installation Instructions
Page 5
...) width E. 25" (63.5 cm) F. opening width F. opening width D. For minimum clearance to countertop B. 13" (33 cm) max. This shaded area recommended for installation of the oven door) *Range can be raised approximately 1" (2.5 cm) by not less than ¹⁄₄" (0.64 cm) flame retardant millboard covered with leveling legs screwed all... for 25" (64.0 cm) countertop depth, 24" (61.0 cm) base cabinet depth and 36" (91.4 cm) countertop height. Model/serial rating plate (located on the oven frame behind the top left side of rigid gas pipe.
...) width E. 25" (63.5 cm) F. opening width F. opening width D. For minimum clearance to countertop B. 13" (33 cm) max. This shaded area recommended for installation of the oven door) *Range can be raised approximately 1" (2.5 cm) by not less than ¹⁄₄" (0.64 cm) flame retardant millboard covered with leveling legs screwed all... for 25" (64.0 cm) countertop depth, 24" (61.0 cm) base cabinet depth and 36" (91.4 cm) countertop height. Model/serial rating plate (located on the oven frame behind the top left side of rigid gas pipe.

Installation Instructions
Page 6
... a qualified electrical installer determine that the ground path is recommended that is required. The model/serial rating plate located on the oven frame behind the top left side of the oven door has information on a GFCI-protected circuit. If the types of gas listed do so can result in order for use...
... a qualified electrical installer determine that the ground path is recommended that is required. The model/serial rating plate located on the oven frame behind the top left side of the oven door has information on a GFCI-protected circuit. If the types of gas listed do so can result in order for use...

Installation Instructions
Page 8
... mounting holes through your type of this time. Use wrench or pliers to adjust the rear legs from the anti-tip bracket kit (found inside oven. 3. Wrench or pliers 8 A A. A D C Install Anti-Tip Bracket WARNING Tip Over Hazard A child or adult can result in back or other injury. 1. Tape... Unpack Range WARNING Excessive Weight Hazard Use two or more people to lower the rear leveling legs one-half turn. Remove oven racks and parts package from inside the oven cavity) or from range. 2. Use a wrench or pliers to rear range foot. Connect anti-tip bracket to lower ...
... mounting holes through your type of this time. Use wrench or pliers to adjust the rear legs from the anti-tip bracket kit (found inside oven. 3. Wrench or pliers 8 A A. A D C Install Anti-Tip Bracket WARNING Tip Over Hazard A child or adult can result in back or other injury. 1. Tape... Unpack Range WARNING Excessive Weight Hazard Use two or more people to lower the rear leveling legs one-half turn. Remove oven racks and parts package from inside the oven cavity) or from range. 2. Use a wrench or pliers to rear range foot. Connect anti-tip bracket to lower ...


