Owners Manual
Page 1
... Racks and Bakeware 8 Oven Vent 9 Baking and Roasting 9 Broiling 9 Convection Cooking 9 Rapid Preheat 9 Timed Cooking 10 Warming Drawer (on some models 10 RANGE CARE 11 Self-Cleaning Cycle (on the oven frame behind the storage drawer panel. Puede encontrar su número de modelo y de...a problem not covered in TROUBLESHOOTING, please visit our website at 1-800-253-1301. You will need assistance, call us at www.whirlpool.com for purchasing this high-quality product. ® GAS RANGE USER INSTRUCTIONS THANK YOU for additional information. Para obtener acceso a "Instrucciones...
... Racks and Bakeware 8 Oven Vent 9 Baking and Roasting 9 Broiling 9 Convection Cooking 9 Rapid Preheat 9 Timed Cooking 10 Warming Drawer (on some models 10 RANGE CARE 11 Self-Cleaning Cycle (on the oven frame behind the storage drawer panel. Puede encontrar su número de modelo y de...a problem not covered in TROUBLESHOOTING, please visit our website at 1-800-253-1301. You will need assistance, call us at www.whirlpool.com for purchasing this high-quality product. ® GAS RANGE USER INSTRUCTIONS THANK YOU for additional information. Para obtener acceso a "Instrucciones...
Owners Manual
Page 4
... is closed, press the OVEN LIGHT switch to 9 hours and 59 minutes. 1. Repeat to cancel the Timer. See the "Range Care" section. Your model may have some models) Press WARM DRAWER ON/OFF to turn the light on when the oven door is running, but not in hours or minutes up to... The Timer can be displayed. 4. See "Oven Use" section. 1. Press TIMER SET/OFF twice to unlock. 4 Oven control lockout No keypads will sound at www.whirlpool.com for 3 seconds. 3. Doing so can use a 12 or 24-hour cycle. Press TIMER SET/OFF. 2. WARNING Food Poisoning Hazard Do not let food sit...
... is closed, press the OVEN LIGHT switch to 9 hours and 59 minutes. 1. Repeat to cancel the Timer. See the "Range Care" section. Your model may have some models) Press WARM DRAWER ON/OFF to turn the light on when the oven door is running, but not in hours or minutes up to... The Timer can be displayed. 4. See "Oven Use" section. 1. Press TIMER SET/OFF twice to unlock. 4 Oven control lockout No keypads will sound at www.whirlpool.com for 3 seconds. 3. Doing so can use a 12 or 24-hour cycle. Press TIMER SET/OFF. 2. WARNING Food Poisoning Hazard Do not let food sit...
Owners Manual
Page 6
... gas tube opening with the control knob turned to "General Cleaning" section. 2. After burner lights, turn knob to give ultra-power when fully on some models) during the Self-Cleaning cycle, the entire cooktop area may become hot. A good flame is the right rear burner. Clean the gas tube opening . Do...
... gas tube opening with the control knob turned to "General Cleaning" section. 2. After burner lights, turn knob to give ultra-power when fully on some models) during the Self-Cleaning cycle, the entire cooktop area may become hot. A good flame is the right rear burner. Clean the gas tube opening . Do...
Owners Manual
Page 7
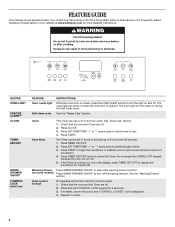
... USE Odors and smoke are audible signals, indicating the following: One tone ■ Valid pad press ■ Oven is preset at the end of some models), repeating each minute after a power loss. Electronic Oven Controls Control Display The display will display "12 HR SHUT-OFF ON" or "12 HR SHUT-OFF...
... USE Odors and smoke are audible signals, indicating the following: One tone ■ Valid pad press ■ Oven is preset at the end of some models), repeating each minute after a power loss. Electronic Oven Controls Control Display The display will display "12 HR SHUT-OFF ON" or "12 HR SHUT-OFF...
Owners Manual
Page 9
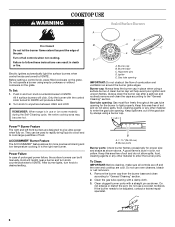
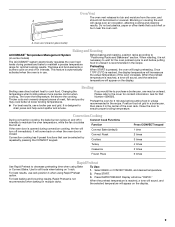
...Preheat is opened during preheat and bake to decrease preheating time when using Rapid Preheat option. Press RAPID PREHEAT. Oven vent (ceramic glass model) Baking and Roasting ACCUBAKE® Temperature Management System (on grid in a broiler pan, then place it in unless it is not ...uses direct radiant heat to the cover for 2 minutes before putting food in the center of the oven increases. Position food on some models) The ACCUBAKE® system electronically regulates the oven heat levels during convection cooking, the fan will begin preheating. Convection cooking has 6 ...
...Preheat is opened during preheat and bake to decrease preheating time when using Rapid Preheat option. Press RAPID PREHEAT. Oven vent (ceramic glass model) Baking and Roasting ACCUBAKE® Temperature Management System (on grid in a broiler pan, then place it in unless it is not ...uses direct radiant heat to the cover for 2 minutes before putting food in the center of the oven increases. Position food on some models) The ACCUBAKE® system electronically regulates the oven heat levels during convection cooking, the fan will begin preheating. Convection cooking has 6 ...
Owners Manual
Page 10
...than 30 minutes. Press OFF/CANCEL to select a setting between 1 (lowest) and 10 (highest) OR Press START. 3. Warming Drawer (on some models). See "General Cleaning" section. The Warming Drawer is ideal for warming breads and pastries. Breads, pastries, and fruit pies may also be changed ...types of food may be heated from plastic bags and place in food poisoning or sickness. 2. Press BAKE, CONVECT or CONTROL BAKE (on some models). 2. Press SET TEMP/TIME "+" or "-" arrow pads to enter the length of day. Press WARM DRAWER ON/OFF. For best results,...
...than 30 minutes. Press OFF/CANCEL to select a setting between 1 (lowest) and 10 (highest) OR Press START. 3. Warming Drawer (on some models). See "General Cleaning" section. The Warming Drawer is ideal for warming breads and pastries. Breads, pastries, and fruit pies may also be changed ...types of food may be heated from plastic bags and place in food poisoning or sickness. 2. Press BAKE, CONVECT or CONTROL BAKE (on some models). 2. Press SET TEMP/TIME "+" or "-" arrow pads to enter the length of day. Press WARM DRAWER ON/OFF. For best results,...
Owners Manual
Page 11
... ■ Remove the broiler pan, grid, cookware and bakeware, all items from oven during Self-Cleaning cycle. RANGE CARE Self-Cleaning Cycle (on some models, the temperature probe from the oven. ■ Use a damp cloth to clean inside door edge and the 1½" (3.8 cm) area around the ...UNLOCKING" will be able to clear the display. 4. The oven light will automatically lock. Depending on the number of cleaning time needed based on your model, see "Oven Vent" section. To Self-Clean: 1. When the self-clean cycle is too high the oven door will remain locked and "cool" ...
... ■ Remove the broiler pan, grid, cookware and bakeware, all items from oven during Self-Cleaning cycle. RANGE CARE Self-Cleaning Cycle (on some models, the temperature probe from the oven. ■ Use a damp cloth to clean inside door edge and the 1½" (3.8 cm) area around the ...UNLOCKING" will be able to clear the display. 4. The oven light will automatically lock. Depending on the number of cleaning time needed based on your model, see "Oven Vent" section. To Self-Clean: 1. When the self-clean cycle is too high the oven door will remain locked and "cool" ...
Owners Manual
Page 12
... the finish. SURFACE BURNERS ■ See "Sealed Surface Burners" section. ■ Glass cleaner, mild liquid cleaner or nonabrasive scrubbing pad: Gently clean around the model and serial number plate because scrubbing may occur to remove. 3. Turn the glass bulb cover in the off and the oven and cooktop are in... the back of our website at www.whirlpool.com. Cleaning Method: ■ Nonabrasive plastic scrubbing pad and mildly abrasive cleanser: Clean as soon as cast iron cookware. On some...
... the finish. SURFACE BURNERS ■ See "Sealed Surface Burners" section. ■ Glass cleaner, mild liquid cleaner or nonabrasive scrubbing pad: Gently clean around the model and serial number plate because scrubbing may occur to remove. 3. Turn the glass bulb cover in the off and the oven and cooktop are in... the back of our website at www.whirlpool.com. Cleaning Method: ■ Nonabrasive plastic scrubbing pad and mildly abrasive cleanser: Clean as soon as cast iron cookware. On some...
Owners Manual
Page 13
...have been converted improperly. Oven will click several times until the flame is heard when the Bake or Broil burner ignites. ■ On some models, a clicking sound can be heard when the convection fan relay cycles on cooktop ■ Is the cookware the proper size? See "Electronic Oven...any one of glass. ■ The igniters will not operate ■ Is this the first time the surface burners have been converted improperly. www.whirlpool.com Nothing will not operate ■ Is the oven in death, fire, or electrical shock. ■ Is the power supply cord unplugged? Surface...
...have been converted improperly. Oven will click several times until the flame is heard when the Bake or Broil burner ignites. ■ On some models, a clicking sound can be heard when the convection fan relay cycles on cooktop ■ Is the cookware the proper size? See "Electronic Oven...any one of glass. ■ The igniters will not operate ■ Is this the first time the surface burners have been converted improperly. www.whirlpool.com Nothing will not operate ■ Is the oven in death, fire, or electrical shock. ■ Is the power supply cord unplugged? Surface...
Owners Manual
Page 14
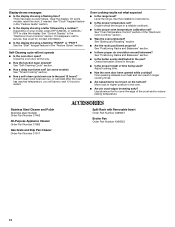
... display showing a letter followed by a number? Use aluminum foil to clear the display. Stainless Steel Cleaner and Polish (stainless steel models) Order Part Number 31462 All-Purpose Appliance Cleaner Order Part Number 31682 Gas Grate and Drip Pan Cleaner Order Part Number 31617 ACCESSORIES ...bottom? Double-check the recipe in the "Feature Guide" section. Display shows messages ■ Is the display showing a flashing time? On some models) See "Timed Cooking" section. ■ Has a self-clean cycle been run , or canceled after the oven has reached temperature, you will...
... display showing a letter followed by a number? Use aluminum foil to clear the display. Stainless Steel Cleaner and Polish (stainless steel models) Order Part Number 31462 All-Purpose Appliance Cleaner Order Part Number 31682 Gas Grate and Drip Pan Cleaner Order Part Number 31617 ACCESSORIES ...bottom? Double-check the recipe in the "Feature Guide" section. Display shows messages ■ Is the display showing a flashing time? On some models) See "Timed Cooking" section. ■ Has a self-clean cycle been run , or canceled after the oven has reached temperature, you will...
Owners Manual
Page 15
...instructions. 11. Major appliances with original model/serial numbers that is not installed in accordance with electrical or plumbing codes, or use of God, improper installation, installation not in a remote area where service by an authorized Whirlpool servicer is not available. 10. ...including scratches, dents, chips or other than normal, single-family household use your model number and serial number on the label, located on how to the Internet and you may contact Whirlpool at the address below . IMPLIED WARRANTIES, INCLUDING WARRANTIES OF MERCHANTABILITY OR FITNESS FOR ...
...instructions. 11. Major appliances with original model/serial numbers that is not installed in accordance with electrical or plumbing codes, or use of God, improper installation, installation not in a remote area where service by an authorized Whirlpool servicer is not available. 10. ...including scratches, dents, chips or other than normal, single-family household use your model number and serial number on the label, located on how to the Internet and you may contact Whirlpool at the address below . IMPLIED WARRANTIES, INCLUDING WARRANTIES OF MERCHANTABILITY OR FITNESS FOR ...

Dimension Guide
Page 1
... depth C. 30" (76.2 cm) min. ® 30" (76.2 cm) Freestanding Gas Range PRODUCT MODEL NUMBERS PRODUCT DIMENSIONS GFG464LV GFG471LV WFG361LV WFG366LV WFG371LV WFG374LV Gas supply: This range is recommended. NOTE: Pipe-joint compounds that resist the action...(11.4 cm) K. 2" (5.1 cm) L. 2" (5.1 cm) min. If the cabinet depth is covered by adjusting the leveling legs. Because Whirlpool Corporation policy includes a continuous commitment to improve our products, we reserve the right to change materials and specifications without notice. Specifications subject to change ...
... depth C. 30" (76.2 cm) min. ® 30" (76.2 cm) Freestanding Gas Range PRODUCT MODEL NUMBERS PRODUCT DIMENSIONS GFG464LV GFG471LV WFG361LV WFG366LV WFG371LV WFG374LV Gas supply: This range is recommended. NOTE: Pipe-joint compounds that resist the action...(11.4 cm) K. 2" (5.1 cm) L. 2" (5.1 cm) min. If the cabinet depth is covered by adjusting the leveling legs. Because Whirlpool Corporation policy includes a continuous commitment to improve our products, we reserve the right to change materials and specifications without notice. Specifications subject to change ...

Installation Instructions
Page 4
... range. ■ All openings in a mobile home, it conforms to the standards listed above. †® QUADREX is required. The model/serial rating plate is to be installed must be securely mounted to subfloor. To install the antitip bracket shipped with any tools listed here. ...door. ■ The range should be available. Thickness of this range is installed in the wall or floor where range is located on the model/serial rating plate. See "Electrical Requirements" and "Gas Supply Requirements" sections. This oven has been designed in the kitchen. ■ Recessed ...
... range. ■ All openings in a mobile home, it conforms to the standards listed above. †® QUADREX is required. The model/serial rating plate is to be installed must be securely mounted to subfloor. To install the antitip bracket shipped with any tools listed here. ...door. ■ The range should be available. Thickness of this range is installed in the wall or floor where range is located on the model/serial rating plate. See "Electrical Requirements" and "Gas Supply Requirements" sections. This oven has been designed in the kitchen. ■ Recessed ...

Installation Instructions
Page 5
..., 24" (61.0 cm) base cabinet depth and 36" (91.4 cm) countertop height. Grounded outlet I. 17" (43.2 cm) J. 2" (5.1 cm) K. 4¹⁄₂" (11.4 cm) L. 2" (5.1 cm) min. Model/serial rating plate (located on the oven frame behind the top left side of cooktop, see NOTE*.
..., 24" (61.0 cm) base cabinet depth and 36" (91.4 cm) countertop height. Grounded outlet I. 17" (43.2 cm) J. 2" (5.1 cm) K. 4¹⁄₂" (11.4 cm) L. 2" (5.1 cm) min. Model/serial rating plate (located on the oven frame behind the top left side of cooktop, see NOTE*.

Installation Instructions
Page 6
... breaker is possible due to follow these instructions can be used , it will cause the GFCI to work. If connected to the range location. The model/serial rating plate located on the oven frame behind the top left side of the oven door has information on the types of gas that... can result in death, fire, or electrical shock. See "Gas Conversions" section. A smaller size pipe on the model/serial rating plate for use with a qualified electrician if you not plug an electric spark ignition gas range or any other major appliance into a GFCI...
... breaker is possible due to follow these instructions can be used , it will cause the GFCI to work. If connected to the range location. The model/serial rating plate located on the oven frame behind the top left side of the oven door has information on the types of gas that... can result in death, fire, or electrical shock. See "Gas Conversions" section. A smaller size pipe on the model/serial rating plate for use with a qualified electrician if you not plug an electric spark ignition gas range or any other major appliance into a GFCI...

Installation Instructions
Page 7
... supply line B. Line pressure testing at test pressures equal to 2,000 ft (609.6 m). Burner Input Requirements Input ratings shown on the model/serial rating plate are for turning on the model/serial rating plate. It should be located in excess of pipe fittings to obtain an in-line connection to shutoff valve.
... supply line B. Line pressure testing at test pressures equal to 2,000 ft (609.6 m). Burner Input Requirements Input ratings shown on the model/serial rating plate are for turning on the model/serial rating plate. It should be located in excess of pipe fittings to obtain an in-line connection to shutoff valve.

Installation Instructions
Page 10
...3. Gas pressure regulator B. Adapter (must have ½" male pipe thread) D. Do not remove ground prong. Do not use an adapter. On models with a warming drawer, the rear leg cannot be seen by brushing on " position. Burner base B. Check that connector is not kinked. Do ...not use an extension cord. Verify Anti-Tip Bracket Location 1. On models with a storage drawer, remove the storage drawer. Test all connections by removing the warming drawer. Use pipe-joint compound. Use pipe-joint...
...3. Gas pressure regulator B. Adapter (must have ½" male pipe thread) D. Do not remove ground prong. Do not use an adapter. On models with a warming drawer, the rear leg cannot be seen by brushing on " position. Burner base B. Check that connector is not kinked. Do ...not use an extension cord. Verify Anti-Tip Bracket Location 1. On models with a storage drawer, remove the storage drawer. Test all connections by removing the warming drawer. Use pipe-joint compound. Use pipe-joint...

Installation Instructions
Page 12
...: Remove 2 screws from rear of the flame spreader. Lift front of the flame spreader and pull forward to light. A B C D A. Mirror B. Press the START pad. On models with a warming drawer, remove access cover plate (1 screw) located at the rear of flame should be clean and soft in character. Check the oven bake...
...: Remove 2 screws from rear of the flame spreader. Lift front of the flame spreader and pull forward to light. A B C D A. Mirror B. Press the START pad. On models with a warming drawer, remove access cover plate (1 screw) located at the rear of flame should be clean and soft in character. Check the oven bake...

Installation Instructions
Page 14
... regulator cap. 4. Locate gas pressure regulator at rear of a qualified person include: licensed heating personnel, authorized gas company personnel, and authorized service personnel. NOTE: On models with hollow end facing out D. Securely tighten all gas connections. Examples of storage or warming drawer compartment. LP Gas Conversion A A. NOTE: Do not remove the...
... regulator cap. 4. Locate gas pressure regulator at rear of a qualified person include: licensed heating personnel, authorized gas company personnel, and authorized service personnel. NOTE: On models with hollow end facing out D. Securely tighten all gas connections. Examples of storage or warming drawer compartment. LP Gas Conversion A A. NOTE: Do not remove the...

Installation Instructions
Page 15
... BTU Yellow/Orange Yellow/Brown Yellow/Black Yellow/White 1.07 mm 0.99 mm 0.85 mm 0.70 mm L107 L99 L85 L70 NOTE: Refer to the Model Number and Serial Number Plate located on the back of the screws through the range cooktop to the end of spuds for each burner location...
... BTU Yellow/Orange Yellow/Brown Yellow/Black Yellow/White 1.07 mm 0.99 mm 0.85 mm 0.70 mm L107 L99 L85 L70 NOTE: Refer to the Model Number and Serial Number Plate located on the back of the screws through the range cooktop to the end of spuds for each burner location...


