Dimension Guide
Page 1
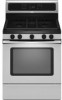
...36" (91.4 cm) countertop height. ® 30" (76.2 cm) Freestanding Gas Range PRODUCT MODEL NUMBERS GFG471LV WFG371LV WFG381LV PRODUCT DIMENSIONS Gas supply: This range is factory set for use with Natural gas. With LP gas, piping or tubing size can be equipped with ...range, follow the range hood or microwave hood combination installation instructions for connection to change without notice. Model/serial rating plate (located on longer runs may be 1/2" (1.3 cm) minimum. If the cabinet depth is recommended. Grounded outlet I . CABINET OPENING DIMENSIONS M Because Whirlpool...
...36" (91.4 cm) countertop height. ® 30" (76.2 cm) Freestanding Gas Range PRODUCT MODEL NUMBERS GFG471LV WFG371LV WFG381LV PRODUCT DIMENSIONS Gas supply: This range is factory set for use with Natural gas. With LP gas, piping or tubing size can be equipped with ...range, follow the range hood or microwave hood combination installation instructions for connection to change without notice. Model/serial rating plate (located on longer runs may be 1/2" (1.3 cm) minimum. If the cabinet depth is recommended. Grounded outlet I . CABINET OPENING DIMENSIONS M Because Whirlpool...
Installation Instructions
Page 4
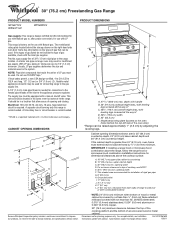
...(0.4 mm) stainless steel, 0.024" (0.6 mm) aluminum or 0.020" (0.5 mm) copper. 30" (76.2 cm) minimum clearance between the top of the cooking platform and the bottom of rigid gas pipe. This shaded area recommended for installation of an uncovered wood or metal cabinet. 4 For ...minimum clearance to countertop B. 13" (33 cm) max. G. 8" (20.3 cm) H. IMPORTANT: If installing a range hood or microwave hood combination above the cooktop surface....
...(0.4 mm) stainless steel, 0.024" (0.6 mm) aluminum or 0.020" (0.5 mm) copper. 30" (76.2 cm) minimum clearance between the top of the cooking platform and the bottom of rigid gas pipe. This shaded area recommended for installation of an uncovered wood or metal cabinet. 4 For ...minimum clearance to countertop B. 13" (33 cm) max. G. 8" (20.3 cm) H. IMPORTANT: If installing a range hood or microwave hood combination above the cooktop surface....
Installation Instructions
Page 14
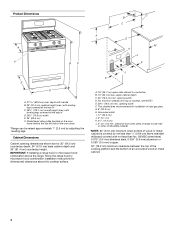
...Burner 1. Complete Installation 1. Refer to the "Make Gas Connection" section for correct LP gas orifice spud placement. Orifice hood B. The oven broil burner flame cannot be killed. Gas supply line 2. Refer to the following chart for properly connecting the range to the gas supply. 2. IMPORTANT: You may have to adjust ... 3. The outer cone is moved. Tip Over Hazard A child or adult can result in death or serious burns to rear range foot. LP Gas Orifice Spud Chart for Surface Burners Burner Rating Color Size ID Number 14,000 BTU 11,000 BTU 8,000 BTU 5,000 BTU...
...Burner 1. Complete Installation 1. Refer to the "Make Gas Connection" section for correct LP gas orifice spud placement. Orifice hood B. The oven broil burner flame cannot be killed. Gas supply line 2. Refer to the following chart for properly connecting the range to the gas supply. 2. IMPORTANT: You may have to adjust ... 3. The outer cone is moved. Tip Over Hazard A child or adult can result in death or serious burns to rear range foot. LP Gas Orifice Spud Chart for Surface Burners Burner Rating Color Size ID Number 14,000 BTU 11,000 BTU 8,000 BTU 5,000 BTU...

Installation Instructions
Page 16
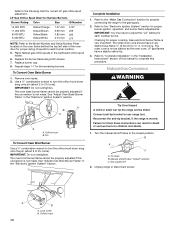
.... 5. To Convert Oven Bake Burner 1. Use a ½" combination wrench to loosen the orifice hood away from the pin (about 2 to the gas supply. 2. See "Adjust Oven Bake Burner Flame" in the "Installation Instructions" section of spuds for properly connecting the range to 2½ turns). Lock screw B. Repeat steps 1-7 for proper cooktop, bake and...
.... 5. To Convert Oven Bake Burner 1. Use a ½" combination wrench to loosen the orifice hood away from the pin (about 2 to the gas supply. 2. See "Adjust Oven Bake Burner Flame" in the "Installation Instructions" section of spuds for properly connecting the range to 2½ turns). Lock screw B. Repeat steps 1-7 for proper cooktop, bake and...

