Owners Manual
Page 1
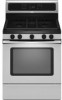
If you should experience a problem not covered in TROUBLESHOOTING, please visit our website at 1-800-807-6777. Table of Contents RANGE SAFETY 2 The Anti-Tip Bracket 3 FEATURE GUIDE 4 COOKTOP USE 6 Sealed Surface Burners 6 OVEN USE 7 Electronic Oven Controls 7 Sabbath Mode 8 ...General Cleaning 12 Oven Light 12 TROUBLESHOOTING 13 ACCESSORIES 14 WARRANTY 15 W10196150B ® GAS RANGE USER INSTRUCTIONS THANK YOU for additional information. You will need assistance, call us at www.whirlpool.ca for purchasing this high-quality product. If you still need your model and...
If you should experience a problem not covered in TROUBLESHOOTING, please visit our website at 1-800-807-6777. Table of Contents RANGE SAFETY 2 The Anti-Tip Bracket 3 FEATURE GUIDE 4 COOKTOP USE 6 Sealed Surface Burners 6 OVEN USE 7 Electronic Oven Controls 7 Sabbath Mode 8 ...General Cleaning 12 Oven Light 12 TROUBLESHOOTING 13 ACCESSORIES 14 WARRANTY 15 W10196150B ® GAS RANGE USER INSTRUCTIONS THANK YOU for additional information. You will need assistance, call us at www.whirlpool.ca for purchasing this high-quality product. If you still need your model and...

Owners Manual
Page 2
... important. All safety messages will follow instructions. WARNING: If the information in the vicinity of this manual and on your gas supplier. RANGE SAFETY Your safety and the safety of others . If a gas leak is , tell you how to light any appliance. • Do not touch any other reproductive harm. 2 Always read and...
... important. All safety messages will follow instructions. WARNING: If the information in the vicinity of this manual and on your gas supplier. RANGE SAFETY Your safety and the safety of others . If a gas leak is , tell you how to light any appliance. • Do not touch any other reproductive harm. 2 Always read and...
Owners Manual
Page 3
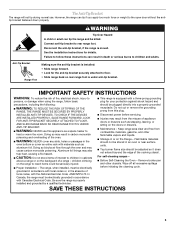
...without the antitip bracket fastened down properly. Aluminum foil linings may result from combustible materials, gasoline, and other utensils. For self-cleaning ranges - ■ Before Self-Cleaning the Oven - Doing so blocks air flow through the oven and may result in carbon monoxide ...tip bracket securely attached to follow basic precautions, including the following: ■ WARNING: TO REDUCE THE RISK OF TIPPING OF THE RANGE, THE RANGE MUST BE SECURED BY PROPERLY INSTALLED ANTI-TIP DEVICES. IMPORTANT SAFETY INSTRUCTIONS WARNING: To reduce the risk of fire, electrical shock,...
...without the antitip bracket fastened down properly. Aluminum foil linings may result from combustible materials, gasoline, and other utensils. For self-cleaning ranges - ■ Before Self-Cleaning the Oven - Doing so blocks air flow through the oven and may result in carbon monoxide ...tip bracket securely attached to follow basic precautions, including the following: ■ WARNING: TO REDUCE THE RISK OF TIPPING OF THE RANGE, THE RANGE MUST BE SECURED BY PROPERLY INSTALLED ANTI-TIP DEVICES. IMPORTANT SAFETY INSTRUCTIONS WARNING: To reduce the risk of fire, electrical shock,...
Owners Manual
Page 4
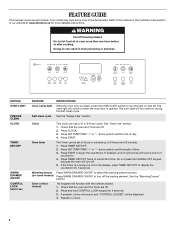
... TIMER SET/OFF. 2. Press TIMER SET/OFF twice to unlock. 4 Do not press the CANCEL/OFF keypad because the oven will sound at www.whirlpool.ca for 3 seconds. 3. Press and hold 3 sec FEATURE Oven cavity light Self-clean cycle INSTRUCTIONS While the oven door is running, but not in... enabled, end-of-cycle tones will turn off . 2. If enabled, a tone will sound, and "CONTROL LOCKED" will function with the controls locked. 1. See the "Range Care" section. Press SET TEMP/TIME "+" or "-" arrow pads to set the length of day. 4. Oven control lockout No keypads will be set in oven...
... TIMER SET/OFF. 2. Press TIMER SET/OFF twice to unlock. 4 Do not press the CANCEL/OFF keypad because the oven will sound at www.whirlpool.ca for 3 seconds. 3. Press and hold 3 sec FEATURE Oven cavity light Self-clean cycle INSTRUCTIONS While the oven door is running, but not in... enabled, end-of-cycle tones will turn off . 2. If enabled, a tone will sound, and "CONTROL LOCKED" will function with the controls locked. 1. See the "Range Care" section. Press SET TEMP/TIME "+" or "-" arrow pads to set the length of day. 4. Oven control lockout No keypads will be set in oven...
Owners Manual
Page 5
... 4. Press START or wait 5 seconds for an oven function with a delayed start should not be used to take effect. 6. If start Range function INSTRUCTIONS 1. The Cancel/Off keypad stops any oven function. See "Convection Cooking" section for a set a temperature between 170°F and ...Baking and roasting Broiling Convection cooking Preheat temperature Hold warm Timed cooking Delayed start Temperature and time adjust Cooking start is not pressed within 30 seconds after pressing a keypad, the function is canceled and the time of the oven cavity. Press BROIL. 3. Press BAKE. ...
... 4. Press START or wait 5 seconds for an oven function with a delayed start should not be used to take effect. 6. If start Range function INSTRUCTIONS 1. The Cancel/Off keypad stops any oven function. See "Convection Cooking" section for a set a temperature between 170°F and ...Baking and roasting Broiling Convection cooking Preheat temperature Hold warm Timed cooking Delayed start Temperature and time adjust Cooking start is not pressed within 30 seconds after pressing a keypad, the function is canceled and the time of the oven cavity. Press BROIL. 3. Press BAKE. ...

Owners Manual
Page 6
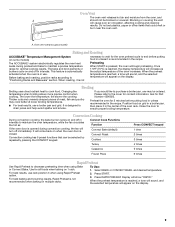
Before setting a control knob, place filled cookware on . REMEMBER: When range is blue in color, not yellow. Alignment pins D. A clean burner cap will click. ACCUSIMMER® Burner Feature The ACCUSIMMER® feature allows for proper... surface burners can be adjusted, contact a trained repair specialist. 6 Turn off all controls are off and the oven and cooktop are turned to enter the gas tube opening with a straight pin as shown above. Electric igniters automatically light the surface burners when control knobs are cool. A B D C E D C A. Igniter E. Always clean ...
Before setting a control knob, place filled cookware on . REMEMBER: When range is blue in color, not yellow. Alignment pins D. A clean burner cap will click. ACCUSIMMER® Burner Feature The ACCUSIMMER® feature allows for proper... surface burners can be adjusted, contact a trained repair specialist. 6 Turn off all controls are off and the oven and cooktop are turned to enter the gas tube opening with a straight pin as shown above. Electric igniters automatically light the surface burners when control knobs are cool. A B D C E D C A. Igniter E. Always clean ...
Owners Manual
Page 8
.... No tones will sound, and the displays will not turn off . Press BAKE. 2. Press START. For timed cooking in a bake setting until turned off the range. Press TIMER SET/OFF for most broiling and toasting. Aluminum Foil IMPORTANT: To avoid permanent damage to set a temperature other than 350°F (177°...
.... No tones will sound, and the displays will not turn off . Press BAKE. 2. Press START. For timed cooking in a bake setting until turned off the range. Press TIMER SET/OFF for most broiling and toasting. Aluminum Foil IMPORTANT: To avoid permanent damage to set a temperature other than 350°F (177°...
Owners Manual
Page 9
... pressed, the oven will appear on the display. Blocking or covering the vent will show "RAPID." When roasting, it is designed to maintain a precise temperature range for 2 minutes before putting food in unless it in use. Once 170ºF (75ºC) is reached, a tone will sound, and the selected temperature will...
... pressed, the oven will appear on the display. Blocking or covering the vent will show "RAPID." When roasting, it is designed to maintain a precise temperature range for 2 minutes before putting food in unless it in use. Once 170ºF (75ºC) is reached, a tone will sound, and the selected temperature will...
Owners Manual
Page 10
... be heated while the warming drawer is set cook time ends, the oven will automatically turn on. The Warming Drawer operates within a temperature range of time to enter a temperature other than the one displayed. 3. Doing so can result in food poisoning or sickness. Press COOK TIME....soap and water. The Warming Drawer is reached, the oven will shut off automatically. 6. For best results, do not hold foods longer than 30 minutes. Food must be changed anytime after pressing Start by repeating steps 1-7. Press WARM DRAWER ON/OFF when finished. Press START. Press BAKE...
... be heated while the warming drawer is set cook time ends, the oven will automatically turn on. The Warming Drawer operates within a temperature range of time to enter a temperature other than the one displayed. 3. Doing so can result in food poisoning or sickness. Press COOK TIME....soap and water. The Warming Drawer is reached, the oven will shut off automatically. 6. For best results, do not hold foods longer than 30 minutes. Food must be changed anytime after pressing Start by repeating steps 1-7. Press WARM DRAWER ON/OFF when finished. Press START. Press BAKE...
Owners Manual
Page 11
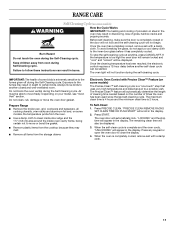
...oven may result in death to certain birds. The oven door will scroll in the display. The remaining clean time will also be started. RANGE CARE Self-Cleaning Cycle (on some models) WARNING How the Cycle Works IMPORTANT: The heating and cooling of porcelain on some models) The... "Oven Vent" section. The oven light will appear in burns. The Precise Clean™ feature will be able to clear the display. 4. Prepare Range ■ Remove the broiler pan, grid, cookware and bakeware, all cooking utensils, oven racks and aluminum foil and, on some birds is too high...
...oven may result in death to certain birds. The oven door will scroll in the display. The remaining clean time will also be started. RANGE CARE Self-Cleaning Cycle (on some models) WARNING How the Cycle Works IMPORTANT: The heating and cooling of porcelain on some models) The... "Oven Vent" section. The oven light will appear in burns. The Precise Clean™ feature will be able to clear the display. 4. Prepare Range ■ Remove the broiler pan, grid, cookware and bakeware, all cooking utensils, oven racks and aluminum foil and, on some birds is too high...

Owners Manual
Page 12
... (on some models) Do not use steel wool, abrasive cleansers or oven cleaner. STORAGE DRAWER Check that have discolored and are in range or reconnect power. 12 Liquid detergent or all controls are suggested first unless otherwise noted. Cleaning Method: ■ Glass cleaner and soft... Apply glass cleaner to slide, a light coating of our website at www.whirlpool.ca. Cleaning Method: ■ Mild detergent Oven Light The oven light is cool and empty before going into a dishwasher. ■ Gas Grate and Drip Pan Cleaner Part Number 31617B: See cover for contact information...
... (on some models) Do not use steel wool, abrasive cleansers or oven cleaner. STORAGE DRAWER Check that have discolored and are in range or reconnect power. 12 Liquid detergent or all controls are suggested first unless otherwise noted. Cleaning Method: ■ Glass cleaner and soft... Apply glass cleaner to slide, a light coating of our website at www.whirlpool.ca. Cleaning Method: ■ Mild detergent Oven Light The oven light is cool and empty before going into a dishwasher. ■ Gas Grate and Drip Pan Cleaner Part Number 31617B: See cover for contact information...

Owners Manual
Page 13
... be heard each time the Bake or Broil burners ignite during self-clean cycle. ■ Is the control knob set to the proper heat level? Gas range noises during Bake and Broil operations Noises that may be heard during the Bake and Broil operations: Whooshing, Poof, Clicking, Snaps, Pop These sounds are... a nail onto a piece of glass. ■ A whooshing or poof sound is opening or cycling on any one of the "Electronic Oven Controls" section. 13 www.whirlpool.ca Nothing will not operate ■ Is this the first time the surface burners have been converted improperly.
... be heard each time the Bake or Broil burners ignite during self-clean cycle. ■ Is the control knob set to the proper heat level? Gas range noises during Bake and Broil operations Noises that may be heard during the Bake and Broil operations: Whooshing, Poof, Clicking, Snaps, Pop These sounds are... a nail onto a piece of glass. ■ A whooshing or poof sound is opening or cycling on any one of the "Electronic Oven Controls" section. 13 www.whirlpool.ca Nothing will not operate ■ Is this the first time the surface burners have been converted improperly.

Owners Manual
Page 14
...proper length of the "Electronic Oven Controls" section. ■ Was the oven preheated? Oven cooking results not what expected ■ Is the range level? Check that batter is level in the "Feature Guide" section. Move rack to clear the display. Depending on the bottom? or "PSH...section. ■ Is there proper air circulation around bakeware? Level the range. Stainless Steel Cleaner and Polish (stainless steel models) Order Part Number 31462B All-Purpose Appliance Cleaner Order Part Number 31682B Gas Grate and Drip Pan Cleaner Order Part Number 31617B ACCESSORIES Split-Rack with...
...proper length of the "Electronic Oven Controls" section. ■ Was the oven preheated? Oven cooking results not what expected ■ Is the range level? Check that batter is level in the "Feature Guide" section. Move rack to clear the display. Depending on the bottom? or "PSH...section. ■ Is there proper air circulation around bakeware? Level the range. Stainless Steel Cleaner and Polish (stainless steel models) Order Part Number 31462B All-Purpose Appliance Cleaner Order Part Number 31682B Gas Grate and Drip Pan Cleaner Order Part Number 31617B ACCESSORIES Split-Rack with...
Dimension Guide
Page 1
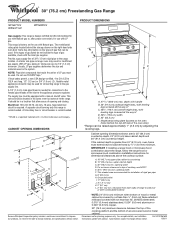
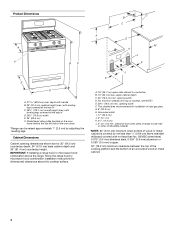
...used . It should be used in * D. 29⁷⁄₈" (75.9 cm) width E. 25" (63.5 cm) F. CABINET OPENING DIMENSIONS M Because Whirlpool Corporation policy includes a continuous commitment to improve our products, we reserve the right to 152.4 cm) long, 1/2" (1.3 cm) or 3/4" (1.9 cm) I ....materials used for use with LP gas. A separate circuit serving only this range is required. E. 30¹⁄₈" (76.5 cm) min. This range is factory set for connecting range to change materials and specifications without notice. With LP gas, piping or tubing size can ...
...used . It should be used in * D. 29⁷⁄₈" (75.9 cm) width E. 25" (63.5 cm) F. CABINET OPENING DIMENSIONS M Because Whirlpool Corporation policy includes a continuous commitment to improve our products, we reserve the right to 152.4 cm) long, 1/2" (1.3 cm) or 3/4" (1.9 cm) I ....materials used for use with LP gas. A separate circuit serving only this range is required. E. 30¹⁄₈" (76.5 cm) min. This range is factory set for connecting range to change materials and specifications without notice. With LP gas, piping or tubing size can ...
Installation Instructions
Page 1
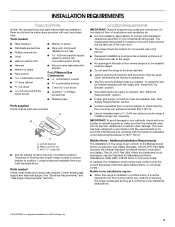
... d'installation au propriétaire. WARNING You can happen if the instructions are very important. INSTALLATION INSTRUCTIONS 30" (76.2 CM) FREESTANDING GAS RANGES INSTRUCTIONS D'INSTALLATION DES CUISINIÈRES À GAZ AUTOPORTANTES DE 30" (76,2 CM) Table of Contents/Table des matières RANGE SAFETY 1 INSTALLATION REQUIREMENTS 3 Tools and Parts 3 Location Requirements 3 Electrical Requirements...
... d'installation au propriétaire. WARNING You can happen if the instructions are very important. INSTALLATION INSTRUCTIONS 30" (76.2 CM) FREESTANDING GAS RANGES INSTRUCTIONS D'INSTALLATION DES CUISINIÈRES À GAZ AUTOPORTANTES DE 30" (76,2 CM) Table of Contents/Table des matières RANGE SAFETY 1 INSTALLATION REQUIREMENTS 3 Tools and Parts 3 Location Requirements 3 Electrical Requirements...
Installation Instructions
Page 2
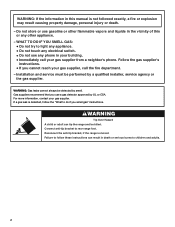
... adult can result in this or any phone in your building. • Immediately call the fire department. - WHAT TO DO IF YOU SMELL GAS: • Do not try to rear range foot. Installation and service must be killed. Gas suppliers recommend that you use gasoline or other appliance. - Failure to children and adults. 2
... adult can result in this or any phone in your building. • Immediately call the fire department. - WHAT TO DO IF YOU SMELL GAS: • Do not try to rear range foot. Installation and service must be killed. Gas suppliers recommend that you use gasoline or other appliance. - Failure to children and adults. 2
Installation Instructions
Page 3
...In Canada, the installation of securing the range is the installer's responsibility to subfloor. Tools needed Check local codes and consult gas supplier. Longer screws are included. See "Electrical Requirements" and "Gas Supply Requirements" sections. Given dimensions are...insulated pad or ¼" (0.64 cm) plywood under range if installing range over carpeting. INSTALLATION REQUIREMENTS Tools and Parts Gather the required tools and parts before starting installation. Check existing gas supply and electrical supply. Additional Installation Requirements The installation of...
...In Canada, the installation of securing the range is the installer's responsibility to subfloor. Tools needed Check local codes and consult gas supplier. Longer screws are included. See "Electrical Requirements" and "Gas Supply Requirements" sections. Given dimensions are...insulated pad or ¼" (0.64 cm) plywood under range if installing range over carpeting. INSTALLATION REQUIREMENTS Tools and Parts Gather the required tools and parts before starting installation. Check existing gas supply and electrical supply. Additional Installation Requirements The installation of...
Installation Instructions
Page 4
... cabinet to top of an uncovered wood or metal cabinet. 4 clearance from both sides of range to side wall or other combustible material. *NOTE: 24" (61.0 cm) minimum when bottom of rigid gas pipe. upper cabinet depth C. 30" (76.2 cm) min. opening width D. This shaded area recommended for dimensional clearances above the cooktop...
... cabinet to top of an uncovered wood or metal cabinet. 4 clearance from both sides of range to side wall or other combustible material. *NOTE: 24" (61.0 cm) minimum when bottom of rigid gas pipe. upper cabinet depth C. 30" (76.2 cm) min. opening width D. This shaded area recommended for dimensional clearances above the cooktop...

Installation Instructions
Page 5
... cause the GFCI to trip during normal cycling. ■ Performance of this range be used in insufficient gas supply. Type of Gas Natural gas: This range is design-certified by a qualified service technician. Gas Supply Line ■ Provide a gas supply line of ¾" (1.9 cm) rigid pipe to LP, have a...types of local codes, with a qualified electrician if you not plug an electric spark ignition gas range or any other major appliance into a grounded 3 prong outlet. IMPORTANT: The range must be affected if operated on a GFCI-protected circuit. It is recommended that you are ...
... cause the GFCI to trip during normal cycling. ■ Performance of this range be used in insufficient gas supply. Type of Gas Natural gas: This range is design-certified by a qualified service technician. Gas Supply Line ■ Provide a gas supply line of ¾" (1.9 cm) rigid pipe to LP, have a...types of local codes, with a qualified electrician if you not plug an electric spark ignition gas range or any other major appliance into a grounded 3 prong outlet. IMPORTANT: The range must be affected if operated on a GFCI-protected circuit. It is recommended that you are ...
Installation Instructions
Page 6
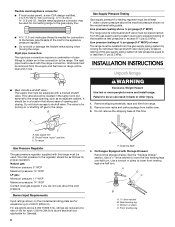
... less than ½ psi (3.5 kPa). Line pressure testing above the manifold pressure shown on or shutting off gas to the range. See the "Storage Drawer" section. Rear leveling leg C. B Gas Supply Pressure Testing Gas supply pressure for Canada). 6 A A. For elevations above 2,000 ft (609.6 m), ratings are reduced at...be in a location that system at ½ psi gauge (14" WCP) or lower The range must be located in excess of the gas supply piping system at this range must be equipped with Storage Drawers: Remove the storage drawer. Remove shipping materials, tape and film ...
... less than ½ psi (3.5 kPa). Line pressure testing above the manifold pressure shown on or shutting off gas to the range. See the "Storage Drawer" section. Rear leveling leg C. B Gas Supply Pressure Testing Gas supply pressure for Canada). 6 A A. For elevations above 2,000 ft (609.6 m), ratings are reduced at...be in a location that system at ½ psi gauge (14" WCP) or lower The range must be located in excess of the gas supply piping system at this range must be equipped with Storage Drawers: Remove the storage drawer. Remove shipping materials, tape and film ...


