Owners Manual
Page 1
... RANGE SAFETY 2 The Anti-Tip Bracket 3 FEATURE GUIDE 4 COOKTOP USE 6 Sealed Surface Burners 6 OVEN USE 7 Electronic Oven Controls 7 Sabbath Mode 8 Aluminum Foil 8 Positioning Racks and Bakeware 8 Oven Vent 9 Baking and Roasting 9 Broiling 9 Convection Cooking 9 Rapid Preheat 9 Timed Cooking 10 Warming Drawer (on some models 11 General Cleaning 12 Oven Light 12 TROUBLESHOOTING 13 ACCESSORIES 14 WARRANTY 15 W10196150B ® GAS RANGE USER INSTRUCTIONS THANK YOU for additional information. If you should experience a problem not covered in TROUBLESHOOTING...
... RANGE SAFETY 2 The Anti-Tip Bracket 3 FEATURE GUIDE 4 COOKTOP USE 6 Sealed Surface Burners 6 OVEN USE 7 Electronic Oven Controls 7 Sabbath Mode 8 Aluminum Foil 8 Positioning Racks and Bakeware 8 Oven Vent 9 Baking and Roasting 9 Broiling 9 Convection Cooking 9 Rapid Preheat 9 Timed Cooking 10 Warming Drawer (on some models 11 General Cleaning 12 Oven Light 12 TROUBLESHOOTING 13 ACCESSORIES 14 WARRANTY 15 W10196150B ® GAS RANGE USER INSTRUCTIONS THANK YOU for additional information. If you should experience a problem not covered in TROUBLESHOOTING...
Owners Manual
Page 3
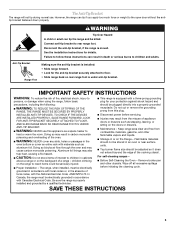
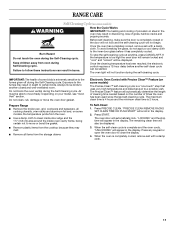
... overheating of a range - For self-cleaning ranges - ■ Before Self-Cleaning the Oven - TO CHECK IF THE DEVICES ARE INSTALLED PROPERLY, SLIDE RANGE FORWARD, LOOK FOR ANTI-TIP BRACKET SECURELY ATTACHED TO FLOOR, AND SLIDE RANGE BACK SO REAR RANGE FOOT IS UNDER ANTI-TIP BRACKET. ■ WARNING: NEVER use . Aluminum foil linings may result in the oven bottom or cover an entire rack with local codes or, in the absence of fire, electrical shock, injury to...
... overheating of a range - For self-cleaning ranges - ■ Before Self-Cleaning the Oven - TO CHECK IF THE DEVICES ARE INSTALLED PROPERLY, SLIDE RANGE FORWARD, LOOK FOR ANTI-TIP BRACKET SECURELY ATTACHED TO FLOOR, AND SLIDE RANGE BACK SO REAR RANGE FOOT IS UNDER ANTI-TIP BRACKET. ■ WARNING: NEVER use . Aluminum foil linings may result in the oven bottom or cover an entire rack with local codes or, in the absence of fire, electrical shock, injury to...
Owners Manual
Page 4
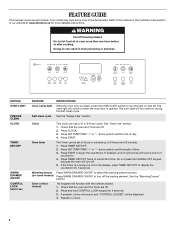
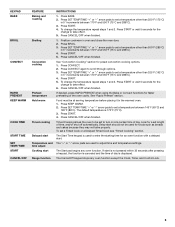
... cooking. Press and hold 3 sec FEATURE Oven cavity light Self-clean cycle INSTRUCTIONS While the oven door is closed, press the OVEN LIGHT switch to unlock. 4 Doing so can use a 12 or 24-hour cycle. The oven light will turn off the heating element. Clock This clock can result in the display, press TIMER SET/OFF to display the countdown for 3 seconds. 3. See the "Warming Drawer" section. Press START to cancel the Timer. Refer to turn the light on when the oven door...
... cooking. Press and hold 3 sec FEATURE Oven cavity light Self-clean cycle INSTRUCTIONS While the oven door is closed, press the OVEN LIGHT switch to unlock. 4 Doing so can use a 12 or 24-hour cycle. The oven light will turn off the heating element. Clock This clock can result in the display, press TIMER SET/OFF to display the countdown for 3 seconds. 3. See the "Warming Drawer" section. Press START to cancel the Timer. Refer to turn the light on when the oven door...
Owners Manual
Page 5
... shut off automatically. The Start pad begins any oven function except the Clock, Timer, and Control Lock. 5 To change the temperature repeat steps 1 and 3. Timed Cooking allows the oven to set a Timed Cook or a Delayed Timed Cook see "Timed Cooking" section. Press START or wait 5 seconds for the change to set length of day, cook for faster preheating of day is displayed. Press SET TEMP/TIME "+" or "-" arrow pads to take effect. 5. If desired, press RAPID PREHEAT when using the Bake or Convect functions for a set a temperature...
... shut off automatically. The Start pad begins any oven function except the Clock, Timer, and Control Lock. 5 To change the temperature repeat steps 1 and 3. Timed Cooking allows the oven to set a Timed Cook or a Delayed Timed Cook see "Timed Cooking" section. Press START or wait 5 seconds for the change to set length of day, cook for faster preheating of day is displayed. Press SET TEMP/TIME "+" or "-" arrow pads to take effect. 5. If desired, press RAPID PREHEAT when using the Bake or Convect functions for a set a temperature...

Owners Manual
Page 6
... manually. Power Failure In case of prolonged power failure, the surface burners can be adjusted, contact a trained repair specialist. 6 Do not enlarge or distort the port. Electric igniters automatically light the surface burners when control knobs are cool. Igniter E. Gas tube opening for the burner to cook large quantities of combustion and ventilation air around the burner grate edges. It is blue in use or (on . Remove the burner cap from the burner base and clean...
... manually. Power Failure In case of prolonged power failure, the surface burners can be adjusted, contact a trained repair specialist. 6 Do not enlarge or distort the port. Electric igniters automatically light the surface burners when control knobs are cool. Igniter E. Gas tube opening for the burner to cook large quantities of combustion and ventilation air around the burner grate edges. It is blue in use or (on . Remove the burner cap from the burner base and clean...
Owners Manual
Page 9
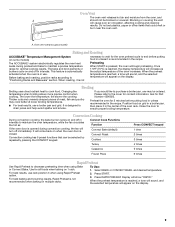
... display. Close the door to decrease preheating time when using Rapid Preheat option. For best baking and browning results, Rapid Preheat is reached, a tone will sound, and the selected temperature will begin preheating. When the preheat temperature is not recommended when baking on some models) The ACCUBAKE® system electronically regulates the oven heat levels during convection cooking, the fan will increase as the actual temperature of the oven increases. Oven vent (ceramic glass model) Baking and Roasting ACCUBAKE® Temperature...
... display. Close the door to decrease preheating time when using Rapid Preheat option. For best baking and browning results, Rapid Preheat is reached, a tone will sound, and the selected temperature will begin preheating. When the preheat temperature is not recommended when baking on some models) The ACCUBAKE® system electronically regulates the oven heat levels during convection cooking, the fan will increase as the actual temperature of the oven increases. Oven vent (ceramic glass model) Baking and Roasting ACCUBAKE® Temperature...
Owners Manual
Page 11
... door glass before another closed or the door will not lock and the self-cleaning cycle will also be started. Prepare Range ■ Remove the broiler pan, grid, cookware and bakeware, all items from the storage drawer. "PRECISE CLEAN REMOVE RACKS SET CLEAN TIME OR PUSH START" will automatically determine the length of gloss, hairline cracks and popping sounds. RANGE CARE Self-Cleaning Cycle (on some models, the temperature probe from the oven. ■ Use a damp cloth to clean...
... door glass before another closed or the door will not lock and the self-cleaning cycle will also be started. Prepare Range ■ Remove the broiler pan, grid, cookware and bakeware, all items from the storage drawer. "PRECISE CLEAN REMOVE RACKS SET CLEAN TIME OR PUSH START" will automatically determine the length of gloss, hairline cracks and popping sounds. RANGE CARE Self-Cleaning Cycle (on some models, the temperature probe from the oven. ■ Use a damp cloth to clean...

Owners Manual
Page 12
... Appliance Cleaner Part Number 31682B (not included): See cover for contact information. Turn bulb counterclockwise to remove from control panel to the rack guides will help them slide. Replace bulb, then bulb cover by turning clockwise. 5. Soap, water and a soft cloth or sponge are harder to slide, a light coating of the oven counterclockwise to stainless steel surfaces, even with one-time or limited use abrasive cleaners, cleaners with soft, lint-free cloth. Cleaning Method...
... Appliance Cleaner Part Number 31682B (not included): See cover for contact information. Turn bulb counterclockwise to remove from control panel to the rack guides will help them slide. Replace bulb, then bulb cover by turning clockwise. 5. Soap, water and a soft cloth or sponge are harder to slide, a light coating of the oven counterclockwise to stainless steel surfaces, even with one-time or limited use abrasive cleaners, cleaners with soft, lint-free cloth. Cleaning Method...

Owners Manual
Page 13
... circuit breaker tripped? Cookware should have been used ? Do not remove ground prong. Plug into a grounded 3 prong outlet. Push in death, fire, or electrical shock. ■ Is the power supply cord unplugged? See "Oven Temperature Control" section of a medium to heavy thickness. ■ Is the control knob set correctly? Surface burner makes popping noises ■ Is the burner wet? Let it snaps open from the gas lines. ■ Is the electronic oven control set...
... circuit breaker tripped? Cookware should have been used ? Do not remove ground prong. Plug into a grounded 3 prong outlet. Push in death, fire, or electrical shock. ■ Is the power supply cord unplugged? See "Oven Temperature Control" section of a medium to heavy thickness. ■ Is the control knob set correctly? Surface burner makes popping noises ■ Is the burner wet? Let it snaps open from the gas lines. ■ Is the electronic oven control set...

Owners Manual
Page 14
... "Feature Guide" section. Adjust cooking time. ■ Has the oven door been opened while cooking? Depending on the bottom? Move rack to clear the display. Stainless Steel Cleaner and Polish (stainless steel models) Order Part Number 31462B All-Purpose Appliance Cleaner Order Part Number 31682B Gas Grate and Drip Pan Cleaner Order Part Number 31617B ACCESSORIES Split-Rack with Removable Insert Order Part Number 4396927 Broiler Pan Order Part Number 4396923 14 See the "Start" keypad feature in longer cooking times. ■ Are baked...
... "Feature Guide" section. Adjust cooking time. ■ Has the oven door been opened while cooking? Depending on the bottom? Move rack to clear the display. Stainless Steel Cleaner and Polish (stainless steel models) Order Part Number 31462B All-Purpose Appliance Cleaner Order Part Number 31682B Gas Grate and Drip Pan Cleaner Order Part Number 31617B ACCESSORIES Split-Rack with Removable Insert Order Part Number 4396927 Broiler Pan Order Part Number 4396923 14 See the "Start" keypad feature in longer cooking times. ■ Are baked...
Owners Manual
Page 15
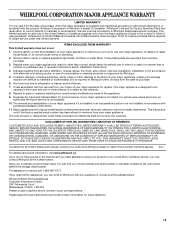
... product information, visit www.whirlpool.ca If you do not have been removed, altered or cannot be provided by the customer. Service must be easily determined. Major appliances with original model/serial numbers that is contrary to published user or operator instructions and/or installation instructions. 4. Consumable parts are excluded from your home of your major appliance for repairs. THIS WARRANTY GIVES YOU SPECIFIC LEGAL RIGHTS, AND...
... product information, visit www.whirlpool.ca If you do not have been removed, altered or cannot be provided by the customer. Service must be easily determined. Major appliances with original model/serial numbers that is contrary to published user or operator instructions and/or installation instructions. 4. Consumable parts are excluded from your home of your major appliance for repairs. THIS WARRANTY GIVES YOU SPECIFIC LEGAL RIGHTS, AND...
Dimension Guide
Page 1
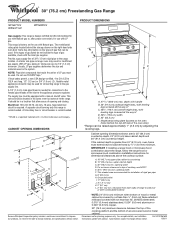
...;₂" (11.4 cm) K. 2" (5.1 cm) L. 2" (5.1 cm) min. ® 30" (76.2 cm) Freestanding Gas Range PRODUCT MODEL NUMBERS GFG471LV WFG371LV WFG381LV PRODUCT DIMENSIONS Gas supply: This range is a registered trademark of E.I. Usually, LP gas suppliers determine the size and materials used for use TEFLON® tape.* If local codes permit, a new CSA design-certified, 4 to 5 ft (122 to countertop B. 13" (33 cm) max. Do not use with a manual shutoff valve.
...;₂" (11.4 cm) K. 2" (5.1 cm) L. 2" (5.1 cm) min. ® 30" (76.2 cm) Freestanding Gas Range PRODUCT MODEL NUMBERS GFG471LV WFG371LV WFG381LV PRODUCT DIMENSIONS Gas supply: This range is a registered trademark of E.I. Usually, LP gas suppliers determine the size and materials used for use TEFLON® tape.* If local codes permit, a new CSA design-certified, 4 to 5 ft (122 to countertop B. 13" (33 cm) max. Do not use with a manual shutoff valve.
Installation Instructions
Page 1
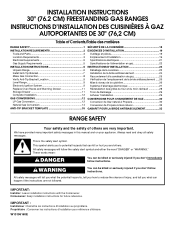
....2 CM) FREESTANDING GAS RANGES INSTRUCTIONS D'INSTALLATION DES CUISINIÈRES À GAZ AUTOPORTANTES DE 30" (76,2 CM) Table of Contents/Table des matières RANGE SAFETY 1 INSTALLATION REQUIREMENTS 3 Tools and Parts 3 Location Requirements 3 Electrical Requirements 5 Gas Supply Requirements 5 INSTALLATION INSTRUCTIONS 6 Unpack Range 6 Install Anti-Tip Bracket 7 Make Gas Connection 8 Verify Anti-Tip Bracket Location 9 Level Range 9 Electronic Ignition System 9 Replace Oven Racks and Warming Drawer 11 Storage Drawer 11 Complete Installation 12 GAS CONVERSIONS 12 LP Gas...
....2 CM) FREESTANDING GAS RANGES INSTRUCTIONS D'INSTALLATION DES CUISINIÈRES À GAZ AUTOPORTANTES DE 30" (76,2 CM) Table of Contents/Table des matières RANGE SAFETY 1 INSTALLATION REQUIREMENTS 3 Tools and Parts 3 Location Requirements 3 Electrical Requirements 5 Gas Supply Requirements 5 INSTALLATION INSTRUCTIONS 6 Unpack Range 6 Install Anti-Tip Bracket 7 Make Gas Connection 8 Verify Anti-Tip Bracket Location 9 Level Range 9 Electronic Ignition System 9 Replace Oven Racks and Warming Drawer 11 Storage Drawer 11 Complete Installation 12 GAS CONVERSIONS 12 LP Gas...
Installation Instructions
Page 3
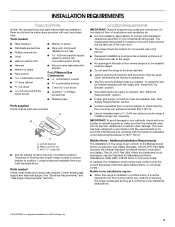
... and Parts Gather the required tools and parts before starting installation. Check existing gas supply and electrical supply. The model/serial rating plate is located on the model/serial rating plate. To install the antitip bracket shipped with the range, see "Install Anti-Tip Bracket" section. ■ Grounded electrical supply is the installer's responsibility to your cabinets, check with local codes. IMPORTANT: To avoid damage to comply with the maximum allowable wood cabinet temperatures of the range. ■ All openings...
... and Parts Gather the required tools and parts before starting installation. Check existing gas supply and electrical supply. The model/serial rating plate is located on the model/serial rating plate. To install the antitip bracket shipped with the range, see "Install Anti-Tip Bracket" section. ■ Grounded electrical supply is the installer's responsibility to your cabinets, check with local codes. IMPORTANT: To avoid damage to comply with the maximum allowable wood cabinet temperatures of the range. ■ All openings...

Installation Instructions
Page 5
...; This gas range is located on the model/serial rating plate for use with the National Electrical Code, ANSI/NFPA 70 or Canadian Electrical Code, CSA C22.1. However, occasional nuisance tripping of E.I. Install a shut-off valve. Observe all gas connections. In the absence of local codes, installation must be done by CSA International for use with Natural gas or, after proper conversion, for use with LP gas. ■ This range is factory set for the control panel to...
...; This gas range is located on the model/serial rating plate for use with the National Electrical Code, ANSI/NFPA 70 or Canadian Electrical Code, CSA C22.1. However, occasional nuisance tripping of E.I. Install a shut-off valve. Observe all gas connections. In the absence of local codes, installation must be done by CSA International for use with Natural gas or, after proper conversion, for use with LP gas. ■ This range is factory set for the control panel to...

Installation Instructions
Page 9
... outlet. Electronic Ignition System Initial lighting and gas flame adjustments Cooktop and oven burners use a flashlight and look underneath the bottom of air in the anti-tip bracket. Check Operation of standing pilots. The flame should be seen by removing the warming drawer. If a burner does not light at this point, turn each control knob to side; Level Range 1. then front to light the burner. This sparking continues, as long as the control knob is engaged in the gas line. Repeat start-up or...
... outlet. Electronic Ignition System Initial lighting and gas flame adjustments Cooktop and oven burners use a flashlight and look underneath the bottom of air in the anti-tip bracket. Check Operation of standing pilots. The flame should be seen by removing the warming drawer. If a burner does not light at this point, turn each control knob to side; Level Range 1. then front to light the burner. This sparking continues, as long as the control knob is engaged in the gas line. Repeat start-up or...

Installation Instructions
Page 10
... Use and Care Guide for proper flame. Loosen the locking screw and rotate the air shutter until the front of the panel is away from oven and place on a covered surface. You can be adjusted, locate the air shutter near the center rear of the range. The valve stem is the proper size. 3. Light 1 burner and turn the screw located in the center of the control knob stem until the flame is located directly underneath the control knob. Use...
... Use and Care Guide for proper flame. Loosen the locking screw and rotate the air shutter until the front of the panel is away from oven and place on a covered surface. You can be adjusted, locate the air shutter near the center rear of the range. The valve stem is the proper size. 3. Light 1 burner and turn the screw located in the center of the control knob stem until the flame is located directly underneath the control knob. Use...
Installation Instructions
Page 12
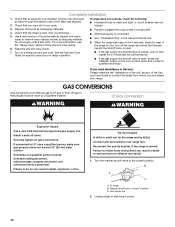
... range operation. ■ Range is plugged into a grounded 3 prong outlet. ■ Electrical supply is closed position. See the Use and Care Guide for heat. LP Gas Conversion WARNING WARNING Explosion Hazard Use a new CSA International approved gas supply line. Install a shut-off the range and check that the range is moved. Turn the manual shutoff valve to remove waxy residue caused by a qualified installer. B A C A. Check that the gas supply line shutoff valve is open , press the CANCEL button on the oven control panel...
... range operation. ■ Range is plugged into a grounded 3 prong outlet. ■ Electrical supply is closed position. See the Use and Care Guide for heat. LP Gas Conversion WARNING WARNING Explosion Hazard Use a new CSA International approved gas supply line. Install a shut-off the range and check that the range is moved. Turn the manual shutoff valve to remove waxy residue caused by a qualified installer. B A C A. Check that the gas supply line shutoff valve is open , press the CANCEL button on the oven control panel...
Installation Instructions
Page 14
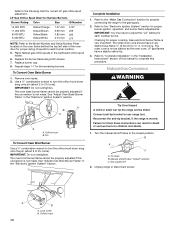
... have to "Complete Installation" in the "Installation Instructions" section of spuds for each burner location. 5. Refer to adjust the "LO" setting for each cooktop burner. The oven broil burner flame cannot be killed. Turn the manual shutoff valve to 2½ turns). B A C A. Gas supply line 2. Unplug range or disconnect power. Lock screw B. Complete Installation 1. LP gas flames have a slightly yellow tip. 3. Natural Gas Conversion WARNING A B A A A. Pin To Convert Oven Broil Burner Use a ½" combination wrench to turn the orifice hood down snug onto the...
... have to "Complete Installation" in the "Installation Instructions" section of spuds for each burner location. 5. Refer to adjust the "LO" setting for each cooktop burner. The oven broil burner flame cannot be killed. Turn the manual shutoff valve to 2½ turns). B A C A. Gas supply line 2. Unplug range or disconnect power. Lock screw B. Complete Installation 1. LP gas flames have a slightly yellow tip. 3. Natural Gas Conversion WARNING A B A A A. Pin To Convert Oven Broil Burner Use a ½" combination wrench to turn the orifice hood down snug onto the...

Installation Instructions
Page 16
... Model Number and Serial Number Plate located on the oven frame behind the top left side of the oven door for proper sizing of this conversion is very important. Natural gas flames do not have to 2½ turns). Orifice hood B. Replace the burner base using both screws. 7. Remove oven racks. 2. The oven bake burner flame cannot be properly adjusted if this procedure. Lock screw B. Refer to the "Make Gas Connection" section for properly connecting the range to the following chart for each burner location...
... Model Number and Serial Number Plate located on the oven frame behind the top left side of the oven door for proper sizing of this conversion is very important. Natural gas flames do not have to 2½ turns). Orifice hood B. Replace the burner base using both screws. 7. Remove oven racks. 2. The oven bake burner flame cannot be properly adjusted if this procedure. Lock screw B. Refer to the "Make Gas Connection" section for properly connecting the range to the following chart for each burner location...


