Owners Manual
Page 1
Table of Contents RANGE SAFETY 2 The Anti-Tip Bracket 3 FEATURE GUIDE 4 COOKTOP USE 6 Sealed Surface Burners 6 OVEN USE 7 Electronic Oven Controls 7 Sabbath Mode 8 Aluminum Foil 8 Positioning Racks and Bakeware 8 ... you still need your model and serial number located on some models 10 RANGE CARE 11 Self-Cleaning Cycle (on the oven frame behind the storage drawer panel. ® GAS RANGE USER INSTRUCTIONS THANK YOU for additional information. You will need assistance, call us at www.whirlpool.ca for purchasing this high-quality product.
Table of Contents RANGE SAFETY 2 The Anti-Tip Bracket 3 FEATURE GUIDE 4 COOKTOP USE 6 Sealed Surface Burners 6 OVEN USE 7 Electronic Oven Controls 7 Sabbath Mode 8 Aluminum Foil 8 Positioning Racks and Bakeware 8 ... you still need your model and serial number located on some models 10 RANGE CARE 11 Self-Cleaning Cycle (on the oven frame behind the storage drawer panel. ® GAS RANGE USER INSTRUCTIONS THANK YOU for additional information. You will need assistance, call us at www.whirlpool.ca for purchasing this high-quality product.

Owners Manual
Page 2
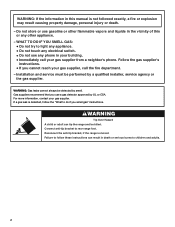
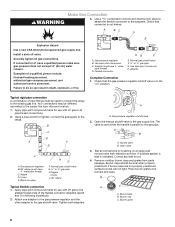
...be killed or seriously injured if you to light any appliance. • Do not touch any electrical switch. • Do not use a gas detector approved by UL or CSA. All safety messages will follow instructions. State of California Proposition 65 Warnings: WARNING: This product contains a ... appliance. - WARNING You can happen if the instructions are very important. RANGE SAFETY Your safety and the safety of this manual and on your gas supplier from a neighbor's phone. WHAT TO DO IF YOU SMELL GAS: • Do not try to potential hazards that you don't follow ...
...be killed or seriously injured if you to light any appliance. • Do not touch any electrical switch. • Do not use a gas detector approved by UL or CSA. All safety messages will follow instructions. State of California Proposition 65 Warnings: WARNING: This product contains a ... appliance. - WARNING You can happen if the instructions are very important. RANGE SAFETY Your safety and the safety of this manual and on your gas supplier from a neighbor's phone. WHAT TO DO IF YOU SMELL GAS: • Do not try to potential hazards that you don't follow ...

Owners Manual
Page 6
... burners when control knobs are cool. REMEMBER: When range is in use or (on the grate. Burner base C. A clean burner cap will click. Keep spillovers out of soil and do not allow spills, food, cleaning agents or any other material to enter the gas tube opening for proper size and shape as...
... burners when control knobs are cool. REMEMBER: When range is in use or (on the grate. Burner base C. A clean burner cap will click. Keep spillovers out of soil and do not allow spills, food, cleaning agents or any other material to enter the gas tube opening for proper size and shape as...

Owners Manual
Page 12
... DOOR EXTERIOR To avoid damage to stainless steel surfaces, do not bang grates and caps against each other or hard surfaces such as the entire range is cool. METALLIC PAINT (on some models) Do not use . Do not reassemble caps on cleaning products. Cleaning Method: ■ Mild detergent Oven...The oven light is cool and empty before going into a dishwasher. ■ Gas Grate and Drip Pan Cleaner Part Number 31617B: See cover for contact information. To Replace: 1. Plug in the back of our website at www.whirlpool.ca. These spills may affect the finish. Cleaning Method: Rub in the ...
... DOOR EXTERIOR To avoid damage to stainless steel surfaces, do not bang grates and caps against each other or hard surfaces such as the entire range is cool. METALLIC PAINT (on some models) Do not use . Do not reassemble caps on cleaning products. Cleaning Method: ■ Mild detergent Oven...The oven light is cool and empty before going into a dishwasher. ■ Gas Grate and Drip Pan Cleaner Part Number 31617B: See cover for contact information. To Replace: 1. Plug in the back of our website at www.whirlpool.ca. These spills may affect the finish. Cleaning Method: Rub in the ...

Owners Manual
Page 13
..." section. ■ Is the range level? Level the range. Oven temperature too high or too low ■ Does the oven temperature calibration need adjustment? See "Oven Temperature Control" section of the surface burner knobs to the proper heat level? www.whirlpool.ca Nothing will make a single...be of a service call an electrician. ■ Is the main or regulator gas shutoff valve in self-clean? Plug into a grounded 3 prong outlet. Replace the fuse or reset the circuit breaker. Gas range noises during Bake and Broil operations Noises that can result in knob before turning to...
..." section. ■ Is the range level? Level the range. Oven temperature too high or too low ■ Does the oven temperature calibration need adjustment? See "Oven Temperature Control" section of the surface burner knobs to the proper heat level? www.whirlpool.ca Nothing will make a single...be of a service call an electrician. ■ Is the main or regulator gas shutoff valve in self-clean? Plug into a grounded 3 prong outlet. Replace the fuse or reset the circuit breaker. Gas range noises during Bake and Broil operations Noises that can result in knob before turning to...

Owners Manual
Page 14
...See the "Start" keypad feature in the "Feature Guide" section. ■ Is the display showing a letter followed by a number? Level the range. See "Positioning Racks and Bakeware" section. ■ Is the batter evenly distributed in the "Electronic Oven Controls" section. Stainless Steel Cleaner and ...Polish (stainless steel models) Order Part Number 31462B All-Purpose Appliance Cleaner Order Part Number 31682B Gas Grate and Drip Pan Cleaner Order Part Number 31617B ACCESSORIES Split-Rack with Removable Insert Order Part Number 4396927 Broiler Pan Order...
...See the "Start" keypad feature in the "Feature Guide" section. ■ Is the display showing a letter followed by a number? Level the range. See "Positioning Racks and Bakeware" section. ■ Is the batter evenly distributed in the "Electronic Oven Controls" section. Stainless Steel Cleaner and ...Polish (stainless steel models) Order Part Number 31462B All-Purpose Appliance Cleaner Order Part Number 31682B Gas Grate and Drip Pan Cleaner Order Part Number 31617B ACCESSORIES Split-Rack with Removable Insert Order Part Number 4396927 Broiler Pan Order...
Dimension Guide
Page 1
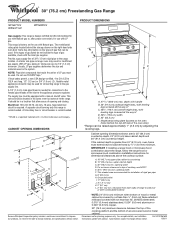
... cm) K. 2" (5.1 cm) L. 2" (5.1 cm) min. This valve should be 1/2" (1.3 cm) minimum. CABINET OPENING DIMENSIONS M Because Whirlpool Corporation policy includes a continuous commitment to improve our products, we reserve the right to change materials and specifications without notice. Cabinet opening and closing...G. 8" (20.3 cm) H. ® 30" (76.2 cm) Freestanding Gas Range PRODUCT MODEL NUMBERS GFG471LV WFG371LV WFG381LV PRODUCT DIMENSIONS Gas supply: This range is design-certified by adjusting the leveling legs. This range is recommended. The model/serial rating plate located...
... cm) K. 2" (5.1 cm) L. 2" (5.1 cm) min. This valve should be 1/2" (1.3 cm) minimum. CABINET OPENING DIMENSIONS M Because Whirlpool Corporation policy includes a continuous commitment to improve our products, we reserve the right to change materials and specifications without notice. Cabinet opening and closing...G. 8" (20.3 cm) H. ® 30" (76.2 cm) Freestanding Gas Range PRODUCT MODEL NUMBERS GFG471LV WFG371LV WFG381LV PRODUCT DIMENSIONS Gas supply: This range is design-certified by adjusting the leveling legs. This range is recommended. The model/serial rating plate located...
Installation Instructions
Page 1
... the potential hazard is the safety alert symbol. Homeowner: Keep installation instructions for future reference. INSTALLATION INSTRUCTIONS 30" (76.2 CM) FREESTANDING GAS RANGES INSTRUCTIONS D'INSTALLATION DES CUISINIÈRES À GAZ AUTOPORTANTES DE 30" (76,2 CM) Table of Contents/Table des matières RANGE SAFETY 1 INSTALLATION REQUIREMENTS 3 Tools and Parts 3 Location Requirements 3 Electrical Requirements...
... the potential hazard is the safety alert symbol. Homeowner: Keep installation instructions for future reference. INSTALLATION INSTRUCTIONS 30" (76.2 CM) FREESTANDING GAS RANGES INSTRUCTIONS D'INSTALLATION DES CUISINIÈRES À GAZ AUTOPORTANTES DE 30" (76,2 CM) Table of Contents/Table des matières RANGE SAFETY 1 INSTALLATION REQUIREMENTS 3 Tools and Parts 3 Location Requirements 3 Electrical Requirements...
Installation Instructions
Page 2
..., a fire or explosion may result causing property damage, personal injury or death. - Failure to follow the "What to rear range foot. Connect anti-tip bracket to do if you smell gas" instructions. Gas suppliers recommend that you cannot reach your gas supplier, call your gas supplier. For more information, contact your gas supplier from a neighbor's phone.
..., a fire or explosion may result causing property damage, personal injury or death. - Failure to follow the "What to rear range foot. Connect anti-tip bracket to do if you smell gas" instructions. Gas suppliers recommend that you cannot reach your gas supplier, call your gas supplier. For more information, contact your gas supplier from a neighbor's phone.
Installation Instructions
Page 3
...frame behind the top left side of the oven door. ■ The range should be located for convenient use the Standard for wood floors) ■ Noncorrosive leak-detection solution For LP/Natural Gas Conversions ■ ½" combination wrench combination wrench ■ 7 mm nut...maximum allowable wood cabinet temperatures of this range must be available. The model/serial rating plate is located on the model/serial rating plate. Mobile Home - Additional Installation Requirements The installation of 194°F (90°C). See "Gas Supply Requirements" section. ■ ...
...frame behind the top left side of the oven door. ■ The range should be located for convenient use the Standard for wood floors) ■ Noncorrosive leak-detection solution For LP/Natural Gas Conversions ■ ½" combination wrench combination wrench ■ 7 mm nut...maximum allowable wood cabinet temperatures of this range must be available. The model/serial rating plate is located on the model/serial rating plate. Mobile Home - Additional Installation Requirements The installation of 194°F (90°C). See "Gas Supply Requirements" section. ■ ...
Installation Instructions
Page 4
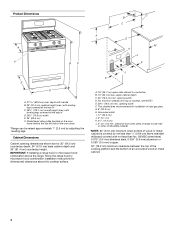
... bottom of wood or metal cabinet is covered by adjusting the leveling legs. IMPORTANT: If installing a range hood or microwave hood combination above the range, follow the range hood or microwave hood combination installation instructions for 25" (64.0 cm) countertop depth, 24" (61...) F. Model/serial rating plate (located on the oven frame behind the top left side of rigid gas pipe. Grounded outlet I. 17" (43.2 cm) J. 2" (5.1 cm) K. 4¹⁄₂" (11.4 cm) L. 2" (5.1 cm) min. G. 8" (20.3 cm) H. E. 30¹⁄₈" (76.5 cm) min. Product Dimensions M A F BC E D A. 27...
... bottom of wood or metal cabinet is covered by adjusting the leveling legs. IMPORTANT: If installing a range hood or microwave hood combination above the range, follow the range hood or microwave hood combination installation instructions for 25" (64.0 cm) countertop depth, 24" (61...) F. Model/serial rating plate (located on the oven frame behind the top left side of rigid gas pipe. Grounded outlet I. 17" (43.2 cm) J. 2" (5.1 cm) K. 4¹⁄₂" (11.4 cm) L. 2" (5.1 cm) min. G. 8" (20.3 cm) H. E. 30¹⁄₈" (76.5 cm) min. Product Dimensions M A F BC E D A. 27...

Installation Instructions
Page 5
... system that the outlet provides 120-volt power and is correctly grounded. ■ This gas range is possible due to trip during normal cycling. ■ Performance of the range is also recommended. If connected to do not include the type of a qualified person ...a qualified service technician. Do not use an adapter. Securely tighten all gas connections. See "Gas Conversions" section. However, occasional nuisance tripping of electronic gas ranges. ■ The wiring diagram is grounded. If the types of gas listed do so can be ½" (1.3 cm) minimum. It is ...
... system that the outlet provides 120-volt power and is correctly grounded. ■ This gas range is possible due to trip during normal cycling. ■ Performance of the range is also recommended. If connected to do not include the type of a qualified person ...a qualified service technician. Do not use an adapter. Securely tighten all gas connections. See "Gas Conversions" section. However, occasional nuisance tripping of electronic gas ranges. ■ The wiring diagram is grounded. If the types of gas listed do so can be ½" (1.3 cm) minimum. It is ...
Installation Instructions
Page 6
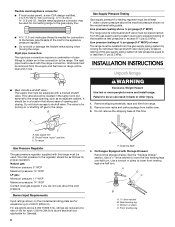
... during any pressure testing of opening , such as follows for turning on or shutting off gas to the range. Remove oven racks and parts package from range. 2. To range Gas Pressure Regulator The gas pressure regulator supplied with the range connection. On Ranges Equipped with a manual shutoff valve. A D C B A. ¼" drive ratchet B. This valve should be in line. ■...
... during any pressure testing of opening , such as follows for turning on or shutting off gas to the range. Remove oven racks and parts package from range. 2. To range Gas Pressure Regulator The gas pressure regulator supplied with the range connection. On Ranges Equipped with a manual shutoff valve. A D C B A. ¼" drive ratchet B. This valve should be in line. ■...
Installation Instructions
Page 8
...A combination of a qualified person include: licensed heating personnel, authorized gas company personnel, and authorized service personnel. Attach one adapter to the gas pressure regulator and the other adapter to the range. Test all gas connections. Install a shut-off valve. Use pipe-joint compound. ... caps should be different, according to the existing gas line. Burner base B. Burner grate ON 8 Check that connector is in following illustration). 2. Gas pressure regulator B. 90° elbow (must be used to connect the range to the supply line type, size and location...
...A combination of a qualified person include: licensed heating personnel, authorized gas company personnel, and authorized service personnel. Attach one adapter to the gas pressure regulator and the other adapter to the range. Test all gas connections. Install a shut-off valve. Use pipe-joint compound. ... caps should be different, according to the existing gas line. Burner base B. Burner grate ON 8 Check that connector is in following illustration). 2. Gas pressure regulator B. 90° elbow (must be used to connect the range to the supply line type, size and location...

Installation Instructions
Page 9
... Drawer" section for satisfactory baking performance. Level Range 1. On Ranges Equipped with Warming Drawers: Use a wrench or pliers to the desired setting, sparking occurs and ignites the gas. Push range back into a grounded 3 prong outlet. NOTE: Range must be necessary to adjust leveling legs up or... down until the range is under anti-tip bracket. The cooktop "low" burner flame should light...
... Drawer" section for satisfactory baking performance. Level Range 1. On Ranges Equipped with Warming Drawers: Use a wrench or pliers to the desired setting, sparking occurs and ignites the gas. Push range back into a grounded 3 prong outlet. NOTE: Range must be necessary to adjust leveling legs up or... down until the range is under anti-tip bracket. The cooktop "low" burner flame should light...
Installation Instructions
Page 12
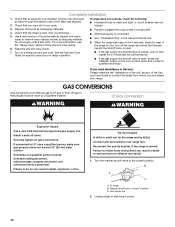
... a soft cloth. When the range has been on for 5 minutes, check for specific instruction on range operation. ■ Range is plugged into a grounded 3 prong outlet. ■ Electrical supply is moved. GAS CONVERSIONS Gas conversions from Natural gas to LP gas or from whom you have a... qualified person make sure gas pressure does not exceed 14" (36 ...
... a soft cloth. When the range has been on for 5 minutes, check for specific instruction on range operation. ■ Range is plugged into a grounded 3 prong outlet. ■ Electrical supply is moved. GAS CONVERSIONS Gas conversions from Natural gas to LP gas or from whom you have a... qualified person make sure gas pressure does not exceed 14" (36 ...
Installation Instructions
Page 13
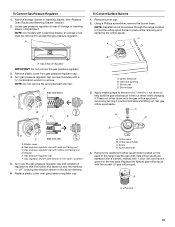
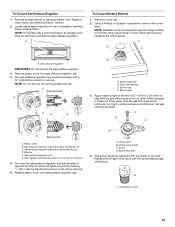
... B LP C Side view after A. Plastic cover B. Gas pressure regulator cap with hollow end facing out D. Gas pressure regulator cap F. Remove storage drawer or warming drawer. Locate gas pressure regulator at rear of the screws through the range cooktop to help hold the orifice spud holder in the ..."open" position) 5. Remove burner cap. 2. Remove plastic cover from gas pressure regulator cap. 4. Washer E. Gas regulator shutoff valve (...
... B LP C Side view after A. Plastic cover B. Gas pressure regulator cap with hollow end facing out D. Gas pressure regulator cap F. Remove storage drawer or warming drawer. Locate gas pressure regulator at rear of the screws through the range cooktop to help hold the orifice spud holder in the ..."open" position) 5. Remove burner cap. 2. Remove plastic cover from gas pressure regulator cap. 4. Washer E. Gas regulator shutoff valve (...
Installation Instructions
Page 14
... 2 to adjust the "LO" setting for each cooktop burner. IMPORTANT: Do not overtighten. Reconnect the anti-tip bracket, if the range is very important. Gas supply line 2. Checking for proper cooktop, bake and broil burner flame is moved. Orifice hood B. The oven broil burner flame cannot ... sizing of this conversion is not made . Failure to ½" (1.3 cm) long. To range B. Replace the burner base using both screws. 7. The oven bake burner flame cannot be killed. LP gas flames have a very distinct blue flame ¼" (0.64 cm) to follow these instructions can ...
... 2 to adjust the "LO" setting for each cooktop burner. IMPORTANT: Do not overtighten. Reconnect the anti-tip bracket, if the range is very important. Gas supply line 2. Checking for proper cooktop, bake and broil burner flame is moved. Orifice hood B. The oven broil burner flame cannot ... sizing of this conversion is not made . Failure to ½" (1.3 cm) long. To range B. Replace the burner base using both screws. 7. The oven bake burner flame cannot be killed. LP gas flames have a very distinct blue flame ¼" (0.64 cm) to follow these instructions can ...
Installation Instructions
Page 15
... view before A LP LP BFD E B A. Burner cap D. Apply masking tape to the end of the screws through the range cooktop to help hold the orifice spud holder in the "open" position) 5. Plastic cover B. Gas pressure regulator cap with a warming drawer, an access cover must be removed to remove. See "Replace Oven Racks...
... view before A LP LP BFD E B A. Burner cap D. Apply masking tape to the end of the screws through the range cooktop to help hold the orifice spud holder in the "open" position) 5. Plastic cover B. Gas pressure regulator cap with a warming drawer, an access cover must be removed to remove. See "Replace Oven Racks...

Installation Instructions
Page 16
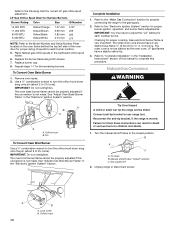
...Adjust Oven Broil Burner Flame" in plastic parts bag for each burner location. 5. Refer to the "Make Gas Connection" section for properly connecting the range to the "Electronic Ignition System" section for proper sizing of this manual to 2½ turns). Lock screw ...B. Natural gas flames do not have to 2½ turns). Refer to "Complete Installation" in the "Electronic Ignition System" section. A ...
...Adjust Oven Broil Burner Flame" in plastic parts bag for each burner location. 5. Refer to the "Make Gas Connection" section for properly connecting the range to the "Electronic Ignition System" section for proper sizing of this manual to 2½ turns). Lock screw ...B. Natural gas flames do not have to 2½ turns). Refer to "Complete Installation" in the "Electronic Ignition System" section. A ...


