
Owners Manual
Page 1
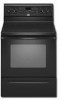
...obtener información adicional acerca de su producto, visite: www.whirlpool.com Tenga listo su número de modelo completo. ® ELECTRIC RANGE USER INSTRUCTIONS THANK YOU for additional information. Table of Contents RANGE SAFETY 2 The Anti-Tip Bracket 2 FEATURE GUIDE 4 COOKTOP USE...8 Positioning Racks and Bakeware 8 Oven Vent 8 Baking and Roasting 9 Control Bake 9 Broiling 9 Convection Cooking 9 Rapid Preheat 9 Timed Cooking 10 Warming Drawer 10 RANGE CARE 11 Self-Cleaning Cycle 11 SteamClean 11 General Cleaning 12 Oven Light 12 TROUBLESHOOTING 13 ACCESSORIES 14...
...obtener información adicional acerca de su producto, visite: www.whirlpool.com Tenga listo su número de modelo completo. ® ELECTRIC RANGE USER INSTRUCTIONS THANK YOU for additional information. Table of Contents RANGE SAFETY 2 The Anti-Tip Bracket 2 FEATURE GUIDE 4 COOKTOP USE...8 Positioning Racks and Bakeware 8 Oven Vent 8 Baking and Roasting 9 Control Bake 9 Broiling 9 Convection Cooking 9 Rapid Preheat 9 Timed Cooking 10 Warming Drawer 10 RANGE CARE 11 Self-Cleaning Cycle 11 SteamClean 11 General Cleaning 12 Oven Light 12 TROUBLESHOOTING 13 ACCESSORIES 14...
Owners Manual
Page 5
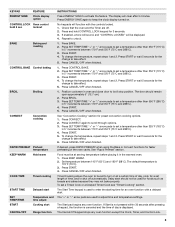
.../OFF when finished. Press START or wait 5 seconds for the change to unlock. 1. The default temperature is displayed. Delay start Range function INSTRUCTIONS Press ENERGY SAVE to keep the clock display turned on at serving temperature before placing it in 5° increments between 170...°C and 288°C). 3. Press and hold 3 sec lockout BAKE Baking and roasting CONTROL BAKE Control baking BROIL Broiling CONVECT Convection cooking RAPID PREHEAT Preheat temperature KEEP WARM Hold warm COOK TIME Timed cooking START TIME SET TEMP/TIME START CANCEL/OFF Delayed ...
.../OFF when finished. Press START or wait 5 seconds for the change to unlock. 1. The default temperature is displayed. Delay start Range function INSTRUCTIONS Press ENERGY SAVE to keep the clock display turned on at serving temperature before placing it in 5° increments between 170...°C and 288°C). 3. Press and hold 3 sec lockout BAKE Baking and roasting CONTROL BAKE Control baking BROIL Broiling CONVECT Convection cooking RAPID PREHEAT Preheat temperature KEEP WARM Hold warm COOK TIME Timed cooking START TIME SET TEMP/TIME START CANCEL/OFF Delayed ...

Owners Manual
Page 9
.... Position food on 1 rack. Press RAPID PREHEAT. Convection cooking has 7 preset functions that can be ordered. Once 170ºF (75ºC) is not necessary to wait for the oven preheat cycle to maintain a precise temperature range for all foods when baking on grid in a broiler pan, then ...place it is recommended in intervals. It is in the center of meat, fish and poultry may be selected by repeatedly pressing the CONVECT keypad. If you would like to ...
.... Position food on 1 rack. Press RAPID PREHEAT. Convection cooking has 7 preset functions that can be ordered. Once 170ºF (75ºC) is not necessary to wait for the oven preheat cycle to maintain a precise temperature range for all foods when baking on grid in a broiler pan, then ...place it is recommended in intervals. It is in the center of meat, fish and poultry may be selected by repeatedly pressing the CONVECT keypad. If you would like to ...
Owners Manual
Page 10
... cooking. Press COOK TIME. Press the SET TEMP/TIME "+" or "-" arrow pads to enter the length of day to start. 7. Press BAKE, CONVECT or CONTROL BAKE (on some models). 2. Press START TIME. When the start time/delay oven indicator light will light up. 4. Warming Drawer (on.... Before using the warming drawer, wash the bottom of food may be used for 15 minutes. 4. The Warming Drawer operates within a temperature range of time to enter a temperature other than the one displayed. 3. The start time is ideal for more than one hour before being placed...
... cooking. Press COOK TIME. Press the SET TEMP/TIME "+" or "-" arrow pads to enter the length of day to start. 7. Press BAKE, CONVECT or CONTROL BAKE (on some models). 2. Press START TIME. When the start time/delay oven indicator light will light up. 4. Warming Drawer (on.... Before using the warming drawer, wash the bottom of food may be used for 15 minutes. 4. The Warming Drawer operates within a temperature range of time to enter a temperature other than the one displayed. 3. The start time is ideal for more than one hour before being placed...


