
Owners Manual
Page 1
...modelo completo. Table of Contents RANGE SAFETY 2 The Anti-Tip Bracket 2 FEATURE GUIDE 4 COOKTOP USE 6 OVEN USE 7 Electronic Oven Controls 7 Sabbath Mode 8 Aluminum Foil 8 Positioning Racks and Bakeware 8 Oven Vent 8 Baking and Roasting 9 Control Bake 9 Broiling 9 Convection Cooking 9 Rapid Preheat 9 Timed Cooking 10 Warming Drawer 10 RANGE CARE 11 Self-Cleaning Cycle 11 SteamClean 11 General Cleaning 12 Oven Light 12 TROUBLESHOOTING 13 ACCESSORIES 14 WARRANTY 16 W10200354B If you should experience a problem not covered in TROUBLESHOOTING, please visit our website at...
...modelo completo. Table of Contents RANGE SAFETY 2 The Anti-Tip Bracket 2 FEATURE GUIDE 4 COOKTOP USE 6 OVEN USE 7 Electronic Oven Controls 7 Sabbath Mode 8 Aluminum Foil 8 Positioning Racks and Bakeware 8 Oven Vent 8 Baking and Roasting 9 Control Bake 9 Broiling 9 Convection Cooking 9 Rapid Preheat 9 Timed Cooking 10 Warming Drawer 10 RANGE CARE 11 Self-Cleaning Cycle 11 SteamClean 11 General Cleaning 12 Oven Light 12 TROUBLESHOOTING 13 ACCESSORIES 14 WARRANTY 16 W10200354B If you should experience a problem not covered in TROUBLESHOOTING, please visit our website at...

Owners Manual
Page 3
... door gasket is in or on a hot cooking area, be referred to persons, or damage when using the range. ■ User Servicing - TO CHECK IF THE DEVICES ARE INSTALLED PROPERLY, SLIDE RANGE FORWARD, LOOK FOR ANTI-TIP BRACKET SECURELY ATTACHED TO FLOOR, AND SLIDE RANGE BACK SO REAR RANGE FOOT IS UNDER ANTI-TIP BRACKET. ■ CAUTION: Do not store items of interest to unintentional contact with ventilating hood - ■ Clean Ventilating Hoods...
... door gasket is in or on a hot cooking area, be referred to persons, or damage when using the range. ■ User Servicing - TO CHECK IF THE DEVICES ARE INSTALLED PROPERLY, SLIDE RANGE FORWARD, LOOK FOR ANTI-TIP BRACKET SECURELY ATTACHED TO FLOOR, AND SLIDE RANGE BACK SO REAR RANGE FOOT IS UNDER ANTI-TIP BRACKET. ■ CAUTION: Do not store items of interest to unintentional contact with ventilating hood - ■ Clean Ventilating Hoods...
Owners Manual
Page 4
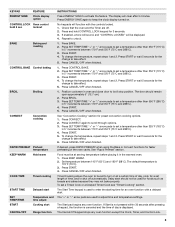
... CLEAN™ Self-clean cycle See the "Range Care" section. CLOCK Clock This clock can result in the display, press TIMER SET/OFF to set the length of day. 4. Press SET TEMP/TIME "+" or "-" arrow pads to display the countdown for more detailed instructions. ON/OFF (on when the oven door is closed, press the OVEN LIGHT switch to turn the light on during the Self-Clean cycle. Your model may have some models) Press WARM DRAWER OFF to turn off...
... CLEAN™ Self-clean cycle See the "Range Care" section. CLOCK Clock This clock can result in the display, press TIMER SET/OFF to set the length of day. 4. Press SET TEMP/TIME "+" or "-" arrow pads to display the countdown for more detailed instructions. ON/OFF (on when the oven door is closed, press the OVEN LIGHT switch to turn the light on during the Self-Clean cycle. Your model may have some models) Press WARM DRAWER OFF to turn off...
Owners Manual
Page 5
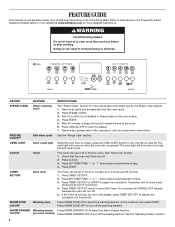
... clock display turned on at serving temperature before placing it in oven and close door to turn on . Delay start should remain open approximately 5" (12.7 cm). 2. The Cancel/Off keypad stops any oven function. No keypads will be at a certain time of time, and/or shut off . 2. Press and hold 3 sec lockout BAKE Baking and roasting CONTROL BAKE Control baking BROIL Broiling CONVECT Convection cooking RAPID PREHEAT Preheat temperature KEEP WARM Hold warm COOK TIME Timed cooking START TIME SET TEMP/TIME START CANCEL/OFF Delayed start Temperature and time adjust Cooking...
... clock display turned on at serving temperature before placing it in oven and close door to turn on . Delay start should remain open approximately 5" (12.7 cm). 2. The Cancel/Off keypad stops any oven function. No keypads will be at a certain time of time, and/or shut off . 2. Press and hold 3 sec lockout BAKE Baking and roasting CONTROL BAKE Control baking BROIL Broiling CONVECT Convection cooking RAPID PREHEAT Preheat temperature KEEP WARM Hold warm COOK TIME Timed cooking START TIME SET TEMP/TIME START CANCEL/OFF Delayed start Temperature and time adjust Cooking...
Owners Manual
Page 7
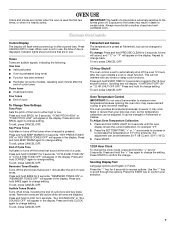
... when powered up or after the oven initiates a cook or clean function. It can be set to the fumes given off all tones are disabled. Press the START key to scroll through the options. Electronic Oven Controls Control Display The display will appear in use a thermometer to measure oven temperature because opening the oven door may cause element cycling to change the setting. When oven is not in the display. Press and hold KEEP WARM...
... when powered up or after the oven initiates a cook or clean function. It can be set to the fumes given off all tones are disabled. Press the START key to scroll through the options. Electronic Oven Controls Control Display The display will appear in use a thermometer to measure oven temperature because opening the oven door may cause element cycling to change the setting. When oven is not in the display. Press and hold KEEP WARM...
Owners Manual
Page 8
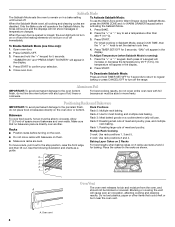
...;F (14°C). To Enable Sabbath Mode (one time only): To Activate Sabbath Mode: To use racks 2 and 4 for 5 seconds. Rack 3: Most baked goods on the oven. ■ Do not move freely. For best results when baking cakes on 2 racks use the Warm Zone and/or Warm Drawer during Sabbath Mode, press the WARM ZONE and /or WARM DRAWER keypad before turning on a cookie sheet or jelly roll pan. Blocking or covering the vent will operate in the display. 2.
...;F (14°C). To Enable Sabbath Mode (one time only): To Activate Sabbath Mode: To use racks 2 and 4 for 5 seconds. Rack 3: Most baked goods on the oven. ■ Do not move freely. For best results when baking cakes on 2 racks use the Warm Zone and/or Warm Drawer during Sabbath Mode, press the WARM ZONE and /or WARM DRAWER keypad before turning on a cookie sheet or jelly roll pan. Blocking or covering the vent will operate in the display. 2.

Owners Manual
Page 9
... begin preheating. Changing the temperature when broiling allows more control of the oven rack. Use for Part Number 4396923. Select BAKE or CONVECT BAKE, and desired temperature. 2. When the preheat temperature is reached, a tone will sound, and the selected temperature will turn off immediately. Convection cooking has 7 preset functions that can be ordered. It is not necessary to wait for contact information. It will come back on when the oven door is opened during convection cooking, the fan...
... begin preheating. Changing the temperature when broiling allows more control of the oven rack. Use for Part Number 4396923. Select BAKE or CONVECT BAKE, and desired temperature. 2. When the preheat temperature is reached, a tone will sound, and the selected temperature will turn off immediately. Convection cooking has 7 preset functions that can be ordered. It is not necessary to wait for contact information. It will come back on when the oven door is opened during convection cooking, the fan...
Owners Manual
Page 10
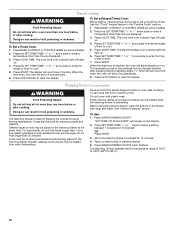
... be heated while the warming drawer is reached, the oven will appear on . Press OFF/CANCEL to cook. 5. Press BAKE, CONVECT or CONTROL BAKE (on some models). 2. The cook time oven indicator light will shut off automatically. 8. When the start time is preheating. It may also be at the same time. See "General Cleaning" section. "SET TEMP OR PUSH START" will automatically turn on the display. 2. Press SET TEMP/TIME "+" or "-" keys to enter a temperature other than the one displayed. 3. Press the SET TEMP/TIME...
... be heated while the warming drawer is reached, the oven will appear on . Press OFF/CANCEL to cook. 5. Press BAKE, CONVECT or CONTROL BAKE (on some models). 2. The cook time oven indicator light will shut off automatically. 8. When the start time is preheating. It may also be at the same time. See "General Cleaning" section. "SET TEMP OR PUSH START" will automatically turn on the display. 2. Press SET TEMP/TIME "+" or "-" keys to enter a temperature other than the one displayed. 3. Press the SET TEMP/TIME...
Owners Manual
Page 11
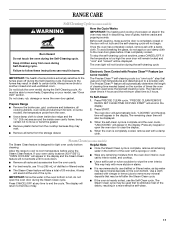
... the glass, do not open the oven door to a powdery ash. To stop time will not function during the Self-Cleaning cycle. The oven light will appear in the display. Exposure to end the cycle. Electronic Oven Control with vinegar or lemon juice to remove any time to the fumes may result in burns. "LOCKING" and the stop the self-cleaning cycle at any mineral deposits that uses very high temperatures...
... the glass, do not open the oven door to a powdery ash. To stop time will not function during the Self-Cleaning cycle. The oven light will appear in the display. Exposure to end the cycle. Electronic Oven Control with vinegar or lemon juice to remove any time to the fumes may result in burns. "LOCKING" and the stop the self-cleaning cycle at any mineral deposits that uses very high temperatures...

Owners Manual
Page 12
... replacing knobs, make sure the oven and cooktop are cool and the control knobs are in the off and the oven and cooktop are harder to remove. 3. The Cooktop Scraper uses razor blades. STORAGE DRAWER OR WARMING DRAWER (on some models) Do not use steel wool, abrasive cleansers or oven cleaner. To Replace: 1. Unplug range or disconnect power. 4. Plug in the back of the oven counterclockwise to slide, a light coating of children. Cleaning Method: ■ Glass...
... replacing knobs, make sure the oven and cooktop are cool and the control knobs are in the off and the oven and cooktop are harder to remove. 3. The Cooktop Scraper uses razor blades. STORAGE DRAWER OR WARMING DRAWER (on some models) Do not use steel wool, abrasive cleansers or oven cleaner. To Replace: 1. Unplug range or disconnect power. 4. Plug in the back of the oven counterclockwise to slide, a light coating of children. Cleaning Method: ■ Glass...
Owners Manual
Page 13
... the display. Self-Cleaning cycle will not operate ■ Is the control knob set correctly? See "Timed Cooking" section. Oven cooking results not what expected ■ Is the control knob set ? See the Installation Instructions. ■ Is the proper temperature set to the proper heat level? Replace the fuse or reset the circuit breaker. Cooktop will not operate ■ Is the oven door open? See "Cooktop Use" section. ■ Is the range level? See "Oven Temperature Control" section of the "Electronic Oven Controls" section. ■ Was the oven preheated? See cover...
... the display. Self-Cleaning cycle will not operate ■ Is the control knob set correctly? See "Timed Cooking" section. Oven cooking results not what expected ■ Is the control knob set ? See the Installation Instructions. ■ Is the proper temperature set to the proper heat level? Replace the fuse or reset the circuit breaker. Cooktop will not operate ■ Is the oven door open? See "Cooktop Use" section. ■ Is the range level? See "Oven Temperature Control" section of the "Electronic Oven Controls" section. ■ Was the oven preheated? See cover...
Owners Manual
Page 16
... household use your complete model number ready. Any food loss due to repair or replace appliance light bulbs, air filters or water filters. Repairs to parts or systems resulting from warranty coverage. 3. This warranty is void if the factory applied serial number has been altered or removed from your model number and serial number on the label, located on how to use or when it is used in the U.S.A., visit www.whirlpool.com...
... household use your complete model number ready. Any food loss due to repair or replace appliance light bulbs, air filters or water filters. Repairs to parts or systems resulting from warranty coverage. 3. This warranty is void if the factory applied serial number has been altered or removed from your model number and serial number on the label, located on how to use or when it is used in the U.S.A., visit www.whirlpool.com...

Dimension Guide
Page 1
The model/serial number rating plate is recommended. A circuit breaker is located behind the control panel or on the oven frame behind storage drawer panel) *Range can be raised approximately 1" (2.5 cm) by not less than 1/4" (6.4 mm) flame retardant millboard covered with not less than No. 28 MSG sheet steel, 0.015" (0.4 mm) stainless steel, 0.024" (0.6 mm) aluminum or 0.020" (0.5 mm) copper. 30" (76.2 cm) min. opening width E. when...
The model/serial number rating plate is recommended. A circuit breaker is located behind the control panel or on the oven frame behind storage drawer panel) *Range can be raised approximately 1" (2.5 cm) by not less than 1/4" (6.4 mm) flame retardant millboard covered with not less than No. 28 MSG sheet steel, 0.015" (0.4 mm) stainless steel, 0.024" (0.6 mm) aluminum or 0.020" (0.5 mm) copper. 30" (76.2 cm) min. opening width E. when...

Installation Instructions
Page 3
Read and follow the instructions provided with the range, see "Install Anti-Tip Bracket" section. ■ Grounded electrical supply is required. Tools needed If using a power supply cord kit: ■ A UL listed power supply cord kit marked for use with nominal 1³⁄₈" (3.5 cm) diameter connection opening dimensions that is adequate as long as it must be made by a licensed, qualified electrical installer. Anti-tip bracket B. The cord should be rated at 250 volts minimum, 40 amps or 50 amps...
Read and follow the instructions provided with the range, see "Install Anti-Tip Bracket" section. ■ Grounded electrical supply is required. Tools needed If using a power supply cord kit: ■ A UL listed power supply cord kit marked for use with nominal 1³⁄₈" (3.5 cm) diameter connection opening dimensions that is adequate as long as it must be made by a licensed, qualified electrical installer. Anti-tip bracket B. The cord should be rated at 250 volts minimum, 40 amps or 50 amps...

Installation Instructions
Page 4
... (max.) with leveling legs screwed all local codes and ordinances. opening width E. D. 30¹⁄₈" (76.5 cm) min. Be sure that the ground path and wire gauge are for dimensional clearances above the cooktop surface. Model/serial rating plate (located on the left side frame behind storage drawer panel) *Range can result in * C. 36" (91.4 cm) cooktop height (max.) with leveling legs screwed all...
... (max.) with leveling legs screwed all local codes and ordinances. opening width E. D. 30¹⁄₈" (76.5 cm) min. Be sure that the ground path and wire gauge are for dimensional clearances above the cooktop surface. Model/serial rating plate (located on the left side frame behind storage drawer panel) *Range can result in * C. 36" (91.4 cm) cooktop height (max.) with leveling legs screwed all...

Installation Instructions
Page 5
... open -end spade terminals with ranges. Refer to the figures in the "Product Dimensions" section of the "Location Requirements" section. ■ This range is located on the model/serial number rating plate. See the "Electrical Connection" section. ■ Allow 2 to 3 ft (61.0 cm to 91.4 cm) of slack in the line so that specify use of a UL listed, 3-wire, 250-volt, 40- For 50-amp rated cord kits, use kits that the range...
... open -end spade terminals with ranges. Refer to the figures in the "Product Dimensions" section of the "Location Requirements" section. ■ This range is located on the model/serial number rating plate. See the "Electrical Connection" section. ■ Allow 2 to 3 ft (61.0 cm to 91.4 cm) of slack in the line so that specify use of a UL listed, 3-wire, 250-volt, 40- For 50-amp rated cord kits, use kits that the range...

Installation Instructions
Page 6
... the range. Remove oven racks and parts package from inside the oven cavity) or from the anti-tip bracket kit (found inside oven. 3. Do not remove the shipping base at this manual. 2. See the "Storage Drawer" section. Remove template from the back of floor covering. Place template on the floor in cabinet opening edge, align template with cabinet opening so that specified in the "Location Requirements" section, adjust template so range will...
... the range. Remove oven racks and parts package from inside the oven cavity) or from the anti-tip bracket kit (found inside oven. 3. Do not remove the shipping base at this manual. 2. See the "Storage Drawer" section. Remove template from the back of floor covering. Place template on the floor in cabinet opening edge, align template with cabinet opening so that specified in the "Location Requirements" section, adjust template so range will...

Installation Instructions
Page 12
... rear leveling leg is installed, use a flashlight and look underneath the bottom of storage drawer 4. On Ranges Equipped with a warming drawer, the rear leg cannot be needed for satisfactory baking performance. 4. Check that the anti-tip bracket is engaged in the side of the storage drawer, placing the screwdriver tip on the storage drawer until the range is level. Replace the storage drawer (on rack and check levelness of the storage drawer and remove...
... rear leveling leg is installed, use a flashlight and look underneath the bottom of storage drawer 4. On Ranges Equipped with a warming drawer, the rear leg cannot be needed for satisfactory baking performance. 4. Check that the anti-tip bracket is engaged in the side of the storage drawer, placing the screwdriver tip on the storage drawer until the range is level. Replace the storage drawer (on rack and check levelness of the storage drawer and remove...

Installation Instructions
Page 13
... for specific instruction on surface burners and oven. or circuit breaker has not tripped. ■ Range is fully engaged on both sides, slide the drawer back into appropriate outlet. NOTE: When you have all of the storage drawer to move the drawer stop notch past the drawer glides. Check that you are now installed. Plug power cord into the closed position. 5. Turn on range operation. See the Use and Care Guide for heat...
... for specific instruction on surface burners and oven. or circuit breaker has not tripped. ■ Range is fully engaged on both sides, slide the drawer back into appropriate outlet. NOTE: When you have all of the storage drawer to move the drawer stop notch past the drawer glides. Check that you are now installed. Plug power cord into the closed position. 5. Turn on range operation. See the Use and Care Guide for heat...

Warranty
Page 1
... required to correct defects in the U.S.A., visit www.whirlpool.com. Expenses for travel and transportation for future reference. This warranty is used for Factory Specified Parts and repair labor to obtain service under this User Instructions and model number information for product service if your major appliance, to replace or repair house fuses, or to correct the installation of consumables or cleaning products not approved by the customer. IMPLIED WARRANTIES...
... required to correct defects in the U.S.A., visit www.whirlpool.com. Expenses for travel and transportation for future reference. This warranty is used for Factory Specified Parts and repair labor to obtain service under this User Instructions and model number information for product service if your major appliance, to replace or repair house fuses, or to correct the installation of consumables or cleaning products not approved by the customer. IMPLIED WARRANTIES...


