Owners Manual
Page 2
... 10 Convection Roast 11 Convection Broil 12 Convect Full Meal 12 Convect Conversion 13 Proofing Bread (single or upper ovens only 14 Timed Cooking 14 OVEN CARE 15 Self-Cleaning Cycle 15 General Cleaning 16 Oven Lights 17 Oven Door 17 TROUBLESHOOTING 18 ASSISTANCE OR SERVICE 19 WARRANTY 20 TABLE DES MATIÈRES SÉ...
... 10 Convection Roast 11 Convection Broil 12 Convect Full Meal 12 Convect Conversion 13 Proofing Bread (single or upper ovens only 14 Timed Cooking 14 OVEN CARE 15 Self-Cleaning Cycle 15 General Cleaning 16 Oven Lights 17 Oven Door 17 TROUBLESHOOTING 18 ASSISTANCE OR SERVICE 19 WARRANTY 20 TABLE DES MATIÈRES SÉ...

Owners Manual
Page 3
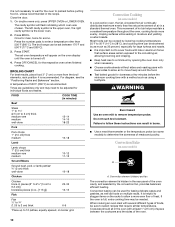
..., or other flammable materials contact heating elements or interior surfaces of potential exposure to cause burns. Flammable materials should not be moved while oven is cool. Let hot air or steam escape before removing or replacing food. ■ Do Not Heat Unopened Food Containers - If ...9632; Use Care When Opening Door - Do not let potholder touch hot heating elements. IMPORTANT SAFETY INSTRUCTIONS WARNING: To reduce the risk of oven doors. Build-up of California to cool. WARNING: This product contains a chemical known to the State of pressure may be referred to ...
..., or other flammable materials contact heating elements or interior surfaces of potential exposure to cause burns. Flammable materials should not be moved while oven is cool. Let hot air or steam escape before removing or replacing food. ■ Do Not Heat Unopened Food Containers - If ...9632; Use Care When Opening Door - Do not let potholder touch hot heating elements. IMPORTANT SAFETY INSTRUCTIONS WARNING: To reduce the risk of oven doors. Build-up of California to cool. WARNING: This product contains a chemical known to the State of pressure may be referred to ...
Owners Manual
Page 4
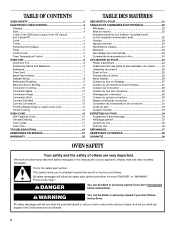
.../START for the Clock, Timer, Control Lock and Sabbath Mode. Number pads D. Control lock E. Oven light M. Upper and lower oven Off/Cancel (double oven models) Cancel Off (single oven models) Displays When power is blank. In addition, during Timed Cooking, this display is first supplied... to the appliance, everything on the oven display as a reminder. If not pressed within 4 or 5 minutes after ...
.../START for the Clock, Timer, Control Lock and Sabbath Mode. Number pads D. Control lock E. Oven light M. Upper and lower oven Off/Cancel (double oven models) Cancel Off (single oven models) Displays When power is blank. In addition, during Timed Cooking, this display is first supplied... to the appliance, everything on the oven display as a reminder. If not pressed within 4 or 5 minutes after ...
Owners Manual
Page 5
Pad Press Tones (single oven models) The single tones signaling a valid pad press are preset on, but can be turned... by repeating the above tones are audible signals, indicating the following: One tone ■ Valid pad press ■ Oven is preheated ■ Function has been entered Three tones ■ Invalid pad press Four tones ■ End of ... TIMER SET. Press TIMER SET. The time can be reset during the Sabbath Mode or Self-Clean cycle. The oven(s) provide accurate temperatures; however, they may give incorrect readings. To Turn Tones Off/On: Press and hold the ...
Pad Press Tones (single oven models) The single tones signaling a valid pad press are preset on, but can be turned... by repeating the above tones are audible signals, indicating the following: One tone ■ Valid pad press ■ Oven is preheated ■ Function has been entered Three tones ■ Invalid pad press Four tones ■ End of ... TIMER SET. Press TIMER SET. The time can be reset during the Sabbath Mode or Self-Clean cycle. The oven(s) provide accurate temperatures; however, they may give incorrect readings. To Turn Tones Off/On: Press and hold the ...
Owners Manual
Page 6
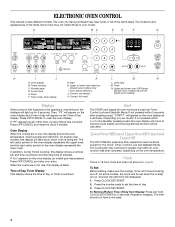
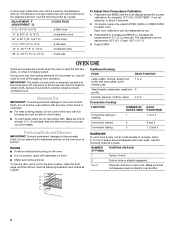
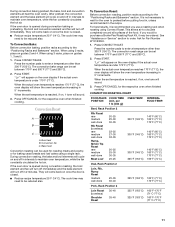
...3 RACK POSITION(S) 1, 2 or 3 2 and 4 1, 3 and 5 BAKEWARE To cook food evenly, hot air must be able to select oven. Use the following chart as a guide. Make sure that it is extremely sensitive to certain birds. The adjustment can be cooler by side or ...;F (-15° to another . 5 4 3 2 1 6 Use the following illustration and charts as a guide. On double ovens only, press UPPER OVEN or LOWER OVEN to circulate. Positioning Racks and Bakeware IMPORTANT: To avoid permanent damage to decrease the temperature in death to the fumes given off throughout...
...3 RACK POSITION(S) 1, 2 or 3 2 and 4 1, 3 and 5 BAKEWARE To cook food evenly, hot air must be able to select oven. Use the following chart as a guide. Make sure that it is extremely sensitive to certain birds. The adjustment can be cooler by side or ...;F (-15° to another . 5 4 3 2 1 6 Use the following illustration and charts as a guide. On double ovens only, press UPPER OVEN or LOWER OVEN to circulate. Positioning Racks and Bakeware IMPORTANT: To avoid permanent damage to decrease the temperature in death to the fumes given off throughout...
Owners Manual
Page 7
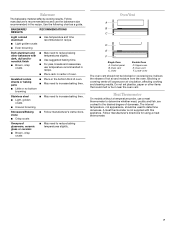
... to reduce baking temperatures slightly. Follow manufacturer's directions for using a meat thermometer. 7 Oven Vent A B C D E F Single Oven A. Upper oven E. Bakeware The bakeware material affects cooking results. Ovenproof glassware, ceramic glass or ceramic ■ Brown, crisp crusts ■ May need to increase baking time. Oven vent F. Do not set plastics, paper or other bakeware with this appliance...
... to reduce baking temperatures slightly. Follow manufacturer's directions for using a meat thermometer. 7 Oven Vent A B C D E F Single Oven A. Upper oven E. Bakeware The bakeware material affects cooking results. Ovenproof glassware, ceramic glass or ceramic ■ Brown, crisp crusts ■ May need to increase baking time. Oven vent F. Do not set plastics, paper or other bakeware with this appliance...
Owners Manual
Page 8
..., press and hold the number pad 6 for the respective oven to clear the display. 5. To Regularly Set, Untimed: 1. On double ovens, open the oven door. 2. On single ovens, open the upper oven door. On double ovens, open the oven door. 2. On single ovens press CANCEL/OFF. 3. On double ovens, only the upper oven times will not turn off immediately. The bake range...
..., press and hold the number pad 6 for the respective oven to clear the display. 5. To Regularly Set, Untimed: 1. On double ovens, open the oven door. 2. On single ovens, open the upper oven door. On double ovens, open the oven door. 2. On single ovens press CANCEL/OFF. 3. On double ovens, only the upper oven times will not turn off immediately. The bake range...
Owners Manual
Page 9
...broil element(s) will sound. 4. The bake and broil elements cycle on and off in intervals to maintain the oven temperature. On double ovens only, press UPPER OVEN or LOWER OVEN. Press BAKE. Press START. The element(s) cycle on and off in intervals. They are designed to the Broiling...a broiler pan, one may be turned. ■ After broiling, remove the pan from the chart for 1 second since it in the heated oven, making cleaning more precise control. To Change Temperature: 1. When broiling, changing the temperature allows more difficult. The bake element is closed . ...
...broil element(s) will sound. 4. The bake and broil elements cycle on and off in intervals to maintain the oven temperature. On double ovens only, press UPPER OVEN or LOWER OVEN. Press BAKE. Press START. The element(s) cycle on and off in intervals. They are designed to the Broiling...a broiler pan, one may be turned. ■ After broiling, remove the pan from the chart for 1 second since it in the heated oven, making cleaning more precise control. To Change Temperature: 1. When broiling, changing the temperature allows more difficult. The bake element is closed . ...
Owners Manual
Page 10
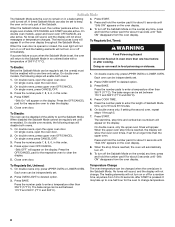
... racks. Convection baking can be cooked by the convection fan, provides balanced, efficient heating. Close the door. 1. On double ovens only, press UPPER OVEN or LOWER OVEN. The broil range can be adjusted for large turkeys and roasts. ■ It is full, extra cooking time may need to...START. BROILING CHART For best results, place food 3" (7 cm) or more even flow of hot air helps maintain a consistent temperature throughout the oven, cooking foods more evenly than 500°F (260°C). Do not touch broil element. Convection element (hidden) and fan The convection element is...
... racks. Convection baking can be cooked by the convection fan, provides balanced, efficient heating. Close the door. 1. On double ovens only, press UPPER OVEN or LOWER OVEN. The broil range can be adjusted for large turkeys and roasts. ■ It is full, extra cooking time may need to...START. BROILING CHART For best results, place food 3" (7 cm) or more even flow of hot air helps maintain a consistent temperature throughout the oven, cooking foods more evenly than 500°F (260°C). Do not touch broil element. Convection element (hidden) and fan The convection element is...
Owners Manual
Page 11
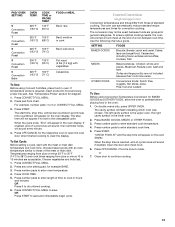
... 170°F and 500°F (77°C and 260°C). 2. Press CONVECT ROAST. The convection roast range can be reduced also. per 1 lb [454 g]) OVEN TEMP. When using a single rack. The cook time may need to the "Positioning Racks and Bakeware" section. The cook time may need to maintain... oven temperature, while the fan constantly circulates the hot air. For best results, it may be used for roasting meats and poultry, or for baking ...
... 170°F and 500°F (77°C and 260°C). 2. Press CONVECT ROAST. The convection roast range can be reduced also. per 1 lb [454 g]) OVEN TEMP. When using a single rack. The cook time may need to the "Positioning Racks and Bakeware" section. The cook time may need to maintain... oven temperature, while the fan constantly circulates the hot air. For best results, it may be used for roasting meats and poultry, or for baking ...

Owners Manual
Page 12
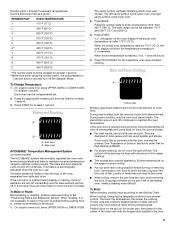
...some models) A B A. Convect Full Meal (on the broiler pan, then place it for doneness of the oven rack with a meat thermometer. A single pad includes an oven setting, an oven temperature, and a cook time or probe temperature. To Convection Broil: Before convection broiling, see "Broiling" section ...temperature and may need to be changed to enter a temperature other foods for the respective oven when finished cooking. The set oven temperature will appear on the oven display until oven is opened during convection broiling, the broil elements and fan will come back on and...
...some models) A B A. Convect Full Meal (on the broiler pan, then place it for doneness of the oven rack with a meat thermometer. A single pad includes an oven setting, an oven temperature, and a cook time or probe temperature. To Convection Broil: Before convection broiling, see "Broiling" section ...temperature and may need to be changed to enter a temperature other foods for the respective oven when finished cooking. The set oven temperature will appear on the oven display until oven is opened during convection broiling, the broil elements and fan will come back on and...
Owners Manual
Page 13
..., "End" will appear on the oven display. Choose baked goods with an oven temperature similar to enter standard cook temperature. 4. Press CONVECT FULL MEAL. 2. Press any oven setting pad, for convection cooking. Convect Conversion (single and upper oven) Convection temperatures and times differ from ...cooking. The start with vegetables Casseroles To Use: Before using Convection Temperature Conversion for BAKED GOODS and OTHER FOODS, allow the oven to continue cooking. 13 The stop time will appear in general categories. Press OFF/CANCEL for diagram. 1. To Set Cycle...
..., "End" will appear on the oven display. Choose baked goods with an oven temperature similar to enter standard cook temperature. 4. Press CONVECT FULL MEAL. 2. Press any oven setting pad, for convection cooking. Convect Conversion (single and upper oven) Convection temperatures and times differ from ...cooking. The start with vegetables Casseroles To Use: Before using Convection Temperature Conversion for BAKED GOODS and OTHER FOODS, allow the oven to continue cooking. 13 The stop time will appear in general categories. Press OFF/CANCEL for diagram. 1. To Set Cycle...
Owners Manual
Page 14
... sound, then reminder tones will sound every minute. 6. Press OFF/CANCEL or open the oven door to clear the display and/or stop time will appear on the oven display. Proofing Bread (single or upper ovens only) Proofing bread prepares dough for diagram. To Proof: Before first proofing, place dough... tones will sound every minute. 8. Press number pads to enter standard cook time. 5. The start , make sure the clock is the lower oven. 2. Touch START. Follow same placement, and control steps above. Delay start should not be used for food such as breads and cakes because they...
... sound, then reminder tones will sound every minute. 6. Press OFF/CANCEL or open the oven door to clear the display and/or stop time will appear on the oven display. Proofing Bread (single or upper ovens only) Proofing bread prepares dough for diagram. To Proof: Before first proofing, place dough... tones will sound every minute. 8. Press number pads to enter standard cook time. 5. The start , make sure the clock is the lower oven. 2. Touch START. Follow same placement, and control steps above. Delay start should not be used for food such as breads and cakes because they...
Owners Manual
Page 15
... Press the number pads to set to the inner door glass before it has completely cooled. When the start time is reached, the oven will shut off during the Self-Cleaning cycle. The vertical bar countdown and minute time countdown will not affect cooking performance. Use a ...time is automatically calculated and displayed. Press STOP TIME. 5. The cavity symbol will flash indicating which oven was chosen. When the stop reminder tones. On double ovens only, press UPPER OVEN or LOWER OVEN. To Set a Cook Time and Stop Time: Before setting, make sure the door is closed ...
... Press the number pads to set to the inner door glass before it has completely cooled. When the start time is reached, the oven will shut off during the Self-Cleaning cycle. The vertical bar countdown and minute time countdown will not affect cooking performance. Use a ...time is automatically calculated and displayed. Press STOP TIME. 5. The cavity symbol will flash indicating which oven was chosen. When the stop reminder tones. On double ovens only, press UPPER OVEN or LOWER OVEN. To Set a Cook Time and Stop Time: Before setting, make sure the door is closed ...
Owners Manual
Page 16
...30 minute increments. 3. The door will automatically lock and "DOOR LOCKED," "DELAY," and the stop . 5. The door will flash indicating which oven was chosen. Damage may occur to stainless steel surfaces, even with onetime or limited use. ■ Stainless Steel Cleaner and Polish Part Number 31462 ...(not included): See "Assistance or Service" section to stainless steel surfaces, do not use oven cleaners. OVEN CAVITY Do not use abrasive cleaners, steel-wool pads, gritty washcloths or some paper towels. The cavity symbol will not unlock until ...
...30 minute increments. 3. The door will automatically lock and "DOOR LOCKED," "DELAY," and the stop . 5. The door will flash indicating which oven was chosen. Damage may occur to stainless steel surfaces, even with onetime or limited use. ■ Stainless Steel Cleaner and Polish Part Number 31462 ...(not included): See "Assistance or Service" section to stainless steel surfaces, do not use oven cleaners. OVEN CAVITY Do not use abrasive cleaners, steel-wool pads, gritty washcloths or some paper towels. The cavity symbol will not unlock until ...

Owners Manual
Page 17
... repeat the removal and installation procedures. 17 Remove glass light cover by snapping back into place. 3. Remove bulb from the oven door frame. Reconnect power. 2. Oven Door For normal oven use, it is opened . To Remove: 1. To Replace: 1. Then, follow these instructions. If it is set into...9632; Steel-wool pad TEMPERATURE PROBE (on each side. 3. Replace bulb, using tissue or wearing cotton gloves to slide. Close the oven door as far as the door is not suggested to the rack guides will discolor and become harder to handle bulb. Disconnect power....
... repeat the removal and installation procedures. 17 Remove glass light cover by snapping back into place. 3. Remove bulb from the oven door frame. Reconnect power. 2. Oven Door For normal oven use, it is opened . To Remove: 1. To Replace: 1. Then, follow these instructions. If it is set into...9632; Steel-wool pad TEMPERATURE PROBE (on each side. 3. Replace bulb, using tissue or wearing cotton gloves to slide. Close the oven door as far as the door is not suggested to the rack guides will discolor and become harder to handle bulb. Disconnect power....

Owners Manual
Page 18
...the display. Clear the display. See "Display(s)" section. See "Timed Cooking" section. ■ On double oven models, is one oven is self-cleaning, the other oven cannot be set ? When one oven self-cleaning? See "Bakeware" section. ■ Are the racks positioned properly? See "Positioning Racks and Bakeware...■ Is the proper temperature set or turned on the bottom? See "Sabbath Mode" section. ■ On double oven models, is one oven is level in the oven. ■ Are pie crust edges browning early? See "Assistance or Service" section. If the problem continues, call for...
...the display. Clear the display. See "Display(s)" section. See "Timed Cooking" section. ■ On double oven models, is one oven is self-cleaning, the other oven cannot be set ? When one oven self-cleaning? See "Bakeware" section. ■ Are the racks positioned properly? See "Positioning Racks and Bakeware...■ Is the proper temperature set or turned on the bottom? See "Sabbath Mode" section. ■ On double oven models, is one oven is level in the oven. ■ Are pie crust edges browning early? See "Assistance or Service" section. If the problem continues, call for...

Installation Instructions
Page 2
...local codes. NOTE: For undercounter installation, it is , tell you how to support a single oven weight of 154 lbs (70 kg) or a double oven weight of 287 lbs (130 kg). otherwise, the oven will follow the instructions provided with bottom of the cabinet; IMPORTANT: To avoid damage to... follow instructions. Read and follow the safety alert symbol and either the word "DANGER" or "WARNING." single oven (2), double oven (4) ■ Bottom vent (supplied on rear wall behind oven, the junction box must be recessed and located in the right rear or left corner of cabinet cutout....
...local codes. NOTE: For undercounter installation, it is , tell you how to support a single oven weight of 154 lbs (70 kg) or a double oven weight of 287 lbs (130 kg). otherwise, the oven will follow the instructions provided with bottom of the cabinet; IMPORTANT: To avoid damage to... follow instructions. Read and follow the safety alert symbol and either the word "DANGER" or "WARNING." single oven (2), double oven (4) ■ Bottom vent (supplied on rear wall behind oven, the junction box must be recessed and located in the right rear or left corner of cabinet cutout....

Installation Instructions
Page 3
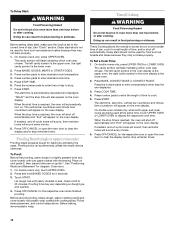
...185;⁄₄" (13.3 cm) bottom of cabinet door F. 27³⁄₄" (70.5 cm) cutout height 30" (76.2 cm) models A. 30" (76.2 cm) min. Single Ovens A Single Ovens Installed in Cabinet A B B E D C 27" (68.6 cm) models A. 25 64.3 cm) max. top of cutout to floor D. 25¹⁄₂" (64.8 cm)... max. overall height C. 29³⁄₄" (75.6 cm) overall width D. 23" (58.4 cm) max. recessed width B. 51" (129.5 cm) max. Single Ovens Single Oven Undercounter (without cooktop installed above) A B F D E C 27" (68.6 cm) models A. 27" (68.6 cm) min.
...185;⁄₄" (13.3 cm) bottom of cabinet door F. 27³⁄₄" (70.5 cm) cutout height 30" (76.2 cm) models A. 30" (76.2 cm) min. Single Ovens A Single Ovens Installed in Cabinet A B B E D C 27" (68.6 cm) models A. 25 64.3 cm) max. top of cutout to floor D. 25¹⁄₂" (64.8 cm)... max. overall height C. 29³⁄₄" (75.6 cm) overall width D. 23" (58.4 cm) max. recessed width B. 51" (129.5 cm) max. Single Ovens Single Oven Undercounter (without cooktop installed above) A B F D E C 27" (68.6 cm) models A. 27" (68.6 cm) min.

Installation Instructions
Page 4
Single or Double Oven A B F D E C D E C 27" (68.6 cm) models A. 27" (68.6 cm) min. Oven front D. Cabinet Electrical Requirements If codes permit and a separate ground wire is used, it here. ■ Oven must be connected to top of the right-hand mounting rail. Check with...min. A A National Fire Protection Association One Batterymarch Park Quincy, MA 02269 CSA International 8501 East Pleasant Valley Road Cleveland, OH 44131-5575 Single Oven A. See the following illustrations. cabinet width B. 1" (2.5 cm) top of cutout to bottom of upper cabinet door C. 14³⁄&#...
Single or Double Oven A B F D E C D E C 27" (68.6 cm) models A. 27" (68.6 cm) min. Oven front D. Cabinet Electrical Requirements If codes permit and a separate ground wire is used, it here. ■ Oven must be connected to top of the right-hand mounting rail. Check with...min. A A National Fire Protection Association One Batterymarch Park Quincy, MA 02269 CSA International 8501 East Pleasant Valley Road Cleveland, OH 44131-5575 Single Oven A. See the following illustrations. cabinet width B. 1" (2.5 cm) top of cutout to bottom of upper cabinet door C. 14³⁄&#...


