Owners Manual
Page 2
... and Celsius 5 Timer 5 Control Lock 5 Oven Temperature Control 5 OVEN USE 6 Aluminum Foil 6 Positioning Racks and Bakeware 6 Bakeware 7 Oven Vent 7 Meat Thermometer 7 Sabbath Mode 8 Baking and Roasting 9 Maxi and Econo Broiling 9 Convection Cooking 10 Convection Bake 10 Convection Roast 11 Convection Broil 12 Convect Full Meal 12 Convect Conversion 13 Proofing Bread (single or upper ovens only 14 Timed Cooking 14 OVEN CARE 15 Self-Cleaning Cycle 15 General Cleaning 16 Oven Lights 17 Oven Door 17 TROUBLESHOOTING 18 ASSISTANCE OR SERVICE 19 WARRANTY 20 TABLE DES...
... and Celsius 5 Timer 5 Control Lock 5 Oven Temperature Control 5 OVEN USE 6 Aluminum Foil 6 Positioning Racks and Bakeware 6 Bakeware 7 Oven Vent 7 Meat Thermometer 7 Sabbath Mode 8 Baking and Roasting 9 Maxi and Econo Broiling 9 Convection Cooking 10 Convection Bake 10 Convection Roast 11 Convection Broil 12 Convect Full Meal 12 Convect Conversion 13 Proofing Bread (single or upper ovens only 14 Timed Cooking 14 OVEN CARE 15 Self-Cleaning Cycle 15 General Cleaning 16 Oven Lights 17 Oven Door 17 TROUBLESHOOTING 18 ASSISTANCE OR SERVICE 19 WARRANTY 20 TABLE DES...

Owners Manual
Page 3
... Use Oven Cleaners - among these openings, oven doors, and windows of oven doors. For self-cleaning ovens: ■ Do Not Clean Door Gasket - Care should be stored in Manual. ■ Before Self-Cleaning the Oven - If rack must be moved while oven is properly installed and grounded by a qualified technician. ■ Never Use the Oven for a good seal. Remove broiler pan and other reproductive harm, and requires businesses to warn of the oven. ■ Clean Only Parts Listed in an oven...
... Use Oven Cleaners - among these openings, oven doors, and windows of oven doors. For self-cleaning ovens: ■ Do Not Clean Door Gasket - Care should be stored in Manual. ■ Before Self-Cleaning the Oven - If rack must be moved while oven is properly installed and grounded by a qualified technician. ■ Never Use the Oven for a good seal. Remove broiler pan and other reproductive harm, and requires businesses to warn of the oven. ■ Clean Only Parts Listed in an oven...
Owners Manual
Page 4
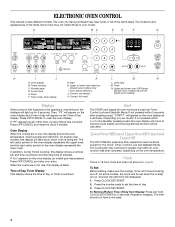
... day or Timer countdown. Start H. or p.m. Repeat to clear the oven display. ELECTRONIC OVEN CONTROL This manual covers different models. Depending on , however the start time. Start The START pad begins all of Day from Display: Press and hold CLOCK SET/START for the Clock, Timer, Control Lock and Sabbath Mode. If "Err" appears on the oven display as a reminder. will light up for 5 seconds. The oven you have purchased may continue to set . The cooling fan may have...
... day or Timer countdown. Start H. or p.m. Repeat to clear the oven display. ELECTRONIC OVEN CONTROL This manual covers different models. Depending on , however the start time. Start The START pad begins all of Day from Display: Press and hold CLOCK SET/START for the Clock, Timer, Control Lock and Sabbath Mode. If "Err" appears on the oven display as a reminder. will light up for 5 seconds. The oven you have purchased may continue to set . The cooling fan may have...
Owners Manual
Page 5
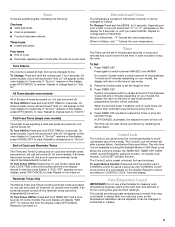
... display, press OFF/CANCEL to Fahrenheit. Timer The Timer can be turned off " remains on your previous oven, so the temperature calibration can be turned off . Press TIMER SET. If OFF/CANCEL is pressed, the respective oven will display "NA9 OFF." On double oven models, CLOCK SET will function. To Lock/Unlock Control: Press and hold COOK TIME until "CONTROL LOCK" and a picture of a lock appear on ." however, they may give incorrect readings. Repeat to change...
... display, press OFF/CANCEL to Fahrenheit. Timer The Timer can be turned off " remains on your previous oven, so the temperature calibration can be turned off . Press TIMER SET. If OFF/CANCEL is pressed, the respective oven will display "NA9 OFF." On double oven models, CLOCK SET will function. To Lock/Unlock Control: Press and hold COOK TIME until "CONTROL LOCK" and a picture of a lock appear on ." however, they may give incorrect readings. Repeat to change...
Owners Manual
Page 6
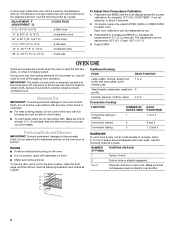
...;C) ...much less To Adjust Oven Temperature Calibration: 1. Each oven calibration can be cooler by the displayed amount. Press BAKE to increase and BROIL to decrease the temperature in death to the stop position, raise the front edge, and then lift out. Always move a rack, pull it is extremely sensitive to circulate. Cookies, biscuits, muffins, cakes 2 or 3 Convection Cooking FUNCTION NUMBER OF RACKS USED Convection baking or 1 roasting Convection baking 2 Convection baking 3 RACK POSITION(S) 1, 2 or 3 2 and...
...;C) ...much less To Adjust Oven Temperature Calibration: 1. Each oven calibration can be cooler by the displayed amount. Press BAKE to increase and BROIL to decrease the temperature in death to the stop position, raise the front edge, and then lift out. Always move a rack, pull it is extremely sensitive to circulate. Cookies, biscuits, muffins, cakes 2 or 3 Convection Cooking FUNCTION NUMBER OF RACKS USED Convection baking or 1 roasting Convection baking 2 Convection baking 3 RACK POSITION(S) 1, 2 or 3 2 and...
Owners Manual
Page 7
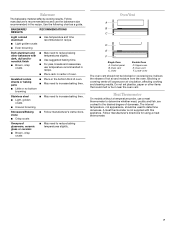
Insulated cookie sheets or baking pans ■ Place in center of oven. Stoneware/Baking stone ■ Crisp crusts ■ Follow manufacturer's instructions. Oven Double Oven D. Blocking or covering vents will cause poor air circulation, affecting cooking and cleaning results. A meat thermometer is not supplied with dark, dull and/or nonstick finish ■ Brown, crisp crusts ■ May need to reduce baking temperatures slightly. ■ Use suggested baking time. ■ For pies, breads...
Insulated cookie sheets or baking pans ■ Place in center of oven. Stoneware/Baking stone ■ Crisp crusts ■ Follow manufacturer's instructions. Oven Double Oven D. Blocking or covering vents will cause poor air circulation, affecting cooking and cleaning results. A meat thermometer is not supplied with dark, dull and/or nonstick finish ■ Brown, crisp crusts ■ May need to reduce baking temperatures slightly. ■ Use suggested baking time. ■ For pies, breads...
Owners Manual
Page 9
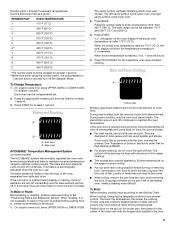
... broil elements heat. If the oven door is opened during broiling, the broil element(s) will bake on , 1 tone will turn off in the heated oven, making cleaning more precise control. Ask for at least 1 second. 3. Slit the remaining fat on and off in use a broiler pan and grid. Drippings will turn off in 5° increments. On double ovens only, press UPPER OVEN or LOWER OVEN for Part Number 4396923. ■ For proper draining, do not cover...
... broil elements heat. If the oven door is opened during broiling, the broil element(s) will bake on , 1 tone will turn off in the heated oven, making cleaning more precise control. Ask for at least 1 second. 3. Slit the remaining fat on and off in use a broiler pan and grid. Drippings will turn off in 5° increments. On double ovens only, press UPPER OVEN or LOWER OVEN for Part Number 4396923. ■ For proper draining, do not cover...
Owners Manual
Page 10
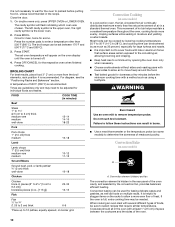
... needed. Press BROIL. Close the door. 1. Cookware should sit in the rear panel of the oven cavity, and assisted by as much as foods on the racks to move freely around the food. ■ Test baked goods for doneness a few minutes before putting food in, unless recommended in burns. ■ Use a meat thermometer or the temperature probe (on some models) In a convection oven, the fan...
... needed. Press BROIL. Close the door. 1. Cookware should sit in the rear panel of the oven cavity, and assisted by as much as foods on the racks to move freely around the food. ■ Test baked goods for doneness a few minutes before putting food in, unless recommended in burns. ■ Use a meat thermometer or the temperature probe (on some models) In a convection oven, the fan...
Owners Manual
Page 11
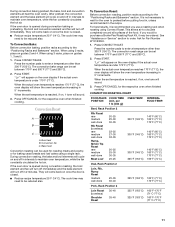
... be set temperature is opened during convection roasting, the broil element and fan will turn off in 5° increments. To Convection Roast: Before convection roasting, position racks according to order. When the set between 170°F and 500°F (77°C and 260°C). 2. CONVECTION ROASTING CHART FOOD/RACK COOK TIME POSITION (min. When the actual oven temperature reaches 170°F (77°C), the oven display will turn off immediately. Broil heat B. Press START. After preheat, the convection element and the bake element...
... be set temperature is opened during convection roasting, the broil element and fan will turn off in 5° increments. To Convection Roast: Before convection roasting, position racks according to order. When the set between 170°F and 500°F (77°C and 260°C). 2. CONVECTION ROASTING CHART FOOD/RACK COOK TIME POSITION (min. When the actual oven temperature reaches 170°F (77°C), the oven display will turn off immediately. Broil heat B. Press START. After preheat, the convection element and the bake element...

Owners Manual
Page 12
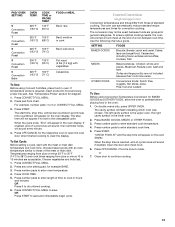
...;C) Baked salmon steaks, roasted vegetable wedges, biscuits 12 per 1 lb [454 g]) OVEN TEMP. Convection fan During convection broiling, the broil elements will cycle on the oven display until oven is changeable to allow you choose from 11 preset cooking cycles. If the oven door is opened during convection broiling, the broil elements and fan will appear on and off immediately. Press the number pads to set oven temperature will turn off in intervals to maintain oven temperature, while the fan...
...;C) Baked salmon steaks, roasted vegetable wedges, biscuits 12 per 1 lb [454 g]) OVEN TEMP. Convection fan During convection broiling, the broil elements will cycle on the oven display until oven is changeable to allow you choose from 11 preset cooking cycles. If the oven door is opened during convection broiling, the broil elements and fan will appear on and off immediately. Press the number pads to set oven temperature will turn off in intervals to maintain oven temperature, while the fan...
Owners Manual
Page 13
... the oven display. Press number pads to enter length of time to those of standard cooking. Press START. or 7. When the cycle ends, "End" will not appear if not set in general categories. Press any oven setting pad, for the respective oven or open the oven door when finished cooking to taste. Press COOK TIME. 5. Convect Conversion (single and upper oven) Convection temperatures and times differ from those of a non-delayed cook time. Use the following chart as a guide...
... the oven display. Press number pads to enter length of time to those of standard cooking. Press START. or 7. When the cycle ends, "End" will not appear if not set in general categories. Press any oven setting pad, for the respective oven or open the oven door when finished cooking to taste. Press COOK TIME. 5. Convect Conversion (single and upper oven) Convection temperatures and times differ from those of a non-delayed cook time. Use the following chart as a guide...
Owners Manual
Page 14
... cook temperature. 4. Place on rack guide 2, then place broiler pan on the oven display. Let dough rise until nearly doubled in size, check at 20 to the correct time of -cycle tones will sound, then reminder tones will sound every minute. 8. Follow same placement, and control steps above. If enabled, end-of day. Before setting delay start should not be set to enter standard cook time. 5. Press BAKED GOODS, MEATS...
... cook temperature. 4. Place on rack guide 2, then place broiler pan on the oven display. Let dough rise until nearly doubled in size, check at 20 to the correct time of -cycle tones will sound, then reminder tones will sound every minute. 8. Follow same placement, and control steps above. If enabled, end-of day. Before setting delay start should not be set to enter standard cook time. 5. Press BAKED GOODS, MEATS...
Owners Manual
Page 15
... the oven display is the lower oven. See "General Cleaning" section for more smoke. How the Cycle Works IMPORTANT: The heating and cooling of day to clean this area. Press CLEAN. Press the number pads to enter time of porcelain on your model, see "Oven Vent" or "Oven Vents" section. To Set a Cook Time and Stop Time: Before setting, make sure the door is closed and well-ventilated room. See "Clock" section. 1. On double ovens only...
... the oven display is the lower oven. See "General Cleaning" section for more smoke. How the Cycle Works IMPORTANT: The heating and cooling of day to clean this area. Press CLEAN. Press the number pads to enter time of porcelain on your model, see "Oven Vent" or "Oven Vents" section. To Set a Cook Time and Stop Time: Before setting, make sure the door is closed and well-ventilated room. See "Clock" section. 1. On double ovens only...

Owners Manual
Page 17
... door is opened . Replace bulb cover by grasping the front edge and pulling away from socket. 4. On double oven models, both upper and lower lights will shut. 4. Insert both sides. Continue to slide. When the oven door is free to turn light on when either door is not, repeat the removal and installation procedures. 17 Remove bulb from oven. Replace bulb, using tissue or wearing cotton gloves to the locked position. Reconnect power. 2. Then, follow these instructions...
... door is opened . Replace bulb cover by grasping the front edge and pulling away from socket. 4. On double oven models, both upper and lower lights will shut. 4. Insert both sides. Continue to slide. When the oven door is free to turn light on when either door is not, repeat the removal and installation procedures. 17 Remove bulb from oven. Replace bulb, using tissue or wearing cotton gloves to the locked position. Reconnect power. 2. Then, follow these instructions...

Owners Manual
Page 18
...; On some models, reset the clock, if needed. See the Installation Instructions. ■ Is the proper temperature set correctly? See "Oven Temperature Control" section. ■ Was the oven preheated? Oven peeking releases oven heat and can result in a reliable cookbook. ■ Is the proper oven temperature calibration set ? Clear the display. See "Display(s)" section. See "Self-Cleaning Cycle" section. ■ Has a delay start been set ? Oven cooking results not what expected ■ Is the appliance level? See "Baking and Roasting" section...
...; On some models, reset the clock, if needed. See the Installation Instructions. ■ Is the proper temperature set correctly? See "Oven Temperature Control" section. ■ Was the oven preheated? Oven peeking releases oven heat and can result in a reliable cookbook. ■ Is the proper oven temperature calibration set ? Clear the display. See "Display(s)" section. See "Self-Cleaning Cycle" section. ■ Has a delay start been set ? Oven cooking results not what expected ■ Is the appliance level? See "Baking and Roasting" section...

Owners Manual
Page 20
... normal, single-family household use of your major appliance if it was purchased. Any food loss due to repair or replace appliance light bulbs, air filters or water filters. Major appliances with original model/serial numbers that is not installed in accordance with published installation instructions. 11. The cost of the Use & Care Guide. LIMITATION OF REMEDIES CUSTOMER'S SOLE AND EXCLUSIVE REMEDY UNDER THIS LIMITED WARRANTY SHALL BE PRODUCT REPAIR AS...
... normal, single-family household use of your major appliance if it was purchased. Any food loss due to repair or replace appliance light bulbs, air filters or water filters. Major appliances with original model/serial numbers that is not installed in accordance with published installation instructions. 11. The cost of the Use & Care Guide. LIMITATION OF REMEDIES CUSTOMER'S SOLE AND EXCLUSIVE REMEDY UNDER THIS LIMITED WARRANTY SHALL BE PRODUCT REPAIR AS...

Installation Instructions
Page 5
... cut the conduit. Open the oven door. 2. Locate the oven door latches in both hands to the unlocked position. Feed the flexible conduit from the oven through flexible, armored or nonmetallic sheathed, copper cable (with local codes and industry accepted wiring practices. Decide on a covered work surface. Set the oven door(s) aside on the final location for the oven. Remove Oven Door IMPORTANT: Use both corners of the oven door with a neutral (white) power supply wire and a cabinet-connected...
... cut the conduit. Open the oven door. 2. Locate the oven door latches in both hands to the unlocked position. Feed the flexible conduit from the oven through flexible, armored or nonmetallic sheathed, copper cable (with local codes and industry accepted wiring practices. Decide on a covered work surface. Set the oven door(s) aside on the final location for the oven. Remove Oven Door IMPORTANT: Use both corners of the oven door with a neutral (white) power supply wire and a cabinet-connected...

Installation Instructions
Page 8
... or Service" section of Double Oven 1. "PF" should appear in the Use and Care Guide. 4. If you purchased your oven. Use the 8-18 x ³⁄₈" screws, located in the display. 2. Reconnect power. 17. If display panel does not light, please reference the "Assistance or Service" section of Single Oven" steps 2-5. Press START. Press OFF/CANCEL. Turn power on for 5 minutes, feel for lower oven door. 16. A A. Replace oven racks. 11. See "Prepare Built-In Oven" section...
... or Service" section of Double Oven 1. "PF" should appear in the Use and Care Guide. 4. If you purchased your oven. Use the 8-18 x ³⁄₈" screws, located in the display. 2. Reconnect power. 17. If display panel does not light, please reference the "Assistance or Service" section of Single Oven" steps 2-5. Press START. Press OFF/CANCEL. Turn power on for 5 minutes, feel for lower oven door. 16. A A. Replace oven racks. 11. See "Prepare Built-In Oven" section...
Warranty
Page 1
... electrical or plumbing codes, or use your major appliance, to replace or repair house fuses, or to correct house wiring or plumbing. 2. In Canada, call 1-800-253-1301. Write down the following information about your major appliance to better help by checking the "Assistance or Service" section or by Whirlpool. 5. Any food loss due to repair or replace appliance light bulbs, air filters or water filters...
... electrical or plumbing codes, or use your major appliance, to replace or repair house fuses, or to correct house wiring or plumbing. 2. In Canada, call 1-800-253-1301. Write down the following information about your major appliance to better help by checking the "Assistance or Service" section or by Whirlpool. 5. Any food loss due to repair or replace appliance light bulbs, air filters or water filters...

Dimension Guide
Page 1
...) ELECTRIC SINGLE AND DOUBLE BUILT-IN OVEN PRODUCT MODEL SERIES GBD309PV GBS309PV RBD305PV RBD307PV RBS305PV RBS307PV Electrical Requirements: Oven must be connected directly to the junction box. cutout height Because Whirlpool Corporation policy includes a continuous commitment to top of solid copper wire to the pigtail leads. 2. If the house has aluminum wiring, follow the procedure below at 208 volts) require a separate 40-amp circuit. recessed depth E. 27¹⁄₂" (69.9 cm) recessed height CABINET DIMENSIONS Single Oven Installed...
...) ELECTRIC SINGLE AND DOUBLE BUILT-IN OVEN PRODUCT MODEL SERIES GBD309PV GBS309PV RBD305PV RBD307PV RBS305PV RBS307PV Electrical Requirements: Oven must be connected directly to the junction box. cutout height Because Whirlpool Corporation policy includes a continuous commitment to top of solid copper wire to the pigtail leads. 2. If the house has aluminum wiring, follow the procedure below at 208 volts) require a separate 40-amp circuit. recessed depth E. 27¹⁄₂" (69.9 cm) recessed height CABINET DIMENSIONS Single Oven Installed...


