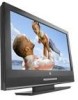

User Manual
Page 3
Refer to them whenever you have any questions or concerns, Please call upon your Westinghouse Digital dealer regarding this product. Keep a record of the TV. Model No Serial No If you call our toll free number 1-866-287-5555 Owner's Record The model and serial numbers are located on the back of the numbers in the spaces provided below.
Refer to them whenever you have any questions or concerns, Please call upon your Westinghouse Digital dealer regarding this product. Keep a record of the TV. Model No Serial No If you call our toll free number 1-866-287-5555 Owner's Record The model and serial numbers are located on the back of the numbers in the spaces provided below.
User Manual
Page 4
...Input 17 For PC connection with D-Sub and PC audio output jacks 18 How to remove the base 18 Watching TV 19 Installation ...19 Turning the LCD Display On and Off 20 Running Initial Setup 21 Menu Navigation ...23 Changing Channels 26 Adjusting The Volume 26 Selecting... Input Source 27 Controls & Adjustments 28 Power Consumption 28 Picture Control...28 Sound Control...31 Channel Management 33 Timer Setting...35 Viewing Closed Caption 37 Ratings Locks ...40...
...Input 17 For PC connection with D-Sub and PC audio output jacks 18 How to remove the base 18 Watching TV 19 Installation ...19 Turning the LCD Display On and Off 20 Running Initial Setup 21 Menu Navigation ...23 Changing Channels 26 Adjusting The Volume 26 Selecting... Input Source 27 Controls & Adjustments 28 Power Consumption 28 Picture Control...28 Sound Control...31 Channel Management 33 Timer Setting...35 Viewing Closed Caption 37 Ratings Locks ...40...
User Manual
Page 5
... allowable defective pixels. there are no user-serviceable parts inside. Important: One Federal Court has held that unauthorized recording of copyrighted TV programs is intended to constitute a risk of these rights. According to qualified service personnel. The symbol is an infringement of the....9% active cells, there still may result in violation of electric shock to the LCD panel. Warning : Do not leave stationary images, patterns, PIP windows, or letterbox images on the screen for LCD display technology; Important Information Warning : To reduce the risk of time as a...
... allowable defective pixels. there are no user-serviceable parts inside. Important: One Federal Court has held that unauthorized recording of copyrighted TV programs is intended to constitute a risk of these rights. According to qualified service personnel. The symbol is an infringement of the....9% active cells, there still may result in violation of electric shock to the LCD panel. Warning : Do not leave stationary images, patterns, PIP windows, or letterbox images on the screen for LCD display technology; Important Information Warning : To reduce the risk of time as a...
User Manual
Page 7
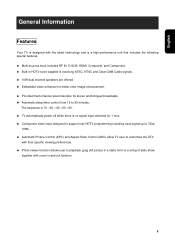
..., Composite, and Component. ‹ Built-in and out function. 5 The sequence is 15ĺ30ĺ45ĺ60ĺ90. ‹ TV automatically power off while there is no signal input detected for 1 hour. ‹ Component video input designed to support only HDTV programming including input signal... up to 720p, 1080i. ‹ Automatic Picture Control (APC) and Aspect Ratio Control (ARC) allow TV user to customize the DTV with their specific viewing preferences. ‹ Photo viewer function allows user to playback .jpeg still picture in a static ...
..., Composite, and Component. ‹ Built-in and out function. 5 The sequence is 15ĺ30ĺ45ĺ60ĺ90. ‹ TV automatically power off while there is no signal input detected for 1 hour. ‹ Component video input designed to support only HDTV programming including input signal... up to 720p, 1080i. ‹ Automatic Picture Control (APC) and Aspect Ratio Control (ARC) allow TV user to customize the DTV with their specific viewing preferences. ‹ Photo viewer function allows user to playback .jpeg still picture in a static ...
User Manual
Page 9
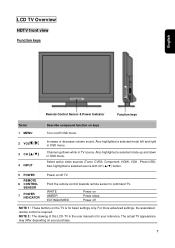
...decrease volume sound. WHITE AMBER EXTINGUISHED Power on Power sleep Power off NOTE 1 : These buttons on the TV is for basic settings only. NOTE 2 : The drawing of this LCD-TV in OSD menu. Also highlighted a selected mode up /down in the user manual is for your purchase.... control is required. Also highlighted a selected mode left and right in TV source. The actual TV appearance may differ depending on your reference. Point the remote control towards remote sensor to command TV. LCD TV Overview HDTV front view Function keys English Remote Control Sensor & Power Indicator...
...decrease volume sound. WHITE AMBER EXTINGUISHED Power on Power sleep Power off NOTE 1 : These buttons on the TV is for basic settings only. NOTE 2 : The drawing of this LCD-TV in OSD menu. Also highlighted a selected mode up /down in the user manual is for your purchase.... control is required. Also highlighted a selected mode left and right in TV source. The actual TV appearance may differ depending on your reference. Point the remote control towards remote sensor to command TV. LCD TV Overview HDTV front view Function keys English Remote Control Sensor & Power Indicator...
User Manual
Page 10
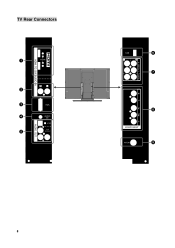
TV Rear Connectors 8
TV Rear Connectors 8
User Manual
Page 11
... external stereo audio amplifier, SPDIF(Optical) receiver or surround sound processor with a memory storage or digital camera through USB cable. In (RF input) Connect the LCD TV to an over-the-air antenna or cable service to an external stereo audio amplifier, (R/L) receiver or surround sound processor with R/L audio inputs. R 9 English Jacks...
... external stereo audio amplifier, SPDIF(Optical) receiver or surround sound processor with a memory storage or digital camera through USB cable. In (RF input) Connect the LCD TV to an over-the-air antenna or cable service to an external stereo audio amplifier, (R/L) receiver or surround sound processor with R/L audio inputs. R 9 English Jacks...
User Manual
Page 12
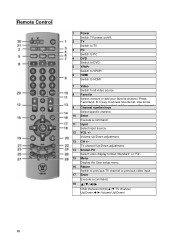
... 9 Channel number keys Select specific channel. 10 Enter Execute a command. 11 Input Select input source. 12 VOL +/Volume Up/Down adjustment. 13 CH +/TV channel Up/Down adjustment. 14 Screen Fit Select video display format "Standard" or "Fill". 15 Menu Display the User setup menu. 16 Return Switch to... all video source 8 Favorite Select, remove or add your favorite channel. Remote Control 1 Power Switch TV power on/off. 2 TV Switch to TV 3 PC Switch to PC 4 DVD Switch to DVD 5 YPbPr Switch to YPbPr 6 HDMI Switch to HDMI 7 Video Switch to previous...
... 9 Channel number keys Select specific channel. 10 Enter Execute a command. 11 Input Select input source. 12 VOL +/Volume Up/Down adjustment. 13 CH +/TV channel Up/Down adjustment. 14 Screen Fit Select video display format "Standard" or "Fill". 15 Menu Display the User setup menu. 16 Return Switch to... all video source 8 Favorite Select, remove or add your favorite channel. Remote Control 1 Power Switch TV power on/off. 2 TV Switch to TV 3 PC Switch to PC 4 DVD Switch to DVD 5 YPbPr Switch to YPbPr 6 HDMI Switch to HDMI 7 Video Switch to previous...
User Manual
Page 14
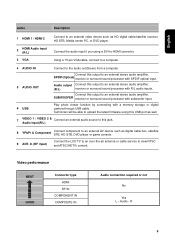
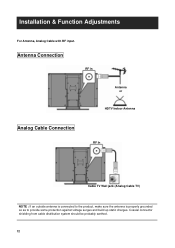
Installation & Function Adjustments For Antenna, Analog Cable with RF input. Coaxial connector shielding from cable distribution system should be probably earthed. 12 Antenna Connection RF In Antenna or HDTV Indoor Antenna Analog Cable Connection RF In Cable TV Wall jack (Analog Cable TV) NOTE : If an outside antenna is connected to the product, make sure the antenna is properly grounded so as to provide some protection against voltage surges and build up static charges.
Installation & Function Adjustments For Antenna, Analog Cable with RF input. Coaxial connector shielding from cable distribution system should be probably earthed. 12 Antenna Connection RF In Antenna or HDTV Indoor Antenna Analog Cable Connection RF In Cable TV Wall jack (Analog Cable TV) NOTE : If an outside antenna is connected to the product, make sure the antenna is properly grounded so as to provide some protection against voltage surges and build up static charges.
User Manual
Page 15
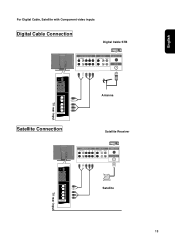
English For Digital Cable, Satellite with Component video inputs Digital Cable Connection Digital Cable STB Satellite Connection TV rear input Antenna Satellite Receiver TV rear input Satellite 13
English For Digital Cable, Satellite with Component video inputs Digital Cable Connection Digital Cable STB Satellite Connection TV rear input Antenna Satellite Receiver TV rear input Satellite 13
User Manual
Page 16
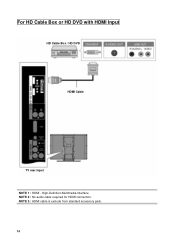
High-Definition Multimedia Interface NOTE 2 : No audio cable required for HDMI connection. NOTE 3 : HDMI cable is exclude from standard accessory pack. 14 For HD Cable Box or HD DVD with HDMI Input HD Cable Box / HD DVD HDMI Cable TV rear input NOTE 1 : HDMI -
High-Definition Multimedia Interface NOTE 2 : No audio cable required for HDMI connection. NOTE 3 : HDMI cable is exclude from standard accessory pack. 14 For HD Cable Box or HD DVD with HDMI Input HD Cable Box / HD DVD HDMI Cable TV rear input NOTE 1 : HDMI -

User Manual
Page 17
NOTE 4 : Cables above is transmitting through 3.5 mm mini-jack audio cable with DVI input * Tips: recommend prioritizing HDMI jack ahead of DVI if your external video devices possessed both connectors. English For External Video Device with PC audio in. NOTE 2 : Audio signal is transmitting through HDMI-to any video device contains DVI connector. Video Device HDMI-to-DVI Cable or HDMI-to-DVI adapter Audio Cable TV rear input NOTE 1 : Video signal is applicable to -DVI connection. NOTE 3 : Diagram above are excluded from standard accessory pack. 15
NOTE 4 : Cables above is transmitting through 3.5 mm mini-jack audio cable with DVI input * Tips: recommend prioritizing HDMI jack ahead of DVI if your external video devices possessed both connectors. English For External Video Device with PC audio in. NOTE 2 : Audio signal is transmitting through HDMI-to any video device contains DVI connector. Video Device HDMI-to-DVI Cable or HDMI-to-DVI adapter Audio Cable TV rear input NOTE 1 : Video signal is applicable to -DVI connection. NOTE 3 : Diagram above are excluded from standard accessory pack. 15

User Manual
Page 18
For HD STB, DVD player, game console with component input HD DVD / Game Console / Digital Cable box / Satellite receiver Audio Cable Component Cable NOTE 1 : Diagram above are excluded from standard accessory pack. 16 TV rear input NOTE 2 : Cables above is applicable to any video device contains YPbPr connector.
For HD STB, DVD player, game console with component input HD DVD / Game Console / Digital Cable box / Satellite receiver Audio Cable Component Cable NOTE 1 : Diagram above are excluded from standard accessory pack. 16 TV rear input NOTE 2 : Cables above is applicable to any video device contains YPbPr connector.
User Manual
Page 19
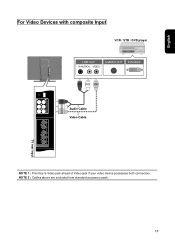
English For Video Devices with composite Input VCR / STB / DVD player Audio Cable Video Cable NOTE 1 : Prioritize S-Video jack ahead of Video jack if your video device possesses both connectors. NOTE 2 : Cables above are excluded from standard accessory pack. 17 TV rear input
English For Video Devices with composite Input VCR / STB / DVD player Audio Cable Video Cable NOTE 1 : Prioritize S-Video jack ahead of Video jack if your video device possesses both connectors. NOTE 2 : Cables above are excluded from standard accessory pack. 17 TV rear input
User Manual
Page 20
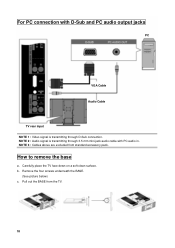
For PC connection with PC audio in. NOTE 2 : Audio signal is transmitting through 3.5 mm mini-jack audio cable with D-Sub and PC audio output jacks PC VGA Cable Audio Cable TV rear input NOTE 1 : Video signal is transmitting through D-Sub connection. Remove the four screws underneath the BASE. (See picture below) c. Pull out the BASE from standard accessory pack. Carefully place the TV face down on a soft clean surface. NOTE 3 : Cables above are excluded from the TV. 18 b. How to remove the base a.
For PC connection with PC audio in. NOTE 2 : Audio signal is transmitting through 3.5 mm mini-jack audio cable with D-Sub and PC audio output jacks PC VGA Cable Audio Cable TV rear input NOTE 1 : Video signal is transmitting through D-Sub connection. Remove the four screws underneath the BASE. (See picture below) c. Pull out the BASE from standard accessory pack. Carefully place the TV face down on a soft clean surface. NOTE 3 : Cables above are excluded from the TV. 18 b. How to remove the base a.
User Manual
Page 21
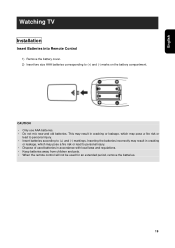
..., which may pose a fire risk or lead to personal injury. Ǹʳ Insert batteries according to (+) and (-) marks on the battery compartment. English ʳ Watching TV Installation Insert Batteries into Remote Control 1) Remove the battery cover. 2) Insert two size AAA batteries corresponding to (+) and (-) markings. CAUTION Ǹʳ Only use AAA...
..., which may pose a fire risk or lead to personal injury. Ǹʳ Insert batteries according to (+) and (-) marks on the battery compartment. English ʳ Watching TV Installation Insert Batteries into Remote Control 1) Remove the battery cover. 2) Insert two size AAA batteries corresponding to (+) and (-) markings. CAUTION Ǹʳ Only use AAA...
User Manual
Page 22
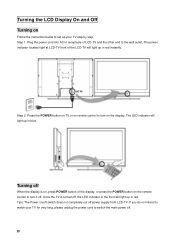
... by step. The LED indicator will light up in red instantly. Step 1: Plug the power cord into AC In receptacle of the LCD-TV will light up in red. Turning off When the display is turned off, the LED indicator in the front will light up in blue. The ...power indicator located right at LCD-TV front of LCD-TV and the other end to the wall outlet. Tips: The Power on/off switch does not completely cut off power supply from...
... by step. The LED indicator will light up in red instantly. Step 1: Plug the power cord into AC In receptacle of the LCD-TV will light up in red. Turning off When the display is turned off, the LED indicator in the front will light up in blue. The ...power indicator located right at LCD-TV front of LCD-TV and the other end to the wall outlet. Tips: The Power on/off switch does not completely cut off power supply from...
User Manual
Page 23
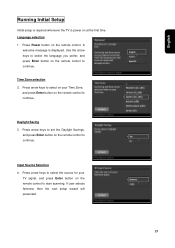
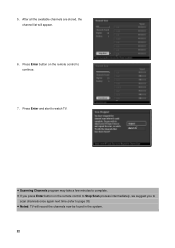
... for your Time Zone, and press Enter button on the remote control to continue. Time Zone selection 2. Press arrow keys to select on your TV signal, and press Enter button on the remote control to start scanning. English Running Initial Setup Initial setup is required whenever the... TV is displayed. Language selection 1. Press Power button on at the first time. Input Source Selection 4. If user selects Antenna, then the next setup wizard ...
... for your Time Zone, and press Enter button on the remote control to continue. Time Zone selection 2. Press arrow keys to select on your TV signal, and press Enter button on the remote control to start scanning. English Running Initial Setup Initial setup is required whenever the... TV is displayed. Language selection 1. Press Power button on at the first time. Input Source Selection 4. If user selects Antenna, then the next setup wizard ...
User Manual
Page 24
Press Enter button on the remote control to Stop Scan process intermediately, we suggest you press Enter button on the remote control to page 33) Noted: TV will appear. 6. 5. Press Enter and start to watch TV. Scanning Channels program may take a few minutes to complete. If you to scan channels once again next time.(refer to continue. 7. After all the available channels are stored, the channel list will record the channels now be found in the system. 22
Press Enter button on the remote control to Stop Scan process intermediately, we suggest you press Enter button on the remote control to page 33) Noted: TV will appear. 6. 5. Press Enter and start to watch TV. Scanning Channels program may take a few minutes to complete. If you to scan channels once again next time.(refer to continue. 7. After all the available channels are stored, the channel list will record the channels now be found in the system. 22
User Manual
Page 25
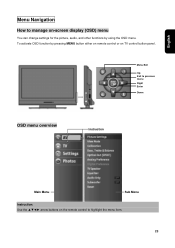
To activate OSD function by using the OSD menu. English Menu Navigation How to manage on-screen display (OSD) menu You can change settings for the picture, audio, and other functions by pressing MENU button either on remote control or on the remote control to previous menu Right Enter Down OSD menu overview Instruction Main Menu Sub Menu Instruction: Use the ŸźŻŹ arrow buttons on TV control button panel. Menu/Exit Up Exit to highlight the menu item. 23
To activate OSD function by using the OSD menu. English Menu Navigation How to manage on-screen display (OSD) menu You can change settings for the picture, audio, and other functions by pressing MENU button either on remote control or on the remote control to previous menu Right Enter Down OSD menu overview Instruction Main Menu Sub Menu Instruction: Use the ŸźŻŹ arrow buttons on TV control button panel. Menu/Exit Up Exit to highlight the menu item. 23


