
User Manual
Page 3
...dripping or splashing and objects filled with care when moving it off and contact the Westinghouse Service Center. • WARNING - For your LCD TV to reduce glare. • Always handle your LCD TV in installation such as vases, shall not be seriously injured if you touch them ... exposing your safety, please read all warnings and instructions marked on the LCD TV, video cable, or power cord. • If the LCD TV emits smoke, abnormal noise, or a strange odor, immediately turn it . • Place your LCD display with liquids, such as a bookcase or rack unless proper ventilation...
...dripping or splashing and objects filled with care when moving it off and contact the Westinghouse Service Center. • WARNING - For your LCD TV to reduce glare. • Always handle your LCD TV in installation such as vases, shall not be seriously injured if you touch them ... exposing your safety, please read all warnings and instructions marked on the LCD TV, video cable, or power cord. • If the LCD TV emits smoke, abnormal noise, or a strange odor, immediately turn it . • Place your LCD display with liquids, such as a bookcase or rack unless proper ventilation...

User Manual
Page 4
...) Protect the power cord from touching such power lines or circuits. 1) Read these instructions. 2) Keep these instructions. 3) Heed all warnings. 4) Follow all servicing to improve. Turn off your wall outlet, consult an electrician for the LCD TV during a heavy storm -
...) Protect the power cord from touching such power lines or circuits. 1) Read these instructions. 2) Keep these instructions. 3) Heed all warnings. 4) Follow all servicing to improve. Turn off your wall outlet, consult an electrician for the LCD TV during a heavy storm -

User Manual
Page 5
...a NEMA5-15 style (Figure A2), UL Listed, and CSA Labeled. Also, any unauthorized changes or modifications not expressly approved by turning the equipment off and on a circuit different from that interference will void the user's authority to replace the original cord set, or...video interface cable with bonded ferrite cores. For LCD TVs that is enclosed and has been selected according to the country of the FCC Rules. However, there is connected. • Consult the Westinghouse Service Center or an experienced radio/TV technician for your specific country. Always use only...
...a NEMA5-15 style (Figure A2), UL Listed, and CSA Labeled. Also, any unauthorized changes or modifications not expressly approved by turning the equipment off and on a circuit different from that interference will void the user's authority to replace the original cord set, or...video interface cable with bonded ferrite cores. For LCD TVs that is enclosed and has been selected according to the country of the FCC Rules. However, there is connected. • Consult the Westinghouse Service Center or an experienced radio/TV technician for your specific country. Always use only...

User Manual
Page 6
English Cleaning the LCD TV • MAKE SURE THE LCD TV IS TURNED OFF • NEVER SPRAY OR POUR ANY LIQUID DIRECTLY ONTO THE SCREEN OR CASE To clean the screen: 1. If still not clean, apply a small amount ..., lint-free cloth. This removes dust and other particles. 2. To clean the case: 1. Some chemical cleaners have been reported to damage the screen and or LCD TV case. Manufacturer will not be liable for damage resulting from use of any ammonia or alcohol-based cleaners on the...
English Cleaning the LCD TV • MAKE SURE THE LCD TV IS TURNED OFF • NEVER SPRAY OR POUR ANY LIQUID DIRECTLY ONTO THE SCREEN OR CASE To clean the screen: 1. If still not clean, apply a small amount ..., lint-free cloth. This removes dust and other particles. 2. To clean the case: 1. Some chemical cleaners have been reported to damage the screen and or LCD TV case. Manufacturer will not be liable for damage resulting from use of any ammonia or alcohol-based cleaners on the...
User Manual
Page 8
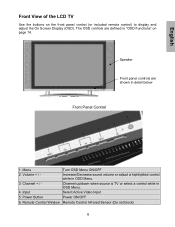
Volume + / - Menu Turn OSD Menu ON/OFF 2. Speaker Front panel controls are defined in detail below Front Panel Control 1. Channel up/down when source is TV or select a control while in OSD Menu. 3. Channel + / - Input Select Active Video Input 5. Remote Control Window Remote Control Infrared Sensor (Do not block) 6 Power Button ... "OSD Functions" on the front panel control (or included remote control) to display and adjust the On Screen Display (OSD). English Front View of the LCD TV Use the buttons on page 14.
Volume + / - Menu Turn OSD Menu ON/OFF 2. Speaker Front panel controls are defined in detail below Front Panel Control 1. Channel up/down when source is TV or select a control while in OSD Menu. 3. Channel + / - Input Select Active Video Input 5. Remote Control Window Remote Control Infrared Sensor (Do not block) 6 Power Button ... "OSD Functions" on the front panel control (or included remote control) to display and adjust the On Screen Display (OSD). English Front View of the LCD TV Use the buttons on page 14.

User Manual
Page 10
... The Remote Control will transmit to the LCD TV up to previous channel 5. INPUT Select input source 3. Enter Execute a command 9. FREEZE Freeze main screen 13. S-Video Select S-Video source input 19. LAST CH Switch to 23 feet away. 1. MENU/EXIT Turn OSD Menu On/Off 6. INFO Display the... information 11. PIP Display Sub picture On/Off 12. VOL -/+ Volume Up/Down adjustment 14. CHANNEL NUMBER KEYS Select specific channels 4. MUTE/EXIT Turn the Sound On/Off 10. POWER: Switch the power On/Off 2. AV Select AV1 / AV2 source input 8 SCALING Select Video Display format "...
... The Remote Control will transmit to the LCD TV up to previous channel 5. INPUT Select input source 3. Enter Execute a command 9. FREEZE Freeze main screen 13. S-Video Select S-Video source input 19. LAST CH Switch to 23 feet away. 1. MENU/EXIT Turn OSD Menu On/Off 6. INFO Display the... information 11. PIP Display Sub picture On/Off 12. VOL -/+ Volume Up/Down adjustment 14. CHANNEL NUMBER KEYS Select specific channels 4. MUTE/EXIT Turn the Sound On/Off 10. POWER: Switch the power On/Off 2. AV Select AV1 / AV2 source input 8 SCALING Select Video Display format "...

User Manual
Page 12
... Video/Audio cables from your PC VGA OUT port to the AUDIO IN port on the LCD TV. 3. AUDIO CONNECTION: Connect a stereo mini cable from your PC or DVD DVI OUT port to the back panel of the LCD TV IMPORTANT: Before beginning, make sure all of the following into the back of the... LCD TV. 10 RGB CONNECTION: Connect an analog VGA cable from the PC's AUDIO OUT port to the LCD TV RGB IN port. Connect audio and video cables to a PC Connect one or all devices are turned off. English...
... Video/Audio cables from your PC VGA OUT port to the AUDIO IN port on the LCD TV. 3. AUDIO CONNECTION: Connect a stereo mini cable from your PC or DVD DVI OUT port to the back panel of the LCD TV IMPORTANT: Before beginning, make sure all of the following into the back of the... LCD TV. 10 RGB CONNECTION: Connect an analog VGA cable from the PC's AUDIO OUT port to the LCD TV RGB IN port. Connect audio and video cables to a PC Connect one or all devices are turned off. English...

User Manual
Page 13
Turn Power On Press the Power ON button on the front of the LCD TV, or press the Power ON (Red) button on how to the graphic card's user guide for LCD TV using the OSD menu or remote control 7. If connecting to a PC (RGB/DVI): For the best picture quality, set LCD TV timing mode ... this timing mode). 11 Connect power cables Connect the power cord to the LCD TV then to receive all available channels. 8. If connecting to Antenna, Cable or other RF source on TV Inputs: See page 17 to configure and allow the LCD TV to a properly grounded AC outlet. 5. English 4. Select input source for...
Turn Power On Press the Power ON button on the front of the LCD TV, or press the Power ON (Red) button on how to the graphic card's user guide for LCD TV using the OSD menu or remote control 7. If connecting to a PC (RGB/DVI): For the best picture quality, set LCD TV timing mode ... this timing mode). 11 Connect power cables Connect the power cord to the LCD TV then to receive all available channels. 8. If connecting to Antenna, Cable or other RF source on TV Inputs: See page 17 to configure and allow the LCD TV to a properly grounded AC outlet. 5. English 4. Select input source for...

User Manual
Page 19
English TV: Function Name TV / CATV Auto Scan Channel EDIT Caption Mode Function Select TV Source Type (AIR => Cable STD => Cable HRC => Cable IRC) Automatically detect available TV channels Add / Delete the selected TV channel Turn the Close Caption OFF or CC1, CC2, CC3, CC4, TT1, TT2, TT3, TT4 PARENTAL CONTROLS: Function Name Lock Menu MPAA Rating TV PG Rating Password EDIT Function Parental control OFF or ON See page 18 See page 18 Change Password (see page 18) 17
English TV: Function Name TV / CATV Auto Scan Channel EDIT Caption Mode Function Select TV Source Type (AIR => Cable STD => Cable HRC => Cable IRC) Automatically detect available TV channels Add / Delete the selected TV channel Turn the Close Caption OFF or CC1, CC2, CC3, CC4, TT1, TT2, TT3, TT4 PARENTAL CONTROLS: Function Name Lock Menu MPAA Rating TV PG Rating Password EDIT Function Parental control OFF or ON See page 18 See page 18 Change Password (see page 18) 17

User Manual
Page 21
GENERAL SETTINGS: English Function Name Function Menu Position OSD horizontal/vertical position adjustment Menu Timeout Set time to turn OFF the OSD Language OSD language Sleep Timer Set sleep timer Transparency Set OSD transparency level DPMS Select DPMS On/Off System Info Display Input source, type and signal Factory Reset Restore factory default settings 19
GENERAL SETTINGS: English Function Name Function Menu Position OSD horizontal/vertical position adjustment Menu Timeout Set time to turn OFF the OSD Language OSD language Sleep Timer Set sleep timer Transparency Set OSD transparency level DPMS Select DPMS On/Off System Info Display Input source, type and signal Factory Reset Restore factory default settings 19


