
User Manual
Page 2
...of the Product...11 Remote Control ...12 The Remote Control should be used within 3 meters of the LCD TV 12 OSD FUNCTIONS ...13 TV OSD Menu ...13 Image Menu ...13 Audio Menu ...14 Color Menu...14 TV Menu...15 Miscellaneous Menu ...15 V-Chip and Parental Control Menu ...16 Rating Menus...17 Video OSD ...Menu...17 PC OSD Menu ...18 Image Menu ...18 Audio Menu ...19 Color Temp Menu ...19 Miscellaneous Menu ...20 INFO Menu...20 PC DVI OSD Menu...
...of the Product...11 Remote Control ...12 The Remote Control should be used within 3 meters of the LCD TV 12 OSD FUNCTIONS ...13 TV OSD Menu ...13 Image Menu ...13 Audio Menu ...14 Color Menu...14 TV Menu...15 Miscellaneous Menu ...15 V-Chip and Parental Control Menu ...16 Rating Menus...17 Video OSD ...Menu...17 PC OSD Menu ...18 Image Menu ...18 Audio Menu ...19 Color Temp Menu ...19 Miscellaneous Menu ...20 INFO Menu...20 PC DVI OSD Menu...
User Manual
Page 3
...not place near basins or sinks where it exits from foot traffic and contact with other appliances that generate heat. Do not place your LCD near heat sources such as radiators, heat registers, or other objects. Overloading wall outlets, circuits, or extension cords can damage or shorten...and level surface. The cord should be severely bent, pinched, or twisted. Unplug cord and discontinue use if damage is discovered. Keep the LCD TV a minimum of four (4) inches away from overheating, these openings must not be blocked or covered. Unstable surfaces can result in personal injury or...
...not place near basins or sinks where it exits from foot traffic and contact with other appliances that generate heat. Do not place your LCD near heat sources such as radiators, heat registers, or other objects. Overloading wall outlets, circuits, or extension cords can damage or shorten...and level surface. The cord should be severely bent, pinched, or twisted. Unplug cord and discontinue use if damage is discovered. Keep the LCD TV a minimum of four (4) inches away from overheating, these openings must not be blocked or covered. Unstable surfaces can result in personal injury or...
User Manual
Page 4
There are no user serviceable parts inside. Your warranty does not cover repairs or attempted repairs by anyone not authorized by placing the LCD TV on a bed, sofa, rug or other similar surface. If smoke, abnormal noise, or strange odor is provided. Other Notices and Precautions ... not be seriously injured if you touch them. To assure proper ventilation, do not block the openings by Westinghouse Digital. Do not attempt repairs yourself. Your LCD TV contains high-voltage parts. Do not place it in a built-in installation, such as a bookcase or an enclosed rack, unless proper ...
There are no user serviceable parts inside. Your warranty does not cover repairs or attempted repairs by anyone not authorized by placing the LCD TV on a bed, sofa, rug or other similar surface. If smoke, abnormal noise, or strange odor is provided. Other Notices and Precautions ... not be seriously injured if you touch them. To assure proper ventilation, do not block the openings by Westinghouse Digital. Do not attempt repairs yourself. Your LCD TV contains high-voltage parts. Do not place it in a built-in installation, such as a bookcase or an enclosed rack, unless proper ...
User Manual
Page 5
...will not be liable for the grounding electrode. Cleaning the LCD TV ʳ • MAKE SURE THE LCD TV IS TURNED OFF • NEVER SPRAY OR POUR LIQUID DIRECTLY ONTO THE SCREEN OR CASE To clean the screen: 1. Disclaimer Westinghouse Digital does not recommend the use of any ammonia or alcohol...-based cleaners. 4 Use a soft, dry cloth. 2. Antenna Installation Safety Outdoor Antenna Grounding If an outside antenna or cable system is connected to the LCD TV, be sure the antenna or ...
...will not be liable for the grounding electrode. Cleaning the LCD TV ʳ • MAKE SURE THE LCD TV IS TURNED OFF • NEVER SPRAY OR POUR LIQUID DIRECTLY ONTO THE SCREEN OR CASE To clean the screen: 1. Disclaimer Westinghouse Digital does not recommend the use of any ammonia or alcohol...-based cleaners. 4 Use a soft, dry cloth. 2. Antenna Installation Safety Outdoor Antenna Grounding If an outside antenna or cable system is connected to the LCD TV, be sure the antenna or ...
User Manual
Page 6
... current rating for this device. 5 FCC Warning To assure continued FCC compliance, the user must be used to correct the interference by Westinghouse Digital will not occur in a particular installation. Also, any unauthorized changes or modifications not expressly approved by one or more of the ... Type SJT SVT Size of Conductors in a residential installation. If a BNC cable is connected. • Consult the dealer or an experienced radio/TV technician for a Class B digital device, pursuant to part 15 of destination and must meet IEC-60320 requirements and may be used . The cord...
... current rating for this device. 5 FCC Warning To assure continued FCC compliance, the user must be used to correct the interference by Westinghouse Digital will not occur in a particular installation. Also, any unauthorized changes or modifications not expressly approved by one or more of the ... Type SJT SVT Size of Conductors in a residential installation. If a BNC cable is connected. • Consult the dealer or an experienced radio/TV technician for a Class B digital device, pursuant to part 15 of destination and must meet IEC-60320 requirements and may be used . The cord...
User Manual
Page 7
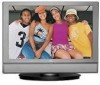
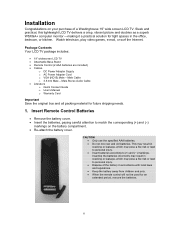
Package Contents Your LCD TV package includes: • 19" widescreen LCD TV • Attachable Base Stand • Remote Control (2 AAA batteries are included) • Cables o DC Power Adapter Supply o AC Power Adapter Cord o VGA (HD15) .... This may result in cracking or leakage, which may pose a fire risk or lead to personal injury. • Dispose of a Westinghouse 19" wide screen LCD TV. Sleek and practical, this lightweight LCD TV delivers a crisp, vibrant picture and doubles as a superb WSXGA+ computer monitor -making it a practical solution for tight spaces in cracking...
Package Contents Your LCD TV package includes: • 19" widescreen LCD TV • Attachable Base Stand • Remote Control (2 AAA batteries are included) • Cables o DC Power Adapter Supply o AC Power Adapter Cord o VGA (HD15) .... This may result in cracking or leakage, which may pose a fire risk or lead to personal injury. • Dispose of a Westinghouse 19" wide screen LCD TV. Sleek and practical, this lightweight LCD TV delivers a crisp, vibrant picture and doubles as a superb WSXGA+ computer monitor -making it a practical solution for tight spaces in cracking...
User Manual
Page 8
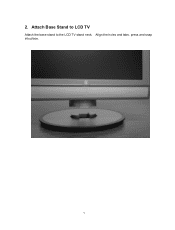
Attach Base Stand to LCD TV Attach the base stand to the LCD TV stand neck. Align the holes and tabs, press and snap into place. 7 2.
Attach Base Stand to LCD TV Attach the base stand to the LCD TV stand neck. Align the holes and tabs, press and snap into place. 7 2.
User Manual
Page 9
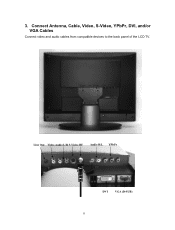
Line Out Video Audio L/R S-Video RF Audio R/L YPbPr DVI VGA (D-SUB) 8 Connect Antenna, Cable, Video, S-Video, YPbPr, DVI, and/or VGA Cables Connect video and audio cables from compatible devices to the back panel of the LCD TV. 3.
Line Out Video Audio L/R S-Video RF Audio R/L YPbPr DVI VGA (D-SUB) 8 Connect Antenna, Cable, Video, S-Video, YPbPr, DVI, and/or VGA Cables Connect video and audio cables from compatible devices to the back panel of the LCD TV. 3.
User Manual
Page 10
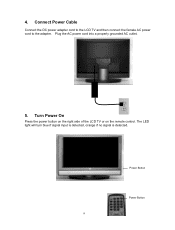
The LED light will turn blue if signal input is detected, orange if no signal is detected. Connect Power Cable Connect the DC power adapter cord to the LCD TV and then connect the female AC power cord to the adapter. Plug the AC power cord into a properly grounded AC outlet. 5. 4. Power Button Power Button 9 Turn Power On Press the power button on the right side of the LCD TV or on the remote control.
The LED light will turn blue if signal input is detected, orange if no signal is detected. Connect Power Cable Connect the DC power adapter cord to the LCD TV and then connect the female AC power cord to the adapter. Plug the AC power cord into a properly grounded AC outlet. 5. 4. Power Button Power Button 9 Turn Power On Press the power button on the right side of the LCD TV or on the remote control.
User Manual
Page 11
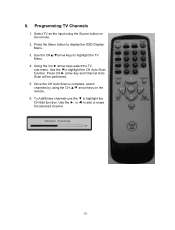
...;/ź arrow keys on the remote. 2. Use the źto add or erase the selected channel 10 Using the Vol Ź arrow keys select the TV sub-menu. Once the CH Auto Scan is complete, switch channels by using the Source button on the remote. 6. Use the Ź, or Ż to... CH Edit function. Press Vol Ź arrow key and Channel Auto Scan will be performed. 5. To Add/Erase channels use the ź to highlight the TV Menu. 4. Press the Menu button to display the OSD Display Menu. 3. Programming...
...;/ź arrow keys on the remote. 2. Use the źto add or erase the selected channel 10 Using the Vol Ź arrow keys select the TV sub-menu. Once the CH Auto Scan is complete, switch channels by using the Source button on the remote. 6. Use the Ź, or Ż to... CH Edit function. Press Vol Ź arrow key and Channel Auto Scan will be performed. 5. To Add/Erase channels use the ź to highlight the TV Menu. 4. Press the Menu button to display the OSD Display Menu. 3. Programming...
User Manual
Page 12
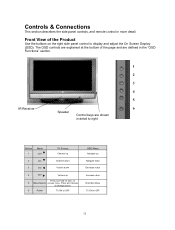
... or OFF OSD Menu Navigate up Press and hold for 2sec. Press and release to right Button 1 Mode CH+ TV Source Channel up 2 CH- The OSD controls are explained at the bottom of the Product Use the buttons on the right side panel control to 5 ... access menu. to display and adjust the On Screen Display (OSD). Channel down 4 Vol+ Volume up Navigate down Decrease value Increase value Enter/Exit Menu TV ON or OFF 11 Front View of the page and are defined in the "OSD Functions" section. 1 2 3 4 5 IR Receiver 6 Speaker Control keys are shown in...
... or OFF OSD Menu Navigate up Press and hold for 2sec. Press and release to right Button 1 Mode CH+ TV Source Channel up 2 CH- The OSD controls are explained at the bottom of the Product Use the buttons on the right side panel control to 5 ... access menu. to display and adjust the On Screen Display (OSD). Channel down 4 Vol+ Volume up Navigate down Decrease value Increase value Enter/Exit Menu TV ON or OFF 11 Front View of the page and are defined in the "OSD Functions" section. 1 2 3 4 5 IR Receiver 6 Speaker Control keys are shown in...
User Manual
Page 13
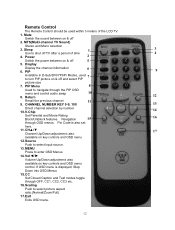
MTS(Multi-channel TV Sound) Stereo and Mono selection 3. Navigation 15 16 through OFF, CC1, CC2, CC3 etc. 16. CHŸ/ź 17 Channel Up/Down adjustment; VolŻ/&#.... Return 12 Recall the previous channel 11 9. If OSD menu is also set here. 11. Sleep 1 3 Use to turn PIP picture on & off TV after a period of the LCD TV. 1. PIP 9 Available in D-Sub/DVI/YPbPr Modes, used within 3 meters of time 4 4. CHANNEL NUMBER KEY 0-9, 100 13 Direct channel selection by number 10...
MTS(Multi-channel TV Sound) Stereo and Mono selection 3. Navigation 15 16 through OFF, CC1, CC2, CC3 etc. 16. CHŸ/ź 17 Channel Up/Down adjustment; VolŻ/&#.... Return 12 Recall the previous channel 11 9. If OSD menu is also set here. 11. Sleep 1 3 Use to turn PIP picture on & off TV after a period of the LCD TV. 1. PIP 9 Available in D-Sub/DVI/YPbPr Modes, used within 3 meters of time 4 4. CHANNEL NUMBER KEY 0-9, 100 13 Direct channel selection by number 10...
User Manual
Page 14
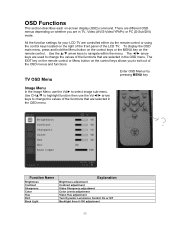
...The EXIT key on the remote control or Menu button on whether you to exit out of the LCD TV. To display the OSD main menu, press and hold the Menu button on the control keys or ...Use CHŸ/ź to highlight function then use the VolŹ to navigate within the menu. TV OSD Menu Enter OSD Menus by pressing MENU key Image Menu In the Image Menu use the Vol&#...Luminance Control On or Off Backlight from 0-100 adjustment 13 All the function settings for your LCD TV are selected in TV, Video (AV/S-Video/YPbPr) or PC (D-Sub/DVI) mode. OSD Functions This section describes each on...
...The EXIT key on the remote control or Menu button on whether you to exit out of the LCD TV. To display the OSD main menu, press and hold the Menu button on the control keys or ...Use CHŸ/ź to highlight function then use the VolŹ to navigate within the menu. TV OSD Menu Enter OSD Menus by pressing MENU key Image Menu In the Image Menu use the Vol&#...Luminance Control On or Off Backlight from 0-100 adjustment 13 All the function settings for your LCD TV are selected in TV, Video (AV/S-Video/YPbPr) or PC (D-Sub/DVI) mode. OSD Functions This section describes each on...
User Manual
Page 16
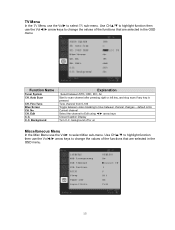
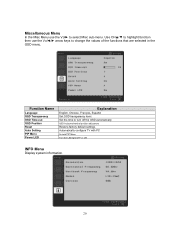
... is pressed. C.C. background off or on Miscellaneous Menu In the Misc Menu use the VolŹ to select TV sub-menu. Auto Scan CH. Background Explanation Select between channel changes - TV Menu In the TV Menu use the VolŹ to select Misc sub-menu. Tune channel from 0-100 Toggle between video blanking...
... is pressed. C.C. background off or on Miscellaneous Menu In the Misc Menu use the VolŹ to select TV sub-menu. Auto Scan CH. Background Explanation Select between channel changes - TV Menu In the TV Menu use the VolŹ to select Misc sub-menu. Tune channel from 0-100 Toggle between video blanking...
User Manual
Page 18
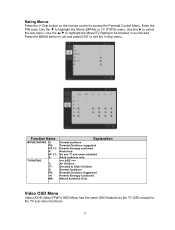
Use the ź to be blocked or un-blocked. Use the Ÿ/ź to highlight the Movie/TV Rating to highlight the Movie (MPAA) or TV (TVPG) menu. Enter the PIN code. Use the Ź to Older Children General Audience Parental Guidance Suggested Parents Strongly Cautioned Mature Audience ...Only Video OSD Menu Video (AV/S-Video/YPbPr) OSD Menu has the same OSD features as the TV OSD except for the TV sub-menu functions. 17 Function Name MOVIE RATING G: PG: PG 13: R: NC 17: X: TV RATING Y: Y7: G: PG: 14: MA: Explanation General audience Parental Guidance suggested Parents strongly ...
Use the ź to be blocked or un-blocked. Use the Ÿ/ź to highlight the Movie/TV Rating to highlight the Movie (MPAA) or TV (TVPG) menu. Enter the PIN code. Use the Ź to Older Children General Audience Parental Guidance Suggested Parents Strongly Cautioned Mature Audience ...Only Video OSD Menu Video (AV/S-Video/YPbPr) OSD Menu has the same OSD features as the TV OSD except for the TV sub-menu functions. 17 Function Name MOVIE RATING G: PG: PG 13: R: NC 17: X: TV RATING Y: Y7: G: PG: 14: MA: Explanation General audience Parental Guidance suggested Parents strongly ...
User Manual
Page 19
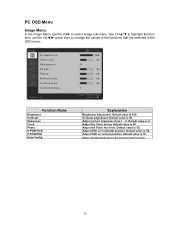
... from 1 - 5. Default value is 50. Default value is 55. Default value is 50. Adjust the Video Hue level. Adjust automatically the picture and synch the LCD TV monitor 18 Function Name Brightness Contrast Sharpness Clock Phase H-POSITION V-POSITION Auto-Config Explanation Brightness adjustment. Adjust the Clock timing. PC OSD Menu Image Menu...
... from 1 - 5. Default value is 50. Default value is 55. Default value is 50. Adjust the Video Hue level. Adjust automatically the picture and synch the LCD TV monitor 18 Function Name Brightness Contrast Sharpness Clock Phase H-POSITION V-POSITION Auto-Config Explanation Brightness adjustment. Adjust the Clock timing. PC OSD Menu Image Menu...
User Manual
Page 21
...;ol Set OSD transparency level Set the time to turn off the OSD automatically OSD horizontal/vertical position adjustment Restore factory default settings Automatically configure TV with PC Access PIP Menu Turn the LED light OFF or ON INFO Menu Display system information. 20
...;ol Set OSD transparency level Set the time to turn off the OSD automatically OSD horizontal/vertical position adjustment Restore factory default settings Automatically configure TV with PC Access PIP Menu Turn the LED light OFF or ON INFO Menu Display system information. 20
User Manual
Page 22
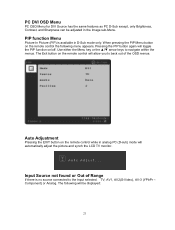
... will allow you to the Input selected. When pressing the PIP Menu button on the remote control will automatically adjust the picture and synch the LCD TV monitor. TV, AV1, AV2(S-Video), AV-3 (YPbPr - Use either the Menu key or the Ÿ/ź arrow keys to navigate within the menus. PIP function Menu...
... will allow you to the Input selected. When pressing the PIP Menu button on the remote control will automatically adjust the picture and synch the LCD TV monitor. TV, AV1, AV2(S-Video), AV-3 (YPbPr - Use either the Menu key or the Ÿ/ź arrow keys to navigate within the menus. PIP function Menu...
User Manual
Page 23
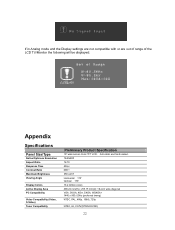
...hard coated. 1440x900 16:10 20ms 600:1 350 cd/m² Horizontal: 170° Vertical: 170° 16.2 million colors 408.24 mm(H) x 255.15 mm(V); 19-inch wide diagonal VGA, SVGA, XGA, SXGA, WSXGA+ 1440 x 900, 60Hz (preferred timing) NTSC, PAL, 480p, 1080i, 720p NTSC, Air, CATV(STD/HRC/...IRC) 22 If in Analog mode and the Display settings are not compatible with or are out of range of the LCD TV/Monitor the following will be displayed: Appendix Specifications Panel Size/Type Native/Optimum Resolution Aspect Ratio Response Time Contrast Ratio Maximum Brightness Viewing Angle Display...
...hard coated. 1440x900 16:10 20ms 600:1 350 cd/m² Horizontal: 170° Vertical: 170° 16.2 million colors 408.24 mm(H) x 255.15 mm(V); 19-inch wide diagonal VGA, SVGA, XGA, SXGA, WSXGA+ 1440 x 900, 60Hz (preferred timing) NTSC, PAL, 480p, 1080i, 720p NTSC, Air, CATV(STD/HRC/...IRC) 22 If in Analog mode and the Display settings are not compatible with or are out of range of the LCD TV/Monitor the following will be displayed: Appendix Specifications Panel Size/Type Native/Optimum Resolution Aspect Ratio Response Time Contrast Ratio Maximum Brightness Viewing Angle Display...
User Manual
Page 24
...% (no condensation) : 20 to 85% (no condensation) : 3,000 m : 12,000 m Troubleshooting No power • Make sure DC cord is plugged into the back of the LCD TV. • ҏMake sure AC power cord is securely connected to the AC socket • Plug another electrical device (like a radio) to the power outlet...
...% (no condensation) : 20 to 85% (no condensation) : 3,000 m : 12,000 m Troubleshooting No power • Make sure DC cord is plugged into the back of the LCD TV. • ҏMake sure AC power cord is securely connected to the AC socket • Plug another electrical device (like a radio) to the power outlet...


