
User Manual
Page 2
... ...22 Specifications ...22 Troubleshooting ...23 No power ...23 Power is ON but no screen image...23 Wrong or abnormal colors ...23 Snow appears on screen...24 No sound...24 Remote control does not work ...24 Remote control code not found or Out of Contents IMPORTANT PRODUCT SAFETY INSTRUCTIONS 2 Antenna Installation Safety ...4 Cleaning the LCD TV ...4 Safety Guidelines ...5 FCC Compliance Statement...5 INSTALLATION ...6 1. Attach Base Stand to LCD TV ...7 3. Connect Power Cable...9 5. Connect Antenna, Cable, Video, S-Video, YPbPr, DVI, and/or VGA Cables 8 4. Turn Power On...
... ...22 Specifications ...22 Troubleshooting ...23 No power ...23 Power is ON but no screen image...23 Wrong or abnormal colors ...23 Snow appears on screen...24 No sound...24 Remote control does not work ...24 Remote control code not found or Out of Contents IMPORTANT PRODUCT SAFETY INSTRUCTIONS 2 Antenna Installation Safety ...4 Cleaning the LCD TV ...4 Safety Guidelines ...5 FCC Compliance Statement...5 INSTALLATION ...6 1. Attach Base Stand to LCD TV ...7 3. Connect Power Cable...9 5. Connect Antenna, Cable, Video, S-Video, YPbPr, DVI, and/or VGA Cables 8 4. Turn Power On...
User Manual
Page 3
... its useful life. Avoid exposing the LCD display to assure sufficient airflow and ventilation. Do not place your LCD television on the LCD display, video cable, or power cord. Never place heavy or sharp objects on a stable and level surface. Power Cord Protection Minimize wear on the product before you operate your LCD television with care. Keep the LCD TV a minimum of Television Always handle your television. IMPORTANT PRODUCT SAFETY INSTRUCTIONS...
... its useful life. Avoid exposing the LCD display to assure sufficient airflow and ventilation. Do not place your LCD television on the LCD display, video cable, or power cord. Never place heavy or sharp objects on a stable and level surface. Power Cord Protection Minimize wear on the product before you operate your LCD television with care. Keep the LCD TV a minimum of Television Always handle your television. IMPORTANT PRODUCT SAFETY INSTRUCTIONS...
User Manual
Page 4
... ventilation is present, immediately unplug the power cord. There are no user serviceable parts inside. Other Notices and Precautions Caution: Never remove the rear cover. You may be used for extended periods of time, unplug the power cord and remove the batteries from the remote control. 3 Your warranty does not cover repairs or attempted repairs by anyone not authorized by placing the LCD TV on a bed, sofa, rug or...
... ventilation is present, immediately unplug the power cord. There are no user serviceable parts inside. Other Notices and Precautions Caution: Never remove the rear cover. You may be used for extended periods of time, unplug the power cord and remove the batteries from the remote control. 3 Your warranty does not cover repairs or attempted repairs by anyone not authorized by placing the LCD TV on a bed, sofa, rug or...
User Manual
Page 5
... the screen with a clean, soft, lint-free cloth. lightning may be fatal. Antenna Installation Safety Outdoor Antenna Grounding If an outside antenna or cable system is connected to the LCD TV, be sure the antenna or cable system is grounded so as contact with them may strike while you are holding the cable cord, causing serious injury. This removes dust and other electric light or power circuits...
... the screen with a clean, soft, lint-free cloth. lightning may be fatal. Antenna Installation Safety Outdoor Antenna Grounding If an outside antenna or cable system is connected to the LCD TV, be sure the antenna or cable system is grounded so as contact with them may strike while you are holding the cable cord, causing serious injury. This removes dust and other electric light or power circuits...
User Manual
Page 6
... that sit on a desk or table, type SVT or SJT cord sets may cause harmful interference to radio communications if not installed and used . If this equipment does cause harmful interference to radio or television reception, which the receiver is connected. • Consult the dealer or an experienced radio/TV technician for help. Also, any unauthorized changes or modifications not expressly approved...
... that sit on a desk or table, type SVT or SJT cord sets may cause harmful interference to radio communications if not installed and used . If this equipment does cause harmful interference to radio or television reception, which the receiver is connected. • Consult the dealer or an experienced radio/TV technician for help. Also, any unauthorized changes or modifications not expressly approved...
User Manual
Page 7
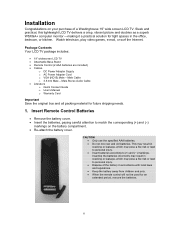
... period, remove the batteries. 6 Installation Congratulations on the battery compartment. • Re-attach the battery cover. Male Cable o 3.5 mm Male - CAUTION • Only use the specified AAA batteries. • Do not mix new and old batteries. Package Contents Your LCD TV package includes: • 19" widescreen LCD TV • Attachable Base Stand • Remote Control (2 AAA batteries are included) • Cables o DC Power Adapter Supply o AC Power Adapter Cord o VGA...
... period, remove the batteries. 6 Installation Congratulations on the battery compartment. • Re-attach the battery cover. Male Cable o 3.5 mm Male - CAUTION • Only use the specified AAA batteries. • Do not mix new and old batteries. Package Contents Your LCD TV package includes: • 19" widescreen LCD TV • Attachable Base Stand • Remote Control (2 AAA batteries are included) • Cables o DC Power Adapter Supply o AC Power Adapter Cord o VGA...
User Manual
Page 9
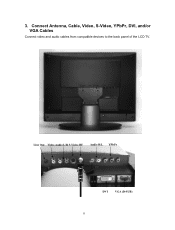
Connect Antenna, Cable, Video, S-Video, YPbPr, DVI, and/or VGA Cables Connect video and audio cables from compatible devices to the back panel of the LCD TV. Line Out Video Audio L/R S-Video RF Audio R/L YPbPr DVI VGA (D-SUB) 8 3.
Connect Antenna, Cable, Video, S-Video, YPbPr, DVI, and/or VGA Cables Connect video and audio cables from compatible devices to the back panel of the LCD TV. Line Out Video Audio L/R S-Video RF Audio R/L YPbPr DVI VGA (D-SUB) 8 3.
User Manual
Page 10
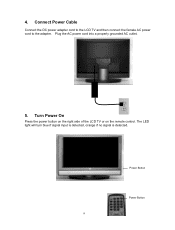
Connect Power Cable Connect the DC power adapter cord to the LCD TV and then connect the female AC power cord to the adapter. Plug the AC power cord into a properly grounded AC outlet. 5. Turn Power On Press the power button on the right side of the LCD TV or on the remote control. The LED light will turn blue if signal input is detected, orange if no signal is detected. 4. Power Button Power Button 9
Connect Power Cable Connect the DC power adapter cord to the LCD TV and then connect the female AC power cord to the adapter. Plug the AC power cord into a properly grounded AC outlet. 5. Turn Power On Press the power button on the right side of the LCD TV or on the remote control. The LED light will turn blue if signal input is detected, orange if no signal is detected. 4. Power Button Power Button 9
User Manual
Page 12
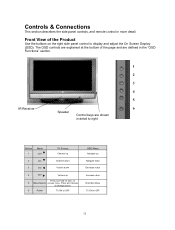
... detail. to display and adjust the On Screen Display (OSD). The OSD controls are explained at the bottom of the Product Use the buttons on the right side panel control to 5 Menu/Source access menu. Press and release to change source 6 Power TV ON or OFF OSD Menu Navigate up Navigate down 3 Vol- Controls & Connections This section describes the side panel controls, and remote control in detail to right Button 1 Mode CH+ TV Source Channel up 2 CH- Channel down Decrease...
... detail. to display and adjust the On Screen Display (OSD). The OSD controls are explained at the bottom of the Product Use the buttons on the right side panel control to 5 Menu/Source access menu. Press and release to change source 6 Power TV ON or OFF OSD Menu Navigate up Navigate down 3 Vol- Controls & Connections This section describes the side panel controls, and remote control in detail to right Button 1 Mode CH+ TV Source Channel up 2 CH- Channel down Decrease...
User Manual
Page 13
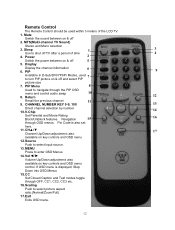
Power 2 Switch the power between on & off 5 5. Display Display the channel information 6 6. Navigation 15 16 through the PIP OSD menu and control audio swap 10 8. CHŸ/ź 17 Channel Up/Down adjustment; MENU Press to select input source. 13. If OSD menu is also set here. 11. Remote Control The Remote Control should be used 7 to turn PIP picture on & off TV after a period of the LCD TV. 1. Mute Switch the sound between on & off 2. CHANNEL NUMBER KEY 0-9, 100 13 Direct channel selection...
Power 2 Switch the power between on & off 5 5. Display Display the channel information 6 6. Navigation 15 16 through the PIP OSD menu and control audio swap 10 8. CHŸ/ź 17 Channel Up/Down adjustment; MENU Press to select input source. 13. If OSD menu is also set here. 11. Remote Control The Remote Control should be used 7 to turn PIP picture on & off TV after a period of the LCD TV. 1. Mute Switch the sound between on & off 2. CHANNEL NUMBER KEY 0-9, 100 13 Direct channel selection...
User Manual
Page 14
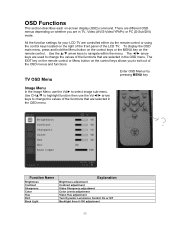
... in the OSD menu. All the function settings for your LCD TV are selected in TV, Video (AV/S-Video/YPbPr) or PC (D-Sub/DVI) mode. Function Name Brightness Contrast Sharpness Color Hue DLC Back Light Explanation Brightness adjustment Contrast adjustment Video Sharpness adjustment Color Levels adjustment Video Hue adjustment Turn Dynamic Luminance Control On or Off Backlight from 0-100 adjustment 13 The Ż/Ź arrow keys are used to change the values of...
... in the OSD menu. All the function settings for your LCD TV are selected in TV, Video (AV/S-Video/YPbPr) or PC (D-Sub/DVI) mode. Function Name Brightness Contrast Sharpness Color Hue DLC Back Light Explanation Brightness adjustment Contrast adjustment Video Sharpness adjustment Color Levels adjustment Video Hue adjustment Turn Dynamic Luminance Control On or Off Backlight from 0-100 adjustment 13 The Ż/Ź arrow keys are used to change the values of...
User Manual
Page 16
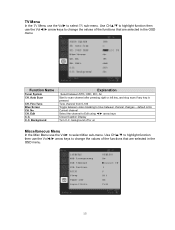
... scan if any key is No Current channel Select the channel to change the values of the functions that are selected in the OSD menu. 15 Fine Tune Blue Screen CH. Use CHŸ/ź to highlight function then use the VolŻ/Ź arrow keys to Edit using Ż/Ź arrow keys Closed Caption Display Turn C.C. default is pressed. Function Name Tuner System CH. TV Menu...
... scan if any key is No Current channel Select the channel to change the values of the functions that are selected in the OSD menu. 15 Fine Tune Blue Screen CH. Use CHŸ/ź to highlight function then use the VolŻ/Ź arrow keys to Edit using Ż/Ź arrow keys Closed Caption Display Turn C.C. default is pressed. Function Name Tuner System CH. TV Menu...
User Manual
Page 17
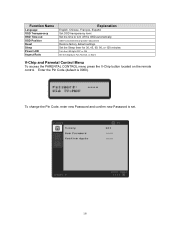
... Position Reset Sleep Power LED Aspect Ratio Explanation English, Chinese, François, Español Set OSD transparency level Set the time to turn off the OSD automatically OSD horizontal/vertical position adjustment Restore factory default settings Set the Sleep timer for 30, 45, 60, 90, or 120 minutes Turn the LED light OFF or ON Set the display to Full, Normal, or Zoom V-Chip and Parental Control Menu To access the PARENTAL CONTROL menu press...
... Position Reset Sleep Power LED Aspect Ratio Explanation English, Chinese, François, Español Set OSD transparency level Set the time to turn off the OSD automatically OSD horizontal/vertical position adjustment Restore factory default settings Set the Sleep timer for 30, 45, 60, 90, or 120 minutes Turn the LED light OFF or ON Set the display to Full, Normal, or Zoom V-Chip and Parental Control Menu To access the PARENTAL CONTROL menu press...
User Manual
Page 18
... the PIN code. Use the Ÿ/ź to highlight the Movie/TV Rating to access the Parental Control Menu. Use the ź to exit the V-chip menu. Press the MENU button to set and press EXIT to highlight the Movie (MPAA) or TV (TVPG) menu. Use the Ź to Older Children General Audience Parental Guidance Suggested Parents Strongly Cautioned Mature Audience Only Video OSD Menu Video (AV/S-Video/YPbPr) OSD Menu has...
... the PIN code. Use the Ÿ/ź to highlight the Movie/TV Rating to access the Parental Control Menu. Use the ź to exit the V-chip menu. Press the MENU button to set and press EXIT to highlight the Movie (MPAA) or TV (TVPG) menu. Use the Ź to Older Children General Audience Parental Guidance Suggested Parents Strongly Cautioned Mature Audience Only Video OSD Menu Video (AV/S-Video/YPbPr) OSD Menu has...
User Manual
Page 19
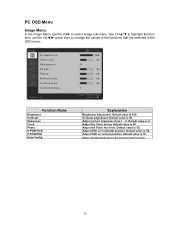
... adjustment. Default value is 55. Adjust picture sharpness from 1 - 5. Adjust OSD on vertical position. Default value is 50. Adjust automatically the picture and synch the LCD TV monitor 18 Default value is 2. Adjust OSD on horizontal position. PC OSD Menu Image Menu In the Image Menu use the VolŻ/Ź arrow keys to select image sub-menu. Contrast adjustment. Default value is 100. Default value is 50. Adjust the Video Hue level. Default...
... adjustment. Default value is 55. Adjust picture sharpness from 1 - 5. Adjust OSD on vertical position. Default value is 50. Adjust automatically the picture and synch the LCD TV monitor 18 Default value is 2. Adjust OSD on horizontal position. PC OSD Menu Image Menu In the Image Menu use the VolŻ/Ź arrow keys to select image sub-menu. Contrast adjustment. Default value is 100. Default value is 50. Adjust the Video Hue level. Default...
User Manual
Page 21
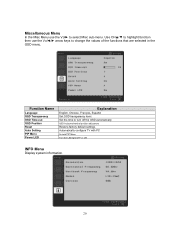
... that are selected in the OSD menu. Function Name Language OSD Transparency OSD Time-out OSD Position Reset Auto Setting PIP Menu Power LED Explanation English, Chinese, François, Español Set OSD transparency level Set the time to turn off the OSD automatically OSD horizontal/vertical position adjustment Restore factory default settings Automatically configure TV with PC Access PIP Menu Turn the LED light OFF or ON INFO Menu Display system information. 20
... that are selected in the OSD menu. Function Name Language OSD Transparency OSD Time-out OSD Position Reset Auto Setting PIP Menu Power LED Explanation English, Chinese, François, Español Set OSD transparency level Set the time to turn off the OSD automatically OSD horizontal/vertical position adjustment Restore factory default settings Automatically configure TV with PC Access PIP Menu Turn the LED light OFF or ON INFO Menu Display system information. 20
User Manual
Page 22
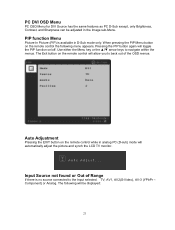
... the Input selected. TV, AV1, AV2(S-Video), AV-3 (YPbPr - Component) or Analog. Auto Adjustment Pressing the EXIT button on the remote control the following will automatically adjust the picture and synch the LCD TV monitor. Input Source not found or Out of the OSD menus. The following menu appears. When pressing the PIP Menu button on the remote control while in analog PC (D-sub) mode will be adjusted in D-Sub mode only. PIP function Menu Picture In Picture (PIP) is no source connected to...
... the Input selected. TV, AV1, AV2(S-Video), AV-3 (YPbPr - Component) or Analog. Auto Adjustment Pressing the EXIT button on the remote control the following will automatically adjust the picture and synch the LCD TV monitor. Input Source not found or Out of the OSD menus. The following menu appears. When pressing the PIP Menu button on the remote control while in analog PC (D-sub) mode will be adjusted in D-Sub mode only. PIP function Menu Picture In Picture (PIP) is no source connected to...
User Manual
Page 23
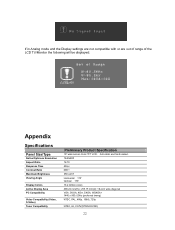
..., 60Hz (preferred timing) NTSC, PAL, 480p, 1080i, 720p NTSC, Air, CATV(STD/HRC/IRC) 22 If in Analog mode and the Display settings are not compatible with or are out of range of the LCD TV/Monitor the following will be displayed: Appendix Specifications Panel Size/Type Native/Optimum Resolution Aspect Ratio Response Time Contrast Ratio Maximum Brightness Viewing Angle Display Colors Active Display Area PC Compatibility Video Compatibility (Video, S-Video) Tuner Compatibility Preliminary Product Specification 19" wide screen Color TFT LCD.
..., 60Hz (preferred timing) NTSC, PAL, 480p, 1080i, 720p NTSC, Air, CATV(STD/HRC/IRC) 22 If in Analog mode and the Display settings are not compatible with or are out of range of the LCD TV/Monitor the following will be displayed: Appendix Specifications Panel Size/Type Native/Optimum Resolution Aspect Ratio Response Time Contrast Ratio Maximum Brightness Viewing Angle Display Colors Active Display Area PC Compatibility Video Compatibility (Video, S-Video) Tuner Compatibility Preliminary Product Specification 19" wide screen Color TFT LCD.
User Manual
Page 24
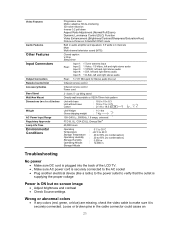
... ON but no screen image • ҏAdjust brightness and contrast • Check Source settings Wrong or abnormal colors • If any colors (red, green, or blue) are missing, check the video cable to make sure it is securely connected. Video Features Audio Features Other Features Input Connectors Output Connectors Remote Control Unit Accessory/Cables Base Stand Wall/Arm Mount Dimensions (w x h x d) inches Weight AC Power Input Range Regulatory Approvals Lamp Life Time Environmental Conditions Progressive scan Motion adaptive 3D de...
... ON but no screen image • ҏAdjust brightness and contrast • Check Source settings Wrong or abnormal colors • If any colors (red, green, or blue) are missing, check the video cable to make sure it is securely connected. Video Features Audio Features Other Features Input Connectors Output Connectors Remote Control Unit Accessory/Cables Base Stand Wall/Arm Mount Dimensions (w x h x d) inches Weight AC Power Input Range Regulatory Approvals Lamp Life Time Environmental Conditions Progressive scan Motion adaptive 3D de...
User Manual
Page 25
... connected Remote control does not work • Make sure batteries are inserted correctly • Replace old or worn batteries Remote control code not found in YPbPr component video input. Westinghouse and You can be set to change without notice. if it's Westinghouse are trademarks of Westinghouse Electric Corporation and are correctly attached. • Remove distribution amplifiers from the signal path Snow appears on screen • Check your antenna connection • Remove unnecessary signal...
... connected Remote control does not work • Make sure batteries are inserted correctly • Replace old or worn batteries Remote control code not found in YPbPr component video input. Westinghouse and You can be set to change without notice. if it's Westinghouse are trademarks of Westinghouse Electric Corporation and are correctly attached. • Remove distribution amplifiers from the signal path Snow appears on screen • Check your antenna connection • Remove unnecessary signal...


