
User Manual
Page 2
... Turn Power On...9 6. Insert Remote Control Batteries ...6 2. Connect Power Cable...9 5. Programming TV Channels...10 CONTROLS & CONNECTIONS...11 Front View of the Product...11 Remote Control ...12 The Remote Control should be used within 3 meters of the LCD TV 12 OSD FUNCTIONS ...13 TV OSD Menu ...13 Image Menu...Menu ...19 Color Temp Menu ...19 Miscellaneous Menu ...20 INFO Menu...20 PC DVI OSD Menu ...21 PIP function Menu ...21 Auto Adjustment ...21 Input Source not found or Out of Contents IMPORTANT PRODUCT SAFETY INSTRUCTIONS 2 Antenna Installation Safety ...4 Cleaning the LCD TV ...4 ...
... Turn Power On...9 6. Insert Remote Control Batteries ...6 2. Connect Power Cable...9 5. Programming TV Channels...10 CONTROLS & CONNECTIONS...11 Front View of the Product...11 Remote Control ...12 The Remote Control should be used within 3 meters of the LCD TV 12 OSD FUNCTIONS ...13 TV OSD Menu ...13 Image Menu...Menu ...19 Color Temp Menu ...19 Miscellaneous Menu ...20 INFO Menu...20 PC DVI OSD Menu ...21 PIP function Menu ...21 Auto Adjustment ...21 Input Source not found or Out of Contents IMPORTANT PRODUCT SAFETY INSTRUCTIONS 2 Antenna Installation Safety ...4 Cleaning the LCD TV ...4 ...
User Manual
Page 4
...strange odor is provided. Contact a qualified service technician If your LCD TV will not be seriously injured if you touch them. You may be used for extended periods of time, unplug the power cord and remove the batteries from the remote control. 3 Do not place it in a built-in ...installation, such as a bookcase or an enclosed rack, unless proper ventilation is present, immediately unplug the power cord. There are no user serviceable parts inside. To assure proper ventilation, do not block the openings by Westinghouse Digital....
...strange odor is provided. Contact a qualified service technician If your LCD TV will not be seriously injured if you touch them. You may be used for extended periods of time, unplug the power cord and remove the batteries from the remote control. 3 Do not place it in a built-in ...installation, such as a bookcase or an enclosed rack, unless proper ventilation is present, immediately unplug the power cord. There are no user serviceable parts inside. To assure proper ventilation, do not block the openings by Westinghouse Digital....
User Manual
Page 7
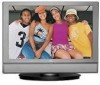
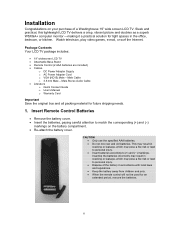
...Only use the specified AAA batteries. • Do not mix new and old batteries. Package Contents Your LCD TV package includes: • 19" widescreen LCD TV • Attachable Base Stand • Remote Control (2 AAA batteries are included) • Cables o DC Power Adapter Supply o AC Power Adapter ...batteries according to (+) and (í) markings. Insert Remote Control Batteries • Remove the battery cover. • Insert the batteries, paying careful attention to personal injury. • Dispose of a Westinghouse 19" wide screen LCD TV. Watch television, play video games, e-mail, or...
...Only use the specified AAA batteries. • Do not mix new and old batteries. Package Contents Your LCD TV package includes: • 19" widescreen LCD TV • Attachable Base Stand • Remote Control (2 AAA batteries are included) • Cables o DC Power Adapter Supply o AC Power Adapter ...batteries according to (+) and (í) markings. Insert Remote Control Batteries • Remove the battery cover. • Insert the batteries, paying careful attention to personal injury. • Dispose of a Westinghouse 19" wide screen LCD TV. Watch television, play video games, e-mail, or...
User Manual
Page 10
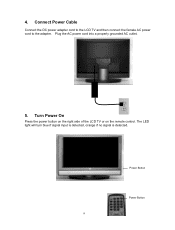
4. Power Button Power Button 9 The LED light will turn blue if signal input is detected, orange if no signal is detected. Turn Power On Press the power button on the right side of the LCD TV or on the remote control. Plug the AC power cord into a properly grounded AC outlet. 5. Connect Power Cable Connect the DC power adapter cord to the LCD TV and then connect the female AC power cord to the adapter.
4. Power Button Power Button 9 The LED light will turn blue if signal input is detected, orange if no signal is detected. Turn Power On Press the power button on the right side of the LCD TV or on the remote control. Plug the AC power cord into a properly grounded AC outlet. 5. Connect Power Cable Connect the DC power adapter cord to the LCD TV and then connect the female AC power cord to the adapter.
User Manual
Page 11
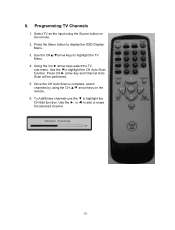
... the input using the CH Ÿ/ź arrow keys on the remote. 2. Use the Ź, or Ż to display the OSD Display Menu. 3. Using the Vol Ź arrow keys select the TV sub-menu. Press the Menu button to add or erase the selected channel 10 Use the źto ... ź to highlight the CH Auto Scan function. Once the CH Auto Scan is complete, switch channels by using the Source button on the remote. 6. Programming TV Channels 1. Use the CHŸ/źarrow keys to highlight the TV Menu. 4. 6. Press Vol Ź arrow key and Channel Auto Scan will be performed. 5.
... the input using the CH Ÿ/ź arrow keys on the remote. 2. Use the Ź, or Ż to display the OSD Display Menu. 3. Using the Vol Ź arrow keys select the TV sub-menu. Press the Menu button to add or erase the selected channel 10 Use the źto ... ź to highlight the CH Auto Scan function. Once the CH Auto Scan is complete, switch channels by using the Source button on the remote. 6. Programming TV Channels 1. Use the CHŸ/źarrow keys to highlight the TV Menu. 4. 6. Press Vol Ź arrow key and Channel Auto Scan will be performed. 5.
User Manual
Page 12
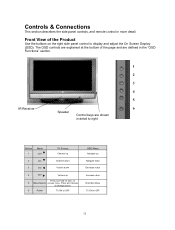
...Increase value Enter/Exit Menu TV ON or OFF 11 Front View of the page and are defined in the "OSD Functions" section. 1 2 3 4 5 IR Receiver 6 Speaker Control keys are shown in more detail. Controls & Connections This section describes the side panel controls, and remote control in detail to ...right Button 1 Mode CH+ TV Source Channel up 2 CH- to 5 Menu/Source access menu.
...Increase value Enter/Exit Menu TV ON or OFF 11 Front View of the page and are defined in the "OSD Functions" section. 1 2 3 4 5 IR Receiver 6 Speaker Control keys are shown in more detail. Controls & Connections This section describes the side panel controls, and remote control in detail to ...right Button 1 Mode CH+ TV Source Channel up 2 CH- to 5 Menu/Source access menu.
User Manual
Page 13
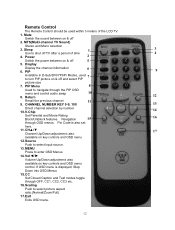
....(Normal/Zoom/Full) 17. Power 2 Switch the power between on key controls and OSD menu 12. also available on & off TV after a period of the LCD TV. 1. PIP Menu 8 Used to enter OSD Menus 14. Return 12 Recall the previous channel 11 9. Pin Code is displayed, ...within 3 meters of time 4 4. CC Set Closed Caption and Text modes toggle through OSD menus. Remote Control The Remote Control should be used 7 to select input source. 13. MTS(Multi-channel TV Sound) Stereo and Mono selection 3. CHANNEL NUMBER KEY 0-9, 100 13 Direct channel selection by number 10...
....(Normal/Zoom/Full) 17. Power 2 Switch the power between on key controls and OSD menu 12. also available on & off TV after a period of the LCD TV. 1. PIP Menu 8 Used to enter OSD Menus 14. Return 12 Recall the previous channel 11 9. Pin Code is displayed, ...within 3 meters of time 4 4. CC Set Closed Caption and Text modes toggle through OSD menus. Remote Control The Remote Control should be used 7 to select input source. 13. MTS(Multi-channel TV Sound) Stereo and Mono selection 3. CHANNEL NUMBER KEY 0-9, 100 13 Direct channel selection by number 10...
User Manual
Page 14
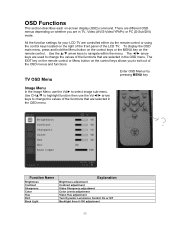
... Luminance Control On or Off Backlight from 0-100 adjustment 13 OSD Functions This section describes each on the remote control. All the function settings for your LCD TV are used to navigate within the menu. The EXIT key on the remote control or Menu button on whether you to select image sub-menu.... TV OSD Menu Enter OSD Menus by pressing MENU key Image Menu In the Image Menu use the Vol&#...
... Luminance Control On or Off Backlight from 0-100 adjustment 13 OSD Functions This section describes each on the remote control. All the function settings for your LCD TV are used to navigate within the menu. The EXIT key on the remote control or Menu button on whether you to select image sub-menu.... TV OSD Menu Enter OSD Menus by pressing MENU key Image Menu In the Image Menu use the Vol&#...
User Manual
Page 17
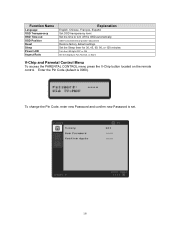
... the display to Full, Normal, or Zoom V-Chip and Parental Control Menu To access the PARENTAL CONTROL menu press the V-Chip button located on the remote control. Enter the Pin Code (default is set. 16 To change the Pin Code, enter new Password and confirm new Password is 0000).
... the display to Full, Normal, or Zoom V-Chip and Parental Control Menu To access the PARENTAL CONTROL menu press the V-Chip button located on the remote control. Enter the Pin Code (default is set. 16 To change the Pin Code, enter new Password and confirm new Password is 0000).
User Manual
Page 18
... Parental Guidance suggested Parents strongly cautioned Restricted No one 17 and under admitted Adult audience only > All Children Directed to highlight the Movie (MPAA) or TV (TVPG) menu. Press the MENU button to set and press EXIT to be blocked or un-blocked. Use the Ÿ/ź to highlight the Movie.../TV Rating to exit the V-chip menu. Rating Menus Press the V-Chip button on the remote control to select the sub-menu. Use the Ź to access the Parental Control Menu. Enter the PIN...
... Parental Guidance suggested Parents strongly cautioned Restricted No one 17 and under admitted Adult audience only > All Children Directed to highlight the Movie (MPAA) or TV (TVPG) menu. Press the MENU button to set and press EXIT to be blocked or un-blocked. Use the Ÿ/ź to highlight the Movie.../TV Rating to exit the V-chip menu. Rating Menus Press the V-Chip button on the remote control to select the sub-menu. Use the Ź to access the Parental Control Menu. Enter the PIN...
User Manual
Page 22
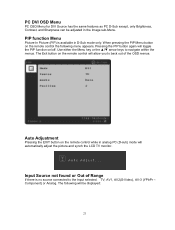
... Menu key or the Ÿ/ź arrow keys to the Input selected. When pressing the PIP Menu button on the remote control the following will automatically adjust the picture and synch the LCD TV monitor. Input Source not found or Out of the OSD menus. PIP function Menu Picture In Picture (PIP) is... allow you to back out of Range If there is available in the Image sub-Menu. The Exit button on the remote control will toggle the PIP function on the remote control while in analog PC (D-sub) mode will be adjusted in D-Sub mode only. PC DVI OSD Menu PC OSD Menu...
... Menu key or the Ÿ/ź arrow keys to the Input selected. When pressing the PIP Menu button on the remote control the following will automatically adjust the picture and synch the LCD TV monitor. Input Source not found or Out of the OSD menus. PIP function Menu Picture In Picture (PIP) is... allow you to back out of Range If there is available in the Image sub-Menu. The Exit button on the remote control will toggle the PIP function on the remote control while in analog PC (D-sub) mode will be adjusted in D-Sub mode only. PC DVI OSD Menu PC OSD Menu...
User Manual
Page 24
...: 20 to 85% (no condensation) : 3,000 m : 12,000 m Troubleshooting No power • Make sure DC cord is plugged into the back of the LCD TV. • ҏMake sure AC power cord is securely connected to the AC socket • Plug another electrical device (like a radio) to the power outlet...DVI, left and right stereo audio 1 D-Sub, left and right stereo audio Rear: 1x 1/8" Mini-jack for Stereo audio line out Infrared remote control Infrared remote control Power cord 2° down, 5° up tilting stand Directly wall mountable or VESA 75mm hole pattern Unit with base Unit without base...
...: 20 to 85% (no condensation) : 3,000 m : 12,000 m Troubleshooting No power • Make sure DC cord is plugged into the back of the LCD TV. • ҏMake sure AC power cord is securely connected to the AC socket • Plug another electrical device (like a radio) to the power outlet...DVI, left and right stereo audio 1 D-Sub, left and right stereo audio Rear: 1x 1/8" Mini-jack for Stereo audio line out Infrared remote control Infrared remote control Power cord 2° down, 5° up tilting stand Directly wall mountable or VESA 75mm hole pattern Unit with base Unit without base...
User Manual
Page 25
... inserted correctly • Replace old or worn batteries Remote control code not found in YPbPr component video input. Westinghouse and You can be set to change without notice. All rights reserved. Double check that headphones are not connected Remote control does not work • Make sure batteries ...quality • Replace poor or worn cables to properly match 75 ohm impedance • Check TV / CATV selection No sound • Check your audio connection • Press MUTE on your TV audio may be sure... improper connection • The red connector for right audio is easily ...
... inserted correctly • Replace old or worn batteries Remote control code not found in YPbPr component video input. Westinghouse and You can be set to change without notice. All rights reserved. Double check that headphones are not connected Remote control does not work • Make sure batteries ...quality • Replace poor or worn cables to properly match 75 ohm impedance • Check TV / CATV selection No sound • Check your audio connection • Press MUTE on your TV audio may be sure... improper connection • The red connector for right audio is easily ...


