
English Manual
Page 2
...over the age of 35 or persons with great force. 5. If you are exercising, stop immediately and begin cooling down. 8. The weights will fall with pre-existing health problems. Read all of the pulleys. 12. The home gym is the responsibility of the owner ...parts immediately. 6. Table of Contents Important Precautions 2 Before You Begin 3 Assembly 4 Cable Diagrams 23 Adjustment 25 Trouble-shooting and Maintenance 26 Weight Resistance Chart 27 Ordering Replacement Parts Back Cover Full 90-day Warranty Back Cover Note: A PART LIST/EXPLODED DRAWING and a PART IDENTIFICATION ...
...over the age of 35 or persons with great force. 5. If you are exercising, stop immediately and begin cooling down. 8. The weights will fall with pre-existing health problems. Read all of the pulleys. 12. The home gym is the responsibility of the owner ...parts immediately. 6. Table of Contents Important Precautions 2 Before You Begin 3 Assembly 4 Cable Diagrams 23 Adjustment 25 Trouble-shooting and Maintenance 26 Weight Resistance Chart 27 Ordering Replacement Parts Back Cover Full 90-day Warranty Back Cover Note: A PART LIST/EXPLODED DRAWING and a PART IDENTIFICATION ...
English Manual
Page 3
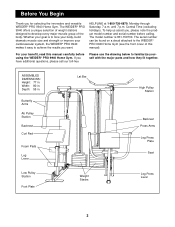
... body, build dramatic muscle size and strength or improve your benefit, read this manual). The WEIDER® PRO 9940 offers a unique selection of weight stations designed to the WEIDER® PRO 9940 Home Gym (see the front cover of the body. Central Time (excluding holidays). For your... cardiovascular system, the WEIDER® PRO 9940 makes it easy to familiarize yourself with the major parts and how they...
... body, build dramatic muscle size and strength or improve your benefit, read this manual). The WEIDER® PRO 9940 offers a unique selection of weight stations designed to the WEIDER® PRO 9940 Home Gym (see the front cover of the body. Central Time (excluding holidays). For your... cardiovascular system, the WEIDER® PRO 9940 makes it easy to familiarize yourself with the major parts and how they...
English Manual
Page 4
... convenient if you have a socket set, a set of ratchet wrenches. Making Things Easier for shipping. Most people find that connect the moving arms with the weights. You may have included a PART IDENTIFICATION CHART located in this manual. Place the chart on the floor or work table and use it to quickly...
... convenient if you have a socket set, a set of ratchet wrenches. Making Things Easier for shipping. Most people find that connect the moving arms with the weights. You may have included a PART IDENTIFICATION CHART located in this manual. Place the chart on the floor or work table and use it to quickly...

English Manual
Page 5
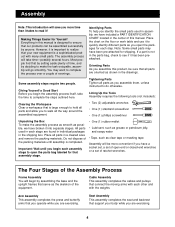
... bag labeled "FRAME ASSEMBLY." Press a 2" Square Inner Cap (28) into the end of the brackets on the floor. Place the Butterfly Base flat on the Weight Base (5) with 3 1/2" center holes (93), and two 5/16" Nylon Locknuts (64). Attach a 3 1/2" Pulley (24) to each Bolt. Insert a 3/8" x 3 1/2" Carriage Bolt (95) up through..., make sure that will fit over the head of the Butterfly Base (4). See drawing 1a. Press two 2" Square Inner Caps (28) into the Weight Base (5). Insert four 5/16" x 2 1/2" Carriage Bolts (92) up through the indicated holes in the Press Base (6). Attach the...
... bag labeled "FRAME ASSEMBLY." Press a 2" Square Inner Cap (28) into the end of the brackets on the floor. Place the Butterfly Base flat on the Weight Base (5) with 3 1/2" center holes (93), and two 5/16" Nylon Locknuts (64). Attach a 3 1/2" Pulley (24) to each Bolt. Insert a 3/8" x 3 1/2" Carriage Bolt (95) up through..., make sure that will fit over the head of the Butterfly Base (4). See drawing 1a. Press two 2" Square Inner Caps (28) into the Weight Base (5). Insert four 5/16" x 2 1/2" Carriage Bolts (92) up through the indicated holes in the Press Base (6). Attach the...
English Manual
Page 8
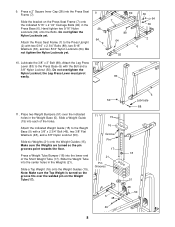
... on the Press Seat Frame (7) onto the indicated 5/16" x 2 1/2" Carriage Bolts (92) in the Weight Base (5). Slide a Weight Guide (15) into the center holes in the Weights (21). Attach the Leg Press 10 Lever (83) to the Weight Base (5) with a 3/8" x 2 3/4" Bolt (46), two 3/8" Flat Washers (48), and a 3/8"... 64 36 89 64 2 6 92 83 50 11. Make sure the Weights are turned so the pin grooves point towards the floor. Slide a Top Weight (16) onto the Weight Guides (15). Slide six Weights (21) onto the Weight Guides (15). Hand tighten two 5/16" Nylon 28 Locknuts (64) onto ...
... on the Press Seat Frame (7) onto the indicated 5/16" x 2 1/2" Carriage Bolts (92) in the Weight Base (5). Slide a Weight Guide (15) into the center holes in the Weights (21). Attach the Leg Press 10 Lever (83) to the Weight Base (5) with a 3/8" x 2 3/4" Bolt (46), two 3/8" Flat Washers (48), and a 3/8"... 64 36 89 64 2 6 92 83 50 11. Make sure the Weights are turned so the pin grooves point towards the floor. Slide a Top Weight (16) onto the Weight Guides (15). Slide six Weights (21) onto the Weight Guides (15). Hand tighten two 5/16" Nylon 28 Locknuts (64) onto ...
English Manual
Page 9
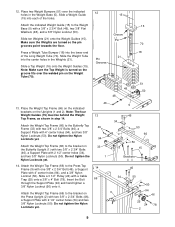
...one 3/8" x 2 3/4" Bolt (46), a Support Plate with 4" center holes (94), and two 3/8" Nylon Locknuts (50). Do not tighten the Nylon Locknuts yet. Attach the Weight Top Frame (66) to the Butterfly Top Frame (33) with two 3/8" x 2 3/4" Bolts (46), a Support Plate with 4" center holes (94), and a 3/8" Nylon ... x 2 3/4" Bolts (46), a Support Plate with a Cable Trap (25) onto a 3/8" x 4" Bolt (78). Slide a Top Weight (16) onto the Weight Guides (15). Slide a Weight Guide 15 (15) into the center holes in step 14. Insert the Bolt through the Support Plate (94) and hand tighten a 3/8" Nylon...
...one 3/8" x 2 3/4" Bolt (46), a Support Plate with 4" center holes (94), and two 3/8" Nylon Locknuts (50). Do not tighten the Nylon Locknuts yet. Attach the Weight Top Frame (66) to the Butterfly Top Frame (33) with two 3/8" x 2 3/4" Bolts (46), a Support Plate with 4" center holes (94), and a 3/8" Nylon ... x 2 3/4" Bolts (46), a Support Plate with a Cable Trap (25) onto a 3/8" x 4" Bolt (78). Slide a Top Weight (16) onto the Weight Guides (15). Slide a Weight Guide 15 (15) into the center holes in step 14. Insert the Bolt through the Support Plate (94) and hand tighten a 3/8" Nylon...

English Manual
Page 10
Press a 1" Round Inner Cap (76) into the top of the four Weight Guides (15) to the Weight Top Frame (66) with two 5/16" x 2 1/2" Bolts (87) and two 5/16" Nylon Locknuts (64). Lubricate the 3/8" x 8" Bolt (52). Attach the Press Arm (77) to the ...
Press a 1" Round Inner Cap (76) into the top of the four Weight Guides (15) to the Weight Top Frame (66) with two 5/16" x 2 1/2" Bolts (87) and two 5/16" Nylon Locknuts (64). Lubricate the 3/8" x 8" Bolt (52). Attach the Press Arm (77) to the ...
English Manual
Page 14
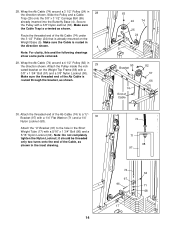
... be threaded only two turns onto the end of the Ab Cable is already mounted on the Weight Top Frame (66) with a 3/8" Nylon Jamnut (63). Attach the Pulley inside the indicated bracket on the Weight Base (5). Make sure the Cable Trap is routed in the inset drawing. 63 24 74 25 95... 57 66 74 71 68 97 74 64 97 96 71 68 17 14 Wrap the Ab Cable (74) around a 4 1/2" Pulley (82) in the Short Weight Tube (17) with a 1/4" Flat Washer (71) and a 1/4" 30 Nylon Locknut (68).
... be threaded only two turns onto the end of the Ab Cable is already mounted on the Weight Top Frame (66) with a 3/8" Nylon Jamnut (63). Attach the Pulley inside the indicated bracket on the Weight Base (5). Make sure the Cable Trap is routed in the inset drawing. 63 24 74 25 95... 57 66 74 71 68 97 74 64 97 96 71 68 17 14 Wrap the Ab Cable (74) around a 4 1/2" Pulley (82) in the Short Weight Tube (17) with a 1/4" Flat Washer (71) and a 1/4" 30 Nylon Locknut (68).
English Manual
Page 19
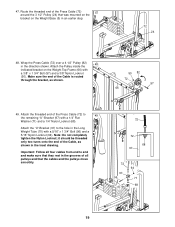
... of the Cable is routed through the bracket, as shown in the inset drawing. Attach the Pulley inside the indicated bracket on the Weight Base (5) in the Long Weight Tube (70) with a 3/8" x 1 3/4" Bolt (57) and a 3/8" Nylon Locknut (50). Attach the "U"-Bracket (97) to the hole in an... remaining "U"-Bracket (97) with a 1/4" Flat Washer (71) and a 1/4" Nylon Locknut (68). Important: Follow all pulleys and that was mounted on the bracket on the Weight Top Frame (66) with a 5/16" x 1 3/4" Bolt (96) and a 5/16" Nylon Locknut (64). Route the threaded end of the Press Cable (72) ...
... of the Cable is routed through the bracket, as shown in the inset drawing. Attach the Pulley inside the indicated bracket on the Weight Base (5) in the Long Weight Tube (70) with a 3/8" x 1 3/4" Bolt (57) and a 3/8" Nylon Locknut (50). Attach the "U"-Bracket (97) to the hole in an... remaining "U"-Bracket (97) with a 1/4" Flat Washer (71) and a 1/4" Nylon Locknut (68). Important: Follow all pulleys and that was mounted on the bracket on the Weight Top Frame (66) with a 5/16" x 1 3/4" Bolt (96) and a 5/16" Nylon Locknut (64). Route the threaded end of the Press Cable (72) ...
English Manual
Page 22
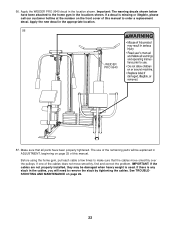
56. Important: The warning decals shown below have been properly tightened. The use of the remaining parts will be damaged when heavy weight is any slack in the cables, you will need to remove the slack by tightening the cables. If one of this manual to the home ... of this manual. If there is used. IMPORTANT: If the cables are not properly installed, they may be explained in the locations shown. Apply the WEIDER PRO 9940 decal in the appropriate location. 56 WEIDER PRO 9940 57.
56. Important: The warning decals shown below have been properly tightened. The use of the remaining parts will be damaged when heavy weight is any slack in the cables, you will need to remove the slack by tightening the cables. If one of this manual to the home ... of this manual. If there is used. IMPORTANT: If the cables are not properly installed, they may be explained in the locations shown. Apply the WEIDER PRO 9940 decal in the appropriate location. 56 WEIDER PRO 9940 57.
English Manual
Page 25
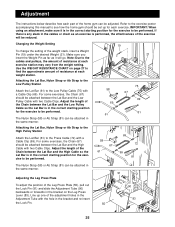
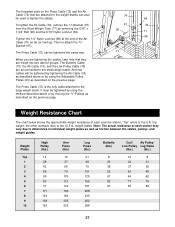
... with two Cable Clips. Adjust the length of the Chain between the Lat Bar and the High Cable with a Cable Clip (69). Use the WEIGHT RESISTANCE CHART on the Leg Press Lever (83). The Nylon Strap (58) or Ab Strap (81) can be performed. Adjustment The instructions below describe... how each part of the weight stack, insert a Weight Pin (19) under the desired Weight (21). Changing the Weight Setting To change the setting of the home gym can be attached in the correct starting position for each...
... with two Cable Clips. Adjust the length of the Chain between the Lat Bar and the High Cable with a Cable Clip (69). Use the WEIGHT RESISTANCE CHART on the Leg Press Lever (83). The Nylon Strap (58) or Ab Strap (81) can be performed. Adjustment The instructions below describe... how each part of the weight stack, insert a Weight Pin (19) under the desired Weight (21). Changing the Weight Setting To change the setting of the home gym can be attached in the correct starting position for each...
English Manual
Page 27
... 77 76 90 89 27 When you are tightening the cables, take note that are attached to tighten the cables. "Top" refers to the small weight stack. The threaded ends on the previous page. To tighten the Ab Cable (74), remove the "U"-Bracket (97) from the Short... Weight Tube (17) by using the method described above or by removing the 5/16" x 1 3/4" Bolt (96) and the 5/16" Nylon Locknut (64). Then re-attach the "U"...
... 77 76 90 89 27 When you are tightening the cables, take note that are attached to tighten the cables. "Top" refers to the small weight stack. The threaded ends on the previous page. To tighten the Ab Cable (74), remove the "U"-Bracket (97) from the Short... Weight Tube (17) by using the method described above or by removing the 5/16" x 1 3/4" Bolt (96) and the 5/16" Nylon Locknut (64). Then re-attach the "U"...
English Manual
Page 30
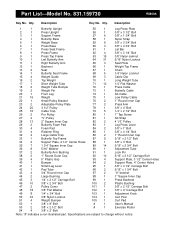
...Cable 21 16 Weight 75 1 Low Pulley Cable 22 1 Small Pulley Bracket 76 2 1" Round Inner Cap 23 2 Adjustable Pulley Plate 77 2 Press Arm 24 20 3 1/2" Pulley 78 1 3/8" x 4" Bolt 25 16 Cable Trap 79 5 1/4" x 2 1/2" Bolt 26 2 Pro Pulley 80 1...Carriage Bolt 48 18 3/8" Flat Washer 102 1 3/8" x 4" Carriage Bolt 49 8 1/4" x 3/4" Bolt 103 1 Adjustment Knob 50 32 3/8" Nylon Locknut 104 1 Curl Post 51 4 Weight Bumper 105 1 Curl Pad 52 1 3/8" x 8" Bolt # 1 User's Manual 53 2 3/8" x 2 1/2" Bolt # 1 Exercise Poster 54 4 3/8" x 2" Bolt Note: "#"...
...Cable 21 16 Weight 75 1 Low Pulley Cable 22 1 Small Pulley Bracket 76 2 1" Round Inner Cap 23 2 Adjustable Pulley Plate 77 2 Press Arm 24 20 3 1/2" Pulley 78 1 3/8" x 4" Bolt 25 16 Cable Trap 79 5 1/4" x 2 1/2" Bolt 26 2 Pro Pulley 80 1...Carriage Bolt 48 18 3/8" Flat Washer 102 1 3/8" x 4" Carriage Bolt 49 8 1/4" x 3/4" Bolt 103 1 Adjustment Knob 50 32 3/8" Nylon Locknut 104 1 Curl Post 51 4 Weight Bumper 105 1 Curl Pad 52 1 3/8" x 8" Bolt # 1 User's Manual 53 2 3/8" x 2 1/2" Bolt # 1 Exercise Poster 54 4 3/8" x 2" Bolt Note: "#"...
English Manual
Page 32
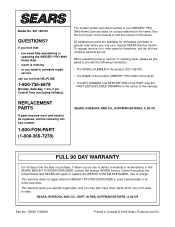
... listed on a decal attached to state. This warranty does not apply when the WEIGHT SYSTEM EXERCISER is missing • or you visit your WEIDER® PRO 9940 Home Gym are available for rental purposes. When requesting help assembling or operating the WEIDER® PRO 9940 Home Gym • a part is used commercially or for immediate purchase or...
... listed on a decal attached to state. This warranty does not apply when the WEIGHT SYSTEM EXERCISER is missing • or you visit your WEIDER® PRO 9940 Home Gym are available for rental purposes. When requesting help assembling or operating the WEIDER® PRO 9940 Home Gym • a part is used commercially or for immediate purchase or...


