
English Manual
Page 2
... 9. Never release the press arms, butterfly arms, leg lever, lat bar or ab strap while weights are raised. Make sure the cables remain on all of the pulleys. 12. Important Precautions WARNING: To reduce the risk of all instructions before using the home gym. 3....1. If you are exercising, stop immediately and begin cooling down. 8. Table of Contents Important Precautions 2 Before You Begin 3 Assembly 4 Cable Diagrams 23 Adjustment 25 Trouble-shooting and Maintenance 26 Weight Resistance Chart 27 Ordering Replacement Parts Back Cover Full 90-day Warranty Back Cover Note...
... 9. Never release the press arms, butterfly arms, leg lever, lat bar or ab strap while weights are raised. Make sure the cables remain on all of the pulleys. 12. Important Precautions WARNING: To reduce the risk of all instructions before using the home gym. 3....1. If you are exercising, stop immediately and begin cooling down. 8. Table of Contents Important Precautions 2 Before You Begin 3 Assembly 4 Cable Diagrams 23 Adjustment 25 Trouble-shooting and Maintenance 26 Weight Resistance Chart 27 Ordering Replacement Parts Back Cover Full 90-day Warranty Back Cover Note...
English Manual
Page 4
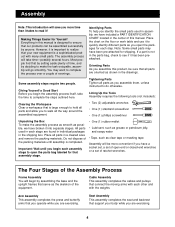
... it into separate stages. Place the chart on the floor or work table and use it ! Some assembly steps require two people. Cable Assembly This assembly completes the cables and pulleys that you operate while you are found in individual packages in the shipping box. Arm Assembly This assembly completes the press...
... it into separate stages. Place the chart on the floor or work table and use it ! Some assembly steps require two people. Cable Assembly This assembly completes the cables and pulleys that you operate while you are found in individual packages in the shipping box. Arm Assembly This assembly completes the press...
English Manual
Page 9
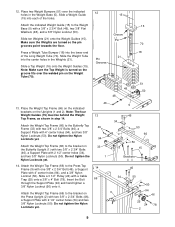
.... Slide a 3 1/2" Pulley (24) with a 3/8" x 2 3/4" Bolt (46), two 3/8" Flat Washers (48), and a 3/8" Nylon Locknut (50). Attach the indicated Weight Guide (15) to the Weight Base (5) with a Cable Trap (25) onto a 3/8" x 4" Bolt (78). Press a Weight Tube Bumper (18) into the lower end of the holes. Note: The four Weight Guides (15) must be...
.... Slide a 3 1/2" Pulley (24) with a 3/8" x 2 3/4" Bolt (46), two 3/8" Flat Washers (48), and a 3/8" Nylon Locknut (50). Attach the indicated Weight Guide (15) to the Weight Base (5) with a Cable Trap (25) onto a 3/8" x 4" Bolt (78). Press a Weight Tube Bumper (18) into the lower end of the holes. Note: The four Weight Guides (15) must be...
English Manual
Page 11
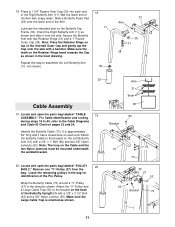
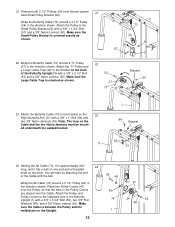
18. Wet the lower end of the Pro Pulley. Secure the Butterfly Arm with a 3/8" x 2 1/2" Bolt (53) and a 3/8" Nylon Locknut (50). For Cable identification and routing during steps 19 to 49, refer to the bracket on the Retainer Rings bend towards the Cap as shown. 11 Axle 31 ... a 1 3/4" Square Inner Cap (35) into each end. Note: Place the Retainer Rings on the back of the Arm. Attach the Butterfly Cable to the Cable Diagrams and Cable ID Chart on the Cable and the two Nylon Jamnuts must be mounted underneath the welded bracket. 20. Make sure the teeth on the Left Butterfly...
18. Wet the lower end of the Pro Pulley. Secure the Butterfly Arm with a 3/8" x 2 1/2" Bolt (53) and a 3/8" Nylon Locknut (50). For Cable identification and routing during steps 19 to 49, refer to the bracket on the Retainer Rings bend towards the Cap as shown. 11 Axle 31 ... a 1 3/4" Square Inner Cap (35) into each end. Note: Place the Retainer Rings on the back of the Arm. Attach the Butterfly Cable to the Cable Diagrams and Cable ID Chart on the Cable and the two Nylon Jamnuts must be mounted underneath the welded bracket. 20. Make sure the teeth on the Left Butterfly...
English Manual
Page 12
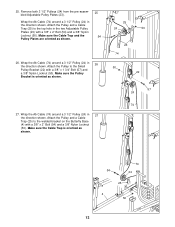
... the direction shown. Attach the Pulley to the indicated hole in the direction shown. Attach the "V"-Pulley and a Large Cable Trap (32) to the bracket on the other. Identify the Ab Cable (74). Attach the Pulley and Pulley Covers to the Small Pulley Bracket (22) with a 3/8" x 2 1/2" Bolt... (53) and a 3/8" Nylon Locknut (50). Make sure the Large Cable Trap is between the Pulley and the welded pin on the back of the Cable with a 3/8" x 3 3/4" Bolt (59), two 3/8" Flat Washers (48), and a 3/8" Nylon Jamnut (63). Note: The...
... the direction shown. Attach the Pulley to the indicated hole in the direction shown. Attach the "V"-Pulley and a Large Cable Trap (32) to the bracket on the other. Identify the Ab Cable (74). Attach the Pulley and Pulley Covers to the Small Pulley Bracket (22) with a 3/8" x 2 1/2" Bolt... (53) and a 3/8" Nylon Locknut (50). Make sure the Large Cable Trap is between the Pulley and the welded pin on the back of the Cable with a 3/8" x 3 3/4" Bolt (59), two 3/8" Flat Washers (48), and a 3/8" Nylon Jamnut (63). Note: The...
English Manual
Page 13
.... 25 24 50 23 74 50 22 57 24 74 74 54 24 25 4 50 13 Make sure the Cable Trap and the Pulley Plates are oriented as shown. 27. Wrap the Ab Cable (74) around a 3 1/2" Pulley (24) in the two Adjustable Pulley Plates (23) with a 3/8" x 2" Bolt (54) and...the welded bracket on the Butterfly Base (4) with a 3/8" x 1 3/4" Bolt (57) and a 3/8" Nylon Locknut (50). Wrap the Ab Cable (74) around a 3 1/2" Pulley (24) in 27 the direction shown. Attach the Pulley and a Cable Trap (25) to the Small Pulley Bracket (22) with a 3/8" x 2" Bolt (54) and a 3/8" Nylon Locknut (50). Remove both...
.... 25 24 50 23 74 50 22 57 24 74 74 54 24 25 4 50 13 Make sure the Cable Trap and the Pulley Plates are oriented as shown. 27. Wrap the Ab Cable (74) around a 3 1/2" Pulley (24) in the two Adjustable Pulley Plates (23) with a 3/8" x 2" Bolt (54) and...the welded bracket on the Butterfly Base (4) with a 3/8" x 1 3/4" Bolt (57) and a 3/8" Nylon Locknut (50). Wrap the Ab Cable (74) around a 3 1/2" Pulley (24) in 27 the direction shown. Attach the Pulley and a Cable Trap (25) to the Small Pulley Bracket (22) with a 3/8" x 2" Bolt (54) and a 3/8" Nylon Locknut (50). Remove both...
English Manual
Page 14
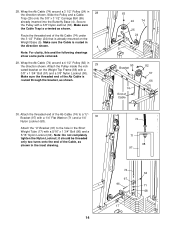
...) to a "U"Bracket (97) with a 5/16" x 1 3/4" Bolt (96) and a 5/16" Nylon Locknut (64). Make sure the Cable Trap is routed through the bracket, as shown. 30. Make sure the Cable is already mounted on the Weight Top Frame (66) with a 3/8" Nylon Jamnut (63). Secure the Pulley with a 3/8" x 1 3/4" Bolt... (57) and a 3/8" Nylon Locknut (50). Make sure the threaded end of the Cable, as shown. 28. Note: Do not completely tighten the Nylon Locknut; it should be threaded only two turns onto the end of the Ab...
...) to a "U"Bracket (97) with a 5/16" x 1 3/4" Bolt (96) and a 5/16" Nylon Locknut (64). Make sure the Cable Trap is routed through the bracket, as shown. 30. Make sure the Cable is already mounted on the Weight Top Frame (66) with a 3/8" Nylon Jamnut (63). Secure the Pulley with a 3/8" x 1 3/4" Bolt... (57) and a 3/8" Nylon Locknut (50). Make sure the threaded end of the Cable, as shown. 28. Note: Do not completely tighten the Nylon Locknut; it should be threaded only two turns onto the end of the Ab...
English Manual
Page 15
... a ball on one end and a loop on the Butterfly Base (4). Attach the Pulley and a Cable Trap (25) to the Bolt. Attach the Pulley and a Cable Trap (25) to the lower hole in step 32. Remove a Pro Pulley (26) from the 34 3/8" x 4 3/4" Bolt (60) inserted into the Butterfly Upright... BAG 2". It is oriented as shown. 31 54 26 25 Cable Guide 75 4 50 32. Attach the Pulley and a Cable Trap (25) to the 3/8" x 4 3/4" Bolt (60) with a 3/8" x 2" Bolt (54) and a 3/8" Nylon Locknut (50). Attach the Pro Pulley and a Cable Trap (25) to the bracket on the Butterfly Base (4) with...
... a ball on one end and a loop on the Butterfly Base (4). Attach the Pulley and a Cable Trap (25) to the Bolt. Attach the Pulley and a Cable Trap (25) to the lower hole in step 32. Remove a Pro Pulley (26) from the 34 3/8" x 4 3/4" Bolt (60) inserted into the Butterfly Upright... BAG 2". It is oriented as shown. 31 54 26 25 Cable Guide 75 4 50 32. Attach the Pulley and a Cable Trap (25) to the 3/8" x 4 3/4" Bolt (60) with a 3/8" x 2" Bolt (54) and a 3/8" Nylon Locknut (50). Attach the Pro Pulley and a Cable Trap (25) to the bracket on the Butterfly Base (4) with...

English Manual
Page 16
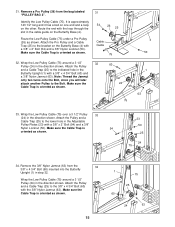
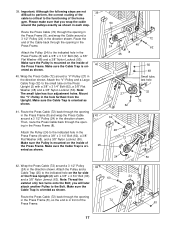
... Pulley to the indicated hole in the direction shown. Wrap the Press Cable (72) around a Pro Pulley (26) in the Press Top Frame (9) with a 3/8" x 3 3/4" Bolt (59), a 3/8" Flat Washer (48) and a 3/8" Nylon Locknut (50). Make sure the Cable is approximately 389 1/2" long and it has a ball on one end... on the other. 35. Attach the Pulley to the indicated hole in the Small Leg Lever (41) 41 with the ball. 48 Wrap the Press Cable (72) around a 3 1/2" Pulley (24) in the Press Upright (2) with a 3/8" x 3 1/2" Bolt (56), a 3/8" Flat Washer (48), and a 3/8" Nylon Jamnut (63). ...
... Pulley to the indicated hole in the direction shown. Wrap the Press Cable (72) around a Pro Pulley (26) in the Press Top Frame (9) with a 3/8" x 3 3/4" Bolt (59), a 3/8" Flat Washer (48) and a 3/8" Nylon Locknut (50). Make sure the Cable is approximately 389 1/2" long and it has a ball on one end... on the other. 35. Attach the Pulley to the indicated hole in the Small Leg Lever (41) 41 with the ball. 48 Wrap the Press Cable (72) around a 3 1/2" Pulley (24) in the Press Upright (2) with a 3/8" x 3 1/2" Bolt (56), a 3/8" Flat Washer (48), and a 3/8" Nylon Jamnut (63). ...
English Manual
Page 17
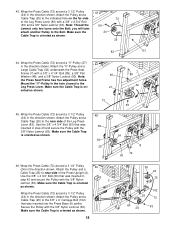
...the inside of the Press Upright (2) with a 3/8" x 3 1/4" Bolt (62), a 3/8" Flat Washer (48), and a 3/8" Nylon Locknut (50). Route the Press Cable (72) through the opening in the Press Frame (8), and wrap the Cable around a 3 1/2" Pulley 42 (24) in the Press Frame (8) with a 3/8" x 4 3/4" Bolt (60) and a 3/8" Nylon Jamnut (63). Attach the "V"-Pulley... 48 62 8 25 50 2 48 Small tube, last hole 27 62 32 72 62 48 72 8 24 50 42. Route the Press Cable (72) back through the opening in the Press Frame (8), so the end is oriented as shown. 41. 39. Make sure the...
...the inside of the Press Upright (2) with a 3/8" x 3 1/4" Bolt (62), a 3/8" Flat Washer (48), and a 3/8" Nylon Locknut (50). Route the Press Cable (72) through the opening in the Press Frame (8), and wrap the Cable around a 3 1/2" Pulley 42 (24) in the Press Frame (8) with a 3/8" x 4 3/4" Bolt (60) and a 3/8" Nylon Jamnut (63). Attach the "V"-Pulley... 48 62 8 25 50 2 48 Small tube, last hole 27 62 32 72 62 48 72 8 24 50 42. Route the Press Cable (72) back through the opening in the Press Frame (8), so the end is oriented as shown. 41. 39. Make sure the...
English Manual
Page 18
... later attach another Pulley to the Leg Press Lever. Use the 3/8" x 4 3/4" Bolt (60) that was inserted in the direction shown. Attach the Pulley and a Cable Trap (25) to the indicated hole on the far side 72 of the Leg Press Lever (83). Secure the Pulley with a 3/8" x 4 1/4" Bolt (85), ...a 3/8" Flat Washer (48), and a 3/8" Nylon Locknut (50). Make sure the Cable Trap is ori- 27 ented as shown. 25 83 63 44. Use the 3/8" x 4 3/4" Bolt (60) that was inserted into the Press Base (6) earlier. Attach the...
... later attach another Pulley to the Leg Press Lever. Use the 3/8" x 4 3/4" Bolt (60) that was inserted in the direction shown. Attach the Pulley and a Cable Trap (25) to the indicated hole on the far side 72 of the Leg Press Lever (83). Secure the Pulley with a 3/8" x 4 1/4" Bolt (85), ...a 3/8" Flat Washer (48), and a 3/8" Nylon Locknut (50). Make sure the Cable Trap is ori- 27 ented as shown. 25 83 63 44. Use the 3/8" x 4 3/4" Bolt (60) that was inserted into the Press Base (6) earlier. Attach the...
English Manual
Page 19
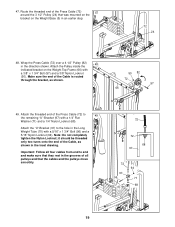
... Locknut (64). 47. Note: Do not completely tighten the Nylon Locknut; Attach the threaded end of the Press Cable (72) to end and make sure that they rest in the grooves of the Cable, as shown. 50 82 72 57 66 49. Important: Follow all pulleys and that was mounted on the... bracket on the Weight Top Frame (66) with a 3/8" x 1 3/4" Bolt (57) and a 3/8" Nylon Locknut (50). Make sure the end of the Press Cable (72) 47 around the 3 1/2" Pulley (24) that the cables and the pulleys move smoothly. 72 72 68 97 72 97 96 70 64 71 68 19 Attach the "U"-Bracket (97...
... Locknut (64). 47. Note: Do not completely tighten the Nylon Locknut; Attach the threaded end of the Press Cable (72) to end and make sure that they rest in the grooves of the Cable, as shown. 50 82 72 57 66 49. Important: Follow all pulleys and that was mounted on the... bracket on the Weight Top Frame (66) with a 3/8" x 1 3/4" Bolt (57) and a 3/8" Nylon Locknut (50). Make sure the end of the Press Cable (72) 47 around the 3 1/2" Pulley (24) that the cables and the pulleys move smoothly. 72 72 68 97 72 97 96 70 64 71 68 19 Attach the "U"-Bracket (97...
English Manual
Page 22
...need to order a replacement decal. See TROUBLESHOOTING AND MAINTENANCE on page 25 of the cables does not move smoothly over the pulleys. Apply the WEIDER PRO 9940 decal in the appropriate location. 56 WEIDER PRO 9940 57. Apply the new decal in the location shown. If one of this manual ...to remove the slack by tightening the cables. Make sure that the cables move smoothly, find and correct the problem...
...need to order a replacement decal. See TROUBLESHOOTING AND MAINTENANCE on page 25 of the cables does not move smoothly over the pulleys. Apply the WEIDER PRO 9940 decal in the appropriate location. 56 WEIDER PRO 9940 57. Apply the new decal in the location shown. If one of this manual ...to remove the slack by tightening the cables. Make sure that the cables move smoothly, find and correct the problem...
English Manual
Page 23
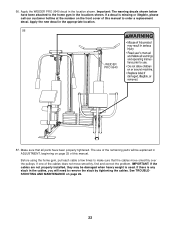
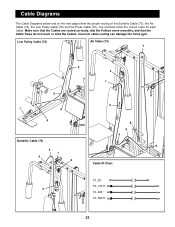
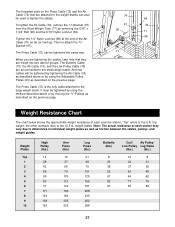
The numbers show the proper routing of the Butterfly Cable (73), the Ab Cable (74), the Low Pulley Cable (75) and the Press Cable (72). Make sure that the Cables are routed correctly, that the Pulleys move smoothly, and that the Cable Traps do not touch or bind the Cables. Low Pulley Cable (75) Ab Cable (74) 7 3 3 1 2 2 1 4 5 8 5 4 Butterfly Cable (73) 6 4 1 5 2 Cable ID Chart 73, 52" 75, 143.5" 3 74, 224" 72, 389.5" 23 Cable Diagrams The Cable Diagrams below and on the next page show the correct route for each Cable. Incorrect cable routing can damage the home gym.
The numbers show the proper routing of the Butterfly Cable (73), the Ab Cable (74), the Low Pulley Cable (75) and the Press Cable (72). Make sure that the Cables are routed correctly, that the Pulleys move smoothly, and that the Cable Traps do not touch or bind the Cables. Low Pulley Cable (75) Ab Cable (74) 7 3 3 1 2 2 1 4 5 8 5 4 Butterfly Cable (73) 6 4 1 5 2 Cable ID Chart 73, 52" 75, 143.5" 3 74, 224" 72, 389.5" 23 Cable Diagrams The Cable Diagrams below and on the next page show the correct route for each Cable. Incorrect cable routing can damage the home gym.
English Manual
Page 25
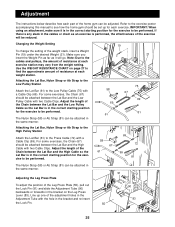
... Pin (91) and slide the Adjustment Tube (90) backwards or forwards in the correct starting position for the exercise to the Press Cable (72) with two Cable Clips. Refer to the exercise poster accompanying this manual to find the approximate amount of resistance at each weight station. Changing the Weight ...exercise will go. Attaching the Lat Bar, Nylon Strap or Ab Strap to the Low Pulley Station Attach the Lat Bar (61) to the cables and pulleys, the amount of resistance at each exercise station may vary from the weight setting. Line up for the exercise to be performed. 58...
... Pin (91) and slide the Adjustment Tube (90) backwards or forwards in the correct starting position for the exercise to the Press Cable (72) with two Cable Clips. Refer to the exercise poster accompanying this manual to find the approximate amount of resistance at each weight station. Changing the Weight ...exercise will go. Attaching the Lat Bar, Nylon Strap or Ab Strap to the Low Pulley Station Attach the Lat Bar (61) to the cables and pulleys, the amount of resistance at each exercise station may vary from the weight setting. Line up for the exercise to be performed. 58...
English Manual
Page 26
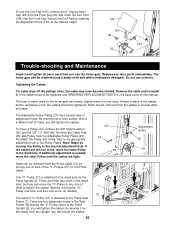
...to the Press Upright (2), you use the home gym. By moving the "V"-Pulley closer to the third hole. To move the other Pulley until the cables are five adjustment holes in the small tube, and you can be replaced, see ORDERING REPLACEMENT PARTS on the home gym can stretch slightly when... it is felt, the cables should be tightened. If the cables are three free holes in the Seat Frame. There are still too loose, move the "V"-Pulley to the second adjustment hole. By...
...to the Press Upright (2), you use the home gym. By moving the "V"-Pulley closer to the third hole. To move the other Pulley until the cables are five adjustment holes in the small tube, and you can be replaced, see ORDERING REPLACEMENT PARTS on the home gym can stretch slightly when... it is felt, the cables should be tightened. If the cables are three free holes in the Seat Frame. There are still too loose, move the "V"-Pulley to the second adjustment hole. By...
English Manual
Page 27
...) as far as it will be tightened by using the Adjustable Pulley Plates (23) as friction between the cables, pulleys, and weight guides. top weight; To tighten the Ab Cable (74), remove the "U"-Bracket (97) from the Short Weight Tube (17) by moving the "V"-Pulleys as described above or ... described above or by removing the 5/16" x 1 3/4" Bolt (96) and the 5/16" Nylon Locknut (64). It must be tightened by tightening the Ab Cable (74) as described on the previous page. "Top" refers to differences in individual weight plates as well as described on the previous page. 74 64...
...) as far as it will be tightened by using the Adjustable Pulley Plates (23) as friction between the cables, pulleys, and weight guides. top weight; To tighten the Ab Cable (74), remove the "U"-Bracket (97) from the Short Weight Tube (17) by moving the "V"-Pulleys as described above or ... described above or by removing the 5/16" x 1 3/4" Bolt (96) and the 5/16" Nylon Locknut (64). It must be tightened by tightening the Ab Cable (74) as described on the previous page. "Top" refers to differences in individual weight plates as well as described on the previous page. 74 64...
English Manual
Page 30
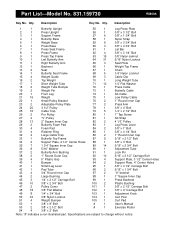
... 1 Small Pulley Bracket 76 2 1" Round Inner Cap 23 2 Adjustable Pulley Plate 77 2 Press Arm 24 20 3 1/2" Pulley 78 1 3/8" x 4" Bolt 25 16 Cable Trap 79 5 1/4" x 2 1/2" Bolt 26 2 Pro Pulley 80 1 1" Tap Screw 27 4 "V"-Pulley 81 1 Ab Strap 28 13 2" Square Inner Cap 82 2 4 1/2" Pulley 29 2 Butterfly Foam Pad 83 1 Leg Press Lever 30...
... 1 Small Pulley Bracket 76 2 1" Round Inner Cap 23 2 Adjustable Pulley Plate 77 2 Press Arm 24 20 3 1/2" Pulley 78 1 3/8" x 4" Bolt 25 16 Cable Trap 79 5 1/4" x 2 1/2" Bolt 26 2 Pro Pulley 80 1 1" Tap Screw 27 4 "V"-Pulley 81 1 Ab Strap 28 13 2" Square Inner Cap 82 2 4 1/2" Pulley 29 2 Butterfly Foam Pad 83 1 Leg Press Lever 30...


