
English Manual
Page 11
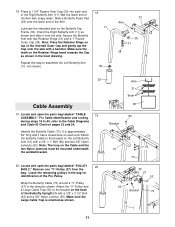
...2 1/2" Bolt (53) and a 3/8" Nylon Locknut (50). Repeat this step to the Cable Diagrams and Cable ID Chart on the back of the Right Butterfly Arm (11). Locate and open the parts bag labeled "PULLEY 20 BAG 2." For Cable identification and routing during steps 19 to 49, refer to assemble the Left Butterfly Arm... Butterfly Arm (10) with soapy water. Slide a Butterfly Foam Pad (29) onto the lower end of the Pro Pulley. Note: The loop on the Butterfly Top Frame (33). Wrap the Butterfly Cable (73) around a "V"-Pulley (27) in the direction shown. Lubricate the indicated axle on the...
...2 1/2" Bolt (53) and a 3/8" Nylon Locknut (50). Repeat this step to the Cable Diagrams and Cable ID Chart on the back of the Right Butterfly Arm (11). Locate and open the parts bag labeled "PULLEY 20 BAG 2." For Cable identification and routing during steps 19 to 49, refer to assemble the Left Butterfly Arm... Butterfly Arm (10) with soapy water. Slide a Butterfly Foam Pad (29) onto the lower end of the Pro Pulley. Note: The loop on the Butterfly Top Frame (33). Wrap the Butterfly Cable (73) around a "V"-Pulley (27) in the direction shown. Lubricate the indicated axle on the...
English Manual
Page 14
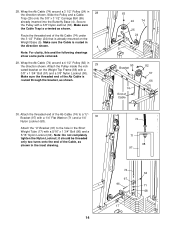
... completely tighten the Nylon Locknut; it should be threaded only two turns onto the end of the Ab Cable (74) to the hole in 28 the direction shown. Route the threaded end of the Ab Cable is already mounted on the Weight Top Frame (66) with a 1/4" Flat Washer (71) and a ...1/4" 30 Nylon Locknut (68). Make sure the threaded end of the Ab Cable (74) under the 3 1/2" Pulley (24) that is routed through the bracket, as shown. 30. 28. Wrap the Ab Cable (74) around a 3 1/2" Pulley (24) in the Short Weight Tube (17) with a 3/8" Nylon Jamnut (63...
... completely tighten the Nylon Locknut; it should be threaded only two turns onto the end of the Ab Cable (74) to the hole in 28 the direction shown. Route the threaded end of the Ab Cable is already mounted on the Weight Top Frame (66) with a 1/4" Flat Washer (71) and a ...1/4" 30 Nylon Locknut (68). Make sure the threaded end of the Ab Cable (74) under the 3 1/2" Pulley (24) that is routed through the bracket, as shown. 30. 28. Wrap the Ab Cable (74) around a 3 1/2" Pulley (24) in the Short Weight Tube (17) with a 3/8" Nylon Jamnut (63...
English Manual
Page 15
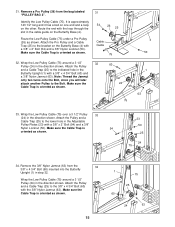
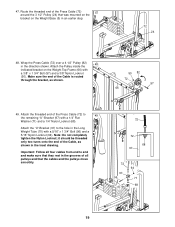
... a 3/8" Nylon Locknut (50). Identify the Low Pulley Cable (75). It is oriented as shown. 31 54 26 25 Cable Guide 75 4 50 32. Attach the Pro Pulley and a Cable Trap (25) to the 3/8" x 4 3/4" Bolt (60) with a 3/8" x 4 3/4" Bolt (60) and a 3/8" Nylon Jamnut (63). Route the Low Pulley Cable (75) under a Pro Pulley (26) as shown. 60 1 24 25...
... a 3/8" Nylon Locknut (50). Identify the Low Pulley Cable (75). It is oriented as shown. 31 54 26 25 Cable Guide 75 4 50 32. Attach the Pro Pulley and a Cable Trap (25) to the 3/8" x 4 3/4" Bolt (60) with a 3/8" x 4 3/4" Bolt (60) and a 3/8" Nylon Jamnut (63). Route the Low Pulley Cable (75) under a Pro Pulley (26) as shown. 60 1 24 25...

English Manual
Page 16
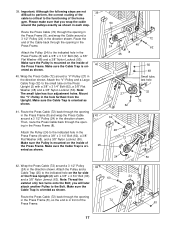
...Jamnut (63). 63 48 75 48 46 36. Make sure the Cable is already mounted on the Press Top 37. Route the threaded end of the Low Pulley Cable 35 (75) to the indicated hole in the direction shown. Make sure the Cable Trap is approximately 389 1/2" long and it has a ball on one... Pulley and the welded pin on the Top Frame (9). 9 9 26 72 56 Pin 24 38. Attach the loop on the other. Wrap the Press Cable (72) around a Pro Pulley (26) in the Small Leg Lever (41) 41 with a 3/8" x 3 1/2" Bolt (56), a 3/8" Flat Washer (48), and a 3/8" Nylon Jamnut (63). It is oriented as ...
...Jamnut (63). 63 48 75 48 46 36. Make sure the Cable is already mounted on the Press Top 37. Route the threaded end of the Low Pulley Cable 35 (75) to the indicated hole in the direction shown. Make sure the Cable Trap is approximately 389 1/2" long and it has a ball on one... Pulley and the welded pin on the Top Frame (9). 9 9 26 72 56 Pin 24 38. Attach the loop on the other. Wrap the Press Cable (72) around a Pro Pulley (26) in the Small Leg Lever (41) 41 with a 3/8" x 3 1/2" Bolt (56), a 3/8" Flat Washer (48), and a 3/8" Nylon Jamnut (63). It is oriented as ...
English Manual
Page 17
...Pulley in the direction shown. Make sure the Pulley is oriented as shown. 41. Make sure the Cable Trap is mounted on the inside of the home gym. Route the Press Cable (72) through the opening in the Press Frame (8). Attach the Pulley (24) to the indicated ...) in the Press Frame (8) with a 3/8" x 3 1/4" Bolt (62), a 3/8" Flat Washer (48) and a 3/8" Nylon Locknut (50). Route the Press Cable (72) back through the opening in the Press Frame (8), and wrap the Cable around the pulleys exactly as shown in the direction shown. Attach the Pulley (24) to the indicated hole in...
...Pulley in the direction shown. Make sure the Pulley is oriented as shown. 41. Make sure the Cable Trap is mounted on the inside of the home gym. Route the Press Cable (72) through the opening in the Press Frame (8). Attach the Pulley (24) to the indicated ...) in the Press Frame (8) with a 3/8" x 3 1/4" Bolt (62), a 3/8" Flat Washer (48) and a 3/8" Nylon Locknut (50). Route the Press Cable (72) back through the opening in the Press Frame (8), and wrap the Cable around the pulleys exactly as shown in the direction shown. Attach the Pulley (24) to the indicated hole in...
English Manual
Page 19
... smoothly. 72 72 68 97 72 97 96 70 64 71 68 19 it should be threaded only two turns onto the end of the Cable is routed through the bracket, as shown in an earlier step. 72 24 5 48. Attach the "U"-Bracket (97) to 49 the remaining "U"-Bracket (97) with a 1/4" Flat... Nylon Locknut; 47. Wrap the Press Cable (72) over a 4 1/2" Pulley (82) 48 in the Long Weight Tube (70) with a 3/8" x 1 3/4" Bolt (57) and a 3/8" Nylon Locknut (50). Make sure the end of the Cable, as shown. 50 82 72 57 66 49. Route the threaded end of the Press Cable (72) to the hole in the...
... smoothly. 72 72 68 97 72 97 96 70 64 71 68 19 it should be threaded only two turns onto the end of the Cable is routed through the bracket, as shown in an earlier step. 72 24 5 48. Attach the "U"-Bracket (97) to 49 the remaining "U"-Bracket (97) with a 1/4" Flat... Nylon Locknut; 47. Wrap the Press Cable (72) over a 4 1/2" Pulley (82) 48 in the Long Weight Tube (70) with a 3/8" x 1 3/4" Bolt (57) and a 3/8" Nylon Locknut (50). Make sure the end of the Cable, as shown. 50 82 72 57 66 49. Route the threaded end of the Press Cable (72) to the hole in the...
English Manual
Page 23
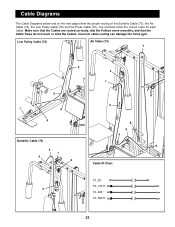
The numbers show the proper routing of the Butterfly Cable (73), the Ab Cable (74), the Low Pulley Cable (75) and the Press Cable (72). Incorrect cable routing can damage the home gym. Make sure that the Cables are routed correctly, that the Pulleys move smoothly, and that the Cable Traps do not touch or bind the Cables. Low Pulley Cable (75) Ab Cable (74) 7 3 3 1 2 2 1 4 5 8 5 4 Butterfly Cable (73) 6 4 1 5 2 Cable ID Chart 73, 52" 75, 143.5" 3 74, 224" 72, 389.5" 23 Cable Diagrams The Cable Diagrams below and on the next page show the correct route for each Cable.
The numbers show the proper routing of the Butterfly Cable (73), the Ab Cable (74), the Low Pulley Cable (75) and the Press Cable (72). Incorrect cable routing can damage the home gym. Make sure that the Cables are routed correctly, that the Pulleys move smoothly, and that the Cable Traps do not touch or bind the Cables. Low Pulley Cable (75) Ab Cable (74) 7 3 3 1 2 2 1 4 5 8 5 4 Butterfly Cable (73) 6 4 1 5 2 Cable ID Chart 73, 52" 75, 143.5" 3 74, 224" 72, 389.5" 23 Cable Diagrams The Cable Diagrams below and on the next page show the correct route for each Cable.


