
Weider Pro 9940 Support Question
Weider Pro 9940 Support Question
Find answers below for this question about Weider Pro 9940.Need a Weider Pro 9940 manual? We have 1 online manual for this item!
Question posted by Leondy on August 29th, 2016
Diagram Cable
I would like how to put the diagram cable of weider Pro 9735
Current Answers
Related Weider Pro 9940 Manual Pages
English Manual - Page 2
....
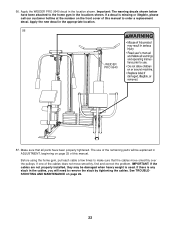
13. Keep hands and feet away from the home gym when performing an exercise that all of the pulleys.
12.
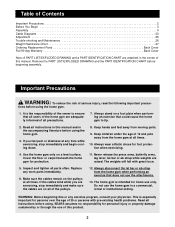
It is intended for personal injury or ...Before beginning this manual. Table of Contents
Important Precautions 2 Before You Begin 3 Assembly 4 Cable Diagrams 23 Adjustment 25 Trouble-shooting and Maintenance 26 Weight Resistance Chart 27 Ordering Replacement Parts Back ...
English Manual - Page 3
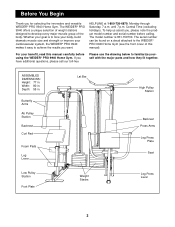
...PRO 9940 Home Gym.
If you want. Depth: 55 in . The model number is to tone your body, build dramatic muscle size and strength or improve your benefit, read this manual). The serial number can be found on a decal attached to familiarize yourself with the major parts and how they fit... WEIDER® PRO 9940 Home Gym. until 7 p.m. For your cardiovascular system, the WEIDER® PRO 9940...
English Manual - Page 4
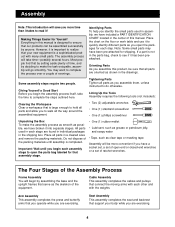
...all the way around the assembled equipment.
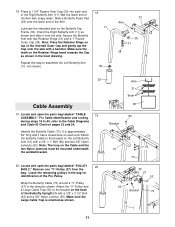
Tightening Parts Tighten all parts in each stage are exercising. The Four Stages of evenings. Some assembly steps require two people. All parts used in... will be more time than it takes to read it into separate stages. Cable Assembly This assembly completes the cables and pulleys that serve as possible, we have broken it ! Most people ...
English Manual - Page 9
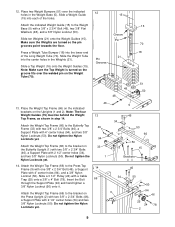
... 4" center holes (94), and two 3/8" Nylon Locknuts (50).
Note: Make sure the Top Weight is turned so the groove fits over the indicated
12
holes in step 14.
Slide a 3 1/2" Pulley (24) with a 3/8" x 2 3/4" Bolt (46...Long Weight Tube (70). Attach the indicated Weight Guide (15) to the Weight Base (5) with a Cable Trap (25) onto a 3/8" x 4" Bolt (78). Do not tighten the Nylon Locknuts yet....
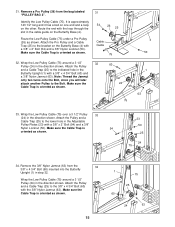
English Manual - Page 11
...(1) with a hammer. Locate and open the parts bag labeled "PULLEY
20
BAG 2." Attach the Butterfly Cable to the bracket on pages 23 and 24. Note: The loop on the Butterfly Top Frame (33).... end. Slide a Butterfly Foam Pad (29) onto the lower end of the Pro Pulley. Repeat this step to the Cable Diagrams
and Cable ID Chart on the back of the Right Butterfly Arm (11). Remove one "V"-...
English Manual - Page 12
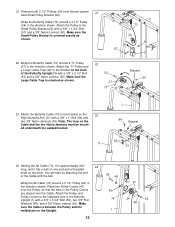
... from the pre-assem- 21 bled Small Pulley Bracket (22). Place two Pulley Covers (47) over the Cable. Make sure the Small Pulley Bracket is oriented as shown.
57
22. Attach the Pulley and Pulley Covers ...to the Small Pulley Bracket (22) with the ball.
59 48
Wrap the Ab Cable (74) around a 3 1/2" Pulley (24) in the Pulley Covers are placed over the Pulley, so ...
English Manual - Page 13
...23 74
50 22
57 24
74
74
54
24
25
4 50
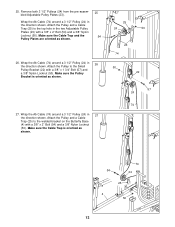
13 Attach the Pulley and a Cable Trap (25) to the top hole in the direction shown. Attach the Pulley to the welded bracket on... a 3/8" x 1 3/4" Bolt (57) and a 3/8" Nylon Locknut (50). Make sure the Cable Trap is oriented as shown.
27. Attach the Pulley and a Cable Trap (25) to the Small Pulley Bracket (22) with a 3/8" x 2" Bolt (54) and...
English Manual - Page 14
...the "U"-Bracket (97) to a "U"Bracket (97) with a 3/8" Nylon Jamnut (63). Wrap the Ab Cable (74) around a 3 1/2" Pulley (24) in 29 the direction shown. Note: Do not completely ... Locknut (68). 28.
Attach the Pulley inside the indicated bracket on the
Weight Base (5). Make sure the Cable Trap is routed through the bracket, as shown in the Short Weight Tube (17) with a 3/8" x ...
English Manual - Page 15
...
attach another Pulley to the lower hole in the
Butterfly Upright (1) with the 3/8" Nylon Jamnut (63). Route the Low Pulley Cable (75) under a Pro Pulley (26) as shown.
60 1
24 25 63
75
33. Make sure the Cable Trap is oriented as shown.
23 50
25
24 75
34. Attach the Pulley and...
English Manual - Page 16

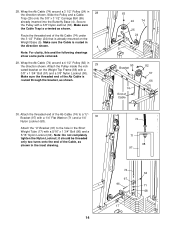
... (24) that is approximately 389
1/2" long and it has a ball on one end and a threaded
shaft on the Press Top
37. Wrap the Press Cable (72) around a Pro Pulley (26) in the direction shown. Attach the Pulley to the indicated hole in the Small Leg Lever (41)
41
with a 3/8" x 3 3/4" Bolt (59), a 3/8" Flat...
English Manual - Page 17
...(62), a 3/8" Flat Washer (48) and a 3/8" Nylon Locknut (50). Make sure the Cable Trap is critical to the indicated hole in the direction shown. Route the Press Cable (72) back through the opening in the
Press Frame (8) with a 3/8" x 3 1/4" Bolt...8
24
50
42. Attach the "V"-Pulley and a Large Cable Trap (32) to the Bolt. Make sure the Cable Trap is in the Press Frame (8), so the end is...
English Manual - Page 18
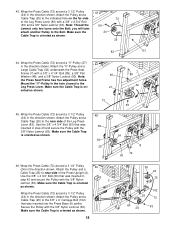
...) around a 3 1/2" Pulley (24) in the hole closest to the 3/8" x 4" Carriage Bolt (102) that was inserted into the Press Base (6) earlier. Wrap the Press Cable (72) around a 3 1/2" Pulley
46
(24) in the direction shown. Secure the Pulley with a 3/8" x 4 1/4" Bolt (85), a 3/8" Flat Washer (48), and a 3/8" Nylon Locknut (50).
Mount the "V"-Pulley ...
English Manual - Page 19
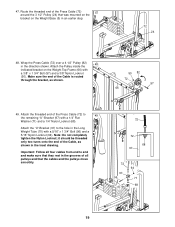
...72
72
68 97
72
97 96
70
64
71 68
19 Attach the threaded end of the Press Cable (72) to end and make sure that they rest in the Long Weight Tube (70) with ... (68). Attach the Pulley inside the
indicated bracket on the Weight Base (5) in the direction shown. Important: Follow all four cables from end to
49
the remaining "U"-Bracket (97) with a 5/16" x 1 3/4" Bolt (96) and a 5/16"...
English Manual - Page 22
... is any slack in ADJUSTMENT, beginning on page 26.
22 IMPORTANT: If the cables are not properly installed, they may be explained in the cables, you will be damaged when heavy weight is used. Apply the WEIDER PRO 9940 decal in the appropriate location. 56
WEIDER PRO 9940
57. See TROUBLESHOOTING AND MAINTENANCE on page 25 of the...
English Manual - Page 23
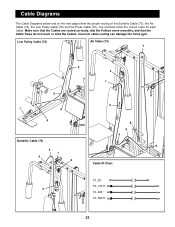
Cable Diagrams
The Cable Diagrams below and on the next page show the correct route for each Cable. Low Pulley Cable (75)
Ab Cable (74) 7
3 3
1
2
2
1
4
5 8
5
4
Butterfly Cable (73)
6 4
1 5
2 Cable ID Chart
73, 52"
75, 143.5" 3
74, 224"
72, 389.5"
23
Incorrect cable routing can damage the home gym. The numbers show the proper routing of the Butterfly Cable (73), the Ab Cable (74...
English Manual - Page 25
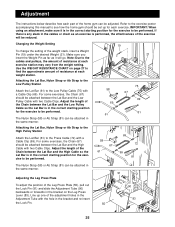
... or forwards in the bracket on page 27 to the Low Pulley Cable (75) with a Cable Clip (69). Line up for the exercise to the cables and pulleys, the amount of resistance at each weight station. Use ...to the High Pulley Station
Attach the Lat Bar (61) to the Press Cable (72) with a Cable Clip (69). Refer to the exercise poster accompanying this manual to see how the home gym should be set up...
English Manual - Page 26
...gym. Secure the Curl Pad by
moving one Pulley to tighten the cables. Tightening the Cables
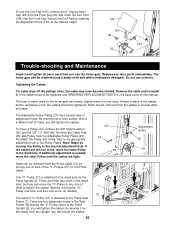
If a cable slips off the pulleys often, the cable may have several different ways:
The Adjustable Pulley Plates (23) ...twisted. Note: Begin by moving it fur- The home gym can be removed form the Press Cable (72) by inserting the Adjustment Knob (103) at the desired height.
105
104 28
103...
English Manual - Page 27
... previous page.
74 64
97
72
96
71
68
17
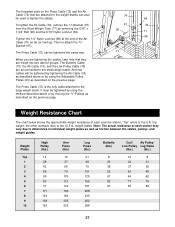
Weight Resistance Chart
The chart below shows the approximate weight resistance at each exercise station. To tighten the Ab Cable (74), remove the "U"-Bracket (97) from the Short Weight Tube (17) by using the method described above or by removing the 5/16...
English Manual - Page 30

...2
Press Arm
24 20
3 1/2" Pulley
78
1
3/8" x 4" Bolt
25 16
Cable Trap
79
5
1/4" x 2 1/2" Bolt
26
2
Pro Pulley
80
1
1" Tap Screw
27
4
"V"-Pulley
81
1
Ab Strap
28 13
...
Curl Pad
52
1
3/8" x 8" Bolt
#
1
User's Manual
53
2
3/8" x 2 1/2" Bolt
#
1
Exercise Poster
54
4
3/8" x 2" Bolt
Note: "#" indicates a non-illustrated part. Description
Key No. Qty. Part List...
English Manual - Page 32

... warranty does not apply when the WEIGHT SYSTEM EXERCISER is missing • or you need help or service, or ordering parts, please be replaced, call the following information:
• The MODEL NUMBER of the product (831.159730)
• The NAME of the product (WEIDER® PRO 9940 Home Gym)
• The KEY NUMBER and...
Similar Questions

I'm Looking To Order Complete Cables To The Weider Pro 9940
(Posted by Hef2324 1 year ago)

How Can I Get A Cable And Pulley Diagram For Weider Pro 4850
(Posted by herschelwaldrop334 2 years ago)


