

English Manual
Page 2
until 7 p.m. Apply the replacement decal in the location shown. 2 TABLE OF CONTENTS WARNING DECAL PLACEMENT 2 IMPORTANT PRECAUTIONS 3 BEFORE YOU BEGIN 4 PART IDENTIFICATION CHART 5 ASSEMBLY 6 ADJUSTMENTS 10 EXERCISE GUIDELINES 12 PART LIST 14 EXPLODED DRAWING 15 ORDERING REPLACEMENT PARTS Back Cover FULL 90 DAY WARRANTY Back Cover WARNING DECAL PLACEMENT ...
until 7 p.m. Apply the replacement decal in the location shown. 2 TABLE OF CONTENTS WARNING DECAL PLACEMENT 2 IMPORTANT PRECAUTIONS 3 BEFORE YOU BEGIN 4 PART IDENTIFICATION CHART 5 ASSEMBLY 6 ADJUSTMENTS 10 EXERCISE GUIDELINES 12 PART LIST 14 EXPLODED DRAWING 15 ORDERING REPLACEMENT PARTS Back Cover FULL 90 DAY WARRANTY Back Cover WARNING DECAL PLACEMENT ...
English Manual
Page 5
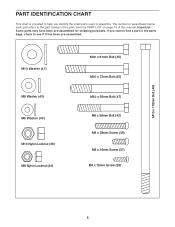
If you identify the small parts used in assembly. M10 x 178mm Bolt (46) M10 Washer (41) M8 Washer (43) M6 Washer (40) M10 Nylon Locknut (36) M8 Nylon Locknut (44) M10 x 81mm Bolt (35) ... Screw (37) M4 x 16mm Screw (38) 5 The number in parenthesis below each part refers to see if it has been pre-assembled. Important: Some parts may have been pre-assembled for shipping purposes. PART IDENTIFICATION CHART This chart is provided to help you cannot find a part in the parts bags, check to...
If you identify the small parts used in assembly. M10 x 178mm Bolt (46) M10 Washer (41) M8 Washer (43) M6 Washer (40) M10 Nylon Locknut (36) M8 Nylon Locknut (44) M10 x 81mm Bolt (35) ... Screw (37) M4 x 16mm Screw (38) 5 The number in parenthesis below each part refers to see if it has been pre-assembled. Important: Some parts may have been pre-assembled for shipping purposes. PART IDENTIFICATION CHART This chart is provided to help you cannot find a part in the parts bags, check to...
English Manual
Page 6
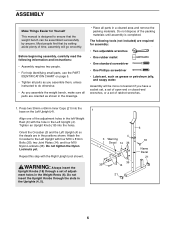
... one of the adjustment holes in the Weight Rests (6). Tighten an Upright Knob (18) into the base on page 5. • Tighten all parts as you assemble them, unless instructed to do otherwise. • As you have a socket set, a set of open-end or closed-end wrenches, or a set of ratchet wrenches... Bolts (35), two Joint Plates (14), and four M10 Nylon Locknuts (36). Most people find that the weight bench can be more convenient if you assemble the weight bench, make sure all parts are in the Uprights (4, 5). 1 4 3 Warning Decal 14 36 36 35 14 21 6 18 Name Decal 21 6 WARNING: ...
... one of the adjustment holes in the Weight Rests (6). Tighten an Upright Knob (18) into the base on page 5. • Tighten all parts as you assemble them, unless instructed to do otherwise. • As you have a socket set, a set of open-end or closed-end wrenches, or a set of ratchet wrenches... Bolts (35), two Joint Plates (14), and four M10 Nylon Locknuts (36). Most people find that the weight bench can be more convenient if you assemble the weight bench, make sure all parts are in the Uprights (4, 5). 1 4 3 Warning Decal 14 36 36 35 14 21 6 18 Name Decal 21 6 WARNING: ...
English Manual
Page 16
...tollfree number 1-800-FON-PART (1-800-366-7278) The model number and serial number of the decal. When requesting help assembling or operating the WEIDER® PRO 875 • a part is used commercially or for immediate purchase or special order when you need to order parts by telephone,... call the following information: • The MODEL NUMBER of the product (831.150680) • The NAME of the product (WEIDER® PRO 875 weight bench) • The PART NUMBER and DESCRIPTION of charge. ORDERING REPLACEMENT PARTS Model No. 831.150680 QUESTIONS? This warranty does not...
...tollfree number 1-800-FON-PART (1-800-366-7278) The model number and serial number of the decal. When requesting help assembling or operating the WEIDER® PRO 875 • a part is used commercially or for immediate purchase or special order when you need to order parts by telephone,... call the following information: • The MODEL NUMBER of the product (831.150680) • The NAME of the product (WEIDER® PRO 875 weight bench) • The PART NUMBER and DESCRIPTION of charge. ORDERING REPLACEMENT PARTS Model No. 831.150680 QUESTIONS? This warranty does not...


