

English Manual
Page 2
... all warnings and operating instructions prior to order a free replacement decal. Apply the replacement decal in the indicated locations. WEIDER is attached in the center of this product may result in serious injury. • Read user's manual and follow ...this manual. Table of Contents Warning Decal Placement 2 Important Precautions 3 Before You Begin 4 Part Identification Chart 5 Assembly 6 Adjusting the Weight Bench 15 Exercise Guidelines 18 Ordering Replacement Parts Back Cover Limited Warranty Back Cover Note: A Part List/Exploded Drawing is a registered trademark of ICON...
... all warnings and operating instructions prior to order a free replacement decal. Apply the replacement decal in the indicated locations. WEIDER is attached in the center of this product may result in serious injury. • Read user's manual and follow ...this manual. Table of Contents Warning Decal Placement 2 Important Precautions 3 Before You Begin 4 Part Identification Chart 5 Assembly 6 Adjusting the Weight Bench 15 Exercise Guidelines 18 Ordering Replacement Parts Back Cover Limited Warranty Back Cover Note: A Part List/Exploded Drawing is a registered trademark of ICON...

English Manual
Page 3
...in this product. 3 It is intended for personal injury or property damage sustained by or through the use the weight rack. Always secure your bench out of 300 pounds, including the barbell and weights (weights are adequately informed of the lat bar. 16. Always remove the lat bar ...floor beneath the weight rack for foot protection while exercising. 9. Inspect and tighten all times. 7. ICON assumes no responsibility for home use the bench. 15. Do not place more than 150 pounds on each time you feel pain or dizziness at all parts each side of weight (not included...
...in this product. 3 It is intended for personal injury or property damage sustained by or through the use the weight rack. Always secure your bench out of 300 pounds, including the barbell and weights (weights are adequately informed of the lat bar. 16. Always remove the lat bar ...floor beneath the weight rack for foot protection while exercising. 9. Inspect and tighten all times. 7. ICON assumes no responsibility for home use the bench. 15. Do not place more than 150 pounds on each time you feel pain or dizziness at all parts each side of weight (not included...
English Manual
Page 4
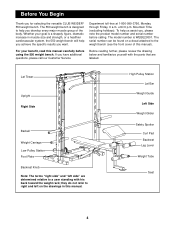
... body. To help you achieve the specific results you , please note the product model number and serial number before using the 550 weight bench. High Pulley Station Lat Bar Weight Guide Left Side Weight Glider Safety Spotter Curl Pad Backrest Leg Lever Weight Tube Seat 4 ...shapely figure, dramatic increase in this manual carefully before calling. For your goal is WEBE29301. If you for selecting the versatile CLUB WEIDER® 550 weight bench. Whether your benefit, read this manual. Before You Begin Thank you have additional questions, please call our Customer Service Before ...
... body. To help you achieve the specific results you , please note the product model number and serial number before using the 550 weight bench. High Pulley Station Lat Bar Weight Guide Left Side Weight Glider Safety Spotter Curl Pad Backrest Leg Lever Weight Tube Seat 4 ...shapely figure, dramatic increase in this manual carefully before calling. For your goal is WEBE29301. If you for selecting the versatile CLUB WEIDER® 550 weight bench. Whether your benefit, read this manual. Before You Begin Thank you have additional questions, please call our Customer Service Before ...

English Manual
Page 6
... a 60mm Square Inner Cap (55) into the end of the packing materials until assembly is designed to ensure that the weight bench can be more convenient if you assemble the weight bench, make sure all parts are oriented as shown in the drawings. Assembly requires the following information and instructions: Make Things...
... a 60mm Square Inner Cap (55) into the end of the packing materials until assembly is designed to ensure that the weight bench can be more convenient if you assemble the weight bench, make sure all parts are oriented as shown in the drawings. Assembly requires the following information and instructions: Make Things...

English Manual
Page 12
... Knob (80) into the bottom and the indicated end of the Front Leg (73). Attach the Stabilizer to the Bench Frame (63) using two M10 x 65mm Bolts (56), two M10 Small Washers (6), and two M10 Nylon Locknuts ...the indicated location. 10 23 10 11 63 60 87 64 60 Decal 12 Attach the Front Leg (73) to the Bench Frame (63) using an M10 x 20mm Bolt (26) and an M10 Nylon Locknut (11). 8 Bracket 3 11...64) and two M10 Nylon Locknuts (11). Press two 50mm Square Inner Caps (10) into the Bench Frame (63) and tighten. 22 6 11 80 56 63 56 73 23. Attach the indicated end of the Stabilizer (...
... Knob (80) into the bottom and the indicated end of the Front Leg (73). Attach the Stabilizer to the Bench Frame (63) using two M10 x 65mm Bolts (56), two M10 Small Washers (6), and two M10 Nylon Locknuts ...the indicated location. 10 23 10 11 63 60 87 64 60 Decal 12 Attach the Front Leg (73) to the Bench Frame (63) using an M10 x 20mm Bolt (26) and an M10 Nylon Locknut (11). 8 Bracket 3 11...64) and two M10 Nylon Locknuts (11). Press two 50mm Square Inner Caps (10) into the Bench Frame (63) and tighten. 22 6 11 80 56 63 56 73 23. Attach the indicated end of the Stabilizer (...

English Manual
Page 13
...69 78 53 80 6 63 11 63 61 13 Attach the Backrest Frame (78) to the Bench Frame (63) with four M6 x 65mm Screws (62) and four M6 Washers (81). Make sure that the pin on... the Bench Frame. To adjust the position of the holes in the Backrest Bracket (53). 27. Attach the Backrest (69...) to the Backrest Frame (78) with four M6 x 16mm Screws (61). Attach the Seat (68) to the Bench Frame (63) using two M10 x 25mm Bolts (43) and two M10 Nylon Locknuts (11). 11 79 78 53 25. Slide the...
...69 78 53 80 6 63 11 63 61 13 Attach the Backrest Frame (78) to the Bench Frame (63) with four M6 x 65mm Screws (62) and four M6 Washers (81). Make sure that the pin on... the Bench Frame. To adjust the position of the holes in the Backrest Bracket (53). 27. Attach the Backrest (69...) to the Backrest Frame (78) with four M6 x 16mm Screws (61). Attach the Seat (68) to the Bench Frame (63) using two M10 x 25mm Bolts (43) and two M10 Nylon Locknuts (11). 11 79 78 53 25. Slide the...

English Manual
Page 14
... sure all parts are properly tightened before you use of the three Pad Tubes (88). Do not overtighten the Nylon Locknut; The use the weight bench. Press three 45mm Square Inner Caps (71) into the indicated end of the Weight Tube. 28 71 84 71 70 67 75 71 72 74... 82 54 67 29. Slide the Pad Tubes through the indicated holes in Adjusting the Weight Bench, starting on page 15. 72 66 65 88 65 66 83 61 86 73 14
... sure all parts are properly tightened before you use of the three Pad Tubes (88). Do not overtighten the Nylon Locknut; The use the weight bench. Press three 45mm Square Inner Caps (71) into the indicated end of the Weight Tube. 28 71 84 71 70 67 75 71 72 74... 82 54 67 29. Slide the Pad Tubes through the indicated holes in Adjusting the Weight Bench, starting on page 15. 72 66 65 88 65 66 83 61 86 73 14

English Manual
Page 15
... the same height. 23 Hook Handle ATTACHING THE LAT BAR TO THE HIGH PULLEY STATION OR THE LOW PULLEY STATION To use the weight bench. The weight bench can be cleaned with a damp cloth and a mild, non-abrasive detergent. WARNING: Always remove the Lat Bar (16) when performing an exercise ...(23, 24 [not shown]) to new positions and pivot the hooks back into the slots in the Uprights (1). Adjusting the Weight Bench This section explains how the weight bench can be adjusted. Inspect and tighten all parts each time you use the high pulley station or the low pulley station, attach...
... the same height. 23 Hook Handle ATTACHING THE LAT BAR TO THE HIGH PULLEY STATION OR THE LOW PULLEY STATION To use the weight bench. The weight bench can be cleaned with a damp cloth and a mild, non-abrasive detergent. WARNING: Always remove the Lat Bar (16) when performing an exercise ...(23, 24 [not shown]) to new positions and pivot the hooks back into the slots in the Uprights (1). Adjusting the Weight Bench This section explains how the weight bench can be adjusted. Inspect and tighten all parts each time you use the high pulley station or the low pulley station, attach...

English Manual
Page 16
... is first used on the Weight Carriage (22). Always secure weights with Weight Clips (51). Do not place more than 150 pounds on the weight bench, can be removed from the lower ends of the Pulley Plates (19). Make sure the Cable Trap holds the Low Cable (8) in the same manner...
... is first used on the Weight Carriage (22). Always secure weights with Weight Clips (51). Do not place more than 150 pounds on the weight bench, can be removed from the lower ends of the Pulley Plates (19). Make sure the Cable Trap holds the Low Cable (8) in the same manner...

English Manual
Page 17
... the pin on the Weight Tube (75). Insert the Curl Post (83) into each end of the holes in use your weight bench with an Olympic weight set, you fully tighten the Curl Post Knob. To adjust the Backrest, pull the Backrest Knob (80) outward...Backrest up or down. Secure the Curl Post with other exercises. ATTACHING THE WEIGHT ADAPTER To use , store it away from the bench so it with the Weight Adapter Pin (52). Slide the Weight Adapter onto the Weight Tube (75) and secure it will not... in the Front Leg and the Curl Post. Make sure that you must be adjusted to the weight bench.
... the pin on the Weight Tube (75). Insert the Curl Post (83) into each end of the holes in use your weight bench with an Olympic weight set, you fully tighten the Curl Post Knob. To adjust the Backrest, pull the Backrest Knob (80) outward...Backrest up or down. Secure the Curl Post with other exercises. ATTACHING THE WEIGHT ADAPTER To use , store it away from the bench so it with the Weight Adapter Pin (52). Slide the Weight Adapter onto the Weight Tube (75) and secure it will not... in the Front Leg and the Curl Post. Make sure that you must be adjusted to the weight bench.

English Manual
Page 20
...) days from state to give the following information when calling: • The MODEL NUMBER of the product (WEBE29301) • The NAME of the product (CLUB WEIDER 550 weight bench) • The SERIAL NUMBER of the product (see the PART LIST and the EXPLODED DRAWING in its authorized service centers with respect to any product...
...) days from state to give the following information when calling: • The MODEL NUMBER of the product (WEBE29301) • The NAME of the product (CLUB WEIDER 550 weight bench) • The SERIAL NUMBER of the product (see the PART LIST and the EXPLODED DRAWING in its authorized service centers with respect to any product...

English Manual
Page 22
... Bolt 57 3 Support Plate 58 6 M10 Large Washer 59 1 Pulley Bar 60 2 50mm x 70mm Outer Cap 61 6 M6 x 16mm Screw 62 4 M6 x 65mm Screw 63 1 Bench Frame 64 2 M10 x 60mm Carriage Bolt 65 6 Foam Pad 66 6 3/4" Round Inner Cap 67 2 M8 Flat Washer 68 1 Seat 69 1 Backrest 70 1 M8 x 55mm Bolt...
... Bolt 57 3 Support Plate 58 6 M10 Large Washer 59 1 Pulley Bar 60 2 50mm x 70mm Outer Cap 61 6 M6 x 16mm Screw 62 4 M6 x 65mm Screw 63 1 Bench Frame 64 2 M10 x 60mm Carriage Bolt 65 6 Foam Pad 66 6 3/4" Round Inner Cap 67 2 M8 Flat Washer 68 1 Seat 69 1 Backrest 70 1 M8 x 55mm Bolt...


