
English Manual
Page 2
...the exclusion or limitation of incidental or consequential damages. ICON HEALTH & FITNESS, INC., 1500 S. 1000 W., LOGAN, UT 84321-9813 WEIDER is not responsible or liable for commercial or rental purposes, or products used as store display models. Table of Contents LIMITED WARRANTY ...2 IMPORTANT PRECAUTIONS 3 BEFORE YOU BEGIN 4 PART IDENTIFICATION CHART 5 ASSEMBLY 6 USING THE WEIGHT BENCH 11 EXERCISE GUIDELINES 14 MUSCLE CHART 15 PART LIST 18 EXPLODED DRAWING 19 ORDERING REPLACEMENT PARTS Back Cover Limited Warranty ICON Health & Fitness...
...the exclusion or limitation of incidental or consequential damages. ICON HEALTH & FITNESS, INC., 1500 S. 1000 W., LOGAN, UT 84321-9813 WEIDER is not responsible or liable for commercial or rental purposes, or products used as store display models. Table of Contents LIMITED WARRANTY ...2 IMPORTANT PRECAUTIONS 3 BEFORE YOU BEGIN 4 PART IDENTIFICATION CHART 5 ASSEMBLY 6 USING THE WEIGHT BENCH 11 EXERCISE GUIDELINES 14 MUSCLE CHART 15 PART LIST 18 EXPLODED DRAWING 19 ORDERING REPLACEMENT PARTS Back Cover Limited Warranty ICON Health & Fitness...
English Manual
Page 3
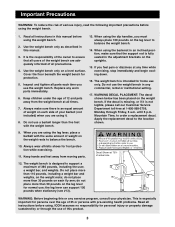
...pounds on the uprights. 15. do not place more than five feet with the same amount of your physician. Read all times. 7. The weight bench is especially important for home use a barbell longer than 110 pounds, including a weight bar and weights, on the leg lever for personal injury or... property damage sustained by or through Friday, 6 a.m. Mountain Time, to the location shown. 9. Keep hands and feet away from the weight bench at 75% of 35 or persons with pre-existing health problems. Read all precautions. 4. Do not place more than 50 pounds on the weight ...
...pounds on the uprights. 15. do not place more than five feet with the same amount of your physician. Read all times. 7. The weight bench is especially important for home use a barbell longer than 110 pounds, including a weight bar and weights, on the leg lever for personal injury or... property damage sustained by or through Friday, 6 a.m. Mountain Time, to the location shown. 9. Keep hands and feet away from the weight bench at 75% of 35 or persons with pre-existing health problems. Read all precautions. 4. Do not place more than 50 pounds on the weight ...
English Manual
Page 4
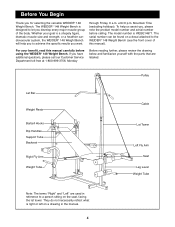
... attached to let you develop every major muscle group of this manual carefully before calling. The model number is designed to the WEIDER¨ 148 Weight Bench (see the front cover of the body. until 6 p.m. For your goal is right or left on the seat, facing the...on a drawing in reference to achieve the specific results you for selecting the versatile WEIDER¨ 148 Weight Bench. If you , please note the product model number and serial number before using the WEIDER¨ 148 Weight Bench. They do not necessarily reflect what is a shapely figure, dramatic muscle size and ...
... attached to let you develop every major muscle group of this manual carefully before calling. The model number is designed to the WEIDER¨ 148 Weight Bench (see the front cover of the body. until 6 p.m. For your goal is right or left on the seat, facing the...on a drawing in reference to achieve the specific results you for selecting the versatile WEIDER¨ 148 Weight Bench. If you , please note the product model number and serial number before using the WEIDER¨ 148 Weight Bench. They do not necessarily reflect what is a shapely figure, dramatic muscle size and ...
English Manual
Page 6
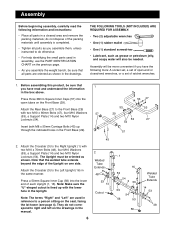
... product, be sure that all parts are used in assembly, use the PART IDENTIFICATION CHART on the previous page. ¥ As you assemble the weight bench, be sure that the welded tube extends beyond the edge of the Upright on the Front Base (29). Attach the Rear Base (27) to do...
... product, be sure that all parts are used in assembly, use the PART IDENTIFICATION CHART on the previous page. ¥ As you assemble the weight bench, be sure that the welded tube extends beyond the edge of the Upright on the Front Base (29). Attach the Rear Base (27) to do...
English Manual
Page 10
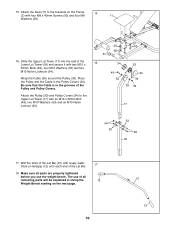
... (34) to the brackets on the next page. 17 12 10 21 12 Make sure all remaining parts will be explained in Using the Weight Bench starting on the Frame 15 (2) with soapy water. The use of the Lat Bar (21) with four M8 x 40mm Screws (50) and four M8 Washers... (20). 16. Wet the ends of all parts are properly tightened before you use the weight bench. Slide a Handgrip (12) onto each end of the Pulley and Pulley Covers. Place the Pulley and the Cable in the grooves of the Lat Bar...
... (34) to the brackets on the next page. 17 12 10 21 12 Make sure all remaining parts will be explained in Using the Weight Bench starting on the Frame 15 (2) with soapy water. The use of the Lat Bar (21) with four M8 x 40mm Screws (50) and four M8 Washers... (20). 16. Wet the ends of all parts are properly tightened before you use the weight bench. Slide a Handgrip (12) onto each end of the Pulley and Pulley Covers. Place the Pulley and the Cable in the grooves of the Lat Bar...
English Manual
Page 11
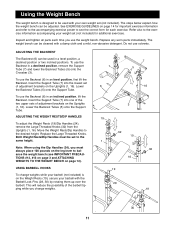
... Threaded Knobs. See EXERCISE GUIDELINES on page 14 for important exercise information and refer to the accompanying exercise poster to balance the weight bench (see the correct form for additional exercises. Replace any worn parts immediately. Lower the Backrest Tubes (5) onto the Support Tube. Note... Support Tube. ADJUSTING THE BACKREST The Backrest (6) can be used in an level position, first lift the Backrest. Using the Weight Bench The weight bench is on the Weight Rests (19), secure your barbell with the Barbell Lock Pins (28, 30) by rotating them up over the...
... Threaded Knobs. See EXERCISE GUIDELINES on page 14 for important exercise information and refer to the accompanying exercise poster to balance the weight bench (see the correct form for additional exercises. Replace any worn parts immediately. Lower the Backrest Tubes (5) onto the Support Tube. Note... Support Tube. ADJUSTING THE BACKREST The Backrest (6) can be used in an level position, first lift the Backrest. Using the Weight Bench The weight bench is on the Weight Rests (19), secure your barbell with the Barbell Lock Pins (28, 30) by rotating them up over the...
English Manual
Page 12
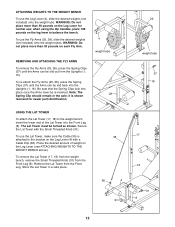
... 37 16 17 18 31 8 12 The Lat Tower must be re-inserted. Store the Lat Tower in the axle; ATTACHING WEIGHTS TO THE WEIGHT BENCH To use the Fly Arms (25, 26), slide the desired weights (not included) onto the weight tubes. WARNING: Do not place more than 30 pounds... the Spring Clips (37) until the Arms can be slid out from the Uprights (1, 16). To remove the Lat Tower (17, 18) from the weight bench, remove the Small Threaded Knob (31) from the Front Leg. Place the desired amount of the Lat Tower into place once the Arms have be...
... 37 16 17 18 31 8 12 The Lat Tower must be re-inserted. Store the Lat Tower in the axle; ATTACHING WEIGHTS TO THE WEIGHT BENCH To use the Fly Arms (25, 26), slide the desired weights (not included) onto the weight tubes. WARNING: Do not place more than 30 pounds... the Spring Clips (37) until the Arms can be slid out from the Uprights (1, 16). To remove the Lat Tower (17, 18) from the weight bench, remove the Small Threaded Knob (31) from the Front Leg. Place the desired amount of the Lat Tower into place once the Arms have be...

English Manual
Page 13
WARNING: Always remove the Lat Bar 36 from the weight bench when performing an exercise that does no use the lat bar. 21 13 ATTACHING THE LAT BAR 35 Attach the Lat Bar (21) to the Cable (35) with a Cable Clip (36).
WARNING: Always remove the Lat Bar 36 from the weight bench when performing an exercise that does no use the lat bar. 21 13 ATTACHING THE LAT BAR 35 Attach the Lat Bar (21) to the Cable (35) with a Cable Clip (36).
English Manual
Page 20
...-3756, Monday through Friday, 6 a.m. Mountain Time (excluding holidays). The KEY NUMBER and DESCRIPTION of the desired part(s) (see the front cover of the product (WEIDER¨ 148 Weight Bench). 3. To help us assist you, please be prepared to give the following information when calling: 1. Part No. 155886 J01168-C R0699A Printed in China ©...
...-3756, Monday through Friday, 6 a.m. Mountain Time (excluding holidays). The KEY NUMBER and DESCRIPTION of the desired part(s) (see the front cover of the product (WEIDER¨ 148 Weight Bench). 3. To help us assist you, please be prepared to give the following information when calling: 1. Part No. 155886 J01168-C R0699A Printed in China ©...


