
XVT3D424SV User Manual
Page 5
... component damage. • Use only with the cart, stand, tripod, bracket, or table specified by manufacturer or sold with a third grounding pin). Wait before turning on your HDTV and any objects on the label. When a cart is equipped with a three-pronged grounded plug (a plug with your HDTV. • A distance of power supplied to your HDTV. • Unplug the power cord before operating your HDTV. Do not install your HDTV. Operating...
... component damage. • Use only with the cart, stand, tripod, bracket, or table specified by manufacturer or sold with a third grounding pin). Wait before turning on your HDTV and any objects on the label. When a cart is equipped with a three-pronged grounded plug (a plug with your HDTV. • A distance of power supplied to your HDTV. • Unplug the power cord before operating your HDTV. Do not install your HDTV. Operating...

XVT3D424SV User Manual
Page 9
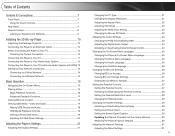
... Remote for Your Other Devices 10 Chapter 3: Completing the First-Time Setup 11 Chapter 4: Connecting Your Devices to the TV 14 Choosing the Correct Connection 15 Connecting Your Devices...16 Setting Up Your Network Connection 18 Connecting to A Wired Network 18 Connecting to a Wireless Network 18 Chapter 5: Using the On-Screen Menu 19 Changing the 3D Mode...19 Changing the Screen Aspect Ratio 20 Setting Up Closed Captioning...21 Changing the Appearance of Digital Closed Captions 21 Using the Sleep Timer...
... Remote for Your Other Devices 10 Chapter 3: Completing the First-Time Setup 11 Chapter 4: Connecting Your Devices to the TV 14 Choosing the Correct Connection 15 Connecting Your Devices...16 Setting Up Your Network Connection 18 Connecting to A Wired Network 18 Connecting to a Wireless Network 18 Chapter 5: Using the On-Screen Menu 19 Changing the 3D Mode...19 Changing the Screen Aspect Ratio 20 Setting Up Closed Captioning...21 Changing the Appearance of Digital Closed Captions 21 Using the Sleep Timer...
XVT3D424SV User Manual
Page 10
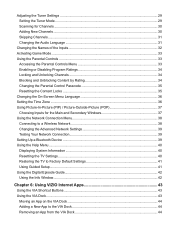
... Game Mode...33 Using the Parental Controls...33 Accessing the Parental Controls Menu 33 Enabling or Disabling Program Ratings 34 Locking and Unlocking Channels 34 Blocking and Unblocking Content by Rating 34 Changing the Parental Control Passcode 35 Resetting the Content Locks...35 Changing the On-Screen Menu Language 36 Setting the Time Zone...36 Using Picture-In-Picture (PIP) / Picture-Outside-Picture (POP 37 Choosing Inputs for the Main and Secondary Windows 37 Using the Network Connection Menu 38 Connecting to a Wireless Network 38 Changing the Advanced Network Settings...
... Game Mode...33 Using the Parental Controls...33 Accessing the Parental Controls Menu 33 Enabling or Disabling Program Ratings 34 Locking and Unlocking Channels 34 Blocking and Unblocking Content by Rating 34 Changing the Parental Control Passcode 35 Resetting the Content Locks...35 Changing the On-Screen Menu Language 36 Setting the Time Zone...36 Using Picture-In-Picture (PIP) / Picture-Outside-Picture (POP 37 Choosing Inputs for the Main and Secondary Windows 37 Using the Network Connection Menu 38 Connecting to a Wireless Network 38 Changing the Advanced Network Settings...

XVT3D424SV User Manual
Page 17
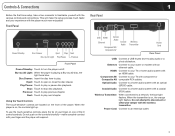
.../TV Audio Out (L/R) Rear Panel Detail Ethernet Connect an ethernet cable to audio device (VIZIO sound bar, home theater system). Audio Out (L/R) Connect RCA audio device. Composite AV Connect composite AV device. RGB PC Video Connect RGB cable from computer. RGB PC Audio Connect 1/8" mini stereo connector from computer. DTV/TV Connect coaxial cable for external antenna or cable TV. 5 HDMI (1,2,3,4) Connect external devices (Blu-Ray, DVD, cable TV box, game console). Audio Out (Optical) Connect to access a network or the Internet. Component Connect component video/audio...
.../TV Audio Out (L/R) Rear Panel Detail Ethernet Connect an ethernet cable to audio device (VIZIO sound bar, home theater system). Audio Out (L/R) Connect RCA audio device. Composite AV Connect composite AV device. RGB PC Video Connect RGB cable from computer. RGB PC Audio Connect 1/8" mini stereo connector from computer. DTV/TV Connect coaxial cable for external antenna or cable TV. 5 HDMI (1,2,3,4) Connect external devices (Blu-Ray, DVD, cable TV box, game console). Audio Out (Optical) Connect to access a network or the Internet. Component Connect component video/audio...
XVT3D424SV User Manual
Page 40
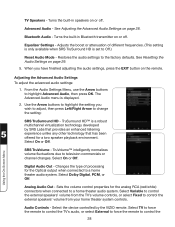
... the Audio Settings Menu, use the Arrow buttons to a home theater audio system. Changes the type of different frequencies. (This setting is only available when SRS TruSurround HD is set to the factory defaults. Restores the audio settings to Off.) Reset Audio Mode - Turns the built-in speakers on or off . Adjusts the boost or attenuation of processing for the analog RCA (red/white) connectors when connected to control the 28 Digital Audio Out - TV Speakers - Turns the built...
... the Audio Settings Menu, use the Arrow buttons to a home theater audio system. Changes the type of different frequencies. (This setting is only available when SRS TruSurround HD is set to the factory defaults. Restores the audio settings to Off.) Reset Audio Mode - Turns the built-in speakers on or off . Adjusts the boost or attenuation of processing for the analog RCA (red/white) connectors when connected to control the 28 Digital Audio Out - TV Speakers - Turns the built...
XVT3D424SV User Manual
Page 41
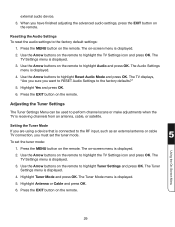
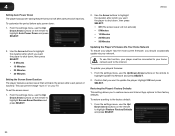
...the MENU button on the remote. 29 Highlight Tuner Mode and press OK. Resetting the Audio Settings To reset the audio settings to perform channel scans or make adjustments when the TV is displayed. 5. The TV Settings menu is displayed. 4. Highlight Yes and press OK. 6. Press the EXIT button on the remote. Use the Arrow buttons on the remote. The Tuner Settings menu is displayed. 3. The Tuner Mode menu is receiving channels from an antenna, cable, or satellite. Adjusting the Tuner Settings The Tuner Settings Menu can be used to the factory default settings: 1. Use...
...the MENU button on the remote. 29 Highlight Tuner Mode and press OK. Resetting the Audio Settings To reset the audio settings to perform channel scans or make adjustments when the TV is displayed. 5. The TV Settings menu is displayed. 4. Highlight Yes and press OK. 6. Press the EXIT button on the remote. Use the Arrow buttons on the remote. The Tuner Settings menu is displayed. 3. The Tuner Mode menu is receiving channels from an antenna, cable, or satellite. Adjusting the Tuner Settings The Tuner Settings Menu can be used to the factory default settings: 1. Use...

XVT3D424SV User Manual
Page 43
... can remove these channels from being viewed, use the parental controls. From the Tuner Settings menu, highlight Analog MTS and press OK. For each channel you select. 3. Press OK. 3. To remove a channel: 1. Using the On-Screen Menu 31 If you wish to remove, use the Up/ Down Arrow buttons on the remote. The MTS feature only works when the program being viewed is completed, you may also be viewed if the channel is displayed. 2. Skipping Channels After a channel scan...
... can remove these channels from being viewed, use the parental controls. From the Tuner Settings menu, highlight Analog MTS and press OK. For each channel you select. 3. Press OK. 3. To remove a channel: 1. Using the On-Screen Menu 31 If you wish to remove, use the Up/ Down Arrow buttons on the remote. The MTS feature only works when the program being viewed is completed, you may also be viewed if the channel is displayed. 2. Skipping Channels After a channel scan...

XVT3D424SV User Manual
Page 49
... AV Component 3 3 3 3 3 3 3 3 3 HDMI 3 3 3 3 RGB 3 3 3 37 Choosing Inputs for which inputs can be displayed using PIP/POP. When using PIP, the main input is displayed on -screen menu is displayed. 3. The PIP Controls menu is displayed in the Parental Controls menu is the PIP Mode selected, use the Arrow buttons to determine which the TV outputs sound. Use the Arrow buttons on page 34. Using Picture-In-Picture (PIP) / Picture-Outside-Picture (POP) Your TV features PIP and POP modes. Highlight PIP Mode and press OK. Size - Use the table below to adjust each...
... AV Component 3 3 3 3 3 3 3 3 3 HDMI 3 3 3 3 RGB 3 3 3 37 Choosing Inputs for which inputs can be displayed using PIP/POP. When using PIP, the main input is displayed on -screen menu is displayed. 3. The PIP Controls menu is displayed in the Parental Controls menu is the PIP Mode selected, use the Arrow buttons to determine which the TV outputs sound. Use the Arrow buttons on page 34. Using Picture-In-Picture (PIP) / Picture-Outside-Picture (POP) Your TV features PIP and POP modes. Highlight PIP Mode and press OK. Size - Use the table below to adjust each...
XVT3D424SV User Manual
Page 53
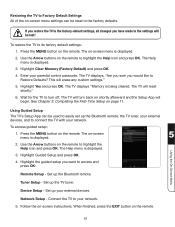
... with your network. 5. The TV will turn off. Network Setup - Press the MENU button on -screen menu is displayed. 5 2. Tuner Setup - Follow the on the remote. 41 Restoring the TV to Factory Default Settings All of the on-screen menu settings can be reset to the factory defaults. Enter your external devices. This will be lost! Set up your parental control passcode. Use the Arrow buttons on the remote to its factory default settings: 1. When finished, press the EXIT button on -screen instructions. To...
... with your network. 5. The TV will turn off. Network Setup - Press the MENU button on -screen menu is displayed. 5 2. Tuner Setup - Follow the on the remote. 41 Restoring the TV to Factory Default Settings All of the on-screen menu settings can be reset to the factory defaults. Enter your external devices. This will be lost! Set up your parental control passcode. Use the Arrow buttons on the remote to its factory default settings: 1. When finished, press the EXIT button on -screen instructions. To...
XVT3D424SV User Manual
Page 58
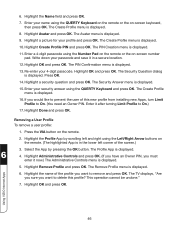
.... The Security Answer menu is displayed. 6. Enter it now.) The Administrative Controls menu is in a secure location. 12. Removing a User Profile To remove a user profile: 1. The Remove Profile menu is displayed. 15. Using VIZIO Internet Apps 46 Highlight Create Profile PIN and press OK. Write down your name using the Left/Right Arrow buttons on -screen keyboard, then press OK. The Create Profile menu is displayed. 8. The TV displays, "Are you...
.... The Security Answer menu is displayed. 6. Enter it now.) The Administrative Controls menu is in a secure location. 12. Removing a User Profile To remove a user profile: 1. The Remove Profile menu is displayed. 15. Using VIZIO Internet Apps 46 Highlight Create Profile PIN and press OK. Write down your name using the Left/Right Arrow buttons on -screen keyboard, then press OK. The Create Profile menu is displayed. 8. The TV displays, "Are you...
XVT3D424SV User Manual
Page 68
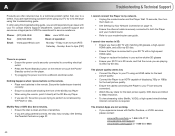
...: cosmetic damage, normal wear and tear, improper operation, improper voltage supply or power surges, signal issues, damages from warranty service or replacement, whichever is not responsible for a period of protection. C THERE ARE NO EXPRESS WARRANTIES OTHER THAN THOSE LISTED OR DESCRIBED ABOVE. VIZIO provides a warranty to 4:00PM Saturday and Sunday, Pacific Time, or visit www.VIZIO.com. Parts and Labor There will cover return shipping...
...: cosmetic damage, normal wear and tear, improper operation, improper voltage supply or power surges, signal issues, damages from warranty service or replacement, whichever is not responsible for a period of protection. C THERE ARE NO EXPRESS WARRANTIES OTHER THAN THOSE LISTED OR DESCRIBED ABOVE. VIZIO provides a warranty to 4:00PM Saturday and Sunday, Pacific Time, or visit www.VIZIO.com. Parts and Labor There will cover return shipping...
XVT3D424SV User Manual
Page 71
... Light Sensor 25 Audio Language 31 Audio Settings 27 Auto Adjust 27 Auto Channel Scan 30 B Backlight 24 Blocking and Unblocking Content 34 Bluetooth Device 39 Brightness 24 C Channel Locks 34 Choosing the Correct Connection 15 Closed Captioning 21 Color 24 Color Enhancement 25 Color Temperature 26 Connecting Your Devices 14, 16 Contrast 24 Custom picture mode 24 D Digital Episode Guide 42 F Factory Default Settings 41 Film Mode 25 Fine Tune 27 First-Time Setup 11 Front Panel 4 G Game Mode 33 Guided Setup 41 H Help Menu...
... Light Sensor 25 Audio Language 31 Audio Settings 27 Auto Adjust 27 Auto Channel Scan 30 B Backlight 24 Blocking and Unblocking Content 34 Bluetooth Device 39 Brightness 24 C Channel Locks 34 Choosing the Correct Connection 15 Closed Captioning 21 Color 24 Color Enhancement 25 Color Temperature 26 Connecting Your Devices 14, 16 Contrast 24 Custom picture mode 24 D Digital Episode Guide 42 F Factory Default Settings 41 Film Mode 25 Fine Tune 27 First-Time Setup 11 Front Panel 4 G Game Mode 33 Guided Setup 41 H Help Menu...
VBR334 Quick Start Guide
Page 13
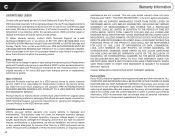
... to obtain warranty service. VIZIO is not responsible for example: cosmetic damage, normal wear and tear, improper operation, improper voltage supply or power surges, signal issues, damages from warranty service or replacement, whichever is greater. ANY IMPLIED WARRANTIES, INCLUDING ANY IMPLIED WARRANTY OF MERCHANTABILITY AND FITNESS FOR A PARTICULAR PURPOSE, SHALL BE LIMITED IN DURATION TO THE PERIOD OF TIME SET FORTH ABOVE. TECHNICAL SUPPORT Products are...
... to obtain warranty service. VIZIO is not responsible for example: cosmetic damage, normal wear and tear, improper operation, improper voltage supply or power surges, signal issues, damages from warranty service or replacement, whichever is greater. ANY IMPLIED WARRANTIES, INCLUDING ANY IMPLIED WARRANTY OF MERCHANTABILITY AND FITNESS FOR A PARTICULAR PURPOSE, SHALL BE LIMITED IN DURATION TO THE PERIOD OF TIME SET FORTH ABOVE. TECHNICAL SUPPORT Products are...
VBR334 User Manual
Page 5
... Network Connection 14 Connecting to A Wired Network 14 Connecting to a Wireless Network 14 Basic Operation 15 Navigating the On-Screen Menu 15 Playing a Disc 15 Basic Playback Functions 16 Advanced Playback Functions 17 Viewing BD-Live Content 17 Viewing USB Media - Video and Audio 17 Playing USB Photos and Audio 18 USB Media Playback Controls 19 Viewing a Photo Slide Show 19 Adjusting the Slide Show Settings 20 Adjusting the Player's Settings 21 Adjusting the Display Settings 21 Changing the TV Type 21 Changing the Display Resolution...
... Network Connection 14 Connecting to A Wired Network 14 Connecting to a Wireless Network 14 Basic Operation 15 Navigating the On-Screen Menu 15 Playing a Disc 15 Basic Playback Functions 16 Advanced Playback Functions 17 Viewing BD-Live Content 17 Viewing USB Media - Video and Audio 17 Playing USB Photos and Audio 18 USB Media Playback Controls 19 Viewing a Photo Slide Show 19 Adjusting the Slide Show Settings 20 Adjusting the Player's Settings 21 Adjusting the Display Settings 21 Changing the TV Type 21 Changing the Display Resolution...
VBR334 User Manual
Page 7
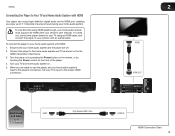
... playing a Blu-ray 3D disc, the light turns blue. USB HDMI Ethernet Optical Audio Coaxial Audio Component AV / Composite AV Wireless Transmitter Power Cord Rear Panel USB: Connect a USB thumb drive to turn the player on , the controls light up. Blu-ray 3D Light: When the player is on the front of your TV or home audio system with the various controls and connections. Using the Touch Controls The touch-sensitive controls are located on , the orange light flashes. Power Cord: Connect to open or close...
... playing a Blu-ray 3D disc, the light turns blue. USB HDMI Ethernet Optical Audio Coaxial Audio Component AV / Composite AV Wireless Transmitter Power Cord Rear Panel USB: Connect a USB thumb drive to turn the player on , the controls light up. Blu-ray 3D Light: When the player is on the front of your TV or home audio system with the various controls and connections. Using the Touch Controls The touch-sensitive controls are located on , the orange light flashes. Power Cord: Connect to open or close...
VBR334 User Manual
Page 13
... receiver with HDMI Your player can output high-definition digital audio via the HDMI port, enabling you are off. 2. Turn the player on by pressing the Power button on the remote, or by touching the Power control on . 5. VBR334 Connecting the Player to Your TV and Home Audio System with an optical cable. Set your TV's input to the proper HDMI connection. 2 HDMI HDMI OUT Best Sound HDMI and Video Up to your home audio system. When you enjoy up of 7.1 channels...
... receiver with HDMI Your player can output high-definition digital audio via the HDMI port, enabling you are off. 2. Turn the player on by pressing the Power button on the remote, or by touching the Power control on . 5. VBR334 Connecting the Player to Your TV and Home Audio System with an optical cable. Set your TV's input to the proper HDMI connection. 2 HDMI HDMI OUT Best Sound HDMI and Video Up to your home audio system. When you enjoy up of 7.1 channels...
VBR334 User Manual
Page 30
... occasionally update via your home network and to highlight Screen Saver Duration and press SELECT. VBR334 2. Confirm that you to restore menu and Internet App options to shut down : 1. From the settings menu, use the Up/ Down Arrow buttons on the remote to highlight Restore Factory Defaults and press SELECT. 30 4 Setting Auto Power Down The player has a power-saving feature that turns it off after a set the screen saver...
... occasionally update via your home network and to highlight Screen Saver Duration and press SELECT. VBR334 2. Confirm that you to restore menu and Internet App options to shut down : 1. From the settings menu, use the Up/ Down Arrow buttons on the remote to highlight Restore Factory Defaults and press SELECT. 30 4 Setting Auto Power Down The player has a power-saving feature that turns it off after a set the screen saver...
VBR334 User Manual
Page 40
..., try to fix the issue using an HDMI cable for the best picture quality. • Connect the Player to an HDTV capable of displaying 720p or 1080p for the best picture quality. Wait 10 seconds, then turn them back on. • See Setting Up Your Network Connection on the player. • Try plugging the power cord into a different electrical outlet. See Setting the Parental Controls on the remote. • Place new batteries in 3D mode, and...
..., try to fix the issue using an HDMI cable for the best picture quality. • Connect the Player to an HDTV capable of displaying 720p or 1080p for the best picture quality. Wait 10 seconds, then turn them back on. • See Setting Up Your Network Connection on the player. • Try plugging the power cord into a different electrical outlet. See Setting the Parental Controls on the remote. • Place new batteries in 3D mode, and...
VBR334 User Manual
Page 42
... EXCLUSIONS MAY NOT APPLY TO YOU. You will provide instructions for example: cosmetic damage, normal wear and tear, improper operation, improper voltage supply or power surges, signal issues, damages from warranty service or replacement, whichever is capable of storing personal data and other than by a VIZIO authorized service center. VIZIO provides a warranty to the VIZIO service center. Replacement parts and Products are not covered. This one -year...
... EXCLUSIONS MAY NOT APPLY TO YOU. You will provide instructions for example: cosmetic damage, normal wear and tear, improper operation, improper voltage supply or power surges, signal issues, damages from warranty service or replacement, whichever is capable of storing personal data and other than by a VIZIO authorized service center. VIZIO provides a warranty to the VIZIO service center. Replacement parts and Products are not covered. This one -year...
VSG102 Quick Start Guide
Page 9
... wear and tear, improper operation, improper voltage supply or power surges, signal issues, damages from 6:00AM to 9:00PM Monday through Friday and 8:00AM to the customer. Parts and Labor There will cover return shipping to 4:00PM Saturday and Sunday, Pacific Time, or visit www. Product returns to the VIZIO service center. THIS WARRANTY GIVES YOU SPECIFIC LEGAL RIGHTS, AND YOU MAY...
... wear and tear, improper operation, improper voltage supply or power surges, signal issues, damages from 6:00AM to 9:00PM Monday through Friday and 8:00AM to the customer. Parts and Labor There will cover return shipping to 4:00PM Saturday and Sunday, Pacific Time, or visit www. Product returns to the VIZIO service center. THIS WARRANTY GIVES YOU SPECIFIC LEGAL RIGHTS, AND YOU MAY...


