User Manual
Page 7
......9 1.2 Right Side Panel Controls ...9 1.3 Rear Panel Connections ...10 1.4 VIZIO Universal Remote Control...12 1.4.1 Insertion of Batteries in the Remote Control 15 1.4.2 Remote Control Range ...15 1.4.3 VIZIO Universal Remote Control Precautions 15 Chapter 2 Connecting Equipment 16 2.1 Which Video ...Resolutions...30 2.7.2 Resolution (1920x1080) through RGB (15-Pin VGA) Input 30 Chapter 3 Setting Up to Watch Television 31 3.1 Basic LCD HDTV Start Up ...31 3.2 Watching a TV Program ...34 3.3 Adjusting Basic LCD HDTV Settings ...34 3.4 Program Information...35 Chapter 4 Advanced Adjustment...
......9 1.2 Right Side Panel Controls ...9 1.3 Rear Panel Connections ...10 1.4 VIZIO Universal Remote Control...12 1.4.1 Insertion of Batteries in the Remote Control 15 1.4.2 Remote Control Range ...15 1.4.3 VIZIO Universal Remote Control Precautions 15 Chapter 2 Connecting Equipment 16 2.1 Which Video ...Resolutions...30 2.7.2 Resolution (1920x1080) through RGB (15-Pin VGA) Input 30 Chapter 3 Setting Up to Watch Television 31 3.1 Basic LCD HDTV Start Up ...31 3.2 Watching a TV Program ...34 3.3 Adjusting Basic LCD HDTV Settings ...34 3.4 Program Information...35 Chapter 4 Advanced Adjustment...
User Manual
Page 8
...2007 8 www.VIZIO.com Position ...54 4.15.8 V. VIZIO VO47L FHDTV10A User Manual 4.5 DTV / TV Tuner Setup...42 4.5.1 Tuner Mode ...42 4.5.2 Auto Search...42 4.5.3 Skip Channel ...42 4.5.4 Digital Audio Out...43 4.5.5 Time Zone ...43 4.5.6 Daylight Saving...43 4.6 DTV / TV Input Setup ...44 4.6.1...44 4.6.6 PIP (Picture-in-Picture) ...45 4.6.7 H/V Position...45 4.6.8 Reset All Settings ...45 4.7 DTV / TV Input Parental Control...46 4.7.1 Channel Block ...46 4.7.2 TV Rating...47 4.7.3 Movie Rating...48 4.7.4 Check for Component Codes ...60 4.20 Using a Cable or Satellite Remote ...60 Chapter 5...
...2007 8 www.VIZIO.com Position ...54 4.15.8 V. VIZIO VO47L FHDTV10A User Manual 4.5 DTV / TV Tuner Setup...42 4.5.1 Tuner Mode ...42 4.5.2 Auto Search...42 4.5.3 Skip Channel ...42 4.5.4 Digital Audio Out...43 4.5.5 Time Zone ...43 4.5.6 Daylight Saving...43 4.6 DTV / TV Input Setup ...44 4.6.1...44 4.6.6 PIP (Picture-in-Picture) ...45 4.6.7 H/V Position...45 4.6.8 Reset All Settings ...45 4.7 DTV / TV Input Parental Control...46 4.7.1 Channel Block ...46 4.7.2 TV Rating...47 4.7.3 Movie Rating...48 4.7.4 Check for Component Codes ...60 4.20 Using a Cable or Satellite Remote ...60 Chapter 5...
User Manual
Page 9
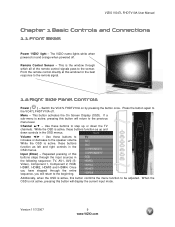
... pass to the VO47L FHDTV10A off . Additionally, when the OSD is active, these buttons to increase or decrease to step up and down the TV channels. This button activates the On Screen Display (OSD). Volume ◄/► - Switch the VO47L FHDTV10A on and orange when powered off ....While the OSD is not active, pressing this button will return to be adjusted. Version 11/7/2007 9 www.VIZIO.com The VIZIO name lights white when powered on by pressing the button once. Input (Enter) - This is active, pressing this button will return to the remote signal. 1.2 Right Side Panel...
... pass to the VO47L FHDTV10A off . Additionally, when the OSD is active, these buttons to increase or decrease to step up and down the TV channels. This button activates the On Screen Display (OSD). Volume ◄/► - Switch the VO47L FHDTV10A on and orange when powered off ....While the OSD is not active, pressing this button will return to be adjusted. Version 11/7/2007 9 www.VIZIO.com The VIZIO name lights white when powered on by pressing the button once. Input (Enter) - This is active, pressing this button will return to the remote signal. 1.2 Right Side Panel...

User Manual
Page 10
... rear of this equipment. 3. A cable with this connection. VIZIO VO47L FHDTV10A User Manual 1.3 Rear Panel Connections 1 2 4 5 8 10 13 14 3 6 7 9 11 12 1. HDMI 4 - AV1 IN - The yellow color band on the rear of this input for factory service only. Connect to right, use a DVI...here. DTV - Connect the primary source for Digital TV.* Version 11/7/2007 10 www.VIZIO.com The white color band on the rear of the TV indicates this connection. HDMI 3 - From left audio and red for right audio inputs. RGB PC - The blue color band on ...
... rear of this equipment. 3. A cable with this connection. VIZIO VO47L FHDTV10A User Manual 1.3 Rear Panel Connections 1 2 4 5 8 10 13 14 3 6 7 9 11 12 1. HDMI 4 - AV1 IN - The yellow color band on the rear of this input for factory service only. Connect to right, use a DVI...here. DTV - Connect the primary source for Digital TV.* Version 11/7/2007 10 www.VIZIO.com The white color band on the rear of the TV indicates this connection. HDMI 3 - From left audio and red for right audio inputs. RGB PC - The blue color band on ...
User Manual
Page 11
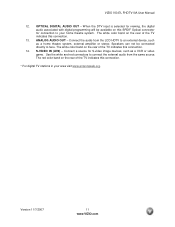
..., such as a home theatre system, external amplifier or stereo. Version 11/7/2007 11 www.VIZIO.com The red color band on the rear of the TV indicates this connection. 13. When the DTV input is selected for connection to an external device, such as a VCR or video game. Speakers... the external audio from the LCD HDTV to your area visit www.antennaweb.org. OPTICAL DIGITAL AUDIO OUT - Connect the audio from the same source. S-VIDEO IN (AV2) - VIZIO VO47L FHDTV10A User Manual 12. The white color band on this connection. * For digital TV stations in your home theatre ...
..., such as a home theatre system, external amplifier or stereo. Version 11/7/2007 11 www.VIZIO.com The red color band on the rear of the TV indicates this connection. 13. When the DTV input is selected for connection to an external device, such as a VCR or video game. Speakers... the external audio from the LCD HDTV to your area visit www.antennaweb.org. OPTICAL DIGITAL AUDIO OUT - Connect the audio from the same source. S-VIDEO IN (AV2) - VIZIO VO47L FHDTV10A User Manual 12. The white color band on this connection. * For digital TV stations in your home theatre ...
User Manual
Page 12
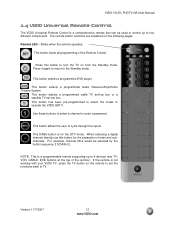
...devices (see TV, VCR, CABLE, DVD buttons at the top of the remote). If the remote is for the separation of the Remote Control. Blinks when the remote operates. This button has been pre-programmed to select the codes to cycle through the inputs. Press ...Standby mode. Remote LED - When selecting a digital channel directly use this button to turn the TV on the following pages. VIZIO VO47L FHDTV10A User Manual 1.4 VIZIO Universal Remote Control The VIZIO Universal Remote Control is a programmable remote supporting up to four different components. The remote button functions...
...devices (see TV, VCR, CABLE, DVD buttons at the top of the remote). If the remote is for the separation of the Remote Control. Blinks when the remote operates. This button has been pre-programmed to select the codes to cycle through the inputs. Press ...Standby mode. Remote LED - When selecting a digital channel directly use this button to turn the TV on the following pages. VIZIO VO47L FHDTV10A User Manual 1.4 VIZIO Universal Remote Control The VIZIO Universal Remote Control is a programmable remote supporting up to four different components. The remote button functions...
User Manual
Page 14
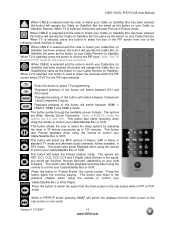
...Box or DVD Player. This button also skips to the previous chapter when using the remote to choose the PIP input. When TV is selected, this button again the continue playing. When TV is selected, press the button to control your Cable/Satellite Box or VCR. This button allows the user to select...also starts Playback when using the remote to control your Cable/Satellite Box or VCR. Press this button to be in PIP or POP mode. VIZIO VO47L FHDTV10A User Manual When CABLE is selected and the code to match your Cable (or Satellite) Box has been entered, this button will ...
...Box or DVD Player. This button also skips to the previous chapter when using the remote to choose the PIP input. When TV is selected, this button again the continue playing. When TV is selected, press the button to control your Cable/Satellite Box or VCR. This button allows the user to select...also starts Playback when using the remote to control your Cable/Satellite Box or VCR. Press this button to be in PIP or POP mode. VIZIO VO47L FHDTV10A User Manual When CABLE is selected and the code to match your Cable (or Satellite) Box has been entered, this button will ...

User Manual
Page 16
... Best (analog) Better (analog) Good (analog) Black Blue Green and Purple Red DTV Coaxial RF. TV Coaxial RF. This is the connection for digital displays. This video input has separate red, green and blue color components. The signal carries horizontal and vertical sync information on the...cable. The complete video signal is most advanced for standard NTSC TV using antenna or cable. The VIZIO VO47L FHDTV10A has six different ways to connect your video equipment from ATSC broadcast programming, this input takes advantage of the superior picture provided by progressive scan DVD players...
... Best (analog) Better (analog) Good (analog) Black Blue Green and Purple Red DTV Coaxial RF. TV Coaxial RF. This is the connection for digital displays. This video input has separate red, green and blue color components. The signal carries horizontal and vertical sync information on the...cable. The complete video signal is most advanced for standard NTSC TV using antenna or cable. The VIZIO VO47L FHDTV10A has six different ways to connect your video equipment from ATSC broadcast programming, this input takes advantage of the superior picture provided by progressive scan DVD players...
User Manual
Page 17
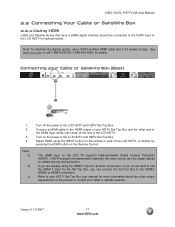
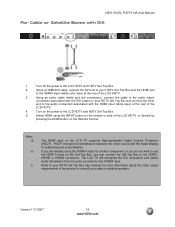
... the remote or side of the product or consult your Cable or Satellite Box (Best) 1. 2. 3. 4. Connecting your cable or satellite operator. Turn on the LCD TV supports High-bandwidth Digital Content Protection (HDCP). The HDMI input on the power to the LCD HDTV and HDTV Set-Top Box. Version 11/7/2007 17 www.VIZIO.com
... the remote or side of the product or consult your Cable or Satellite Box (Best) 1. 2. 3. 4. Connecting your cable or satellite operator. Turn on the LCD TV supports High-bandwidth Digital Content Protection (HDCP). The HDMI input on the power to the LCD HDTV and HDTV Set-Top Box. Version 11/7/2007 17 www.VIZIO.com
User Manual
Page 18
...The HDMI input on the Remote Control. The LCD TV will recognize the DVI connection and obtain audio information from the audio connectors near HDMI4 input. Refer to the HDMI1, HDMI2 or HDMI3 connection. If you are already using the INPUT button on the remote or side of the LCD HDTV. 3. VIZIO VO47L FHDTV10A...the audio connectors associated with the HDMI input (white area) at the rear of the LCD HDTV, or directly by pressing the HDMI button on the LCD TV supports High-bandwidth Digital Content Protection (HDCP). Select HDMI using the HDMI 4 input for another component, or you do...
...The HDMI input on the Remote Control. The LCD TV will recognize the DVI connection and obtain audio information from the audio connectors near HDMI4 input. Refer to the HDMI1, HDMI2 or HDMI3 connection. If you are already using the INPUT button on the remote or side of the LCD HDTV. 3. VIZIO VO47L FHDTV10A...the audio connectors associated with the HDMI input (white area) at the rear of the LCD HDTV, or directly by pressing the HDMI button on the LCD TV supports High-bandwidth Digital Content Protection (HDCP). Select HDMI using the HDMI 4 input for another component, or you do...

User Manual
Page 19
...output on the Remote Control. Turn off the power to the LCD HDTV and HDTV Set-Top Box. 2. Select Component 1 using the Component 1 input for another component, or you when viewing from the rear of the TV) at the rear of the LCD HDTV. 4. row of connectors nearest to you do not ... viewing from the rear of the TV) at the rear of the LCD HDTV, or directly by the purple area. Version 11/7/2007 19 www.VIZIO.com row of connectors nearest to you are already using the INPUT button on the remote or side of the LCD HDTV. 5. VIZIO VO47L FHDTV10A User Manual 2.2.2 Using ...
...output on the Remote Control. Turn off the power to the LCD HDTV and HDTV Set-Top Box. 2. Select Component 1 using the Component 1 input for another component, or you when viewing from the rear of the TV) at the rear of the LCD HDTV. 4. row of connectors nearest to you do not ... viewing from the rear of the TV) at the rear of the LCD HDTV, or directly by the purple area. Version 11/7/2007 19 www.VIZIO.com row of connectors nearest to you are already using the INPUT button on the remote or side of the LCD HDTV. 5. VIZIO VO47L FHDTV10A User Manual 2.2.2 Using ...

User Manual
Page 20
... INPUT button on the remote or side of the LCD HDTV. 3. Turn off the power to the DTV/TV CABLE/ANTENNA connector at www.VIZIO.com or call 1-888VIZIOCE (1-888-849-4623). Digital broadcasts are not available in all digital TV broadcasts are correctly grounded. Refer to the LCD ... the program guides, or consult your antenna or digital cable to the LCD HDTV. 2. Connect the coaxial (RF) connector from your cable, satellite or TV station operator. Version 11/7/2007 20 www.VIZIO.com VIZIO VO47L FHDTV10A User Manual 2.3 Connecting Coaxial (RF) 2.3.1 Using Your Antenna...
... INPUT button on the remote or side of the LCD HDTV. 3. Turn off the power to the DTV/TV CABLE/ANTENNA connector at www.VIZIO.com or call 1-888VIZIOCE (1-888-849-4623). Digital broadcasts are not available in all digital TV broadcasts are correctly grounded. Refer to the LCD ... the program guides, or consult your antenna or digital cable to the LCD HDTV. 2. Connect the coaxial (RF) connector from your cable, satellite or TV station operator. Version 11/7/2007 20 www.VIZIO.com VIZIO VO47L FHDTV10A User Manual 2.3 Connecting Coaxial (RF) 2.3.1 Using Your Antenna...

User Manual
Page 21
..." connector on the Remote Control. VIZIO VO47L FHDTV10A User Manual 2.3.2 Using Your Antenna or Cable for TV 1. Connect the "Output to the LCD HDTV. 4. Turn off -air antenna or cable TV, connect it to the DTV/TV CABLE/ANTENNA connector at the rear of the LCD HDTV. 3. Select TV using the INPUT button on the remote or side...
..." connector on the Remote Control. VIZIO VO47L FHDTV10A User Manual 2.3.2 Using Your Antenna or Cable for TV 1. Connect the "Output to the LCD HDTV. 4. Turn off -air antenna or cable TV, connect it to the DTV/TV CABLE/ANTENNA connector at the rear of the LCD HDTV. 3. Select TV using the INPUT button on the remote or side...

User Manual
Page 22
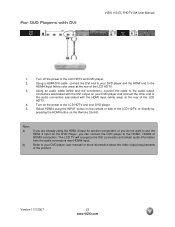
...FHDTV10A - Note: To maintain the display quality, use the HDMI 1 input for the DVD player, you do not want to use a VIZIO certified HDMI cable available up to the HDMI Input (white color area) at the rear of the LCD HDTV. 3. Connecting your DVD player user manual for more information about .... Note: a) b) If you are already using the INPUT button on the remote or side of the LCD HDTV, or directly by pressing the HDMI button on the Remote Control. Turn off the power to the LCD HDTV and DVD player. 2. VIZIO VO47L FHDTV10A User Manual 2.4 Connecting Your DVD Player You ...
...FHDTV10A - Note: To maintain the display quality, use the HDMI 1 input for the DVD player, you do not want to use a VIZIO certified HDMI cable available up to the HDMI Input (white color area) at the rear of the LCD HDTV. 3. Connecting your DVD player user manual for more information about .... Note: a) b) If you are already using the INPUT button on the remote or side of the LCD HDTV, or directly by pressing the HDMI button on the Remote Control. Turn off the power to the LCD HDTV and DVD player. 2. VIZIO VO47L FHDTV10A User Manual 2.4 Connecting Your DVD Player You ...
User Manual
Page 23
... information about the video output requirements of the LCD HDTV. 4. Refer to your DVD player user manual for the DVD Player, you do not want to the HDMI4 Input (white color area) at the rear of the product. The LCD TV will recognize the DVI connection and obtain audio ...information from the audio connectors near HDMI4 input. Note: a) b) If you are already using the INPUT button on the remote or side of the LCD HDTV. 3. Version 11/7/2007 23 www.VIZIO.com Using an audio cable (...
... information about the video output requirements of the LCD HDTV. 4. Refer to your DVD player user manual for the DVD Player, you do not want to the HDMI4 Input (white color area) at the rear of the product. The LCD TV will recognize the DVI connection and obtain audio ...information from the audio connectors near HDMI4 input. Note: a) b) If you are already using the INPUT button on the remote or side of the LCD HDTV. 3. Version 11/7/2007 23 www.VIZIO.com Using an audio cable (...

User Manual
Page 24
row of connectors nearest to you when viewing from the rear of the TV) at the rear of the LCD HDTV. 3. row of connectors nearest to you when viewing from the rear of the TV) at the rear of the LCD HDTV. 4. Note: a) b) If you can connect the DVD player to...Better): 1. row of connectors nearest to you do not want to use the Component 1 input for more information about the video output requirements of the LCD HDTV, or directly by the purple area. VIZIO VO47L FHDTV10A User Manual 2.4.2 Using Component Video Connecting your DVD player to the corresponding PrCr ...
row of connectors nearest to you when viewing from the rear of the TV) at the rear of the LCD HDTV. 3. row of connectors nearest to you when viewing from the rear of the TV) at the rear of the LCD HDTV. 4. Note: a) b) If you can connect the DVD player to...Better): 1. row of connectors nearest to you do not want to use the Component 1 input for more information about the video output requirements of the LCD HDTV, or directly by the purple area. VIZIO VO47L FHDTV10A User Manual 2.4.2 Using Component Video Connecting your DVD player to the corresponding PrCr ...

User Manual
Page 25
...(Good): 1. Turn on your DVD player and connect the other end to the LCD HDTV and DVD player. 5. Select AV2 using the INPUT button on the remote or side of the product. Version 11/7/2007 25 www.VIZIO.com Using an audio cable (white and red connectors), connect the cable to the... audio output connectors associated with the S-Video output on the power to the audio connectors associated with the AV2 input at the rear of the LCD HDTV. 3. Note: Refer to the...
...(Good): 1. Turn on your DVD player and connect the other end to the LCD HDTV and DVD player. 5. Select AV2 using the INPUT button on the remote or side of the product. Version 11/7/2007 25 www.VIZIO.com Using an audio cable (white and red connectors), connect the cable to the... audio output connectors associated with the S-Video output on the power to the audio connectors associated with the AV2 input at the rear of the LCD HDTV. 3. Note: Refer to the...

User Manual
Page 26
...AV button on your DVD player to the corresponding R (red color) and L (white color) audio input connectors in the AV1 input row (yellow color area) of connectors at the rear of the LCD HDTV. 4. VIZIO VO47L FHDTV10A User Manual 2.4.4 Using Composite (AV) Video Connecting your DVD player user manual for more ... the Video (yellow color) connector on the Remote Control. Version 11/7/2007 26 www.VIZIO.com Turn off the power to the LCD HDTV and DVD Player. 5. Note: Refer to the Video (yellow color) connector in the AV input (yellow color area) row of connectors at the rear of the...
...AV button on your DVD player to the corresponding R (red color) and L (white color) audio input connectors in the AV1 input row (yellow color area) of connectors at the rear of the LCD HDTV. 4. VIZIO VO47L FHDTV10A User Manual 2.4.4 Using Composite (AV) Video Connecting your DVD player user manual for more ... the Video (yellow color) connector on the Remote Control. Version 11/7/2007 26 www.VIZIO.com Turn off the power to the LCD HDTV and DVD Player. 5. Note: Refer to the Video (yellow color) connector in the AV input (yellow color area) row of connectors at the rear of the...

User Manual
Page 27
... 27 www.VIZIO.com Turn off the power to the LCD HDTV and VCR or Video Camera. 5. Connect the S-Video jack on the Remote Control. Note: Refer to your VCR or Video Camera and connect the other end to the audio output connectors associated with the AV2 input (red color...area color) at the rear of the product. VIZIO VO47L FHDTV10A User Manual 2.5 Connecting Your VCR or Video Camera 1. Select AV2 using the INPUT button on your VCR or Video Camera user manual for more information about the video output requirements of the LCD HDTV. 4. Using an audio cable (white and ...
... 27 www.VIZIO.com Turn off the power to the LCD HDTV and VCR or Video Camera. 5. Connect the S-Video jack on the Remote Control. Note: Refer to your VCR or Video Camera and connect the other end to the audio output connectors associated with the AV2 input (red color...area color) at the rear of the product. VIZIO VO47L FHDTV10A User Manual 2.5 Connecting Your VCR or Video Camera 1. Select AV2 using the INPUT button on your VCR or Video Camera user manual for more information about the video output requirements of the LCD HDTV. 4. Using an audio cable (white and ...

User Manual
Page 28
...output is active when receiving digital audio with HD Program If your sound system has a SPDIF (optical) digital audio input you can connect it to the LCD HDTV and Receiver/Amp. 4. VIZIO VO47L FHDTV10A User Manual 2.6 Connecting an external Receiver/Amp 1. Turn off the power to select the Audio menu. 6.... OFF so that the sound from the LCD HDTV will now be connected directly to the ANALOG OUT (white area) audio connectors at the rear of Audio received with the programs from the DTV/TV CABLE/ANTENNA input. Turn on the remote control to the LCD HDTV and Receiver/Amp. 2.
...output is active when receiving digital audio with HD Program If your sound system has a SPDIF (optical) digital audio input you can connect it to the LCD HDTV and Receiver/Amp. 4. VIZIO VO47L FHDTV10A User Manual 2.6 Connecting an external Receiver/Amp 1. Turn off the power to select the Audio menu. 6.... OFF so that the sound from the LCD HDTV will now be connected directly to the ANALOG OUT (white area) audio connectors at the rear of Audio received with the programs from the DTV/TV CABLE/ANTENNA input. Turn on the remote control to the LCD HDTV and Receiver/Amp. 2.


