

User Manual
Page 1
...of the look and performance, but also because it's Earth- Visit our website or call us at techsupport@vizio.com. Purchase Date VIZIO is a registered trademark of you new VECO TV, Vizio's Eco-hugging system. SRS technology is normally printed on has been reduced. ALL RIGHTS RESERVED. TM ®... OF THEIR RESPECTIVE OWNERS; We recommend you will be green with soy ink, and even the amount of your VIZIO HDTV for your new VIZIO VECO TV. Write down the serial number located on -site extended warranty service plans. PRODUCT SPECIFICATIONS ARE SUBJECT TO CHANGE WITHOUT...
...of the look and performance, but also because it's Earth- Visit our website or call us at techsupport@vizio.com. Purchase Date VIZIO is a registered trademark of you new VECO TV, Vizio's Eco-hugging system. SRS technology is normally printed on has been reduced. ALL RIGHTS RESERVED. TM ®... OF THEIR RESPECTIVE OWNERS; We recommend you will be green with soy ink, and even the amount of your VIZIO HDTV for your new VIZIO VECO TV. Write down the serial number located on -site extended warranty service plans. PRODUCT SPECIFICATIONS ARE SUBJECT TO CHANGE WITHOUT...
User Manual
Page 3
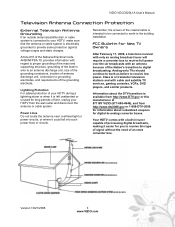
...wall outlet and disconnect the antenna or cable system. Remember, the screen of the Nation's transition to receive this manufacturer at 877 MY VIZIO (877-698-4946), and from http://www.dtv2009.gov or 1-888-DTV-2009 for information about the DTV transition is available from ...to receive low power, Class A or translator television stations and with a built-in the building installation. Your HDTV comes with cable and satellite TV services, gaming consoles, VCRs, DVD players, and similar products. Lightning Protection For added protection of your HDTV, make sure that the antenna ...
...wall outlet and disconnect the antenna or cable system. Remember, the screen of the Nation's transition to receive this manufacturer at 877 MY VIZIO (877-698-4946), and from http://www.dtv2009.gov or 1-888-DTV-2009 for information about the DTV transition is available from ...to receive low power, Class A or translator television stations and with a built-in the building installation. Your HDTV comes with cable and satellite TV services, gaming consoles, VCRs, DVD players, and similar products. Lightning Protection For added protection of your HDTV, make sure that the antenna ...
User Manual
Page 4
...Advanced Settings 27 Adjusting the Picture Settings 27 Adjusting the Audio Settings 29 Adjusting the TV settings 30 Adjusting the Setup settings 31 Adjusting the Parental Control settings 32 Understanding Viewing Modes 34 Normal Mode 34 Panoramic Mode 34 Maintaining and Troubleshooting 35 Maintenance... and Specifications 38 Compliance 38 FCC Class B Radio Interference Statement 38 Specifications 39 Glossary - Standard Definitions 40 VIZIO LIMITED PRODUCT WARRANTY 41 VIZIO RETURN POLICY 42 Warranty Replacement Procedure 43 Mail-In Warranty Repair Procedure 43 Index 44 4 www...
...Advanced Settings 27 Adjusting the Picture Settings 27 Adjusting the Audio Settings 29 Adjusting the TV settings 30 Adjusting the Setup settings 31 Adjusting the Parental Control settings 32 Understanding Viewing Modes 34 Normal Mode 34 Panoramic Mode 34 Maintaining and Troubleshooting 35 Maintenance... and Specifications 38 Compliance 38 FCC Class B Radio Interference Statement 38 Specifications 39 Glossary - Standard Definitions 40 VIZIO LIMITED PRODUCT WARRANTY 41 VIZIO RETURN POLICY 42 Warranty Replacement Procedure 43 Mail-In Warranty Repair Procedure 43 Index 44 4 www...
User Manual
Page 6
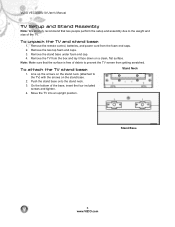
VIZIO VECO320L1A User's Manual TV Setup and Stand Assembly Note: We strongly recommend that the surface is free of the TV. Remove the two top foam end caps. 3. Remove the remote control, batteries, and power cord from the box and lay it face down on the ... to the weight and size of debris to the TV) with the arrows on a clean, flat surface. Remove the stand base under foam end cap. 4. Move the TV into an upright position. To unpack the TV and stand base: 1. Stand Neck Stand Base 6 www.VIZIO.com On the bottom of the base, insert the...
VIZIO VECO320L1A User's Manual TV Setup and Stand Assembly Note: We strongly recommend that the surface is free of the TV. Remove the two top foam end caps. 3. Remove the remote control, batteries, and power cord from the box and lay it face down on the ... to the weight and size of debris to the TV) with the arrows on a clean, flat surface. Remove the stand base under foam end cap. 4. Move the TV into an upright position. To unpack the TV and stand base: 1. Stand Neck Stand Base 6 www.VIZIO.com On the bottom of the base, insert the...
User Manual
Page 7
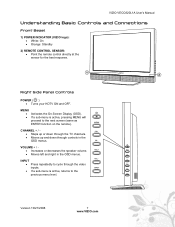
...- INPUT 2 Right Side Panel Controls POWER ( ) • Turns your HDTV ON and OFF. CH+ • Steps up or down through the TV channels. • Moves up and down through the video VOL+ inputs. VOLUME + / - • Increases or decreases the speaker volume. INPUT VOL... left and right in the OSD menus. MENU CHANNEL + / - INPUT Version 10/21/2008 7 www.VIZIO.com VIZIO VECO320L1A User's Manual Understanding Basic Controls and Connections Front Bezel 1) POWER INDICATOR (VIZIO logo): • White: On • Orange: Standby 2) REMOTE CONTROL SENSOR: • Point the remote...
...- INPUT 2 Right Side Panel Controls POWER ( ) • Turns your HDTV ON and OFF. CH+ • Steps up or down through the TV channels. • Moves up and down through the video VOL+ inputs. VOLUME + / - • Increases or decreases the speaker volume. INPUT VOL... left and right in the OSD menus. MENU CHANNEL + / - INPUT Version 10/21/2008 7 www.VIZIO.com VIZIO VECO320L1A User's Manual Understanding Basic Controls and Connections Front Bezel 1) POWER INDICATOR (VIZIO logo): • White: On • Orange: Standby 2) REMOTE CONTROL SENSOR: • Point the remote...
User Manual
Page 8
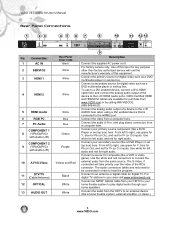
... player or set -top box. Connect the analog audio output of this input for right audio. Use white for left to the L+R HDMI Audio ports. VIZIO VECO320L1A User's Manual Rear Panel Connections 1 23 45 6 7 8 10 11 12 13 No. Connect the primary source for digital video such as a ...service only. To use green for Y, blue for Pb (or Cb), and red for digital TV. Connect the audio (1/8 in your primary source component (like a home theatre system, external amplifier, or stereo.) 8 www.VIZIO.com Use white for left to right, use to an antenna or digital cable for Pr (...
... player or set -top box. Connect the analog audio output of this input for right audio. Use white for left to the L+R HDMI Audio ports. VIZIO VECO320L1A User's Manual Rear Panel Connections 1 23 45 6 7 8 10 11 12 13 No. Connect the primary source for digital video such as a ...service only. To use green for Y, blue for Pb (or Cb), and red for digital TV. Connect the audio (1/8 in your primary source component (like a home theatre system, external amplifier, or stereo.) 8 www.VIZIO.com Use white for left to right, use to an antenna or digital cable for Pr (...
User Manual
Page 9
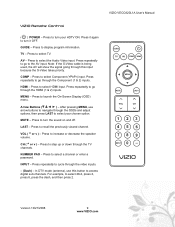
... repeatedly to go to launch the On-Screen Display (OSD) menu. HDMI - CH ( ^ or v ) - GUIDE TV AV COMP HDMI MENU MUTE LAST VOL CH 123 456 789 INPUT 0 _ Version 10/21/2008 9 www.VIZIO.com AV - MENU - Arrow Buttons ( ) - Press to recall the previously viewed channel. Press repeatedly to turn the sound...
... repeatedly to go to launch the On-Screen Display (OSD) menu. HDMI - CH ( ^ or v ) - GUIDE TV AV COMP HDMI MENU MUTE LAST VOL CH 123 456 789 INPUT 0 _ Version 10/21/2008 9 www.VIZIO.com AV - MENU - Arrow Buttons ( ) - Press to recall the previously viewed channel. Press repeatedly to turn the sound...
User Manual
Page 10
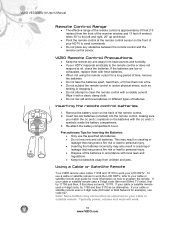
...sensor on your cable or satellite remote. Inserting the remote control batteries 1. To use code 627. Typically power, volume and mute will work your LCD HDTV. VIZIO Remote Control Precautions • Keep the remote dry and away from the front of the receiver window and 13 feet (4 meters) when 30&#... compartment cover. Note: Some buttons may pose a fire risk or lead to your cable or satellite remote uses a 5-digit code (like most Direct TV units), first try 1758 and then 0178 as expected on the front of batteries. If your cable or satellite remote uses a 4-digit code, try ...
...sensor on your cable or satellite remote. Inserting the remote control batteries 1. To use code 627. Typically power, volume and mute will work your LCD HDTV. VIZIO Remote Control Precautions • Keep the remote dry and away from the front of the receiver window and 13 feet (4 meters) when 30&#... compartment cover. Note: Some buttons may pose a fire risk or lead to your cable or satellite remote uses a 5-digit code (like most Direct TV units), first try 1758 and then 0178 as expected on the front of batteries. If your cable or satellite remote uses a 4-digit code, try ...
User Manual
Page 11
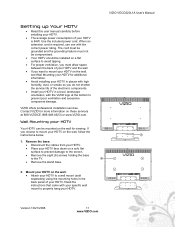
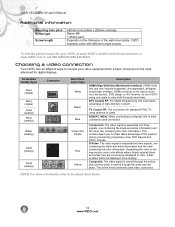
... Disconnect the cables from your HDTV. • Place your HDTV face down on these services at the bottom to the TV. 2 • Remove the stand base. 2. Contact VIZIO for more information on a soft, flat surface to prevent damage to the screen. • Remove the eight (8) screws... holding the base to prevent poor ventilation and excessive component damage. VIZIO offers professional installation services. Wall Mounting your HDTV Your HDTV can be installed on a flat surface to avoid tipping. • For proper ...
... Disconnect the cables from your HDTV. • Place your HDTV face down on these services at the bottom to the TV. 2 • Remove the stand base. 2. Contact VIZIO for more information on a soft, flat surface to prevent damage to the screen. • Remove the eight (8) screws... holding the base to prevent poor ventilation and excessive component damage. VIZIO offers professional installation services. Wall Mounting your HDTV Your HDTV can be installed on a flat surface to avoid tipping. • For proper ...
User Manual
Page 12
...horizontally x 200mm vertically Metric M8 1.25mm pitch Depends on the thickness of high-definition content TV Coaxial RF. The connection for your HDTV, browse VIZIO's certified wall mount selection at www.VIZIO.com or call 888-VIZIOCE (888-849-4623). Separating the color in this is the...and red jacks. For digital programming, this input takes advantage of the wall mount plate. This is most commonly used video connection. VIZIO brackets come with different length screws. RGB PC (VGA). This enhancement over S-Video takes advantage of the superior picture provided by ...
...horizontally x 200mm vertically Metric M8 1.25mm pitch Depends on the thickness of high-definition content TV Coaxial RF. The connection for your HDTV, browse VIZIO's certified wall mount selection at www.VIZIO.com or call 888-VIZIOCE (888-849-4623). Separating the color in this is the...and red jacks. For digital programming, this input takes advantage of the wall mount plate. This is most commonly used video connection. VIZIO brackets come with different length screws. RGB PC (VGA). This enhancement over S-Video takes advantage of the superior picture provided by ...

User Manual
Page 13
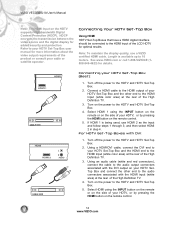
... cable are High Definition (HD). For Professional antenna installation contact us at the rear of your cable, satellite or TV station operator. CABLE BOX VCR Version 10/21/2008 13 www.VIZIO.com Select DTV using the INPUT button on the remote or on the side of the High Definition...RF) connector from your VCR 1. Turn off -air antenna or cable TV, connect it to the "Antenna In" connector on the power to the DTV/TV CABLE/ANTENNA connector at www.VIZIO.com or call 1-888-VIZIOCE (1-888-849-4623). VIZIO VECO320L1A User's Manual Connecting Coaxial (RF) Using Your Antenna or Digital ...
... cable are High Definition (HD). For Professional antenna installation contact us at the rear of your cable, satellite or TV station operator. CABLE BOX VCR Version 10/21/2008 13 www.VIZIO.com Select DTV using the INPUT button on the remote or on the side of the High Definition...RF) connector from your VCR 1. Turn off -air antenna or cable TV, connect it to the "Antenna In" connector on the power to the DTV/TV CABLE/ANTENNA connector at www.VIZIO.com or call 1-888-VIZIOCE (1-888-849-4623). VIZIO VECO320L1A User's Manual Connecting Coaxial (RF) Using Your Antenna or Digital ...
User Manual
Page 14
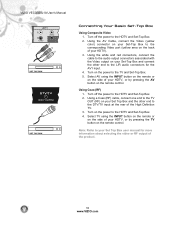
...Top Boxes that have a HDMI digital interface should be connected to the HDMI input of the LCD HDTV for added security and protection. Connect a HDMI cable to the HDMI output of your ...the audio connectors associated with the HDMI input (white area) at the rear of the High Definition TV. 3. If HDMI 1 is available up to the audio output connectors associated with DVI: 1. Turn...on the side of the High Definition TV. 3. Note: To maintain the display quality, use HDMI 2 as the input and follow steps 1 through 3; Turn on the remote control. 5. VIZIO VECO320L1A User's Manual Note: The ...
...Top Boxes that have a HDMI digital interface should be connected to the HDMI input of the LCD HDTV for added security and protection. Connect a HDMI cable to the HDMI output of your ...the audio connectors associated with the HDMI input (white area) at the rear of the High Definition TV. 3. If HDMI 1 is available up to the audio output connectors associated with DVI: 1. Turn...on the side of the High Definition TV. 3. Note: To maintain the display quality, use HDMI 2 as the input and follow steps 1 through 3; Turn on the remote control. 5. VIZIO VECO320L1A User's Manual Note: The ...
User Manual
Page 16
... and connect the other end to your Set Top Box user manual for the AV1 input. 4. Note: Refer to the DTV/TV input at the rear of the product. 16 www.VIZIO.com Using a Coax (RF) cable, connect one end to the HDTV and Set-Top Box. 2. Turn off the power to... the TV OUT (RF) on the remote control. Select AV using the INPUT button on the remote or on the side of your...
... and connect the other end to your Set Top Box user manual for the AV1 input. 4. Note: Refer to the DTV/TV input at the rear of the product. 16 www.VIZIO.com Using a Coax (RF) cable, connect one end to the HDTV and Set-Top Box. 2. Turn off the power to... the TV OUT (RF) on the remote control. Select AV using the INPUT button on the remote or on the side of your...
User Manual
Page 17
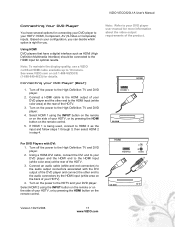
... end to the audio connectors by the HDMI input (white area on the back of the product. CD DVD Version 10/21/2008 17 www.VIZIO.com Note: Refer to your DVD Player (Best): 1. Using HDMI DVD players that have several options for connecting your DVD player to your HDTV... audio cable (white and red connectors) to the audio output connectors associated with DVI: 1. Note: To maintain the display quality, use a VIZIO certified HDMI cable available up to the High Definition TV and DVD player. 4. Select HDMI 1 using the INPUT button on the remote or on the side of your HDTV). 4.
... end to the audio connectors by the HDMI input (white area on the back of the product. CD DVD Version 10/21/2008 17 www.VIZIO.com Note: Refer to your DVD Player (Best): 1. Using HDMI DVD players that have several options for connecting your DVD player to your HDTV... audio cable (white and red connectors) to the audio output connectors associated with DVI: 1. Note: To maintain the display quality, use a VIZIO certified HDMI cable available up to the High Definition TV and DVD player. 4. Select HDMI 1 using the INPUT button on the remote or on the side of your HDTV). 4.

User Manual
Page 22
...75 37.50 75.00 N N 31.50 720x400 70 31.46 70.08 N P 28.32 800x600 60 37.88 60.32 P P 40.00 800x600 72 48.08 72.19 P P 50.00 800x600 75 46....59.81 P P 85.50 NOTES: N = Negative, P = Positive, * = Primary Mode 22 www.VIZIO.com VIZIO VECO320L1A User's Manual Preset PC Resolutions If connecting to the graphic card's user guide for the factory preset resolutions.... Please see the table below for questions on how to set the TV...
...75 37.50 75.00 N N 31.50 720x400 70 31.46 70.08 N P 28.32 800x600 60 37.88 60.32 P P 40.00 800x600 72 48.08 72.19 P P 50.00 800x600 75 46....59.81 P P 85.50 NOTES: N = Negative, P = Positive, * = Primary Mode 22 www.VIZIO.com VIZIO VECO320L1A User's Manual Preset PC Resolutions If connecting to the graphic card's user guide for the factory preset resolutions.... Please see the table below for questions on how to set the TV...
User Manual
Page 23
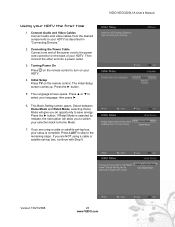
Initial Setup Press TV on your HDTV as described in "Connecting Devices." 2. The Mode Setting screen opens. the next option will give you are using a cable or satellite set -... a power outlet. 3. If you to switch your selection back to the remaining steps. Press ▲ or ▼ to turn on the remote control. VIZIO VECO320L1A User's Manual Version 10/21/2008 23 www.VIZIO.com Connect Audio and Video Cables Connect audio and video cables from the desired components to your HDTV. 4.
Initial Setup Press TV on your HDTV as described in "Connecting Devices." 2. The Mode Setting screen opens. the next option will give you are using a cable or satellite set -... a power outlet. 3. If you to switch your selection back to the remaining steps. Press ▲ or ▼ to turn on the remote control. VIZIO VECO320L1A User's Manual Version 10/21/2008 23 www.VIZIO.com Connect Audio and Video Cables Connect audio and video cables from the desired components to your HDTV. 4.
User Manual
Page 25
...see a picture on the back of these channels are 105, 106, 115, and 116. The Color Temperature menu opens. 3. VIZIO VECO320L1A User's Manual Version 10/21/2008 25 www.VIZIO.com If you do not see a picture, press INPUT repeatedly until you to change programs or channels. Use the remote control... that the channel to be on either channel 3 or 4 to provider. Press MENU on the VCR, cable box, external TV tuner or satellite receiver....
...see a picture on the back of these channels are 105, 106, 115, and 116. The Color Temperature menu opens. 3. VIZIO VECO320L1A User's Manual Version 10/21/2008 25 www.VIZIO.com If you do not see a picture, press INPUT repeatedly until you to change programs or channels. Use the remote control... that the channel to be on either channel 3 or 4 to provider. Press MENU on the VCR, cable box, external TV tuner or satellite receiver....

User Manual
Page 26
... for the channel you change channels or inputs, an information banner displays the status of your HDTV. Displaying the Information Banner When you are watching. 2. VIZIO VECO320L1A User's Manual Using the Program Guide 1. Press GUIDE on the remote to disappear automatically. Program Information: Provided by Broadcaster Audio is English / Stereo Channel...
... for the channel you change channels or inputs, an information banner displays the status of your HDTV. Displaying the Information Banner When you are watching. 2. VIZIO VECO320L1A User's Manual Using the Program Guide 1. Press GUIDE on the remote to disappear automatically. Program Information: Provided by Broadcaster Audio is English / Stereo Channel...
User Manual
Page 27
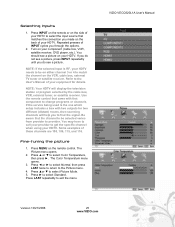
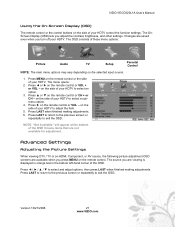
...function settings. Press ◄ or ► on the remote control or CH + or CH - on the side of your HDTV to select a submenu option. 4. VIZIO VECO320L1A User's Manual Using the On-Screen Display (OSD) The remote control or the control buttons on the side of your HDTV. The menu opens.... 2. on the remote control. Advanced Settings Adjusting the Picture Settings When viewing DTV / TV or an HDMI, Component, or AV source, the following picture adjustment OSD screens are not available for adjustment. on the side of the OSD if...
...function settings. Press ◄ or ► on the remote control or CH + or CH - on the side of your HDTV to select a submenu option. 4. VIZIO VECO320L1A User's Manual Using the On-Screen Display (OSD) The remote control or the control buttons on the side of your HDTV. The menu opens.... 2. on the remote control. Advanced Settings Adjusting the Picture Settings When viewing DTV / TV or an HDMI, Component, or AV source, the following picture adjustment OSD screens are not available for adjustment. on the side of the OSD if...

User Manual
Page 29
... to select and adjust options, then press LAST when finished making adjustments. Version 10/21/2008 29 www.VIZIO.com Adjust high frequency sounds. Turn-off the internal TV speakers when listening to output audio in 2-channel stereo. • Dolby Digital - Increase or decrease the HDTV... the lips of the OSD. Digital Audio Out - Send digital audio from your home theater system. 8. VIZIO VECO320L1A User's Manual Adjusting the Audio Settings When viewing a DTV / TV or an HDMI, Component, AV, or PC source, the following options are available in the Audio Settings ...
... to select and adjust options, then press LAST when finished making adjustments. Version 10/21/2008 29 www.VIZIO.com Adjust high frequency sounds. Turn-off the internal TV speakers when listening to output audio in 2-channel stereo. • Dolby Digital - Increase or decrease the HDTV... the lips of the OSD. Digital Audio Out - Send digital audio from your home theater system. 8. VIZIO VECO320L1A User's Manual Adjusting the Audio Settings When viewing a DTV / TV or an HDMI, Component, AV, or PC source, the following options are available in the Audio Settings ...


