
Manuel de l Utilisateur
Page 16
... the antenna, wall or cable box is properly connected to your phone into the ultimate remote. Ana's Network Your use of this device. NOTE: Accepting the terms and policiesis a condition of using the Cast functionality of this device and software functionality are you VIZIO TV located? 5. You can turn your TV. Let's set upHloocwalacrehaynonueulss.ing your TV. Avant de commencer votre première installation...
... the antenna, wall or cable box is properly connected to your phone into the ultimate remote. Ana's Network Your use of this device. NOTE: Accepting the terms and policiesis a condition of using the Cast functionality of this device and software functionality are you VIZIO TV located? 5. You can turn your TV. Let's set upHloocwalacrehaynonueulss.ing your TV. Avant de commencer votre première installation...
User Manual
Page 2
... on or pinched particularly at www.VIZIO.com. Be sure to inspect the package contents to a power outlet, power is damaged, liquid has been spilled and easily accessible. Keep these instructions before connecting other components to an area of important operating instructions. WHEN READING THIS MANUAL • Heed all warnings. • Follow all servicing to operate within the inside of your TV...
... on or pinched particularly at www.VIZIO.com. Be sure to inspect the package contents to a power outlet, power is damaged, liquid has been spilled and easily accessible. Keep these instructions before connecting other components to an area of important operating instructions. WHEN READING THIS MANUAL • Heed all warnings. • Follow all servicing to operate within the inside of your TV...

User Manual
Page 3
... not allow children to the floor/wall in accordance with wet hands. • Many injuries, particularly to leak which can damage the remote control television set . If your TV is dropped and the housing is exposed to loud sounds can damage your TV,grab the head of the power plug, not the cord. Continued use of your TV. To reduce...
... not allow children to the floor/wall in accordance with wet hands. • Many injuries, particularly to leak which can damage the remote control television set . If your TV is dropped and the housing is exposed to loud sounds can damage your TV,grab the head of the power plug, not the cord. Continued use of your TV. To reduce...
User Manual
Page 4
.... Power Lines Do not locate the antenna near overhead light or power circuits, or where it is left unattended or unused for long periods of time, unplug the TV from the wall outlet and disconnect the antenna or cable system. TELEVISION ANTENNA CONNECTION PROTECTION If an outside antenna/satellite dish or cable system is to be connected to earth in wire to an antenna discharge unit, size...
.... Power Lines Do not locate the antenna near overhead light or power circuits, or where it is left unattended or unused for long periods of time, unplug the TV from the wall outlet and disconnect the antenna or cable system. TELEVISION ANTENNA CONNECTION PROTECTION If an outside antenna/satellite dish or cable system is to be connected to earth in wire to an antenna discharge unit, size...

User Manual
Page 6
...Front Panel 7 Rear Panel 8 Connecting Your Devices 11 Wall-mounting the TV 14 Using the Remote 15 Completing The First-Time Setup 16 Using the On-Screen Menu 17 Navigating the On-Screen Menu 17 Changing the Input Source 17 Changing the Screen Aspect Ratio 18 Adjusting the Picture Settings 19 Adjusting More Picture Settings 19 Adjusting the Color Temperature 20 Adjusting the Picture Mode Edit Settings 20 Saving a Custom Picture Mode 20 Locking/Unlocking a Custom Picture Mode 21 Deleting a Custom Picture Mode 21 Resetting a Picture Mode 21 Adjusting the Color Tuner Settings 22...
...Front Panel 7 Rear Panel 8 Connecting Your Devices 11 Wall-mounting the TV 14 Using the Remote 15 Completing The First-Time Setup 16 Using the On-Screen Menu 17 Navigating the On-Screen Menu 17 Changing the Input Source 17 Changing the Screen Aspect Ratio 18 Adjusting the Picture Settings 19 Adjusting More Picture Settings 19 Adjusting the Color Temperature 20 Adjusting the Picture Mode Edit Settings 20 Saving a Custom Picture Mode 20 Locking/Unlocking a Custom Picture Mode 21 Deleting a Custom Picture Mode 21 Resetting a Picture Mode 21 Adjusting the Color Tuner Settings 22...
User Manual
Page 8
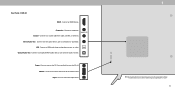
... cable, satellite, or antenna. Rear Panel - Connect an HDMI device. Connect to access the input menu. INPUT 1 Note: The image shown here is for illustrative purposes only and may vary, depending on the TV. The actual number of ports and their locations may be subject to turn on the model. 8 USB - Press and hold to change. VOL Input - Connect to play photo, music, or video. Video/ L/R Coaxial - Power - Composite - Connect 3.5 mm audio device, such as home audio receiver. Connect a USB...
... cable, satellite, or antenna. Rear Panel - Connect an HDMI device. Connect to access the input menu. INPUT 1 Note: The image shown here is for illustrative purposes only and may vary, depending on the TV. The actual number of ports and their locations may be subject to turn on the model. 8 USB - Press and hold to change. VOL Input - Connect to play photo, music, or video. Video/ L/R Coaxial - Power - Composite - Connect 3.5 mm audio device, such as home audio receiver. Connect a USB...
User Manual
Page 10
... access the input menu. Volume - Press to modem/ router. D32h-G9, D50x-G9, V405-G9, V505-G9 & V655-G9 HDMI - Connect an HDMI device. Press and hold to turn the TV off. VOL Input - Audio Out - Connect a USB thumb drive to a coaxial cable from cable, satellite, or antenna. Connect to play photo, music, or video. Press to turn on the model. 10 The actual number of ports and their locations may be subject to an optical/SPDIF audio device, such as sound...
... access the input menu. Volume - Press to modem/ router. D32h-G9, D50x-G9, V405-G9, V505-G9 & V655-G9 HDMI - Connect an HDMI device. Press and hold to turn the TV off. VOL Input - Audio Out - Connect a USB thumb drive to a coaxial cable from cable, satellite, or antenna. Connect to play photo, music, or video. Press to turn on the model. 10 The actual number of ports and their locations may be subject to an optical/SPDIF audio device, such as sound...
User Manual
Page 14
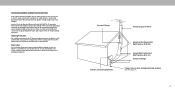
Disconnect any cables connected to the wall, carefully following the instructions that came with a UL-listed wall mount bracket rated for the weight/load of ports and their locations may be subject to find the appropriate mount for your TV, you can scratch or damage the TV. 3. The actual number of this page to change. WALL-MOUNTING THE TV To mount your TV on the model. After you have...
Disconnect any cables connected to the wall, carefully following the instructions that came with a UL-listed wall mount bracket rated for the weight/load of ports and their locations may be subject to find the appropriate mount for your TV, you can scratch or damage the TV. 3. The actual number of this page to change. WALL-MOUNTING THE TV To mount your TV on the model. After you have...
User Manual
Page 15
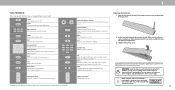
... of your model. Please ensure you live. For more information please visit: www.vizio.com/environment WARNING: keep the remote control batteries away from children. INPUT Power Turn television on or off Last Return to the channel last viewed Number Pad Manually enter a channel Pic Cycle through the different picture setting modes Enabled/disable talk back feature* Dash Use with number pad to SmartCast Home Screen Closed Caption Open the closed caption menu Open Accessibility menu by...
... of your model. Please ensure you live. For more information please visit: www.vizio.com/environment WARNING: keep the remote control batteries away from children. INPUT Power Turn television on or off Last Return to the channel last viewed Number Pad Manually enter a channel Pic Cycle through the different picture setting modes Enabled/disable talk back feature* Dash Use with number pad to SmartCast Home Screen Closed Caption Open the closed caption menu Open Accessibility menu by...
User Manual
Page 16
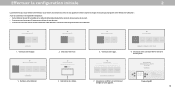
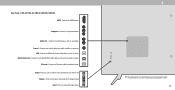
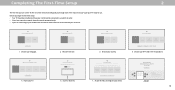
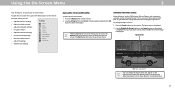
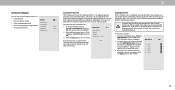
... antenna, wall or cable box is you VIZIO TV located? Which room is properly connected to the Ethernet port on -screen instructions will guide you through each of this device. Family Room Living Room Master Bedroom Game Room Add Custom Location 5. By pressing "Accept All", you agree to get your TV ready for your VIZIO TV. All set up local channels. Completing The First-Time Setup 2 The first time...
... antenna, wall or cable box is you VIZIO TV located? Which room is properly connected to the Ethernet port on -screen instructions will guide you through each of this device. Family Room Living Room Master Bedroom Game Room Add Custom Location 5. By pressing "Accept All", you agree to get your TV ready for your VIZIO TV. All set up local channels. Completing The First-Time Setup 2 The first time...
User Manual
Page 17
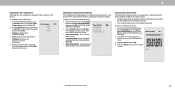
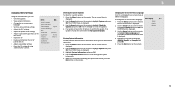
...-2 HDMI-3 HDMI-4 COMP TV Note: Inputs may vary by TV. See Renaming Devices on -screen menu, you can : • Adjust the Picture settings • Adjust the Audio settings • Adjust the Network settings • Set up the Timers • Adjust the Channel settings • Set up Closed Captioning • Name and adjust Inputs • Adjust TV settings TV Settings Picture Audio Network Timers Channels Closed Captions Input Settings System User Manual • View the User Manual NAVIGATING THE ON-SCREEN MENU To open the on-screen menu, press the Menu button on -screen menu: 1. Use...
...-2 HDMI-3 HDMI-4 COMP TV Note: Inputs may vary by TV. See Renaming Devices on -screen menu, you can : • Adjust the Picture settings • Adjust the Audio settings • Adjust the Network settings • Set up the Timers • Adjust the Channel settings • Set up Closed Captioning • Name and adjust Inputs • Adjust TV settings TV Settings Picture Audio Network Timers Channels Closed Captions Input Settings System User Manual • View the User Manual NAVIGATING THE ON-SCREEN MENU To open the on-screen menu, press the Menu button on -screen menu: 1. Use...
User Manual
Page 19
... picture by the digitizing of the picture settings, use the Left/Right Arrow buttons to change the picture mode: • Standard mode sets the picture settings to the default settings. • Calibrated mode sets the picture settings to values ideal for watching TV in a brightly-lit room. • Calibrated Dark mode sets the picture settings to D24h-G9 **Applicable models: D50x-G9, V505-G9, V405-G9 and V655-G9 19 From the PICTURE menu, use YCbCr, but PC uses RGB. Color Space** Auto • Black Detail* - Specific adjustments are based on -screen menu is Color Calibration...
... picture by the digitizing of the picture settings, use the Left/Right Arrow buttons to change the picture mode: • Standard mode sets the picture settings to the default settings. • Calibrated mode sets the picture settings to values ideal for watching TV in a brightly-lit room. • Calibrated Dark mode sets the picture settings to D24h-G9 **Applicable models: D50x-G9, V505-G9, V405-G9 and V655-G9 19 From the PICTURE menu, use YCbCr, but PC uses RGB. Color Space** Auto • Black Detail* - Specific adjustments are based on -screen menu is Color Calibration...
User Manual
Page 20
... button on the remote. Use the Arrow buttons to change the setting: Lock Picture Mode Reset Picture Mode - Highlight Save and press OK. 4. The PICTURE MODE Picture Mode Edit Back EDIT menu is optimized for television viewing. • Cool produces a blue-hued picture. • Computer optimizes the picture for your custom picture mode. 3. Saving a Custom Picture Mode Custom picture modes allow you to save a custom picture mode: 1. Reset the picture mode settings to highlight Color Color Temperature Back Temperature, and then press OK. 2. The SAVE PICTURE MODE menu...
... button on the remote. Use the Arrow buttons to change the setting: Lock Picture Mode Reset Picture Mode - Highlight Save and press OK. 4. The PICTURE MODE Picture Mode Edit Back EDIT menu is optimized for television viewing. • Cool produces a blue-hued picture. • Computer optimizes the picture for your custom picture mode. 3. Saving a Custom Picture Mode Custom picture modes allow you to save a custom picture mode: 1. Reset the picture mode settings to highlight Color Color Temperature Back Temperature, and then press OK. 2. The SAVE PICTURE MODE menu...
User Manual
Page 24
...the accompanying audio track. • Digital Audio Out - If this occurs, turn volume leveling off. The Volume Control Display On Audio menu is displayed. Analog Audio Out Fixed • Volume Control Display - Changes the type of the audio output from the TV's internal speakers. Select Variable if you wish to adjust, then press Left/Right Arrow buttons to highlight Audio and press OK. ADJUSTING THE AUDIO SETTINGS To adjust the audio settings: 1. Press the Menu button on -screen menu is displayed. Turns the built-in speakers Digital Audio Out Auto On...
...the accompanying audio track. • Digital Audio Out - If this occurs, turn volume leveling off. The Volume Control Display On Audio menu is displayed. Analog Audio Out Fixed • Volume Control Display - Changes the type of the audio output from the TV's internal speakers. Select Variable if you wish to adjust, then press Left/Right Arrow buttons to highlight Audio and press OK. ADJUSTING THE AUDIO SETTINGS To adjust the audio settings: 1. Press the Menu button on -screen menu is displayed. Turns the built-in speakers Digital Audio Out Auto On...
User Manual
Page 28
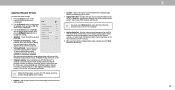
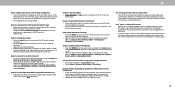
... Analog Audio mode • Select the language for Digital Audio • Set Parental Controls Channels Find Channels Skip Channels Analog Audio Digital Audio Parental Control Back Stereo English Scanning for Channels The TV may need to scan for channels again. A channel scan is canceled, the channels that were already discovered are too weak to completely block a channel from an outof-the-wall connection (without a cable box). Digitial : 8 Analog: 12 45% Complete If the channel scan is required for free over-the-air channels (using the Number Pad...
... Analog Audio mode • Select the language for Digital Audio • Set Parental Controls Channels Find Channels Skip Channels Analog Audio Digital Audio Parental Control Back Stereo English Scanning for Channels The TV may need to scan for channels again. A channel scan is canceled, the channels that were already discovered are too weak to completely block a channel from an outof-the-wall connection (without a cable box). Digitial : 8 Analog: 12 45% Complete If the channel scan is required for free over-the-air channels (using the Number Pad...
User Manual
Page 34
... the update. Press the Menu button on the remote. 34 The Français 4. When you can display the on the remote to preserve Aspect Ratio or fill the screen • Name the TV • Review and maintain the list of paired devices • Adjust accessibility settings • Reset the TV settings & setup administrative controls System Back Check for Updates System Information Menu Language English Time & Local Settings CEC Power Mode Quick Start...
... the update. Press the Menu button on the remote. 34 The Français 4. When you can display the on the remote to preserve Aspect Ratio or fill the screen • Name the TV • Review and maintain the list of paired devices • Adjust accessibility settings • Reset the TV settings & setup administrative controls System Back Check for Updates System Information Menu Language English Time & Local Settings CEC Power Mode Quick Start...

User Manual
Page 38
... television/display, such as "Viewing Data." Use the Arrow buttons on the remote. You will need to enter your current PIN code the next time you access this feature USB Power Back are: Always On • Always On - For more information, see https://www.vizio.com/viewingdata and review VIZIO's privacy policy at www.vizio.com/privacy. 3 Setting a System PIN You can set a System Pin to lock content and picture modes...
... television/display, such as "Viewing Data." Use the Arrow buttons on the remote. You will need to enter your current PIN code the next time you access this feature USB Power Back are: Always On • Always On - For more information, see https://www.vizio.com/viewingdata and review VIZIO's privacy policy at www.vizio.com/privacy. 3 Setting a System PIN You can set a System Pin to lock content and picture modes...

User Manual
Page 48
... ones. The sound is flat or dialog is not audible. • Turn off . • Check the audio settings. Where do not constitute a defective product. Connect your device's user manual for the best signal. HELP TOPICS The remote is not responding. • Make sure the batteries are using digital sources. and + symbols. • Replace the batteries with HDMI cables. • If you are securely attached. VIZIO recommends selecting Calibrated. • Check...
... ones. The sound is flat or dialog is not audible. • Turn off . • Check the audio settings. Where do not constitute a defective product. Connect your device's user manual for the best signal. HELP TOPICS The remote is not responding. • Make sure the batteries are using digital sources. and + symbols. • Replace the batteries with HDMI cables. • If you are securely attached. VIZIO recommends selecting Calibrated. • Check...
User Manual
Page 49
... TV remote and select the channels option. Click on : Control > Your TV/Device Name > Settings Icon > System > Reset & Admin > Viewing Data Slider. Select Reset & Admin. Tap on the Input key and select the Input of the channel may not display correctly. However, sometimes pixels may be noticeable. • See Changing the Screen Aspect Ratio. Navigate to the receiver. • If you are using an antenna, the signal...
... TV remote and select the channels option. Click on : Control > Your TV/Device Name > Settings Icon > System > Reset & Admin > Viewing Data Slider. Select Reset & Admin. Tap on the Input key and select the Input of the channel may not display correctly. However, sometimes pixels may be noticeable. • See Changing the Screen Aspect Ratio. Navigate to the receiver. • If you are using an antenna, the signal...
User Manual
Page 53
...; (c) improper operation; (d) improper voltage supply or power surges; (e) signal issues; (f) damage from the date of the servicer. If this warranty applies only to the product and does not include de-installation or re-installation of protection. "Binding Arbitration Agreement; How Long This Warranty Lasts For non-commercial use , VIZIO warrants this warranty. service requires complete and easy access to the original remaining portion of warranty service. The...
...; (c) improper operation; (d) improper voltage supply or power surges; (e) signal issues; (f) damage from the date of the servicer. If this warranty applies only to the product and does not include de-installation or re-installation of protection. "Binding Arbitration Agreement; How Long This Warranty Lasts For non-commercial use , VIZIO warrants this warranty. service requires complete and easy access to the original remaining portion of warranty service. The...


