Quickstart Guide
Page 2
...only with instructions. WARNING: To reduce the risk of fire or electric shock, do not touch the connector with wet hands. • Insert the remote control batteries in accordance with a dry cloth. • Do not block any object into your outlet, consult an electrician for replacement of the obsolete ...rules should be located near your Unit and be sufficient magnitude to constitute a risk of shock to rain or moisture. Overloading can damage the remote control or injure the operator. • See the important note and rating located on the power cord may damage the wires inside the ...
...only with instructions. WARNING: To reduce the risk of fire or electric shock, do not touch the connector with wet hands. • Insert the remote control batteries in accordance with a dry cloth. • Do not block any object into your outlet, consult an electrician for replacement of the obsolete ...rules should be located near your Unit and be sufficient magnitude to constitute a risk of shock to rain or moisture. Overloading can damage the remote control or injure the operator. • See the important note and rating located on the power cord may damage the wires inside the ...

Quickstart Guide
Page 4
TABLE OF CONTENTS Package Contents 5 Controls & Connections 6 FIrst-Time Setup 8 Using the Remote 13 Settings and LED Behavior 14 Programming the Sound Bar 16 Resetting to Factory Default Settings 17 Bluetooth Pairing 18 Using Bluetooth Mode 19 Advanced Setup 20 Connecting a Subwoofer 22 Wall Mounting the Sound Bar 23 Help & Troubleshooting 25 One-Year Limited Warranty 26 Specifications 26 Legal & Compliance 27
TABLE OF CONTENTS Package Contents 5 Controls & Connections 6 FIrst-Time Setup 8 Using the Remote 13 Settings and LED Behavior 14 Programming the Sound Bar 16 Resetting to Factory Default Settings 17 Bluetooth Pairing 18 Using Bluetooth Mode 19 Advanced Setup 20 Connecting a Subwoofer 22 Wall Mounting the Sound Bar 23 Help & Troubleshooting 25 One-Year Limited Warranty 26 Specifications 26 Legal & Compliance 27
Quickstart Guide
Page 5
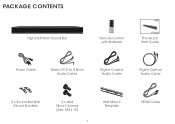
PACKAGE CONTENTS High Definition Sound Bar VIZIO INPUT MENU Remote Control with Batteries This Quick Start Guide Power Cable Stereo RCA to 3.5mm Audio Cable Digital Coaxial Audio Cable Digital Optical Audio Cable 2 x Sound Bar Wall Mount Brackets 2 x Wall Mount Screws (Size: M4 x 10) 5 Wall Mount Template HDMI Cable
PACKAGE CONTENTS High Definition Sound Bar VIZIO INPUT MENU Remote Control with Batteries This Quick Start Guide Power Cable Stereo RCA to 3.5mm Audio Cable Digital Coaxial Audio Cable Digital Optical Audio Cable 2 x Sound Bar Wall Mount Brackets 2 x Wall Mount Screws (Size: M4 x 10) 5 Wall Mount Template HDMI Cable
Quickstart Guide
Page 12
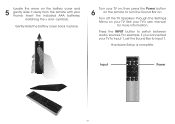
Gently slide the battery cover back in place. Turn your TV on, then press the Power button 6 on . Input VIZIO INPUT MENU Power 12 Insert the included AAA batteries, matching the + and - Turn off the TV Speakers through the Settings Menu on the battery cover ...and 5 gently slide it away from the remote with your thumb. Press the INPUT button to turn the Sound Bar on the remote to switch between audio sources. For example, if you connected your TV's user manual for more information. See...
Gently slide the battery cover back in place. Turn your TV on, then press the Power button 6 on . Input VIZIO INPUT MENU Power 12 Insert the included AAA batteries, matching the + and - Turn off the TV Speakers through the Settings Menu on the battery cover ...and 5 gently slide it away from the remote with your thumb. Press the INPUT button to turn the Sound Bar on the remote to switch between audio sources. For example, if you connected your TV's user manual for more information. See...
Quickstart Guide
Page 13
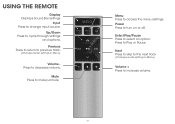
Mute Press to access the menu settings. VIZIO INPUT MENU Menu Press to mute/unmute. Enter/Play/Pause Press to change input source. USING THE REMOTE Display Displays Sound Bar settings Input Press to select an option. Press to increase volume. 13 Next Press to skip to the next track. (Changes audio settings in Menu) Volume Press to cycle through settings and options. Previous Press to return to previous track. (Changes audio settings in Menu) Volume + Press to Play or Pause. Up/Down Press to decrease volume. Power Press to turn on or off.
Mute Press to access the menu settings. VIZIO INPUT MENU Menu Press to mute/unmute. Enter/Play/Pause Press to change input source. USING THE REMOTE Display Displays Sound Bar settings Input Press to select an option. Press to increase volume. 13 Next Press to skip to the next track. (Changes audio settings in Menu) Volume Press to cycle through settings and options. Previous Press to return to previous track. (Changes audio settings in Menu) Volume + Press to Play or Pause. Up/Down Press to decrease volume. Power Press to turn on or off.

Quickstart Guide
Page 14
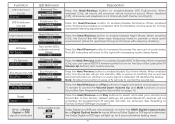
...decreasing levels. Note: Subwoofer not included. 14 Function Bluetooth Pairing BT Pair LED Behavior (When searching for the Sound Bar (VIZIO S5430w) using your Bluetooth device into pairing mode prior to Right and back continuously. Dialog Levels Center Two center LEDs indicate dialog is... level 0. The LED indicators will power down if no device is decreased. Note: DTS TruSurround must be displayed on the remote control's LCD display. Surround Levels Surround Subwoofer Levels Subwoofer Two center LEDs indicate surround is centered. Each function and setting will...
...decreasing levels. Note: Subwoofer not included. 14 Function Bluetooth Pairing BT Pair LED Behavior (When searching for the Sound Bar (VIZIO S5430w) using your Bluetooth device into pairing mode prior to Right and back continuously. Dialog Levels Center Two center LEDs indicate dialog is... level 0. The LED indicators will power down if no device is decreased. Note: DTS TruSurround must be displayed on the remote control's LCD display. Surround Levels Surround Subwoofer Levels Subwoofer Two center LEDs indicate surround is centered. Each function and setting will...
Quickstart Guide
Page 15
...button to enable/disable Night Mode. Dolby Digital Logo DTS Logo Press the Next/Previous button to enable/disable VIZIO TV Remotes.When enabled (On), you can use a VIZIO TV remote control to Factory Default Settings on your Sound Bar. See Programming the Sound Bar on the Sound Bar ...(using a TV remote to the factory default settings. When enabled (On), TruVolume provides a consistent and comfortable volume level for ...
...button to enable/disable Night Mode. Dolby Digital Logo DTS Logo Press the Next/Previous button to enable/disable VIZIO TV Remotes.When enabled (On), you can use a VIZIO TV remote control to Factory Default Settings on your Sound Bar. See Programming the Sound Bar on the Sound Bar ...(using a TV remote to the factory default settings. When enabled (On), TruVolume provides a consistent and comfortable volume level for ...
Quickstart Guide
Page 16
...Left to Prg Remote. Press the MENU button on the TV remote control. While the Sound Bar is in learning mode, press the Volume Down button on the remote, then use the Up/Down buttons to navigate to Right and back continuously. VIZIO INPUT MENU 16 TV Remote Ensure that it... has successfully recognized the TV remote. Press the Play button to confirm. When programming your Sound ...
...Left to Prg Remote. Press the MENU button on the TV remote control. While the Sound Bar is in learning mode, press the Volume Down button on the remote, then use the Up/Down buttons to navigate to Right and back continuously. VIZIO INPUT MENU 16 TV Remote Ensure that it... has successfully recognized the TV remote. Press the Play button to confirm. When programming your Sound ...
Quickstart Guide
Page 17
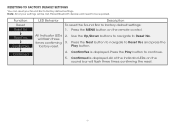
... FACTORY DEFAULT SETTINGS You can reset your settings will be re-paired. will flash three times confirming 3. Note: All of the Indicator LEDs on the remote control. Use the Up/Down buttons to navigate to continue. 5. Press the Next button to navigate to factory default settings: 1. Function Reset Reset No Reset...
... FACTORY DEFAULT SETTINGS You can reset your settings will be re-paired. will flash three times confirming 3. Note: All of the Indicator LEDs on the remote control. Use the Up/Down buttons to navigate to continue. 5. Press the Next button to navigate to factory default settings: 1. Function Reset Reset No Reset...
Quickstart Guide
Page 18
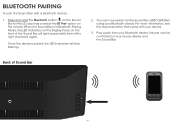
Volume can now search for five (5) seconds or select the BT Pair option on the Sound Bar for the Sound Bar (VIZIO S5430w) using your Bluetooth device. Back of the Sound Bar will stop flashing. 2. Once the device is in Bluetooth Pairing Mode, the LED Indicators on the ... from left to right and back again. BLUETOOTH PAIRING To pair the Sound Bar with your device. 3. Press and hold the Bluetooth button on the remote. You can be controlled on the front of Sound Bar 18 When the Sound Bar is paired, the LED Indicators will light sequentially from your...
Volume can now search for five (5) seconds or select the BT Pair option on the Sound Bar for the Sound Bar (VIZIO S5430w) using your Bluetooth device. Back of the Sound Bar will stop flashing. 2. Once the device is in Bluetooth Pairing Mode, the LED Indicators on the ... from left to right and back again. BLUETOOTH PAIRING To pair the Sound Bar with your device. 3. Press and hold the Bluetooth button on the remote. You can be controlled on the front of Sound Bar 18 When the Sound Bar is paired, the LED Indicators will light sequentially from your...

Quickstart Guide
Page 22
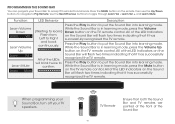
...* *RCA subwoofer cable and subwoofer not included. Enter the Subwoofer menu option on the remote and use the Up/ Down Arrow buttons to the center position. 3. Press the MENU button on the remote control to the Subwoofer. 4. Use the Previous/Next buttons to adjust the bass level ...to cycle through the menu options until Bass. Power On the Sound Bar and Subwoofer. 5. CONNECTING A SUBWOOFER Back of Sound Bar RCA Subwoofer Cable* For best results setting up an optional subwoofer,VIZIO...
...* *RCA subwoofer cable and subwoofer not included. Enter the Subwoofer menu option on the remote and use the Up/ Down Arrow buttons to the center position. 3. Press the MENU button on the remote control to the Subwoofer. 4. Use the Previous/Next buttons to adjust the bass level ...to cycle through the menu options until Bass. Power On the Sound Bar and Subwoofer. 5. CONNECTING A SUBWOOFER Back of Sound Bar RCA Subwoofer Cable* For best results setting up an optional subwoofer,VIZIO...
Quickstart Guide
Page 25
... or (B) Connect directly to your source device is turned up and that the audio output setting is set to variable audio output. The remote isn't working. • Replace the remote batteries with the original device. • Connect your Sound Bar. • Ensure the power cord is securely connected. • Plug a different ... the problem may not be set to FIXED or STANDARD, not VARIABLE. HELP & TROUBLESHOOTING There is no power. • Press the POWER button on the remote control or on the side of your device to a different input on the Sound Bar. Press Volume Up on the...
... or (B) Connect directly to your source device is turned up and that the audio output setting is set to variable audio output. The remote isn't working. • Replace the remote batteries with the original device. • Connect your Sound Bar. • Ensure the power cord is securely connected. • Plug a different ... the problem may not be set to FIXED or STANDARD, not VARIABLE. HELP & TROUBLESHOOTING There is no power. • Press the POWER button on the remote control or on the side of your device to a different input on the Sound Bar. Press Volume Up on the...


