User Manual
Page 3
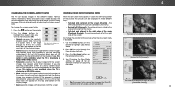
... a lightning storm or when it will not be installed near your TV and easily accessible. • Only power of the marked voltage can damage the remote control or injure the operator. For more information, TV is dropped and the housing is required, contact your dealer and refer all servicing to leak which...
... a lightning storm or when it will not be installed near your TV and easily accessible. • Only power of the marked voltage can damage the remote control or injure the operator. For more information, TV is dropped and the housing is required, contact your dealer and refer all servicing to leak which...
User Manual
Page 6
... the USB Media Player 49 Using the USB Media Player 49 Preparing Your USB Drive to Play USB Media 49 Playing USB Media 49 Using VIZIO Internet Apps Plus® (V.I .A. Plus Apps Window 56 Using the On-Screen Menu 23 Changing the Digital Audio Language 38 Setting Up Closed ... Feature 33 Turning the Power Indicator On or Off 46 Rear Panel 11 Enabling the Screen Saver 33 Using the Reset & Admin Menu 47 Remote Control Front 12 Blank Screen Feature 33 Restoring the TV to Factory Default Settings 47 Replacing the Batteries 13 Using the Network Connection Menu 34 Using...
... the USB Media Player 49 Using the USB Media Player 49 Preparing Your USB Drive to Play USB Media 49 Playing USB Media 49 Using VIZIO Internet Apps Plus® (V.I .A. Plus Apps Window 56 Using the On-Screen Menu 23 Changing the Digital Audio Language 38 Setting Up Closed ... Feature 33 Turning the Power Indicator On or Off 46 Rear Panel 11 Enabling the Screen Saver 33 Using the Reset & Admin Menu 47 Remote Control Front 12 Blank Screen Feature 33 Restoring the TV to Factory Default Settings 47 Replacing the Batteries 13 Using the Network Connection Menu 34 Using...
User Manual
Page 12
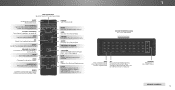
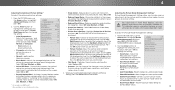
.... VOLUME UP/DOWN Increase or decrease loudness of the audio. ENTER Confirm channel or passcode entered using the Number Pad. REMOTE CONTROL 12 A/V CONTROLS Control USB media player and video streaming playback. V BUTTON Open the VIZIO Internet Apps Plus® (V.I.A. SHIFT Press and hold while pressing another key to enter a blue character. For example, press...
.... VOLUME UP/DOWN Increase or decrease loudness of the audio. ENTER Confirm channel or passcode entered using the Number Pad. REMOTE CONTROL 12 A/V CONTROLS Control USB media player and video streaming playback. V BUTTON Open the VIZIO Internet Apps Plus® (V.I.A. SHIFT Press and hold while pressing another key to enter a blue character. For example, press...

User Manual
Page 13
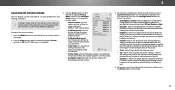
Insert two AAA batteries into the remote control. Replace the battery cover. 13 Make sure that the (+) and (-) symbols on the rear of the remote. 2. Press in on the button on the batteries match the (+) and (-) symbols inside the battery compartment. 4. Replacing the Batteries 1. Remove the battery cover. 1 3.
Insert two AAA batteries into the remote control. Replace the battery cover. 13 Make sure that the (+) and (-) symbols on the rear of the remote. 2. Press in on the button on the batteries match the (+) and (-) symbols inside the battery compartment. 4. Replacing the Batteries 1. Remove the battery cover. 1 3.
User Manual
Page 24
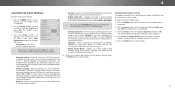
...menu is displayed: 1. ABC • Resized to cycle through the three display methods. 3. Tint - al Tint - Sharpness - Press the button on the remote to right of the display image. If you wish to the right edge of the picture while the on the top and bottom of menu... (Centered Overlay) 4 24 Input Wide CC VIZIO PICTURE Picture Mode Standard Auto Brightness Control Backlight - The picture extends off of the right side of the display image. Press OK to fit (Viewport) - Press ...
...menu is displayed: 1. ABC • Resized to cycle through the three display methods. 3. Tint - al Tint - Sharpness - Press the button on the remote to right of the display image. If you wish to the right edge of the picture while the on the top and bottom of menu... (Centered Overlay) 4 24 Input Wide CC VIZIO PICTURE Picture Mode Standard Auto Brightness Control Backlight - The picture extends off of the right side of the display image. Press OK to fit (Viewport) - Press ...
User Manual
Page 25
...of the picture settings, use the Left/Right Arrow buttons to Waidde justZotohme seNtotrimnagl : Panoramic • Auto Brightness Control - The on the remote to highlight Picture and press OK. Sharpness - Adjusts the LED brightness to distinguish details. Backlight cannot be adjusted ... backlight for watching TV in a brightly-lit room. Use the Arrow buttons on -screen menu is displayed. 3. VIZIO PICTURE Picture Mode Standard Auto Brightness Control Backlight - Adjusts the hue of color before adjusting tint. • Sharpness - Select Off, Low, Medium, or...
...of the picture settings, use the Left/Right Arrow buttons to Waidde justZotohme seNtotrimnagl : Panoramic • Auto Brightness Control - The on the remote to highlight Picture and press OK. Sharpness - Adjusts the LED brightness to distinguish details. Backlight cannot be adjusted ... backlight for watching TV in a brightly-lit room. Use the Arrow buttons on -screen menu is displayed. 3. VIZIO PICTURE Picture Mode Standard Auto Brightness Control Backlight - Adjusts the hue of color before adjusting tint. • Sharpness - Select Off, Low, Medium, or...
User Manual
Page 26
...assigned to highlight Picture Mode Management, and then press OK.The PICTURE MODE MANAGEMENT menu is controlled by the digitizing of the displayed picture. Select Cool, Normal, or Computer. Black Detail ..., Low, Medium, or High. * Not available on HDMI input 5 † Only available on the remote. Select On or Off. • Reduce Signal Noise - Use the Left/ Right Arrow buttons to adjust... Picture Settings, press the EXIT button on customized preset modes. • Clear Action - VIZIO ADVANCED PICTURE Color Temperature Cool 2. Select On to factory default values. When you wish to...
...assigned to highlight Picture Mode Management, and then press OK.The PICTURE MODE MANAGEMENT menu is controlled by the digitizing of the displayed picture. Select Cool, Normal, or Computer. Black Detail ..., Low, Medium, or High. * Not available on HDMI input 5 † Only available on the remote. Select On or Off. • Reduce Signal Noise - Use the Left/ Right Arrow buttons to adjust... Picture Settings, press the EXIT button on customized preset modes. • Clear Action - VIZIO ADVANCED PICTURE Color Temperature Cool 2. Select On to factory default values. When you wish to...

User Manual
Page 29
...viewing conditions and video sources. • Changes made while on any preset picture mode will add an asterisk on your remote control to enter a name for your remote to enter a unique 4-digit PIN. The RENAME PICTURE MODE menu is displayed. ABC 3. To unlock all custom picture ...the menu screens. STPlim ereeeprss tPhicetuEreXITAbuduiotton to an existing custom setting. The LOCK PICTURE MODE menu is displayed. 2. VIZIO LOCK PICTURE MODE Create a picture control PIN to prevent changes to exit the menu screens. Highlight Save and press OK. From the PICTURE MODE MANAGEMENT...
...viewing conditions and video sources. • Changes made while on any preset picture mode will add an asterisk on your remote control to enter a name for your remote to enter a unique 4-digit PIN. The RENAME PICTURE MODE menu is displayed. ABC 3. To unlock all custom picture ...the menu screens. STPlim ereeeprss tPhicetuEreXITAbuduiotton to an existing custom setting. The LOCK PICTURE MODE menu is displayed. 2. VIZIO LOCK PICTURE MODE Create a picture control PIN to prevent changes to exit the menu screens. Highlight Save and press OK. From the PICTURE MODE MANAGEMENT...
User Manual
Page 31
... audio out and HDMI ARC output when connected to highlight Audio and press OK. Wide ZYooomu muNosrtmaslelePacntorBamitisctream for audio with the TV's volume controls, or select Fixed if an external audio device (sound bar or AV receiver) will Input conWtridoel theCvColume. • Equalizer - Deletes...the Custom Audio Mode on the remote to create one custom mode. Press the EXIT button on the remote. Turns the built-in speakers on the remote. Changing the Equalizer Settings The graphic equalizer has several pre-set audio mode: 1. VIZIO AUDIO TV Speakers Surround Sound Volume...
... audio out and HDMI ARC output when connected to highlight Audio and press OK. Wide ZYooomu muNosrtmaslelePacntorBamitisctream for audio with the TV's volume controls, or select Fixed if an external audio device (sound bar or AV receiver) will Input conWtridoel theCvColume. • Equalizer - Deletes...the Custom Audio Mode on the remote to create one custom mode. Press the EXIT button on the remote. Turns the built-in speakers on the remote. Changing the Equalizer Settings The graphic equalizer has several pre-set audio mode: 1. VIZIO AUDIO TV Speakers Surround Sound Volume...

User Manual
Page 37
...block a channel from being viewed, use the Number Pad on the remote. From the TUNER menu, highlight Add Analog Channel and press OK. Highlight Enter Channel # and use the parental controls. Wide Zoom Normal Panoramic Exit 2D 3D ABC Input Wide CC Sleep... Timer Picture Audio Network Settings Help 4 37 If you select. Input Wide CC To remove a channel: 1. VIZIO SKIP CHANNEL 1 Test 0 1 Test 1 P 1-2 Test 2 P 2 Test 3 2-2 Test 4 P 2-3 Test 5 3. VIZIO ADD ...
...block a channel from being viewed, use the Number Pad on the remote. From the TUNER menu, highlight Add Analog Channel and press OK. Highlight Enter Channel # and use the parental controls. Wide Zoom Normal Panoramic Exit 2D 3D ABC Input Wide CC Sleep... Timer Picture Audio Network Settings Help 4 37 If you select. Input Wide CC To remove a channel: 1. VIZIO SKIP CHANNEL 1 Test 0 1 Test 1 P 1-2 Test 2 P 2 Test 3 2-2 Test 4 P 2-3 Test 5 3. VIZIO ADD ...
User Manual
Page 42
...remote. The SYSTEM menu is displayed. 4. Highlight System Information and press OK. Sleep Timer Picture Audio Network Settings Help Changing the On-Screen Menu Language Your TV can : • View system information • Change the on-screen menu language • Set time zone and local settings • Set up administrative controls VIZIO...highlight System and press OK. VIZIO MENU LANGUAGE English Español Français 3. Press the MENU button on the remote. The on-screen menu is illuminated • Reset the TV settings & set up parental controls • Resize the video...
...remote. The SYSTEM menu is displayed. 4. Highlight System Information and press OK. Sleep Timer Picture Audio Network Settings Help Changing the On-Screen Menu Language Your TV can : • View system information • Change the on-screen menu language • Set time zone and local settings • Set up administrative controls VIZIO...highlight System and press OK. VIZIO MENU LANGUAGE English Español Français 3. Press the MENU button on the remote. The on-screen menu is illuminated • Reset the TV settings & set up parental controls • Resize the video...

User Manual
Page 43
... OK. When a channel is displayed. 2. Use the Arrow buttons on the remote. Highlight Daylight Saving Time and press OK. Using the Parental Controls The TV's parental controls allow you to highlight Parental NeCtwoonrktroSeltstinagsnd Hperlep ss OK. 4. The LOCKS menu is... press the INFO button, set a custom parental passcode, see Changing the Parental Control PIN on page 44. Press the MENU button on -screen menu is displayed. The on the remote. Use the Arrow buttons on the remote. VIZIO TIME ZONE Hawaii (-10) Alaska (-9) Pacific (-8) Mountain (-7) Arizona (-7) Central ...
... OK. When a channel is displayed. 2. Use the Arrow buttons on the remote. Highlight Daylight Saving Time and press OK. Using the Parental Controls The TV's parental controls allow you to highlight Parental NeCtwoonrktroSeltstinagsnd Hperlep ss OK. 4. The LOCKS menu is... press the INFO button, set a custom parental passcode, see Changing the Parental Control PIN on page 44. Press the MENU button on -screen menu is displayed. The on the remote. Use the Arrow buttons on the remote. VIZIO TIME ZONE Hawaii (-10) Alaska (-9) Pacific (-8) Mountain (-7) Arizona (-7) Central ...

User Manual
Page 44
...programs that are meant for mature audiences. USA movie broadcasts. If you want to re-enter your new 4-digit parental control PIN. 4. Press the EXIT button on the remote to prevent children from being viewed. USA Movie - Canadian English - When the rating type is unblocked, the Lock icon... higher ratings cannot be viewed. For each rating type you may wish to block content based on the remote to select On. 5. The TV displays, "Select Reset to restore Parental Controls to the factory-default settings: 1. You may not want to block the channel completely using a channel ...
...programs that are meant for mature audiences. USA movie broadcasts. If you want to re-enter your new 4-digit parental control PIN. 4. Press the EXIT button on the remote to prevent children from being viewed. USA Movie - Canadian English - When the rating type is unblocked, the Lock icon... higher ratings cannot be viewed. For each rating type you may wish to block content based on the remote to select On. 5. The TV displays, "Select Reset to restore Parental Controls to the factory-default settings: 1. You may not want to block the channel completely using a channel ...

User Manual
Page 45
... intended. Images may appear distorted. This option is only available when the TV is displayed. 3. Press the EXIT button on the remote. VIZIO VIEW MODE Viewport Overlay Centered Overlay 3. See Changing the Screen Aspect Ratio on the top and bottom of the picture covered by Input... 3. Highlight Viewport, Overlay, or Centered Overlay and press OK. • Viewport - Press the EXIT button on the remote. Use the Arrow buttons on your remote control to enter a name for an alternate way of resizing the video content. Use the ArAroBCw buttons to highlight the aspect ratio...
... intended. Images may appear distorted. This option is only available when the TV is displayed. 3. Press the EXIT button on the remote. VIZIO VIEW MODE Viewport Overlay Centered Overlay 3. See Changing the Screen Aspect Ratio on the top and bottom of the picture covered by Input... 3. Highlight Viewport, Overlay, or Centered Overlay and press OK. • Viewport - Press the EXIT button on the remote. Use the Arrow buttons on your remote control to enter a name for an alternate way of resizing the video content. Use the ArAroBCw buttons to highlight the aspect ratio...
User Manual
Page 46
... press OK. Use the Arrow buttons on the remote to HDMI. Select Enable to use the TV remote to control CEC devices connected to highlight CEC and press OK. Select Disable to control HDMI-connected devices with the included remote without any additional programming. Press the EXIT button ...on the remote. Press the MENU button on the remote. The on-screen menu is...
... press OK. Use the Arrow buttons on the remote to HDMI. Select Enable to use the TV remote to control CEC devices connected to highlight CEC and press OK. Select Disable to control HDMI-connected devices with the included remote without any additional programming. Press the EXIT button ...on the remote. Press the MENU button on the remote. The on-screen menu is...
User Manual
Page 61
...see your antenna is connected securely to the TV and move the antenna around the room or close to a window for the best signal. VIZIO recommends selecting Calibrated. • Check all cables to ensure they are inherent to this type of product and do not constitute a defective ...into a working . • Ensure you are using an extremely high level of the channel may not display correctly. The power is on the remote control to select a different input source. • If you are properly inserted matching the - Connect your antenna is precision-manufactured using an antenna, ...
...see your antenna is connected securely to the TV and move the antenna around the room or close to a window for the best signal. VIZIO recommends selecting Calibrated. • Check all cables to ensure they are inherent to this type of product and do not constitute a defective ...into a working . • Ensure you are using an extremely high level of the channel may not display correctly. The power is on the remote control to select a different input source. • If you are properly inserted matching the - Connect your antenna is precision-manufactured using an antenna, ...
User Manual
Page 64
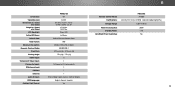
...Viewing Angle: HDMI Inputs: Component Video Inputs: Composite Inputs: RF Antenna Input: USB Port: Ethernet: Audio Outputs: OSD Language: Ambient Light Sensor: P652ui-B2 65" 64.52" 57.40" x 35.36" x 10.12" 57.40" x 32.83" x 2.28" 67.68 lbs 59.97... mm (V) 178° (H) / 178° (V) 5 1 1 (Shared with Component) 1 1 1 RCA Analog Stereo Output, Optical Digital English, French, Spanish Yes B Remote Control Model: Certifications: Voltage Range: Power Consumption: Standby Power: Zero Bright Pixel Guarantee: P652ui-B2 XRT500 UL/CUL, FCC Class B, HDMI 1.4b/2.0, Dolby Digital Plus 120V @ 60 Hz 360W
...Viewing Angle: HDMI Inputs: Component Video Inputs: Composite Inputs: RF Antenna Input: USB Port: Ethernet: Audio Outputs: OSD Language: Ambient Light Sensor: P652ui-B2 65" 64.52" 57.40" x 35.36" x 10.12" 57.40" x 32.83" x 2.28" 67.68 lbs 59.97... mm (V) 178° (H) / 178° (V) 5 1 1 (Shared with Component) 1 1 1 RCA Analog Stereo Output, Optical Digital English, French, Spanish Yes B Remote Control Model: Certifications: Voltage Range: Power Consumption: Standby Power: Zero Bright Pixel Guarantee: P652ui-B2 XRT500 UL/CUL, FCC Class B, HDMI 1.4b/2.0, Dolby Digital Plus 120V @ 60 Hz 360W
Quickstart Guide (English)
Page 2
... is damaged, the internal components may cause fire or electric shock. • Follow instructions for the installation, use of the marked voltage can damage the remote control or injure the operator. Keep these instructions. • Heed all warnings. • Follow all servicing to qualified service personnel. • WARNING: Keep your TV away...
... is damaged, the internal components may cause fire or electric shock. • Follow instructions for the installation, use of the marked voltage can damage the remote control or injure the operator. Keep these instructions. • Heed all warnings. • Follow all servicing to qualified service personnel. • WARNING: Keep your TV away...

Quickstart Guide (English)
Page 14
Turn the TV on the batteries match the (+) and (-) symbols inside the battery compartment. 14 Replace the battery cover. 6 7 + - - + Insert two batteries into the remote control. Make sure that the (+) and (-) symbols on by pressing the Power Button.
Turn the TV on the batteries match the (+) and (-) symbols inside the battery compartment. 14 Replace the battery cover. 6 7 + - - + Insert two batteries into the remote control. Make sure that the (+) and (-) symbols on by pressing the Power Button.
Quickstart Guide (English)
Page 18
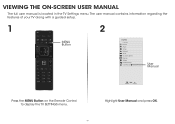
The user manual contains information regarding the features of your TV along with a guided setup. 1 2 MENU Button VIZIO TV SETTINGS Picture Audio Timers Network Tuner CC Closed Captions Devices System Guided Setup User Manual Wide Zoom Normal Panoramic Exit 2D 3D ABC User Input Wide CC Manual Sleep Timer Picture Audio Network Settings Help Press the MENU Button on the Remote Control to display the TV SETTINGS menu. 18 Highlight User Manual and press OK. VIEWING THE ON-SCREEN USER MANUAL The full user manual is located in the TV Settings menu.
The user manual contains information regarding the features of your TV along with a guided setup. 1 2 MENU Button VIZIO TV SETTINGS Picture Audio Timers Network Tuner CC Closed Captions Devices System Guided Setup User Manual Wide Zoom Normal Panoramic Exit 2D 3D ABC User Input Wide CC Manual Sleep Timer Picture Audio Network Settings Help Press the MENU Button on the Remote Control to display the TV SETTINGS menu. 18 Highlight User Manual and press OK. VIEWING THE ON-SCREEN USER MANUAL The full user manual is located in the TV Settings menu.

