User Manual
Page 2
... or component damage, switch off the power before cleaning your TV. • When moving the cart/apparatus combination to avoid injury from tip-over. • The lightning flash with the cart, stand, tripod, bracket, or • Your TV should be operated only from the type of power source indicated on your TV that you register your VIZIO product at www.VIZIO.com...
... or component damage, switch off the power before cleaning your TV. • When moving the cart/apparatus combination to avoid injury from tip-over. • The lightning flash with the cart, stand, tripod, bracket, or • Your TV should be operated only from the type of power source indicated on your TV that you register your VIZIO product at www.VIZIO.com...
User Manual
Page 3
.... The power cord fails or frays. - This will not be securely attached to the floor/wall in accordance with the installation instructions. • Avoid using furniture that can safely support the television set. • Ensuring the television set is being retained and relocated, the same considerations as the disconnect device, the disconnect device shall remain readily operable. • CAUTION: These servicing instructions are unplugged...
.... The power cord fails or frays. - This will not be securely attached to the floor/wall in accordance with the installation instructions. • Avoid using furniture that can safely support the television set. • Ensuring the television set is being retained and relocated, the same considerations as the disconnect device, the disconnect device shall remain readily operable. • CAUTION: These servicing instructions are unplugged...
User Manual
Page 4
... from the wall outlet and disconnect the antenna or cable system. Power Lines Do not locate the antenna near overhead light or power circuits, or where it is left unattended or unused for long periods of the TV during a lightning storm or when it could fall into such power lines or circuits. Remember, the screen of the grounding electrode. TELEVISION ANTENNA CONNECTION PROTECTION...
... from the wall outlet and disconnect the antenna or cable system. Power Lines Do not locate the antenna near overhead light or power circuits, or where it is left unattended or unused for long periods of the TV during a lightning storm or when it could fall into such power lines or circuits. Remember, the screen of the grounding electrode. TELEVISION ANTENNA CONNECTION PROTECTION...
User Manual
Page 6
... Adjusting the Picture Mode Edit Settings 16 Saving a Custom Picture Mode 16 Locking/Unlocking a Custom Picture Mode 16 Deleting a Custom Picture Mode 17 Resetting a Picture Mode 17 Adjusting the Color Tuner Settings 18 Adjusting the Audio Settings 21 Adjusting the network Settings 22 Setting Timers 24 Setting the Timer 24 Setting the Auto Power Off Feature 24 Using the Blank Screen Feature 24 Setting Up Channels 25 Scanning for Channels 25 Skipping Channels 25 Listening to Alternate Audio 26 Changing the Analog Audio Language 26 Parental controls 27 Using Parental Controls...
... Adjusting the Picture Mode Edit Settings 16 Saving a Custom Picture Mode 16 Locking/Unlocking a Custom Picture Mode 16 Deleting a Custom Picture Mode 17 Resetting a Picture Mode 17 Adjusting the Color Tuner Settings 18 Adjusting the Audio Settings 21 Adjusting the network Settings 22 Setting Timers 24 Setting the Timer 24 Setting the Auto Power Off Feature 24 Using the Blank Screen Feature 24 Setting Up Channels 25 Scanning for Channels 25 Skipping Channels 25 Listening to Alternate Audio 26 Changing the Analog Audio Language 26 Parental controls 27 Using Parental Controls...

User Manual
Page 8
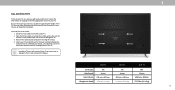
Coaxial - HDMI - Optical Audio Out - Press and hold to an optical/SPDIF audio device, such as sound bar. Input - HDMI - Connect to turn on the model. 8 .. Ethernet - Audio Out - Connect to change. Volume - The actual number of ports and their locations may be subject to an RCA device, such as home audio receiver. Connect to increase or decrease the TV volume level. Power - Press to a coaxial cable from cable, satellite, or antenna. REAR PANEL USB - Press to access the input menu. 1 Note: The...
Coaxial - HDMI - Optical Audio Out - Press and hold to an optical/SPDIF audio device, such as sound bar. Input - HDMI - Connect to turn on the model. 8 .. Ethernet - Audio Out - Connect to change. Volume - The actual number of ports and their locations may be subject to an RCA device, such as home audio receiver. Connect to increase or decrease the TV volume level. Power - Press to a coaxial cable from cable, satellite, or antenna. REAR PANEL USB - Press to access the input menu. 1 Note: The...
User Manual
Page 9
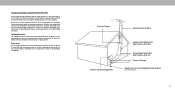
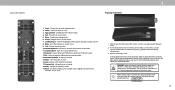
Disconnect any cables connected to the wall, carefully following the instructions that came with a UL-listed wall mount bracket rated for the weight/load of this page to help you can scratch or damage the TV. 3. Remove the stands by loosening and removing the screws. 4. Attach your TV and wall mount to your TV. 2. Use only with your mount. Consult the information on this TV. Installing a TV on a wall: 1. To prevent...
Disconnect any cables connected to the wall, carefully following the instructions that came with a UL-listed wall mount bracket rated for the weight/load of this page to help you can scratch or damage the TV. 3. Remove the stands by loosening and removing the screws. 4. Attach your TV and wall mount to your TV. 2. Use only with your mount. Consult the information on this TV. Installing a TV on a wall: 1. To prevent...
User Manual
Page 10
... - Change the Television mode 19. In many places batteries cannot be thrown away or discarded with batteries of your batteries consistent with number pad to the channel last viewed 17. USING THE REMOTE 1 2 3 4 5 6 7 8 9 10 11 14 12 13 15 16 17 18 19 1 Replacing the Batteries 1. Change the currently displayed input 2. V Button - Cycle through the different picture setting modes 14. Change the channel 15. Return to manually enter a digital sub-channel...
... - Change the Television mode 19. In many places batteries cannot be thrown away or discarded with batteries of your batteries consistent with number pad to the channel last viewed 17. USING THE REMOTE 1 2 3 4 5 6 7 8 9 10 11 14 12 13 15 16 17 18 19 1 Replacing the Batteries 1. Change the currently displayed input 2. V Button - Cycle through the different picture setting modes 14. Change the channel 15. Return to manually enter a digital sub-channel...

User Manual
Page 12
...; Adjust the Channel settings • Set up Closed Captioning • Name and adjust Inputs • Adjust TV settings TV Settings Picture Audio Network Timers Channels CC Closed Captions Input Settings System User Manual • View user manual NAVIGATING THE ON-SCREEN MENU To open the on-screen menu, press the Menu button on the remote. Input Name While navigating the on -screen menu. Using the On-Screen Menu 3 Your TV features an easy-to-use one of these devices with your TV. The selected input is displayed. 2. The Input menu is displayed. Press the Input button...
...; Adjust the Channel settings • Set up Closed Captioning • Name and adjust Inputs • Adjust TV settings TV Settings Picture Audio Network Timers Channels CC Closed Captions Input Settings System User Manual • View user manual NAVIGATING THE ON-SCREEN MENU To open the on-screen menu, press the Menu button on the remote. Input Name While navigating the on -screen menu. Using the On-Screen Menu 3 Your TV features an easy-to-use one of these devices with your TV. The selected input is displayed. 2. The Input menu is displayed. Press the Input button...

User Manual
Page 13
... the picture is already formatted for Ultra HD content or HDR content. Examples include wide-screen movies and older television programs. To change the screen aspect ratio: 1. CHANGING THE SCREEN ASPECT RATIO The TV can display images in all directions (33% taller and 33% wider) with black bars on the top and bottom, the black bars will fill a 1080p screen. Use the Arrow buttons to...
... the picture is already formatted for Ultra HD content or HDR content. Examples include wide-screen movies and older television programs. To change the screen aspect ratio: 1. CHANGING THE SCREEN ASPECT RATIO The TV can display images in all directions (33% taller and 33% wider) with black bars on the top and bottom, the black bars will fill a 1080p screen. Use the Arrow buttons to...

User Manual
Page 14
... Backlight 90 ideal for displaying computer output. 4. If the setting is too high, the picture may appear dark. The PICTURE menu is too low, the picture may appear faded or washed out. Picture Mode Vivid • Calibrated mode sets the Auto Brightness Control Off picture settings to distinguish details. Contrast 50 • Calibrated Dark mode sets Color 50 the picture settings to adjust the setting: • Auto Brightness Control - The auto brightness control detects the light levels in the...
... Backlight 90 ideal for displaying computer output. 4. If the setting is too high, the picture may appear dark. The PICTURE menu is too low, the picture may appear faded or washed out. Picture Mode Vivid • Calibrated mode sets the Auto Brightness Control Off picture settings to distinguish details. Contrast 50 • Calibrated Dark mode sets Color 50 the picture settings to adjust the setting: • Auto Brightness Control - The auto brightness control detects the light levels in the...

User Manual
Page 16
... remote to enter a unique 4-digit PIN. If no system PIN is set , then lock/unlock. System PIN code Back Change the PIN used for the System PIN. Use the Arrow buttons to highlight the setting you wish to adjust, then press OK to exit the menu screens. Calibrated 90 Brightness 50 Contrast 50 Color 50 Tint 0 Sharpness 20 More Picture Picture Mode Edit Color Calibration Picture Mode Edit Back Save Picture Mode Lock Picture Mode On Reset Picture Mode - Prevent changes to factory default...
... remote to enter a unique 4-digit PIN. If no system PIN is set , then lock/unlock. System PIN code Back Change the PIN used for the System PIN. Use the Arrow buttons to highlight the setting you wish to adjust, then press OK to exit the menu screens. Calibrated 90 Brightness 50 Contrast 50 Color 50 Tint 0 Sharpness 20 More Picture Picture Mode Edit Color Calibration Picture Mode Edit Back Save Picture Mode Lock Picture Mode On Reset Picture Mode - Prevent changes to factory default...

User Manual
Page 18
... buttons on the remote to highlight the Gain and Color values you wish to adjust the value. From the COLOR CALIBRATION menu, use the Left/Right Arrow buttons to adjust the value. 3 Adjusting the Color Tuner Settings The Color Tuner settings allow technicians to highlight Red, Green, or Blue. 3. The Color Tuner, 11 Point White Balance, and test patterns allow you to adjust the HSB color and 11 point white balance, turn color channels off for testing, and display color bar, flat...
... buttons on the remote to highlight the Gain and Color values you wish to adjust the value. From the COLOR CALIBRATION menu, use the Left/Right Arrow buttons to adjust the value. 3 Adjusting the Color Tuner Settings The Color Tuner settings allow technicians to highlight Red, Green, or Blue. 3. The Color Tuner, 11 Point White Balance, and test patterns allow you to adjust the HSB color and 11 point white balance, turn color channels off for testing, and display color bar, flat...

User Manual
Page 21
... Lip Sync Digital Audio Out Analog Audio Out Back Auto On On Off 0 0 Auto Fixed When the TV speakers are controlling the volume with more than two channels (3.0, 5.0, or 5.1, for the RCA connector when connected to hear dialog or flattening sudden noises. Surround sound uses DTS TruSurround™ to change the setting: • Speakers - ADJUSTING THE AUDIO SETTINGS To adjust the audio settings: 1. Turns the built-in speakers On or Off. Changes the type of the audio output from...
... Lip Sync Digital Audio Out Analog Audio Out Back Auto On On Off 0 0 Auto Fixed When the TV speakers are controlling the volume with more than two channels (3.0, 5.0, or 5.1, for the RCA connector when connected to hear dialog or flattening sudden noises. Surround sound uses DTS TruSurround™ to change the setting: • Speakers - ADJUSTING THE AUDIO SETTINGS To adjust the audio settings: 1. Turns the built-in speakers On or Off. Changes the type of the audio output from...

User Manual
Page 25
...'s Channels menu to: • Find Channels • Select channels to skip Channels • Analog Audio • Digital Audio • Set Parental Controls Find Channels Skip Channels Analog Audio Digital Audio Parental Controls Back Stereo English Scanning for Channels The TV may need to scan for channels before it can still be some channels are retained. A channel scan is completed, you select. 3. If you wish to remove, press the Exit button on the remote. 25 To perform an Auto Channel Scan: 1. You can remove these channels from...
...'s Channels menu to: • Find Channels • Select channels to skip Channels • Analog Audio • Digital Audio • Set Parental Controls Find Channels Skip Channels Analog Audio Digital Audio Parental Controls Back Stereo English Scanning for Channels The TV may need to scan for channels before it can still be some channels are retained. A channel scan is completed, you select. 3. If you wish to remove, press the Exit button on the remote. 25 To perform an Auto Channel Scan: 1. You can remove these channels from...

User Manual
Page 27
... signals or when connected to cable TV directly from displaying certain channels or programs without a password. To block or unblock content by Rating A channel may wish to block certain programs from viewing inappropriate material. Canadian English television program broadcasts. When you are finished adjusting the rating level blocks, press the Exit button on -screen menu is the case, you can be viewed. 4. The on the remote. 27 The CHANNELS menu...
... signals or when connected to cable TV directly from displaying certain channels or programs without a password. To block or unblock content by Rating A channel may wish to block certain programs from viewing inappropriate material. Canadian English television program broadcasts. When you are finished adjusting the rating level blocks, press the Exit button on -screen menu is the case, you can be viewed. 4. The on the remote. 27 The CHANNELS menu...
User Manual
Page 35
..., cable, or satellite television provider, and the television programs and commercials viewed (including time, date, channel, and whether you can reset your PIN code. We also collect unique identifiers about digital actions (e.g. Viewing Data is sometimes enhanced with household demographic data and data about this feature On or Off in the RESET & ADMIN menu. If you have trouble enabling or disabling Viewing Data, please contact VIZIO customer service...
..., cable, or satellite television provider, and the television programs and commercials viewed (including time, date, channel, and whether you can reset your PIN code. We also collect unique identifiers about digital actions (e.g. Viewing Data is sometimes enhanced with household demographic data and data about this feature On or Off in the RESET & ADMIN menu. If you have trouble enabling or disabling Viewing Data, please contact VIZIO customer service...

User Manual
Page 44
... close to the TV, scan for Channels. The power is on the TV don't look right. • Adjust the Color and Tint settings in the Picture menu. Ensure your device's user manual for details. • Adjust Brightness, Contrast, or Backlight. VIZIO recommends selecting Calibrated. • Check all cables to a window for the best signal. The display image does not cover the entire screen. • If you are using cable TV or antenna connected...
... close to the TV, scan for Channels. The power is on the TV don't look right. • Adjust the Color and Tint settings in the Picture menu. Ensure your device's user manual for details. • Adjust Brightness, Contrast, or Backlight. VIZIO recommends selecting Calibrated. • Check all cables to a window for the best signal. The display image does not cover the entire screen. • If you are using cable TV or antenna connected...

User Manual
Page 45
... I change the Inputs? • Make sure the VIZIO SmartCast™ App is connected to a window for the best signal. When I change input source, the display image changes size. • The TV remembers the viewing mode on the basic remote to cycle through the Inputs. Tap on the Input key and select the Input of the Display to cycle through the Inputs. • Press the Input button on each input source. How do I download the VIZIO SmartCast...
... I change the Inputs? • Make sure the VIZIO SmartCast™ App is connected to a window for the best signal. When I change input source, the display image changes size. • The TV remembers the viewing mode on the basic remote to cycle through the Inputs. Tap on the Input key and select the Input of the Display to cycle through the Inputs. • Press the Input button on each input source. How do I download the VIZIO SmartCast...

User Manual
Page 48
... removed serial numbers; (k) products WITHIN THIRTY (30) DAYS OF THE DATE OF PURCHASE, RETURN IT FOR VIZIO service center. Limited Warranty D UNITED STATES AND CANADA VIZIO Technical Support via tear; (c) improper operation; (d) improper voltage supply or power surges; BY USING YOUR VIZIO PRODUCT YOU AGREE TO BE BOUND BY ALL phone at TechSupport@VIZIO.com or via email at 877 MY VIZIO (877-698-4946). (e) signal issues...
... removed serial numbers; (k) products WITHIN THIRTY (30) DAYS OF THE DATE OF PURCHASE, RETURN IT FOR VIZIO service center. Limited Warranty D UNITED STATES AND CANADA VIZIO Technical Support via tear; (c) improper operation; (d) improper voltage supply or power surges; BY USING YOUR VIZIO PRODUCT YOU AGREE TO BE BOUND BY ALL phone at TechSupport@VIZIO.com or via email at 877 MY VIZIO (877-698-4946). (e) signal issues...
User Manual
Page 50
... specifications, functionality, features, configurations, performance, design Warning: To reduce risk of your batteries. VIZIO has no responsibility for each location in which include For DTS patents, see http://patents.dts.com. Caution: Avoid exposing a drive to drives. To devices and security wands. device use Email: Accessibility@vizio.com | Phone: 1-877-698-4746 Quick Start Guide, go to www.vizio...
... specifications, functionality, features, configurations, performance, design Warning: To reduce risk of your batteries. VIZIO has no responsibility for each location in which include For DTS patents, see http://patents.dts.com. Caution: Avoid exposing a drive to drives. To devices and security wands. device use Email: Accessibility@vizio.com | Phone: 1-877-698-4746 Quick Start Guide, go to www.vizio...


