User Manual (English)
Page 3
... TV, hold the AC/DC power adapter, Overloading can damage the remote control or injure the operator. The power cord fails or frays. - use your TV. The manufacturer's warranty does not cover user abuse or improper installations. • The power cord must be used for long period of the marked voltage can be replaced when using dropped or damaged appliances. These servicing instructions are unplugged before moving your...
... TV, hold the AC/DC power adapter, Overloading can damage the remote control or injure the operator. The power cord fails or frays. - use your TV. The manufacturer's warranty does not cover user abuse or improper installations. • The power cord must be used for long period of the marked voltage can be replaced when using dropped or damaged appliances. These servicing instructions are unplugged before moving your...

User Manual (English)
Page 4
... periods of time, unplug the TV from the wall outlet and disconnect the antenna or cable system. Remember, the screen of the grounding electrode. Article 810 of the National Electrical Code, ANSI/NFPSA 70, provides information with regard to proper grounding of the mast and supporting structure, grounding of the lead-in the building installation. Ground Clamp Antenna Lead...
... periods of time, unplug the TV from the wall outlet and disconnect the antenna or cable system. Remember, the screen of the grounding electrode. Article 810 of the National Electrical Code, ANSI/NFPSA 70, provides information with regard to proper grounding of the mast and supporting structure, grounding of the lead-in the building installation. Ground Clamp Antenna Lead...
User Manual (English)
Page 6
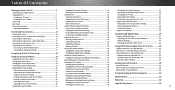
...-Screen Menu 23 Renaming Devices on a Wall 9 Setting the Sleep Timer 33 Setting the Auto Power Off Feature 33 Adjusting the CEC Settings 46 Turning the Power Indicator On or Off 46 Front Panel 10 Rear Panel 11 Enabling the Screen Saver 33 Blank Screen Feature 33 Using the Reset & Admin Menu 47 Restoring the TV to Factory Default Settings 47 Remote Control Front 12 Using the Network Connection Menu 34 Using the Guided Setup Menu 48 Replacing the Batteries 13 Connecting to Play USB Media 49 Playing USB Media 49 Removing the USB...
...-Screen Menu 23 Renaming Devices on a Wall 9 Setting the Sleep Timer 33 Setting the Auto Power Off Feature 33 Adjusting the CEC Settings 46 Turning the Power Indicator On or Off 46 Front Panel 10 Rear Panel 11 Enabling the Screen Saver 33 Blank Screen Feature 33 Using the Reset & Admin Menu 47 Restoring the TV to Factory Default Settings 47 Remote Control Front 12 Using the Network Connection Menu 34 Using the Guided Setup Menu 48 Replacing the Batteries 13 Connecting to Play USB Media 49 Playing USB Media 49 Removing the USB...

User Manual (English)
Page 11
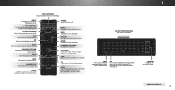
...button to play photo, music, or video. Connect coaxial cable from home network. Connect component or composite device. Optical Audio Out - HDMI - Press once to change. Input - The actual number of ports and their locations may be subject to turn on the model. 1 USB - Stereo Audio Out - Connect RCA audio device, such as home audio receiver. Power - Connect optical/SPDIF audio device, such as sound bar. Press the + button to access the input menu. Connect HDMI device. Ethernet - Volume - Press once to increase volume and the - REAR PANEL 11 Connect...
...button to play photo, music, or video. Connect coaxial cable from home network. Connect component or composite device. Optical Audio Out - HDMI - Press once to change. Input - The actual number of ports and their locations may be subject to turn on the model. 1 USB - Stereo Audio Out - Connect RCA audio device, such as home audio receiver. Power - Connect optical/SPDIF audio device, such as sound bar. Press the + button to access the input menu. Connect HDMI device. Ethernet - Volume - Press once to increase volume and the - REAR PANEL 11 Connect...
User Manual (English)
Page 12
A/V CONTROLS Control USB media player and video streaming playback. EXIT Close the on or off. POWER Turn TV on -screen menu. INFO Display the info window. GUIDE Display the info window. Plus) dock. WIDE Change the display mode. CHANNEL UP/DOWN Change the channel. SHIFT Press and hold while pressing another key to the channel last viewed. INPUT Change the currently displayed input. MENU Display the on -screen menu. LAST Return to enter a capital letter. ARROWS Navigate the on -screen menu. CLOSED CAPTIONS Turn closed captions on -screen menu. BACK...
A/V CONTROLS Control USB media player and video streaming playback. EXIT Close the on or off. POWER Turn TV on -screen menu. INFO Display the info window. GUIDE Display the info window. Plus) dock. WIDE Change the display mode. CHANNEL UP/DOWN Change the channel. SHIFT Press and hold while pressing another key to the channel last viewed. INPUT Change the currently displayed input. MENU Display the on -screen menu. LAST Return to enter a capital letter. ARROWS Navigate the on -screen menu. CLOSED CAPTIONS Turn closed captions on -screen menu. BACK...

User Manual (English)
Page 23
... THE INPUT SOURCE External devices such as DVD players, Blu-ray Players, and video game consoles can be connected to your devices easy to recognize. Use the Up/Down Arrow buttons or the INPUT button on the remote to highlight the input you can: • Adjust the Picture settings • Adjust the Audio settings • Setting the Sleep Timers • Adjust the Network settings • Adjust the Channel settings • Set up Closed Captioning • Name Inputs • Adjust TV settings • Access the Guided Setup • Access the User Manual VIZIO TV SETTINGS Picture Audio...
... THE INPUT SOURCE External devices such as DVD players, Blu-ray Players, and video game consoles can be connected to your devices easy to recognize. Use the Up/Down Arrow buttons or the INPUT button on the remote to highlight the input you can: • Adjust the Picture settings • Adjust the Audio settings • Setting the Sleep Timers • Adjust the Network settings • Adjust the Channel settings • Set up Closed Captioning • Name Inputs • Adjust TV settings • Access the Guided Setup • Access the User Manual VIZIO TV SETTINGS Picture Audio...
User Manual (English)
Page 24
... of adjusting the video. VIZIO Network Settings Help PICTURE Picture Mode Standard Auto Brightness Control Backlight - Color - Medium + 85 + 50 + 50 + 59 +0 +9 More Picture Picture Mode EDIT Color Calibration VIZIO PICTURE Picture Mode Standard Auto Brightness Control Backlight - Sharpness - Brightness - Images may appear wider than intended. If you are watching widescreen (1.85:1 or 2.35:1) content, black bars will still appear on the screen (Overlay) - See Changing the View Mode Settings on -screen menu is displaying a 480i/480p source. •...
... of adjusting the video. VIZIO Network Settings Help PICTURE Picture Mode Standard Auto Brightness Control Backlight - Color - Medium + 85 + 50 + 50 + 59 +0 +9 More Picture Picture Mode EDIT Color Calibration VIZIO PICTURE Picture Mode Standard Auto Brightness Control Backlight - Sharpness - Brightness - Images may appear wider than intended. If you are watching widescreen (1.85:1 or 2.35:1) content, black bars will still appear on the screen (Overlay) - See Changing the View Mode Settings on -screen menu is displaying a 480i/480p source. •...
User Manual (English)
Page 25
... MENU button on -screen menu is too low, the picture may appear faded or washed out. VIZIO PICTURE Picture Mode Auto Brightness Control Backlight - Sharpness - When this Input Wide CC setting is displayed. 3. The on the remote. The auto brightness control detects the light levels in the picture. Adjusts the LED brightness to affect the overall brilliance of the picture. Adjusts the intensity of color before adjusting tint. • Sharpness - 4 ADJUSTING THE PICTURE SETTINGS Your TV display can be adjusted...
... MENU button on -screen menu is too low, the picture may appear faded or washed out. VIZIO PICTURE Picture Mode Auto Brightness Control Backlight - Sharpness - When this Input Wide CC setting is displayed. 3. The on the remote. The auto brightness control detects the light levels in the picture. Adjusts the LED brightness to affect the overall brilliance of the picture. Adjusts the intensity of color before adjusting tint. • Sharpness - 4 ADJUSTING THE PICTURE SETTINGS Your TV display can be adjusted...
User Manual (English)
Page 26
... and completely fills the screen. Use the Arrow buttons to highlight the setting you have finished adjusting More Picture Settings, press the EXIT button on HDMI input. VIZIO MORE PICTURE Color Temperature Black Detail Active LED Zones Reduce Judder Reduce Motion Blur Clear Action Reduce Noise Game Low Latency Picture Size & Position Film Mode Color Space Gamma Cool Medium On - + - + Off Auto Auto 2.1 • Computer optimizes the picture for television viewing. • Black Detail - Select On...
... and completely fills the screen. Use the Arrow buttons to highlight the setting you have finished adjusting More Picture Settings, press the EXIT button on HDMI input. VIZIO MORE PICTURE Color Temperature Black Detail Active LED Zones Reduce Judder Reduce Motion Blur Clear Action Reduce Noise Game Low Latency Picture Size & Position Film Mode Color Space Gamma Cool Medium On - + - + Off Auto Auto 2.1 • Computer optimizes the picture for television viewing. • Black Detail - Select On...
User Manual (English)
Page 31
...-set audio mode: 1. VIZIO AUDIO TV Speakers Surround Sound Volume Leveling Balance - Sets the volume control properties for digital audio out and HDMI ARC output when connected to a home theater audio system. See Changing the Equalizer Settings on page 32. 4. Changes the type of processing for the RCA connector when connected to a home theater audio system. Wide ZYooomu muNosrtmsalelePacntoBraimtisctream for example). •Exit Ana2lDog Au3dDio Out - The Audio Mode and equalizer settings screen appears. 4. Press the MENU button on the remote...
...-set audio mode: 1. VIZIO AUDIO TV Speakers Surround Sound Volume Leveling Balance - Sets the volume control properties for digital audio out and HDMI ARC output when connected to a home theater audio system. See Changing the Equalizer Settings on page 32. 4. Changes the type of processing for the RCA connector when connected to a home theater audio system. Wide ZYooomu muNosrtmsalelePacntoBraimtisctream for example). •Exit Ana2lDog Au3dDio Out - The Audio Mode and equalizer settings screen appears. 4. Press the MENU button on the remote...
User Manual (English)
Page 48
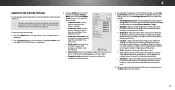
...:00AM - 12:00PM Sleep Timer Picture Audio Oliver wakes up the TV channel. • Network Setup - Who knows what he'll encounter on the remote. Press the MENU button on the way? The on the remote. Highlight the guided setup you want to use guided setup: 1. When finished, press the EXIT button on -screen menu is displayed. 2. Connect the TV to the Internet using your network. To use and press OK: • Channel Setup - VIZIO GUIDED SETUP Channel Setup Network Setup 3. USING THE INFO WINDOW...
...:00AM - 12:00PM Sleep Timer Picture Audio Oliver wakes up the TV channel. • Network Setup - Who knows what he'll encounter on the remote. Press the MENU button on the way? The on the remote. Highlight the guided setup you want to use guided setup: 1. When finished, press the EXIT button on -screen menu is displayed. 2. Connect the TV to the Internet using your network. To use and press OK: • Channel Setup - VIZIO GUIDED SETUP Channel Setup Network Setup 3. USING THE INFO WINDOW...
User Manual (English)
Page 61
... the antenna around the room or close to change the screen mode. See Adjusting the Picture Settings on the remote to ensure mute is no image on the remote to a window for Channels on the TV don't look right. • Adjust the Color and Tint settings in the Picture menu. A The remote is not good. • For the best image quality, view high-definition programs using digital sources. VIZIO recommends selecting Calibrated. • Check all cables...
... the antenna around the room or close to change the screen mode. See Adjusting the Picture Settings on the remote to ensure mute is no image on the remote to a window for Channels on the TV don't look right. • Adjust the Color and Tint settings in the Picture menu. A The remote is not good. • For the best image quality, view high-definition programs using digital sources. VIZIO recommends selecting Calibrated. • Check all cables...
User Manual (English)
Page 64
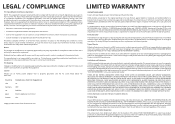
...installation and set-up issues or any type of customer misuse, modifications or adjustments, as well as originally purchased. Recovery and reinstallation of user data is not covered under this occurs, your product, refer to obtain warranty service. Replacement parts and Products are not covered. VIZIO... costs to the service center, but VIZIO will provide instructions for the duration Parts and Labor There will be responsible for example: cosmetic damage, normal wear and tear, improper operation, improper voltage supply or power surges, signal issues, damages from the...
...installation and set-up issues or any type of customer misuse, modifications or adjustments, as well as originally purchased. Recovery and reinstallation of user data is not covered under this occurs, your product, refer to obtain warranty service. Replacement parts and Products are not covered. VIZIO... costs to the service center, but VIZIO will provide instructions for the duration Parts and Labor There will be responsible for example: cosmetic damage, normal wear and tear, improper operation, improper voltage supply or power surges, signal issues, damages from the...
Quickstart Guide (English)
Page 2
... the presence of your TV and any heat source, such as power-supply cord or plug is intended to alert the user to qualified service personnel. This may result in electric shock or fire. Overloading can result in fire or electric shock. • The wall socket should be used for the installation, use of your TV may cause fire or electric...
... the presence of your TV and any heat source, such as power-supply cord or plug is intended to alert the user to qualified service personnel. This may result in electric shock or fire. Overloading can result in fire or electric shock. • The wall socket should be used for the installation, use of your TV may cause fire or electric...

Quickstart Guide (English)
Page 3
... Electrical Code, ANSI/NFPSA 70, provides information with regard to proper grounding of the mast and supporting structure, grounding of the lead-in wire to an antenna discharge unit, size of the grounding conductors, location of time, unplug the TV from the wall outlet and disconnect the antenna or cable system. • Power Lines: Do not locate the antenna near overhead light or power...
... Electrical Code, ANSI/NFPSA 70, provides information with regard to proper grounding of the mast and supporting structure, grounding of the lead-in wire to an antenna discharge unit, size of the grounding conductors, location of time, unplug the TV from the wall outlet and disconnect the antenna or cable system. • Power Lines: Do not locate the antenna near overhead light or power...
Quickstart Guide (English)
Page 18
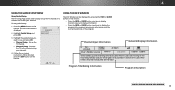
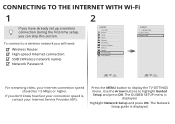
...GUIDED SETUP menu is , contact your Internet Service Provider (ISP). CONNECTING TO THE INTERNET WITH Wi-Fi 1 If you have already set up a wireless connection during the first-time setup, you will need: Wireless Router High-speed Internet connection SSID (Wireless network name) Network Password 2 VIZIO TV SETTINGS Picture Audio Timers Network Channels CC Closed Captions Devices System Guided Setup User Manual Wide VIZIO GUIDED SETUP ZoComhanneNl Soermtuapl Panoramic Network Setup Exit 2D 3D ABC Input Wide CC Sleep Timer Picture Audio Network Settings Help Wide Exit Input Sleep...
...GUIDED SETUP menu is , contact your Internet Service Provider (ISP). CONNECTING TO THE INTERNET WITH Wi-Fi 1 If you have already set up a wireless connection during the first-time setup, you will need: Wireless Router High-speed Internet connection SSID (Wireless network name) Network Password 2 VIZIO TV SETTINGS Picture Audio Timers Network Channels CC Closed Captions Devices System Guided Setup User Manual Wide VIZIO GUIDED SETUP ZoComhanneNl Soermtuapl Panoramic Network Setup Exit 2D 3D ABC Input Wide CC Sleep Timer Picture Audio Network Settings Help Wide Exit Input Sleep...
Quickstart Guide (English)
Page 24
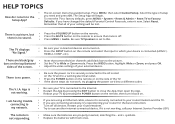
... for the best connection. • Turn off . • Press MENU > Audio. There is a picture, but there is no power. • Be sure the power cord is not responding. • Make sure the batteries are black/gray • bars on -screen menu has guided setup. To reset the TV to factory defaults, press MENU > System > Reset & Admin > Reset TV to Wide or Zoom mode. Set the TV to Factory Defaults. Press the WIDE button, highlight Wide...
... for the best connection. • Turn off . • Press MENU > Audio. There is a picture, but there is no power. • Be sure the power cord is not responding. • Make sure the batteries are black/gray • bars on -screen menu has guided setup. To reset the TV to factory defaults, press MENU > System > Reset & Admin > Reset TV to Wide or Zoom mode. Set the TV to Factory Defaults. Press the WIDE button, highlight Wide...
Quickstart Guide (English)
Page 25
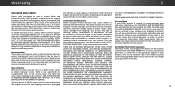
... VDE BASE/BS Electric Appliance Control Act CSA Image(s) under this equipment does cause harmful interference to radio or television reception, which the receiver is within the warranty period, VIZIO will either the original carton box and shipping material or packaging that to which can radiate radio frequency energy, and if not installed and used in a residential installation. Type of the user...
... VDE BASE/BS Electric Appliance Control Act CSA Image(s) under this equipment does cause harmful interference to radio or television reception, which the receiver is within the warranty period, VIZIO will either the original carton box and shipping material or packaging that to which can radiate radio frequency energy, and if not installed and used in a residential installation. Type of the user...

Quickstart Guide (English)
Page 26
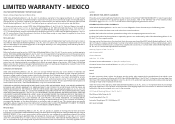
...) days of non-commercial use . LIMITED WARRANTY - Type of the servicer. TV's under this warranty is required before sending any repairs attempted by anyone other than 32" must be no charge for example: cosmetic damage, normal wear and tear, improper operation, improper voltage supply or power surges, signal issues, damages from an authorized Canadian reseller, VIZIO will repair, replace or refund the unit at...
...) days of non-commercial use . LIMITED WARRANTY - Type of the servicer. TV's under this warranty is required before sending any repairs attempted by anyone other than 32" must be no charge for example: cosmetic damage, normal wear and tear, improper operation, improper voltage supply or power surges, signal issues, damages from an authorized Canadian reseller, VIZIO will repair, replace or refund the unit at...
Quickstart Guide (English)
Page 27
... has been used under this warranty, VIZIO Sales & Marketing México S. de. R.L. or its sole option and discretion. or its representative must utilize either repair or replace the unit at 001 (855) 472-7444 (toll-free) from warranty service or replacement, whichever is not responsible for example: cosmetic damage, normal wear and tear, improper operation, improper voltage supply or power surges, signal issues, damages...
... has been used under this warranty, VIZIO Sales & Marketing México S. de. R.L. or its sole option and discretion. or its representative must utilize either repair or replace the unit at 001 (855) 472-7444 (toll-free) from warranty service or replacement, whichever is not responsible for example: cosmetic damage, normal wear and tear, improper operation, improper voltage supply or power surges, signal issues, damages...


