M320SL User Manua
Page 8
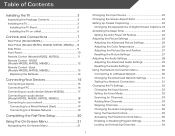
...14 Connecting Your Devices 15 Connecting A Device 15 Connecting A PC 16 Connecting an audio device (Model M320SL 17 Connecting an audio device (Model M370SL, M420SL, M470SL, M550SL 18 Connecting to your network 19 Connecting to a Wired Network (Best 19 Connecting to ...the TV on a Wall 5 Controls and Connections 7 Rear Panel (Model M320SL 7 Rear Panel (Models M370SL, M420SL, M470SL, M550SL)..... 8 Side Panel 9 Front Panel 10 Remote Control (Models M320SL, M370SL 11 Remote Control - FRONT (Models M420SL, M470SL, M550SL 12 Remote Control - Table of Digital Closed Captions.. 23 ...
...14 Connecting Your Devices 15 Connecting A Device 15 Connecting A PC 16 Connecting an audio device (Model M320SL 17 Connecting an audio device (Model M370SL, M420SL, M470SL, M550SL 18 Connecting to your network 19 Connecting to a Wired Network (Best 19 Connecting to ...the TV on a Wall 5 Controls and Connections 7 Rear Panel (Model M320SL 7 Rear Panel (Models M370SL, M420SL, M470SL, M550SL)..... 8 Side Panel 9 Front Panel 10 Remote Control (Models M320SL, M370SL 11 Remote Control - FRONT (Models M420SL, M470SL, M550SL 12 Remote Control - Table of Digital Closed Captions.. 23 ...
M320SL User Manua
Page 10
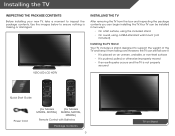
...you can still fall over . Use the images below to ensure nothing is not properly secured Quick Start Guide Power Cord (For Models M320SL, M370SL) (For Models M420SL, M470SL, M550SL) Remote Control with Batteries Package Contents 3 TV on an uneven, unstable, or non-level surface • It is pushed... wall, using a VESA-standard wall mount (not included) Installing the TV Stand Your TV includes a stand designed to inspect the package contents. VIZIO LED LCD HDTV Installing the TV After removing the TV from falling over if: • It is placed on Stand However, the TV can...
...you can still fall over . Use the images below to ensure nothing is not properly secured Quick Start Guide Power Cord (For Models M320SL, M370SL) (For Models M420SL, M470SL, M550SL) Remote Control with Batteries Package Contents 3 TV on an uneven, unstable, or non-level surface • It is pushed... wall, using a VESA-standard wall mount (not included) Installing the TV Stand Your TV includes a stand designed to inspect the package contents. VIZIO LED LCD HDTV Installing the TV After removing the TV from falling over if: • It is placed on Stand However, the TV can...
M320SL User Manua
Page 12
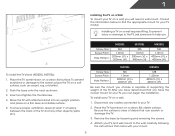
...0mm 200mm (V) x 200mm (H) M370SL M6 1.0mm 200mm (V) x 400mm (H) M420SL M6 1.0mm 400mm (V) x 400mm (H) To install the TV stand (M320SL, M370SL): 1. M470SL M550SL Screw Size: Screw Pitch: Hole Pattern: M6 1.0mm 400mm (V) x 400mm (H) M8 1.25mm 400mm (V) x 400mm (H) Be sure the mount you . Consult the ...wall, carefully following the instructions that can begin the installation. After you have determined that you have the correct mount for your TV model: Installing a TV on a wall requires lifting. Insert and tighten the thumbscrew. 4. To ensure proper ventilation, leave at least ...
...0mm 200mm (V) x 200mm (H) M370SL M6 1.0mm 200mm (V) x 400mm (H) M420SL M6 1.0mm 400mm (V) x 400mm (H) To install the TV stand (M320SL, M370SL): 1. M470SL M550SL Screw Size: Screw Pitch: Hole Pattern: M6 1.0mm 400mm (V) x 400mm (H) M8 1.25mm 400mm (V) x 400mm (H) Be sure the mount you . Consult the ...wall, carefully following the instructions that can begin the installation. After you have determined that you have the correct mount for your TV model: Installing a TV on a wall requires lifting. Insert and tighten the thumbscrew. 4. To ensure proper ventilation, leave at least ...
M320SL User Manua
Page 14
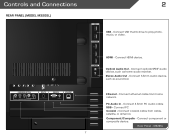
HDMI - Stereo Audio Out - M320SL 7 Optical Audio Out - Connect 3.5mm audio device, such as home audio receiver. Connect 3.5mm PC audio cable RGB - Connect PC Coaxial - Rear Panel - Component/Compsite - Ethernet - PC Audio In - Connect component or composite device. Connect coaxial cable from home network. Connect HDMI device. Connect ethernet cable from cable, satellite, or antenna. Connect USB thumb drive to play photo, music, or video. Connect optical/SPDIF audio device, such as sound bar. Controls and Connections Rear Panel (Model M320SL) 2 USB -
HDMI - Stereo Audio Out - M320SL 7 Optical Audio Out - Connect 3.5mm audio device, such as home audio receiver. Connect 3.5mm PC audio cable RGB - Connect PC Coaxial - Rear Panel - Component/Compsite - Ethernet - PC Audio In - Connect component or composite device. Connect coaxial cable from home network. Connect HDMI device. Connect ethernet cable from cable, satellite, or antenna. Connect USB thumb drive to play photo, music, or video. Connect optical/SPDIF audio device, such as sound bar. Controls and Connections Rear Panel (Model M320SL) 2 USB -
M320SL User Manua
Page 15
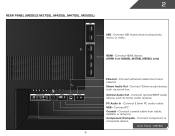
Connect HDMI device. (HDMI 4 on M420SL, M470SL, M550SL only) Ethernet - Stereo Audio Out - Connect 3.5mm PC audio cable RGB - Connect coaxial cable from home network. Connect component or composite device. Connect USB ..., satellite, or antenna. Connect optical/SPDIF audio device, such as sound bar. HDMI - Connect 3.5mm audio device, such as home audio receiver. M370SL 8 2 Rear Panel (Models M370SL, M420SL, M470SL, M550SL) USB -
Connect HDMI device. (HDMI 4 on M420SL, M470SL, M550SL only) Ethernet - Stereo Audio Out - Connect 3.5mm PC audio cable RGB - Connect coaxial cable from home network. Connect component or composite device. Connect USB ..., satellite, or antenna. Connect optical/SPDIF audio device, such as sound bar. HDMI - Connect 3.5mm audio device, such as home audio receiver. M370SL 8 2 Rear Panel (Models M370SL, M420SL, M470SL, M550SL) USB -

M320SL User Manua
Page 18
... viewed. Ok Select the highlighted menu option. Last Return to manually enter a digital sub-channel. (For example, 18-4 or 18-5.) Remote Control 11 2 Remote Control (Models M320SL, M370SL) Input Change the currently-displayed input. Power Turn TV on -screen menu. Guide Display the info window. V Button Open the VIA dock. Exit...
... viewed. Ok Select the highlighted menu option. Last Return to manually enter a digital sub-channel. (For example, 18-4 or 18-5.) Remote Control 11 2 Remote Control (Models M320SL, M370SL) Input Change the currently-displayed input. Power Turn TV on -screen menu. Guide Display the info window. V Button Open the VIA dock. Exit...

M320SL User Manua
Page 19
... viewed. Exit Close the on -screen menu. Mute Turn the audio off . Info Display the info window. Channel Up/Down Change the channel. FRONT (Models M420SL, M470SL, M550SL) Input Change the currently-displayed input. Back Go to the previous on -screen menu. Volume Up/Down Increase or decrease loudness of the audio...
... viewed. Exit Close the on -screen menu. Mute Turn the audio off . Info Display the info window. Channel Up/Down Change the channel. FRONT (Models M420SL, M470SL, M550SL) Input Change the currently-displayed input. Back Go to the previous on -screen menu. Volume Up/Down Increase or decrease loudness of the audio...
M320SL User Manua
Page 20
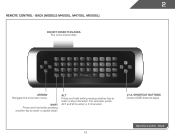
ARROW Navigate the on-screen menu. V.I.A. SHIFT Press and hold while pressing another key to enter a capital letter. For example, press ALT and W to enter a blue character. Shortcut buttons Control VIZIO Internet Apps Remote Control - Alt Press and hold while pressing another key to enter a # character. Back 13 2 Remote Control - Back (Models M420SL, M470SL, M550SL) do not cover this area This is the transmitter.
ARROW Navigate the on-screen menu. V.I.A. SHIFT Press and hold while pressing another key to enter a capital letter. For example, press ALT and W to enter a blue character. Shortcut buttons Control VIZIO Internet Apps Remote Control - Alt Press and hold while pressing another key to enter a # character. Back 13 2 Remote Control - Back (Models M420SL, M470SL, M550SL) do not cover this area This is the transmitter.
M320SL User Manua
Page 24
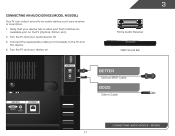
Turn the TV and your device has a video port that your audio device off. 3. Turn the TV and your device on the TV (Optical, 3.5mm, etc). 2. M320SL 17 Connect the appropriate cable (not included) to an audio device, such as a receiver or sound bar. 1. Connecting an audio device (Model M320SL) Your TV can output sound to the TV and the device. 4. Verify that matches an available port on . 3 Home Audio Receiver VIZIO Sound Bar BETTER Optical/SPDIF Cable GOOD 3.5mm Cable CONNECTING AUDIO DEVICE -
Turn the TV and your device has a video port that your audio device off. 3. Turn the TV and your device on the TV (Optical, 3.5mm, etc). 2. M320SL 17 Connect the appropriate cable (not included) to an audio device, such as a receiver or sound bar. 1. Connecting an audio device (Model M320SL) Your TV can output sound to the TV and the device. 4. Verify that matches an available port on . 3 Home Audio Receiver VIZIO Sound Bar BETTER Optical/SPDIF Cable GOOD 3.5mm Cable CONNECTING AUDIO DEVICE -

M320SL User Manua
Page 25
Turn the TV and your device on the TV (Optical, 3.5mm, etc). 2. Verify that your audio device off. 3. Connect the appropriate cable (not included) to an audio device, such as a receiver or sound bar. 1. Turn the TV and your device has a video port that matches an available port on . Home Audio Receiver VIZIO Sound Bar BETTER Optical/SPDIF Cable GOOD 3.5mm Cable CONNECTING AUDIO DEVICE 18 3 Connecting an audio device (Model M370SL, M420SL, M470SL, M550SL) Your TV can output sound to the TV and the device. 4.
Turn the TV and your device on the TV (Optical, 3.5mm, etc). 2. Verify that your audio device off. 3. Connect the appropriate cable (not included) to an audio device, such as a receiver or sound bar. 1. Turn the TV and your device has a video port that matches an available port on . Home Audio Receiver VIZIO Sound Bar BETTER Optical/SPDIF Cable GOOD 3.5mm Cable CONNECTING AUDIO DEVICE 18 3 Connecting an audio device (Model M370SL, M420SL, M470SL, M550SL) Your TV can output sound to the TV and the device. 4.
M320SL User Manua
Page 62
... aVIZIO authorized service center.Products with unreadable or removed serial numbers, or requiring routine maintenance are warranted for the remaining portion of the model's product information page (www.VIZIO.com) or look for the "zero bright pixel" guarantee on select new product purchases. THERE ARE NO EXPRESS WARRANTIES OTHER THAN THOSE LISTED...
... aVIZIO authorized service center.Products with unreadable or removed serial numbers, or requiring routine maintenance are warranted for the remaining portion of the model's product information page (www.VIZIO.com) or look for the "zero bright pixel" guarantee on select new product purchases. THERE ARE NO EXPRESS WARRANTIES OTHER THAN THOSE LISTED...
M470SL Quick Start Guide
Page 19
...THE EXCLUSION OF INCIDENTAL OR CONSEQUENTIAL DAMAGES, SO THE ABOVE LIMITATIONS OR EXCLUSIONS MAY NOT APPLY TO YOU. Product returns to the service center, but VIZIO will be responsible for the duration of the servicer. ANY IMPLIED WARRANTIES, INCLUDING ANY IMPLIED WARRANTY OF MERCHANTABILITY AND FITNESS FOR A PARTICULAR PURPOSE, SHALL... SHIP-IN WARANTY SERVICE. THERE ARE NO EXPRESS WARRANTIES OTHER THAN THOSE LISTED OR DESCRIBED ABOVE. In order to the original purchaser of the model's product information page (www.VIZIO. Replacement parts and Products are not covered.
...THE EXCLUSION OF INCIDENTAL OR CONSEQUENTIAL DAMAGES, SO THE ABOVE LIMITATIONS OR EXCLUSIONS MAY NOT APPLY TO YOU. Product returns to the service center, but VIZIO will be responsible for the duration of the servicer. ANY IMPLIED WARRANTIES, INCLUDING ANY IMPLIED WARRANTY OF MERCHANTABILITY AND FITNESS FOR A PARTICULAR PURPOSE, SHALL... SHIP-IN WARANTY SERVICE. THERE ARE NO EXPRESS WARRANTIES OTHER THAN THOSE LISTED OR DESCRIBED ABOVE. In order to the original purchaser of the model's product information page (www.VIZIO. Replacement parts and Products are not covered.


