M320SL User Manua
Page 3
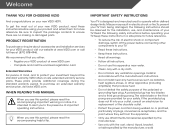
...safety instructions before using your outlet, consult an electrician for replacement of important operating instructions. Welcome Thank You for Choosing VIZIO And congratulations on -site extended warranty service plans. Important Safety Instructions Your TV is intended to alert you see this symbol, ... of your new VIZIO product, read the accompanying helpful tip. The wide blade or the third prong are no missing or damaged parts. Product Registration To purchase or inquire about accessories and installation services for your TV. When Reading this Manual When you to...
...safety instructions before using your outlet, consult an electrician for replacement of important operating instructions. Welcome Thank You for Choosing VIZIO And congratulations on -site extended warranty service plans. Important Safety Instructions Your TV is intended to alert you see this symbol, ... of your new VIZIO product, read the accompanying helpful tip. The wide blade or the third prong are no missing or damaged parts. Product Registration To purchase or inquire about accessories and installation services for your TV. When Reading this Manual When you to...

M320SL User Manua
Page 18
... Up/Down Increase or decrease loudness of the audio. Power Turn TV on or off or on. Guide Display the info window. Last Return to manually enter a digital sub-channel. (For example, 18-4 or 18-5.) Remote Control 11 Info Display the info window. Menu Display the on -screen menu. V ...Button Open the VIA dock. Exit Close the on -screen menu. Back Go to the previous on -screen menu. Number Pad Manually enter a channel. App launcher Quickly launch the pictured app. Channel Up/Down Change the channel. Mute Turn the audio off . Arrow Navigate the on -screen...
... Up/Down Increase or decrease loudness of the audio. Power Turn TV on or off or on. Guide Display the info window. Last Return to manually enter a digital sub-channel. (For example, 18-4 or 18-5.) Remote Control 11 Info Display the info window. Menu Display the on -screen menu. V ...Button Open the VIA dock. Exit Close the on -screen menu. Back Go to the previous on -screen menu. Number Pad Manually enter a channel. App launcher Quickly launch the pictured app. Channel Up/Down Change the channel. Mute Turn the audio off . Arrow Navigate the on -screen...

M320SL User Manua
Page 19
... the info window. Remote Control 12 2 Remote Control - FRONT (Models M420SL, M470SL, M550SL) Input Change the currently-displayed input. Back Go to the previous on -screen menu. Last Return to manually enter a digital sub-channel. (For example, 18-4 or 18-5.) battery compartment ...Insert 2 AAA batteries here. Number Pad Manually enter a channel. Wide Switch the display mode. Arrow Navigate the on...
... the info window. Remote Control 12 2 Remote Control - FRONT (Models M420SL, M470SL, M550SL) Input Change the currently-displayed input. Back Go to the previous on -screen menu. Last Return to manually enter a digital sub-channel. (For example, 18-4 or 18-5.) battery compartment ...Insert 2 AAA batteries here. Number Pad Manually enter a channel. Wide Switch the display mode. Arrow Navigate the on...
M320SL User Manua
Page 30
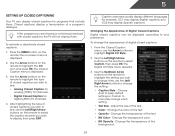
... Caption for analog (NTSC) TV channels. • Digital Closed Caption for programs that include them . After highlighting the type of closed captions you wish to manually change the appearance of the background. 23 Caption channels usually display different languages. To change each setting. • Text Size - Choose Auto to keep default...
... Caption for analog (NTSC) TV channels. • Digital Closed Caption for programs that include them . After highlighting the type of closed captions you wish to manually change the appearance of the background. 23 Caption channels usually display different languages. To change each setting. • Text Size - Choose Auto to keep default...
M320SL User Manua
Page 32
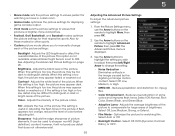
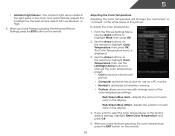
....The Advanced Picture menu is too low, the picture may appear faded or washed out. Use the Arrow buttons to highlight the setting you to manually change the setting: • Noise Reduction Diminishes artifacts in the picture. When this setting is displayed. 3. If the setting is too low, the picture may...
....The Advanced Picture menu is too low, the picture may appear faded or washed out. Use the Arrow buttons to highlight the setting you to manually change the setting: • Noise Reduction Diminishes artifacts in the picture. When this setting is displayed. 3. If the setting is too low, the picture may...
M320SL User Manua
Page 33
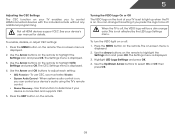
... for use the Arrow buttons to the factory default settings, highlight Reset Color Temperature and press OK. 5. Use the Arrow buttons on the remote to manually change the "warmness" or "coolness" of the white areas of each color in the display. When you have finished adjusting the Advanced Picture Settings, press...
... for use the Arrow buttons to the factory default settings, highlight Reset Color Temperature and press OK. 5. Use the Arrow buttons on the remote to manually change the "warmness" or "coolness" of the white areas of each color in the display. When you have finished adjusting the Advanced Picture Settings, press...
M320SL User Manua
Page 38
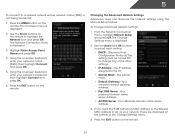
...on -screen keyboard, enter your network, these are displayed at the bottom of the other settings. • IP Address - From the Network Connection menu, highlight Manual Setup and press OK. Changing the Advanced Network Settings Advanced users can fine-tune the network settings using the... Manual Setup feature. 5 To connect to a wireless network whose network name (SSID) is displayed. 2. DNS Server - Use the Arrow buttons on the remote. Highlight Enter ...
...on -screen keyboard, enter your network, these are displayed at the bottom of the other settings. • IP Address - From the Network Connection menu, highlight Manual Setup and press OK. Changing the Advanced Network Settings Advanced users can fine-tune the network settings using the... Manual Setup feature. 5 To connect to a wireless network whose network name (SSID) is displayed. 2. DNS Server - Use the Arrow buttons on the remote. Highlight Enter ...
M320SL User Manua
Page 46
...buttons on the remote. Use the Up/Down Arrow buttons to adjust each setting: • CEC Function - The on-screen menu is off, the VIZIO logo will be off : 1. See your TV enables you must select Enable. • System Audio Control - Not all HDMI devices support CEC. ...5 Adjusting the CEC Settings The CEC function on your device's user manual for details. Press the EXIT button on the remote to control HDMI-connected devices with the included remote without any additional programming. Use the Arrow...
...buttons on the remote. Use the Up/Down Arrow buttons to adjust each setting: • CEC Function - The on-screen menu is off, the VIZIO logo will be off : 1. See your TV enables you must select Enable. • System Audio Control - Not all HDMI devices support CEC. ...5 Adjusting the CEC Settings The CEC function on your device's user manual for details. Press the EXIT button on the remote to control HDMI-connected devices with the included remote without any additional programming. Use the Arrow...

M320SL User Manua
Page 58
.... • Press the Power/Standby button on the remote or on the side of the TV to select a different input source. Ensure your device's user manual for Channels on page 33 There is connected securely to the TV and move the antenna around the room or close to the TV. •...
.... • Press the Power/Standby button on the remote or on the side of the TV to select a different input source. Ensure your device's user manual for Channels on page 33 There is connected securely to the TV and move the antenna around the room or close to the TV. •...
M470SL Quick Start Guide
Page 4
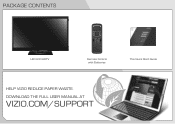
DOWNLOAD THE FULL USER MANUAL AT VIZIO.COM/SUPPORT PACKAGE CONTENTS LED LCD HDTV Remote Control with Batteries This Quick Start Guide HELP VIZIO REDUCE PAPER WASTE.
DOWNLOAD THE FULL USER MANUAL AT VIZIO.COM/SUPPORT PACKAGE CONTENTS LED LCD HDTV Remote Control with Batteries This Quick Start Guide HELP VIZIO REDUCE PAPER WASTE.
M470SL Quick Start Guide
Page 6
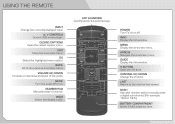
A/V CONTROLS Control USB media player. EXIT Close the on -screen menu. NUMBER PAD Manually enter a channel. WIDE Switch the display mode. INFO Display the info window. V BUTTON Open the VIA dock. CHANNEL UP/DOWN Change the channel. OK Select ... TV on or off or on. MENU Display the on -screen menu. VOLUME UP/DOWN Increase or decrease loudness of the audio. LAST Return to manually enter a digital sub-channel. (For example, 18-4 or 18-5.) BATTERY COMPARTMENT Insert 2 AAA batteries here. GUIDE Display the info window. MUTE Turn the audio off...
A/V CONTROLS Control USB media player. EXIT Close the on -screen menu. NUMBER PAD Manually enter a channel. WIDE Switch the display mode. INFO Display the info window. V BUTTON Open the VIA dock. CHANNEL UP/DOWN Change the channel. OK Select ... TV on or off or on. MENU Display the on -screen menu. VOLUME UP/DOWN Increase or decrease loudness of the audio. LAST Return to manually enter a digital sub-channel. (For example, 18-4 or 18-5.) BATTERY COMPARTMENT Insert 2 AAA batteries here. GUIDE Display the info window. MUTE Turn the audio off...

