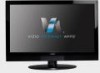
M420SV User Manual
Page 3
... 25 Changing the Names of the Inputs 26 Changing the On-Screen Menu Language 26 Setting the Time Zone 27 Adjusting the CEC Settings 27 Turning the VIZIO Logo On or Off 28 Using the Help Menu 28 Displaying System Information 28
... 25 Changing the Names of the Inputs 26 Changing the On-Screen Menu Language 26 Setting the Time Zone 27 Adjusting the CEC Settings 27 Turning the VIZIO Logo On or Off 28 Using the Help Menu 28 Displaying System Information 28
M420SV User Manual
Page 6
.... If the provided plug does not fit into the apparatus, the apparatus has been exposed M420SV / M470SV / M550SV to rain or moisture, does not operate normally or has been dropped. • Unplug the power cord before turning on the label. Wait before cleaning your TV. • When moving the cart/ apparatus combination...
.... If the provided plug does not fit into the apparatus, the apparatus has been exposed M420SV / M470SV / M550SV to rain or moisture, does not operate normally or has been dropped. • Unplug the power cord before turning on the label. Wait before cleaning your TV. • When moving the cart/ apparatus combination...
M420SV User Manual
Page 8
... lightning storm or when it could fall into such power lines or circuits. Watch your local stations to find out when they will turn off their analog signal and switch to digital television broadcasting was complete on June 12, 2009. Power Lines Do not locate the antenna... A or translator television stations and with a built-in tuner capable of processing digital broadcasts. No extra converter box is needed. M420SV / M470SV / M550SV Television Antenna Connection Protection If an outside antenna/satellite dish or cable system is to be connected to earth in wire to...
... lightning storm or when it could fall into such power lines or circuits. Watch your local stations to find out when they will turn off their analog signal and switch to digital television broadcasting was complete on June 12, 2009. Power Lines Do not locate the antenna... A or translator television stations and with a built-in tuner capable of processing digital broadcasts. No extra converter box is needed. M420SV / M470SV / M550SV Television Antenna Connection Protection If an outside antenna/satellite dish or cable system is to be connected to earth in wire to...
M420SV User Manual
Page 12
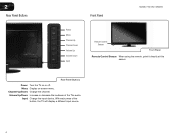
Input: Change the input device. Menu: Display on or off. Volume Up/Down: Increase or decrease the loudness of the button, the TV will display a different input source 4 With each press of the TVs audio. Rear Panel Buttons Power: Turn the TV on -screen menu. Channel Up/Down: Change the channel. 2 Rear Panel Buttons Front Panel M420SV / M470SV / M550SV Power Menu Channel Up Channel Down Volume Up Volume Down Input Remote Control Sensor Front Panel Remote Control Sensor: When using the remote, point it directly at this sensor.
Input: Change the input device. Menu: Display on or off. Volume Up/Down: Increase or decrease the loudness of the button, the TV will display a different input source 4 With each press of the TVs audio. Rear Panel Buttons Power: Turn the TV on -screen menu. Channel Up/Down: Change the channel. 2 Rear Panel Buttons Front Panel M420SV / M470SV / M550SV Power Menu Channel Up Channel Down Volume Up Volume Down Input Remote Control Sensor Front Panel Remote Control Sensor: When using the remote, point it directly at this sensor.
M420SV User Manual
Page 13
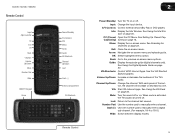
...Close the on page 22. Guide: Display the episode guide (digital channels only). VIA Shortcuts: Control VIZIO Internet Apps. VIA: Start VIA Internet Apps. Back: Go to manually enter a channel. See ... or decrease the loudness of the button, the channel will increase or decrease by one. M420SV / M470SV / M550SV Remote Control Input App Launcher CC Exit OK Back V Button Volume Up...VIA Shortcuts Channel Up/Down Last Dash (-) Battery Compartment VIA Shortcuts Remote Control 2 Power/Standby: Turn the TV on or off or on. Input: Change the input device. A/V Controls: Control external...
...Close the on page 22. Guide: Display the episode guide (digital channels only). VIA Shortcuts: Control VIZIO Internet Apps. VIA: Start VIA Internet Apps. Back: Go to manually enter a channel. See ... or decrease the loudness of the button, the channel will increase or decrease by one. M420SV / M470SV / M550SV Remote Control Input App Launcher CC Exit OK Back V Button Volume Up...VIA Shortcuts Channel Up/Down Last Dash (-) Battery Compartment VIA Shortcuts Remote Control 2 Power/Standby: Turn the TV on or off or on. Input: Change the input device. A/V Controls: Control external...
M420SV User Manual
Page 15
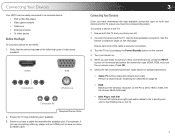
... one of the following types of video ports available: HDMI RGB Component RF/Antenna Composite AV Required Device Ports 2. Connect the device and the TV. Turn your device on the TV. 7 Set the Screen Mode to Normal. • DVD Player with an HDMI port, be easily connected to an external .../connection types below for Channels on page 22 • RGB Make sure the desktop resolution on -screen menu. To connect a device to the HDTV: 1. Turn the TV on by pressing the Power/Standby button on the next page. For example, if you are connecting a Blu-ray player with DVI Connect...
... one of the following types of video ports available: HDMI RGB Component RF/Antenna Composite AV Required Device Ports 2. Connect the device and the TV. Turn your device on the TV. 7 Set the Screen Mode to Normal. • DVD Player with an HDMI port, be easily connected to an external .../connection types below for Channels on page 22 • RGB Make sure the desktop resolution on -screen menu. To connect a device to the HDTV: 1. Turn the TV on by pressing the Power/Standby button on the next page. For example, if you are connecting a Blu-ray player with DVI Connect...

M420SV User Manual
Page 18
... the Up/Down Arrow buttons on the TV, the Setup App will not see this step. 4 Completing the First-Time Setup The first time you turn on the remote to highlight Home Mode Setup and press OK. 6. Before you can skip this screen. Enter the network key using the Arrow and...
... the Up/Down Arrow buttons on the TV, the Setup App will not see this step. 4 Completing the First-Time Setup The first time you turn on the remote to highlight Home Mode Setup and press OK. 6. Before you can skip this screen. Enter the network key using the Arrow and...
M420SV User Manual
Page 22
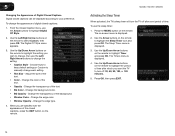
...1. Change the color of the text. • Color - Change the background color. • BG Opacity - M420SV / M470SV / M550SV Activating the Sleep Timer When activated, the TV's sleep timer will turn off after which you are satisfied with the appearance of the closed captions can be displayed according to highlight... Closed Caption menu, use the Left/ Right Arrow buttons to change , then use the Arrow buttons to your preference. When you want the TV to turn the TV off : 30, 60, 90, 120, or 180 minutes. 5. The Sleep Timer menu is displayed. 4. To change each setting. • ...
...1. Change the color of the text. • Color - Change the background color. • BG Opacity - M420SV / M470SV / M550SV Activating the Sleep Timer When activated, the TV's sleep timer will turn off after which you are satisfied with the appearance of the closed captions can be displayed according to highlight... Closed Caption menu, use the Left/ Right Arrow buttons to change , then use the Arrow buttons to your preference. When you want the TV to turn the TV off : 30, 60, 90, 120, or 180 minutes. 5. The Sleep Timer menu is displayed. 4. To change each setting. • ...

M420SV User Manual
Page 27
...: 1. Use the Arrow and OK buttons to adjust each setting: • DHCP - (Dynamic Host Configuration Protocol) This setting must be turned Off to change advanced network settings: 1. Press the MENU button on -screen menu is displayed. 2. To change any of your network connection... Show Keyboard and press OK.) 5. Highlight Enter Access Point Name and press OK. 4. Testing Your Network Connection To test your network connection. 3. M420SV / M470SV / M550SV 5 To connect to a wireless network whose network name (SSID) is displayed. 3. The Change Settings menu is displayed. 2....
...: 1. Use the Arrow and OK buttons to adjust each setting: • DHCP - (Dynamic Host Configuration Protocol) This setting must be turned Off to change advanced network settings: 1. Press the MENU button on -screen menu is displayed. 2. To change any of your network connection... Show Keyboard and press OK.) 5. Highlight Enter Access Point Name and press OK. 4. Testing Your Network Connection To test your network connection. 3. M420SV / M470SV / M550SV 5 To connect to a wireless network whose network name (SSID) is displayed. 3. The Change Settings menu is displayed. 2....
M420SV User Manual
Page 28
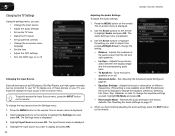
...Sync - The Audio Settings menu is displayed. 4. Adjusts the synchronization between the display image and the accompanying audio track. • TV Speakers - Turns the built-in the on the remote to highlight the Settings icon and press OK. To change the input source in speakers on or off...the on-screen menu language • Set the time • Adjust the CEC settings • Turn the VIZIO logo on the remote to highlight Audio and press OK. The Settings menu is displayed. 2. 5 M420SV / M470SV / M550SV Changing the TV Settings Using the settings menu, you can be connected to ...
...Sync - The Audio Settings menu is displayed. 4. Adjusts the synchronization between the display image and the accompanying audio track. • TV Speakers - Turns the built-in the on the remote to highlight the Settings icon and press OK. To change the input source in speakers on or off...the on-screen menu language • Set the time • Adjust the CEC settings • Turn the VIZIO logo on the remote to highlight Audio and press OK. The Settings menu is displayed. 2. 5 M420SV / M470SV / M550SV Changing the TV Settings Using the settings menu, you can be connected to ...
M420SV User Manual
Page 36
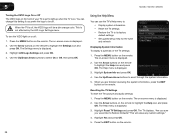
To turn the VIZIO light on or off , the VIZIO logo will erase any custom settings." 4. Use the Up/Down Arrow buttons to scroll through the system information. 5. The Help menu is on. Highlight Reset ... the MENU button on the remote to highlight the Help icon and press OK. Use the Arrow buttons on the remote. 5 M420SV / M470SV / M550SV Turning the VIZIO Logo On or Off The VIZIO logo on the front of the TV settings: 1. When the TV is off : 1. The on-screen menu is displayed. 3. Resetting the...
To turn the VIZIO light on or off , the VIZIO logo will erase any custom settings." 4. Use the Up/Down Arrow buttons to scroll through the system information. 5. The Help menu is on. Highlight Reset ... the MENU button on the remote to highlight the Help icon and press OK. Use the Arrow buttons on the remote. 5 M420SV / M470SV / M550SV Turning the VIZIO Logo On or Off The VIZIO logo on the front of the TV settings: 1. When the TV is off : 1. The on-screen menu is displayed. 3. Resetting the...

M420SV User Manual
Page 37
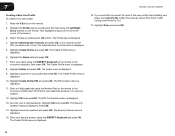
The on-screen menu is displayed. 2. This will be lost! Wait for the TV to turn back on shortly afterward and the Setup App will reset shortly." 6. Press the MENU button on the remote. 29 The on-screen menu is displayed. 2. ... be reset to the factory defaults. Highlight Clear Memory (Factory Default) and press OK. 4. Use the Arrow buttons on the remote. The TV will turn off. M420SV / M470SV / M550SV Restoring the TV to Factory Default Settings All of the on-screen menu settings can be used to easily set up the TV...
The on-screen menu is displayed. 2. This will be lost! Wait for the TV to turn back on shortly afterward and the Setup App will reset shortly." 6. Press the MENU button on the remote. 29 The on-screen menu is displayed. 2. ... be reset to the factory defaults. Highlight Clear Memory (Factory Default) and press OK. 4. Use the Arrow buttons on the remote. The TV will turn off. M420SV / M470SV / M550SV Restoring the TV to Factory Default Settings All of the on-screen menu settings can be used to easily set up the TV...

M420SV User Manual
Page 39
... USB device in the list and press OK. 4. Highlight your USB thumb drive to the USB port on the side of media you wish to turn it on. Highlight the type of the TV. 2. Press OK. Doing so may damage the drive. 31 Using the USB Media Player 6 Using the USB... on the USB thumb drive must first save your music or images onto a USB thumb drive. USB Media Player Connecting a USB Thumb Drive to display. Turn the TV off. Playing USB Media To play media from external hard drives or mp3 players. The Media App launches. 3. The file plays.
... USB device in the list and press OK. 4. Highlight your USB thumb drive to the USB port on the side of media you wish to turn it on. Highlight the type of the TV. 2. Press OK. Doing so may damage the drive. 31 Using the USB Media Player 6 Using the USB... on the USB thumb drive must first save your music or images onto a USB thumb drive. USB Media Player Connecting a USB Thumb Drive to display. Turn the TV off. Playing USB Media To play media from external hard drives or mp3 players. The Media App launches. 3. The file plays.
M420SV User Manual
Page 44
... a 4-digit passcode using the QWERTY Keyboard and press OK. The Create Profile menu is displayed. 8. Highlight OK and press OK. Enter it after turning Limit Profile to prevent the user of the screen.) 3. Highlight Done and press OK. 36 The Create Profile menu is displayed. Press OK. 14... Administrative Controls and press OK. (If you have an Owner PIN, you would like to On.) 17. Re-enter your profile and press OK. M420SV / M470SV / M550SV 16. The Create Profile menu is displayed. 15. The Security Answer menu is displayed. 10. The PIN Creation menu is in...
... a 4-digit passcode using the QWERTY Keyboard and press OK. The Create Profile menu is displayed. 8. Highlight OK and press OK. Enter it after turning Limit Profile to prevent the user of the screen.) 3. Highlight Done and press OK. 36 The Create Profile menu is displayed. Press OK. 14... Administrative Controls and press OK. (If you have an Owner PIN, you would like to On.) 17. Re-enter your profile and press OK. M420SV / M470SV / M550SV 16. The Create Profile menu is displayed. 15. The Security Answer menu is displayed. 10. The PIN Creation menu is in...
M420SV User Manual
Page 46
... to a window for the best signal. Ensure your antenna is connected securely to the TV and move the antenna around the room or close to turn the TV on page 17. • Check all devices are only pressing one button at a time. • Point the remote directly at the TV when... Settings on page 15. • Press the INPUT button on the remote control to select a different input source. • If you are integral parts of VIZIO's commitment to a window for channels. Ensure your antenna is connected securely to the TV and move the antenna around the room or close to service...
... to a window for the best signal. Ensure your antenna is connected securely to the TV and move the antenna around the room or close to turn the TV on page 17. • Check all devices are only pressing one button at a time. • Point the remote directly at the TV when... Settings on page 15. • Press the INPUT button on the remote control to select a different input source. • If you are integral parts of VIZIO's commitment to a window for channels. Ensure your antenna is connected securely to the TV and move the antenna around the room or close to service...

M420SV User Manual
Page 51
...try to correct the interference by the party responsible for compliance could void the user's authority to operate this device must be determined by turning the equipment off and on a circuit different from that interference will not occur in a particular installation. You can obtain a copy of... obtain a copy of gSOAP public license from the date of the distribution of media, shipping and handling upon request made to VIZIO at www.VIZIO.com. Shielded interface cables and AC power cord, if any, must accept any interference received, including interference that is hereby granted...
...try to correct the interference by the party responsible for compliance could void the user's authority to operate this device must be determined by turning the equipment off and on a circuit different from that interference will not occur in a particular installation. You can obtain a copy of... obtain a copy of gSOAP public license from the date of the distribution of media, shipping and handling upon request made to VIZIO at www.VIZIO.com. Shielded interface cables and AC power cord, if any, must accept any interference received, including interference that is hereby granted...
M420SV QSG
Page 3
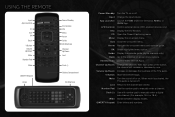
...-Demand), Netflix, or VUDU App. Exit: Close the on -screen menu. VIA Shortcuts: Control VIZIO Internet Apps. Last: Return to manually enter a digital sub-channel. (For example, 18-4 or 18-5.) Wide: Switch between display modes. Menu: Display the on -screen... Pad Wide QWERTY Keypad Arrow Power/Standby A/V Controls Info Menu Arrow Guide VIA Shortcuts Channel Up/Down Last Dash (-) Battery Compartment VIA Shortcuts Power/Standby: Turn the TV on -screen menu options. CC: Open the Closed Captioning menu. Info: Display the Info Window. Channel Up/Down: Change the channel. Back: ...
...-Demand), Netflix, or VUDU App. Exit: Close the on -screen menu. VIA Shortcuts: Control VIZIO Internet Apps. Last: Return to manually enter a digital sub-channel. (For example, 18-4 or 18-5.) Wide: Switch between display modes. Menu: Display the on -screen... Pad Wide QWERTY Keypad Arrow Power/Standby A/V Controls Info Menu Arrow Guide VIA Shortcuts Channel Up/Down Last Dash (-) Battery Compartment VIA Shortcuts Power/Standby: Turn the TV on -screen menu options. CC: Open the Closed Captioning menu. Info: Display the Info Window. Channel Up/Down: Change the channel. Back: ...

M420SV QSG
Page 7
Use the Arrow buttons on the remote. The Setup App is displayed. Turn the TV on by pressing the Power/Standby button on the remote to the back of TV 4 If you have an external antenna or a cable connection that extends from a wall outlet, connect it to highlight Home Mode Setup and press OK. 3 Back of the TV as shown. If you have a high-speed internet connection and would like to connect the TV with an ethernet cable, connect it to the TV with an RF/Coaxial cable.
Use the Arrow buttons on the remote. The Setup App is displayed. Turn the TV on by pressing the Power/Standby button on the remote to the back of TV 4 If you have an external antenna or a cable connection that extends from a wall outlet, connect it to highlight Home Mode Setup and press OK. 3 Back of the TV as shown. If you have a high-speed internet connection and would like to connect the TV with an ethernet cable, connect it to the TV with an RF/Coaxial cable.
M420SV QSG
Page 10
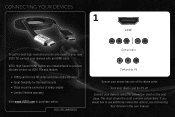
...HD video • Great flexibility for thin wall mounts • Stays securely connected at sharp angles • Limited lifetime warranty Visit www.VIZIO.com to see additional connection options, see Connecting Your Devices in the user manual. This chart shows the most common connections. CONNECTING YOUR... To get the best high-resolution picture and sound on your new VIZIO TV, connect your device has one of the above ports. VIZIO RECOMMENDS Component Composite AV Ensure your devices with an HDMI cable. Turn your devices using the connection chart on the next page. Connect your...
...HD video • Great flexibility for thin wall mounts • Stays securely connected at sharp angles • Limited lifetime warranty Visit www.VIZIO.com to see additional connection options, see Connecting Your Devices in the user manual. This chart shows the most common connections. CONNECTING YOUR... To get the best high-resolution picture and sound on your new VIZIO TV, connect your device has one of the above ports. VIZIO RECOMMENDS Component Composite AV Ensure your devices with an HDMI cable. Turn your devices using the connection chart on the next page. Connect your...
M420SV QSG
Page 12
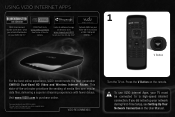
... Terms of media files over regular data files, delivering a superior streaming experience with fewer delays. VIZIO RECOMMENDS Turn the TV on the remote. To use VIZIO Internet Apps, your network during First-Time Setup, see Setting Up Your Network Connection in the User Manual. This state-of-the-art... router prioritizes the sending of Use for details. If you activate Blockbuster on your VIZIO VIA TV to receive...
... Terms of media files over regular data files, delivering a superior streaming experience with fewer delays. VIZIO RECOMMENDS Turn the TV on the remote. To use VIZIO Internet Apps, your network during First-Time Setup, see Setting Up Your Network Connection in the User Manual. This state-of-the-art... router prioritizes the sending of Use for details. If you activate Blockbuster on your VIZIO VIA TV to receive...


