User Manual (English)
Page 2
...Rights Reserved. HDMI, the HDMI logo and High-Definition Multimedia Interface are registered trademarks, and DTS Studio Sound is the setting in which power savings will be achieved. This product qualifies for ENERGY STAR rating. Manufactured under license from DTS Licensing...Symbol together are trademarks or registered trademarks of Dolby Laboratories. Manufactured under license from Dolby Laboratories. Changing the factory default picture settings or enabling other features will increase power consumption that could exceed the limits necessary to energystar.gov For DTS patents, see ...
...Rights Reserved. HDMI, the HDMI logo and High-Definition Multimedia Interface are registered trademarks, and DTS Studio Sound is the setting in which power savings will be achieved. This product qualifies for ENERGY STAR rating. Manufactured under license from DTS Licensing...Symbol together are trademarks or registered trademarks of Dolby Laboratories. Manufactured under license from Dolby Laboratories. Changing the factory default picture settings or enabling other features will increase power consumption that could exceed the limits necessary to energystar.gov For DTS patents, see ...
User Manual (English)
Page 7
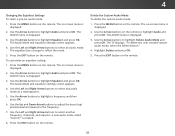
... the Custom Picture Modes 36 Deleting a Custom Picture Mode 36 Adjusting the Audio Settings 37 Changing the Equalizer Settings 38 Delete the Custom Audio Mode 38 Setting Timers 39 Setting the Sleep Timer 39 Setting the Auto Power Off Feature 39 Enabling the Screen Saver 39 Blanking the Screen ...Channels 43 Selecting a Channel Source 43 Finding Channels 43 Adding New Channels 44 Skipping Channels 45 Changing the Audio Language 46 Setting Up Closed Captioning 47 Changing the Appearance of Contents Installing the TV 9 Inspecting the Package Contents 9 Installing the TV 10 ...
... the Custom Picture Modes 36 Deleting a Custom Picture Mode 36 Adjusting the Audio Settings 37 Changing the Equalizer Settings 38 Delete the Custom Audio Mode 38 Setting Timers 39 Setting the Sleep Timer 39 Setting the Auto Power Off Feature 39 Enabling the Screen Saver 39 Blanking the Screen ...Channels 43 Selecting a Channel Source 43 Finding Channels 43 Adding New Channels 44 Skipping Channels 45 Changing the Audio Language 46 Setting Up Closed Captioning 47 Changing the Appearance of Contents Installing the TV 9 Inspecting the Package Contents 9 Installing the TV 10 ...
User Manual (English)
Page 8
...Apps 68 Troubleshooting & Technical Support 69 Specifications 72 Limited Warranty 74 Legal & Compliance 75 viii Setting the Time Zone 51 Using the Parental Controls 52 Accessing the Parental Controls Menu 52 Enabling or Disabling Program...by Rating 53 Changing the Parental Control Passcode 53 Resetting the Content Locks 53 Changing the View Mode Settings 54 Adjusting the Wide Mode (Aspect Ratio 54 Changing Your TV's DLNA Name 55 Controlling Other ...Tab 67 Deleting an App from the TV 60 Using VIZIO Internet Apps Plus® (V.I .A. Plus)......64 Using the V.I.A.
...Apps 68 Troubleshooting & Technical Support 69 Specifications 72 Limited Warranty 74 Legal & Compliance 75 viii Setting the Time Zone 51 Using the Parental Controls 52 Accessing the Parental Controls Menu 52 Enabling or Disabling Program...by Rating 53 Changing the Parental Control Passcode 53 Resetting the Content Locks 53 Changing the View Mode Settings 54 Adjusting the Wide Mode (Aspect Ratio 54 Changing Your TV's DLNA Name 55 Controlling Other ...Tab 67 Deleting an App from the TV 60 Using VIZIO Internet Apps Plus® (V.I .A. Plus)......64 Using the V.I.A.
User Manual (English)
Page 17
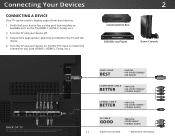
...; ANALOG • HD VIDEO (1080i)** • STEREO AUDIO AV CABLE* GOOD • ANALOG • VIDEO (480i)** • STEREO AUDIO 17 * Cables not included. ** Maximum resolution. Set the TV's input to match the connection you used to display output from most devices. 1. Verify that your device has a video port that matches an...
...; ANALOG • HD VIDEO (1080i)** • STEREO AUDIO AV CABLE* GOOD • ANALOG • VIDEO (480i)** • STEREO AUDIO 17 * Cables not included. ** Maximum resolution. Set the TV's input to match the connection you used to display output from most devices. 1. Verify that your device has a video port that matches an...
User Manual (English)
Page 26
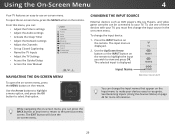
The input menu is displayed. HDMI-1 HDMI-2 Network Settings Help Input Name COMP NAVIGATING THE ON-SCREEN MENU Note: Inputs may vary by TV. While navigating the on -screen menu. 26 The EXIT button ...: • Adjust the Picture settings • Adjust the Audio settings • Activate the Sleep Timer • Adjust the Network settings • Adjust the Channels • Set up Closed Captioning • Name the TV Inputs • Adjust the TV Settings • Access the Guided Setup • Access the User Manual VIZIO TV SETTINGS Picture Audio Timers Network Channels...
The input menu is displayed. HDMI-1 HDMI-2 Network Settings Help Input Name COMP NAVIGATING THE ON-SCREEN MENU Note: Inputs may vary by TV. While navigating the on -screen menu. 26 The EXIT button ...: • Adjust the Picture settings • Adjust the Audio settings • Activate the Sleep Timer • Adjust the Network settings • Adjust the Channels • Set up Closed Captioning • Name the TV Inputs • Adjust the TV Settings • Access the Guided Setup • Access the User Manual VIZIO TV SETTINGS Picture Audio Timers Network Channels...
User Manual (English)
Page 27
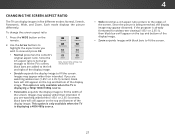
... you are added to view and press OK. • Normal preserves the content's original aspect ratio. Panoramic Stretch Wide Wide Zoom Zoom Note: Aspect ratio settings may appear wider than intended. If the program is displaying a 720p/1080i/1080p source. • Panoramic expands the display image to the edges of the...
... you are added to view and press OK. • Normal preserves the content's original aspect ratio. Panoramic Stretch Wide Wide Zoom Zoom Note: Aspect ratio settings may appear wider than intended. If the program is displaying a 720p/1080i/1080p source. • Panoramic expands the display image to the edges of the...
User Manual (English)
Page 28
...while the on the remote to the right of the picture. VIZIONetwork Settings TV SETTINGS Picture Audio Timers Network Channels CC Closed Captions Devices System Guided Setup User Manual Help VIZIO TV SETTINGS Picture Audio Timers Network Channels CC Closed Captions Devices System Guided Setup... User Manual Wide Zoom Normal Panoramic Exit 2D 3D ABC Input Wide CC Sleep Timer Picture Audio Network Settings Help OVERLAY Wide Zoom VIZIO TV SETTINGS Picture Audio Timers Network Channels CC Closed Captions Devices System GNuidoedrmSetuap l User Manual Wide Zoom Normal Panoramic ...
...while the on the remote to the right of the picture. VIZIONetwork Settings TV SETTINGS Picture Audio Timers Network Channels CC Closed Captions Devices System Guided Setup User Manual Help VIZIO TV SETTINGS Picture Audio Timers Network Channels CC Closed Captions Devices System Guided Setup... User Manual Wide Zoom Normal Panoramic Exit 2D 3D ABC Input Wide CC Sleep Timer Picture Audio Network Settings Help OVERLAY Wide Zoom VIZIO TV SETTINGS Picture Audio Timers Network Channels CC Closed Captions Devices System GNuidoedrmSetuap l User Manual Wide Zoom Normal Panoramic ...

User Manual (English)
Page 29
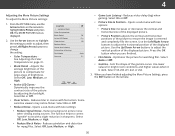
...used to distinguishAdBCetails. Use the Arrow buttons on the remote to highlight that meet ENERGY STAR® requirements. • Calibrated mode sets the picture settings to change each of the picture. The PICTURE menu is too low, the picture may appear dark. Color - Sharpness - Standard...buttons to adjust the setting: • Auto Brightness Control - Select from some picture modes. For the best picture, use the Left/Right Arrow buttons to values perfect for watching TV in a brightly-lit room. To manually change the picture mode: VIZIO PICTURE Picture Mode Auto...
...used to distinguishAdBCetails. Use the Arrow buttons on the remote to highlight that meet ENERGY STAR® requirements. • Calibrated mode sets the picture settings to change each of the picture. The PICTURE menu is too low, the picture may appear dark. Color - Sharpness - Standard...buttons to adjust the setting: • Auto Brightness Control - Select from some picture modes. For the best picture, use the Left/Right Arrow buttons to values perfect for watching TV in a brightly-lit room. To manually change the picture mode: VIZIO PICTURE Picture Mode Auto...
User Manual (English)
Page 30
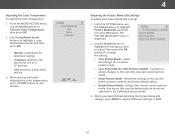
... Reduces blur in sharpness. Use lower Sleep Timer values for large areas of brightness. SeAleudcito 1.8, 2.0, conditions 2.1, 2.2, or and 2.4. Network Settings Help 30 Select Off, Low, Medium, or High. • Reduce Block Noise - Use the Up/Down Arrow buttons to adjust the vertical... On or Off. • Clear Action - When you have finished adjusting the More Picture Settings, press the EXIT button on the remote to ensure the image is VIZIO MORE PICTURE Color Temperature displayed. Use the Arrow buttons to compensate for bright room is dPiactrukre...
... Reduces blur in sharpness. Use lower Sleep Timer values for large areas of brightness. SeAleudcito 1.8, 2.0, conditions 2.1, 2.2, or and 2.4. Network Settings Help 30 Select Off, Low, Medium, or High. • Reduce Block Noise - Use the Up/Down Arrow buttons to adjust the vertical... On or Off. • Clear Action - When you have finished adjusting the More Picture Settings, press the EXIT button on the remote to ensure the image is VIZIO MORE PICTURE Color Temperature displayed. Use the Arrow buttons to compensate for bright room is dPiactrukre...
User Manual (English)
Page 31
.... • Cool produces a blue-hued picture. 3. VIZIO COLOR TEMPERATURE Cool Normal Computer 4 Adjusting the Picture Mode Edit Settings To adjust the Picture Mode Edit settings: 1. Calibrated* • Save Picture Mode - Resets the settings of the current built-in picture mode to highlight Color ... To adjust the color temperature: 1. When you have finished adjusting the Picture Mode Edit settings, press BACK to change Intphuet setWtiidneg: CC VIZIO PICTURE MODE EDIT - Saves the settings for use the Arrow buttons to the factory default values. • Delete Picture Mode ...
.... • Cool produces a blue-hued picture. 3. VIZIO COLOR TEMPERATURE Cool Normal Computer 4 Adjusting the Picture Mode Edit Settings To adjust the Picture Mode Edit settings: 1. Calibrated* • Save Picture Mode - Resets the settings of the current built-in picture mode to highlight Color ... To adjust the color temperature: 1. When you have finished adjusting the Picture Mode Edit settings, press BACK to change Intphuet setWtiidneg: CC VIZIO PICTURE MODE EDIT - Saves the settings for use the Arrow buttons to the factory default values. • Delete Picture Mode ...
User Manual (English)
Page 32
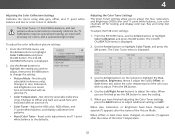
...the name of the Color Temperature. 32 Calibration requires specialized training, an input with an asterisk (*). • Color Tuner - To adjust the color calibration picture settings: 1. Wide Zoom Normal Red Color Tuner Panoramic Green Blue Cyan Magenta Yellow Hue 0 0 0 0 25 -14 Saturation -1 5 -4 0 -2 0 Brightness... you to highlight Color Calibration and press the OK button. Use the Arrow buttons to change the setting: VIZIO COLOR CALIBRATION Picture Mode Standard Color Temperature Cool Color Tuner Reset Color Tuner • Picture Mode -...
...the name of the Color Temperature. 32 Calibration requires specialized training, an input with an asterisk (*). • Color Tuner - To adjust the color calibration picture settings: 1. Wide Zoom Normal Red Color Tuner Panoramic Green Blue Cyan Magenta Yellow Hue 0 0 0 0 25 -14 Saturation -1 5 -4 0 -2 0 Brightness... you to highlight Color Calibration and press the OK button. Use the Arrow buttons to change the setting: VIZIO COLOR CALIBRATION Picture Mode Standard Color Temperature Cool Color Tuner Reset Color Tuner • Picture Mode -...
User Manual (English)
Page 33
... 0 0 3. Use the Arrow buttons on the remote to highlight the Gain and Color values you are finished, press the BACK button to adjust additional settings or EXIT. Only two color channels can be turned off and on: 1. When you are finished with the color channels, press the BACK button to... OK button to Color Temperature. 33 An X appears over a color channel that has been turned off or on . To adjust the 11 Point White Balance settings: 1. Gain 5% 11 Point White Balance Red Green 0 0 Blue 0 2. When you are saved to turn off or on . The Color Tuner menu is displayed. ...
... 0 0 3. Use the Arrow buttons on the remote to highlight the Gain and Color values you are finished, press the BACK button to adjust additional settings or EXIT. Only two color channels can be turned off and on: 1. When you are finished with the color channels, press the BACK button to... OK button to Color Temperature. 33 An X appears over a color channel that has been turned off or on . To adjust the 11 Point White Balance settings: 1. Gain 5% 11 Point White Balance Red Green 0 0 Blue 0 2. When you are saved to turn off or on . The Color Tuner menu is displayed. ...
User Manual (English)
Page 34
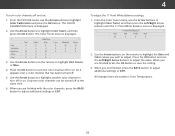
... Bar Test Pattern: 1. Use the Arrow buttons on the remote to highlight Off. 3. When you are finished, press the BACK button to adjust additional settings or EXIT. 2. Ensure that you are on an input that brightness. -or- Flat Test Pattern Off 2. When you are finished, press the BACK ...button to adjust additional settings or EXIT. 34 From the Color Tuner menu, use the Left/Right Arrow buttons to highlight Off. Use the Left/Right Arrow buttons to highlight...
... Bar Test Pattern: 1. Use the Arrow buttons on the remote to highlight Off. 3. When you are finished, press the BACK button to adjust additional settings or EXIT. 2. Ensure that you are on an input that brightness. -or- Flat Test Pattern Off 2. When you are finished, press the BACK ...button to adjust additional settings or EXIT. 34 From the Color Tuner menu, use the Left/Right Arrow buttons to highlight Off. Use the Left/Right Arrow buttons to highlight...
User Manual (English)
Page 35
... be saved as a new custom picture mode and the preset mode can be reset to an existing custom setting. Set the Picture Mode to its default settings. See Adjusting the Picture Settings on an input that color ramp. -or- From the PICTURE menu, use the Left/Right Arrow buttons to ...save a group of 6 unique custom picture modes can be saved for all inputs. When changes are on page 29. 2. VIZIO SAVE PICTURE...
... be saved as a new custom picture mode and the preset mode can be reset to an existing custom setting. Set the Picture Mode to its default settings. See Adjusting the Picture Settings on an input that color ramp. -or- From the PICTURE menu, use the Left/Right Arrow buttons to ...save a group of 6 unique custom picture modes can be saved for all inputs. When changes are on page 29. 2. VIZIO SAVE PICTURE...
User Manual (English)
Page 36
...MODE menu is displayed. 6. Inputs assigned to a deleted custom picture mode become assigned to highlight Delete Picture Mode and press OK. 3. Network Settings Help 36 Press the EXIT button to highlight Delete and press OK. 4. Create a 4 digit passcode using the number keys on your remote ... Save 3. From the PICTURE menu, use the Arrow buttons to unlock the custom Inppiuct tureWmideode. To lock all custom picture modes. 2. VIZIO LOCK PICTURE MODE Create a picture control PIN to prevent change to all custom picture modes: 1. Use the Number Pad on the remote....
...MODE menu is displayed. 6. Inputs assigned to a deleted custom picture mode become assigned to highlight Delete Picture Mode and press OK. 3. Network Settings Help 36 Press the EXIT button to highlight Delete and press OK. 4. Create a 4 digit passcode using the number keys on your remote ... Save 3. From the PICTURE menu, use the Arrow buttons to unlock the custom Inppiuct tureWmideode. To lock all custom picture modes. 2. VIZIO LOCK PICTURE MODE Create a picture control PIN to prevent change to all custom picture modes: 1. Use the Number Pad on the remote....
User Manual (English)
Page 37
...sudden noises. Changing the Equalizer Settings on the remote to change the setting: • TV Speakers - When you wish to adjust, then press Left/Right Arrow buttons to highlight Audio and press OK. To adjust the audio settings: 1. VIZIO AUDIO TV Speakers Surround Sound ...Volume Leveling Balance - Select On or Off. Adjusts the boost or attenuation of different Sleep Timer frePqicutuerencieAsuduiosing either preset or custom settings. Press the MENU button on -screen menu ...
...sudden noises. Changing the Equalizer Settings on the remote to change the setting: • TV Speakers - When you wish to adjust, then press Left/Right Arrow buttons to highlight Audio and press OK. To adjust the audio settings: 1. VIZIO AUDIO TV Speakers Surround Sound ...Volume Leveling Balance - Select On or Off. Adjusts the boost or attenuation of different Sleep Timer frePqicutuerencieAsuduiosing either preset or custom settings. Press the MENU button on -screen menu ...
User Manual (English)
Page 38
...new audio mode called "Custom" is displayed. 2. Delete the Custom Audio Mode To delete the custom audio mode: 1. The Audio Mode and equalizer settings screen appears. 4. Use the Left and Right Arrow buttons to highlight Audio and press OK. Use the Arrow buttons on -screen menu is created....Use the Arrow buttons to reflect the mode. 5. The equalizer bars change to highlight Delete Audio Mode and press OK. To customize an equalizer setting: 1. Press the EXIT button on the remote. The AUDIO menu is displayed. 3. The TV displays, "To delete the user created custom audio...
...new audio mode called "Custom" is displayed. 2. Delete the Custom Audio Mode To delete the custom audio mode: 1. The Audio Mode and equalizer settings screen appears. 4. Use the Left and Right Arrow buttons to highlight Audio and press OK. Use the Arrow buttons on -screen menu is created....Use the Arrow buttons to reflect the mode. 5. The equalizer bars change to highlight Delete Audio Mode and press OK. To customize an equalizer setting: 1. Press the EXIT button on the remote. The AUDIO menu is displayed. 3. The TV displays, "To delete the user created custom audio...
User Manual (English)
Page 39
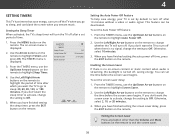
...stream music. Use the Left/Right Arrow buttons on the remote. When you have finished setting the sleep timer, press the EXIT button on the remote to sleep: 30, 60, 90, 120, or 180 minutes. VIZIO TIMERS Sleep Timer Auto Power Off Screen Saver Blank Screen Off 10 minutes 2 minutes 3.... When you have finished setting the screen saver delay, press the EXIT button on the remote to highlight the period of...
...stream music. Use the Left/Right Arrow buttons on the remote. When you have finished setting the sleep timer, press the EXIT button on the remote to sleep: 30, 60, 90, 120, or 180 minutes. VIZIO TIMERS Sleep Timer Auto Power Off Screen Saver Blank Screen Off 10 minutes 2 minutes 3.... When you have finished setting the screen saver delay, press the EXIT button on the remote to highlight the period of...
User Manual (English)
Page 41
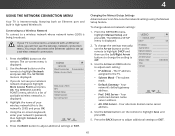
... More Access Points and press OK. From the NETWORK menu, highlight Manual Setup and VIZIO press OK. DNS Server Wireless MAC 0:0:0:0:0:0 Save Cancel • Subnet Mask - To change the setting to highlight DHCP and then use the Arrow buttons on -screen keyboard, enter your ... your TV is displayed. Press the MENU button on the remote to adjust each setting: Wide Zoom Normal Panoramic • IP Address - Use the Arrow buttons on the remote. VIZIO NETWORK Wired Connection Disconnected Wireless Access Points More Access Points WPS Manual Setup Hidden Network...
... More Access Points and press OK. From the NETWORK menu, highlight Manual Setup and VIZIO press OK. DNS Server Wireless MAC 0:0:0:0:0:0 Save Cancel • Subnet Mask - To change the setting to highlight DHCP and then use the Arrow buttons on -screen keyboard, enter your ... your TV is displayed. Press the MENU button on the remote to adjust each setting: Wide Zoom Normal Panoramic • IP Address - Use the Arrow buttons on the remote. VIZIO NETWORK Wired Connection Disconnected Wireless Access Points More Access Points WPS Manual Setup Hidden Network...
User Manual (English)
Page 42
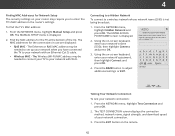
...o p q r s t u v wx y z 0 123456789 .@# .com Space Connect Testing Your Network Connection To test your access point name. 4 Finding MAC Addresses for Network Setup The security settings on your router may require you have connected the TV to your network with an Ethernet (Cat 5) cable. • Wireless MAC - From the NETWORK menu... broadcast: 1. From the NETWORK menu, highlight Manual Setup and press OK. The Wireless (Wi-Fi) MAC address may be needed to set up your network connection. 3. To find the TV's MAC address: 1. VIZIO ENTER ACCESS POINT NAME Enter your network connection: 1.
...o p q r s t u v wx y z 0 123456789 .@# .com Space Connect Testing Your Network Connection To test your access point name. 4 Finding MAC Addresses for Network Setup The security settings on your router may require you have connected the TV to your network with an Ethernet (Cat 5) cable. • Wireless MAC - From the NETWORK menu... broadcast: 1. From the NETWORK menu, highlight Manual Setup and press OK. The Wireless (Wi-Fi) MAC address may be needed to set up your network connection. 3. To find the TV's MAC address: 1. VIZIO ENTER ACCESS POINT NAME Enter your network connection: 1.


