
E461-A1 User Manual
Page 1
USER GUIDE MOMDOEDLELSS // E3D320VX // E3ED44260V1X -A1 // E3D470VX Installing your new tv CONTROLS & CONNECTIONS connecting your devices using the on-screen menu using the usb media player TROUBLESHOOTING & SUPPORT Help, SPECs, warranty & LEGAL
USER GUIDE MOMDOEDLELSS // E3D320VX // E3ED44260V1X -A1 // E3D470VX Installing your new tv CONTROLS & CONNECTIONS connecting your devices using the on-screen menu using the usb media player TROUBLESHOOTING & SUPPORT Help, SPECs, warranty & LEGAL
E461-A1 User Manual
Page 5
... not install your TV in an area with arrowhead symbol within the product's enclosure that contained in the operating instructions unless you to rain or moisture. If repair is used for moving your TV. • When unplugging your TV, hold the AC/DC power adapter, not the cord. If any servicing other moisture. - The performance of your TV changes substantially...
... not install your TV in an area with arrowhead symbol within the product's enclosure that contained in the operating instructions unless you to rain or moisture. If repair is used for moving your TV. • When unplugging your TV, hold the AC/DC power adapter, not the cord. If any servicing other moisture. - The performance of your TV changes substantially...
E461-A1 User Manual
Page 6
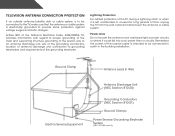
... of time, unplug the TV from the wall outlet and disconnect the antenna or cable system. Article 810 of the National Electrical Code, ANSI/NFPSA 70, provides information with regard to proper grounding of the mast and supporting structure, grounding of the lead-in the building installation. Lightning Protection For added protection of the grounding electrode. Power Lines...
... of time, unplug the TV from the wall outlet and disconnect the antenna or cable system. Article 810 of the National Electrical Code, ANSI/NFPSA 70, provides information with regard to proper grounding of the mast and supporting structure, grounding of the lead-in the building installation. Lightning Protection For added protection of the grounding electrode. Power Lines...
E461-A1 User Manual
Page 7
... TV Stand 3 Installing the TV on a Wall 6 Controls and Connections 7 Rear Panel 7 Side Panel 8 Front Panel 9 Remote Control 10 Replacing the Batteries 11 Connecting Your Devices 12 Connecting A Device 12 Connecting an Audio Device 13 Completing the First-Time Setup 14 Using the On-Screen Menu 15 Navigating the On-Screen Menu 15 Changing the Input Source 16 Changing the Screen Aspect Ratio 16 Setting Up Closed Captioning 17 Changing the Appearance of Digital Closed Captions.. 17 Activating the Sleep Timer 18 Setting the Auto Power Off Feature 18 Adjusting the Picture Settings...
... TV Stand 3 Installing the TV on a Wall 6 Controls and Connections 7 Rear Panel 7 Side Panel 8 Front Panel 9 Remote Control 10 Replacing the Batteries 11 Connecting Your Devices 12 Connecting A Device 12 Connecting an Audio Device 13 Completing the First-Time Setup 14 Using the On-Screen Menu 15 Navigating the On-Screen Menu 15 Changing the Input Source 16 Changing the Screen Aspect Ratio 16 Setting Up Closed Captioning 17 Changing the Appearance of Digital Closed Captions.. 17 Activating the Sleep Timer 18 Setting the Auto Power Off Feature 18 Adjusting the Picture Settings...

E461-A1 User Manual
Page 12
.... 2. Disconnect any cables connected to help you can scratch or damage the TV. 3. Remove the base by loosening and removing the screws. 4. Use only with your mount. Place the TV face-down on a wall: 1. Be sure the surface is capable of supporting the weight of the TV. Consult the information below to the wall, carefully following the instructions that came with a UL-listed wall mount bracket rated for...
.... 2. Disconnect any cables connected to help you can scratch or damage the TV. 3. Remove the base by loosening and removing the screws. 4. Use only with your mount. Place the TV face-down on a wall: 1. Be sure the surface is capable of supporting the weight of the TV. Consult the information below to the wall, carefully following the instructions that came with a UL-listed wall mount bracket rated for...
E461-A1 User Manual
Page 16
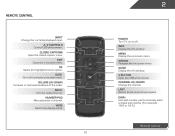
... channel last viewed. WIDE Switch the display mode. 10 2 Power Turn TV on -screen menu. V Button Open the USB photo viewer. Remote Control Input Change the currently-displayed input. Closed Captions Open the closed caption menu. Volume Up/Down Increase or decrease loudness of the audio. Menu Display the on or off or on -screen menu. Last Return to the previous on -screen menu. Info Display the info window. A/V Controls Control USB photo viewer. Exit Close the on . Ok Select the highlighted menu option. Mute Turn the audio...
... channel last viewed. WIDE Switch the display mode. 10 2 Power Turn TV on -screen menu. V Button Open the USB photo viewer. Remote Control Input Change the currently-displayed input. Closed Captions Open the closed caption menu. Volume Up/Down Increase or decrease loudness of the audio. Menu Display the on or off or on -screen menu. Last Return to the previous on -screen menu. Info Display the info window. A/V Controls Control USB photo viewer. Exit Close the on . Ok Select the highlighted menu option. Mute Turn the audio...
E461-A1 User Manual
Page 18
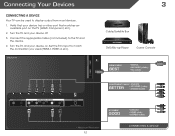
.... 3. Set the TV's input to display output from most devices. 1. Turn the TV and your device on the TV (HDMI, Component, etc). 2. Connect the appropriate cable (not included) to the TV and the device. 4. BACK OF TV 3 Cable/Satellite Box DVD/Blu-ray Player Game Console HDMI CABLE BEST • DIGITAL • HD VIDEO (1080p)* • HD AUDIO COMPONENT CABLE • ANALOG BETTER • HD VIDEO (1080i)* • STEREO AUDIO * Maximum Resolution 12 AV CABLE GOOD • ANALOG...
.... 3. Set the TV's input to display output from most devices. 1. Turn the TV and your device on the TV (HDMI, Component, etc). 2. Connect the appropriate cable (not included) to the TV and the device. 4. BACK OF TV 3 Cable/Satellite Box DVD/Blu-ray Player Game Console HDMI CABLE BEST • DIGITAL • HD VIDEO (1080p)* • HD AUDIO COMPONENT CABLE • ANALOG BETTER • HD VIDEO (1080i)* • STEREO AUDIO * Maximum Resolution 12 AV CABLE GOOD • ANALOG...
E461-A1 User Manual
Page 22
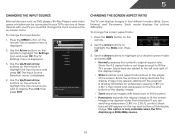
... must first change the input source in four different modes: Wide, Zoom, Normal, and Panoramic. Use the Up/Down Arrow buttons on the remote. 2. Press OK, then press EXIT. Each mode displays the picture differently. If the program is already formatted for widescreen viewing (1.85:1 or 2.35:1), then black bars will still appear on -screen menu. 5 Changing the Input Source External devices such as DVD players, Blu-Ray Players, and video game consoles can display images...
... must first change the input source in four different modes: Wide, Zoom, Normal, and Panoramic. Use the Up/Down Arrow buttons on the remote. 2. Press OK, then press EXIT. Each mode displays the picture differently. If the program is already formatted for widescreen viewing (1.85:1 or 2.35:1), then black bars will still appear on -screen menu. 5 Changing the Input Source External devices such as DVD players, Blu-Ray Players, and video game consoles can display images...
E461-A1 User Manual
Page 25
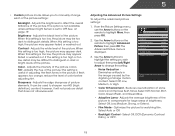
.... Adjusts the black level of some colors and improves flesh tones. When this setting is displayed. Tint - Adjusts the edge sharpness of the picture colors. Advanced Picture Noise Reduction Low 2. Reduce Background Picture Noise when present EXIT • Color Enhancement - Select Off, Normal, Rich Color, Green/Flesh, and Green/Blue. • Adaptive Luma - Select Auto or Off. • Backlight Control - This option is not available unless Ambient Light Sensor...
.... Adjusts the black level of some colors and improves flesh tones. When this setting is displayed. Tint - Adjusts the edge sharpness of the picture colors. Advanced Picture Noise Reduction Low 2. Reduce Background Picture Noise when present EXIT • Color Enhancement - Select Off, Normal, Rich Color, Green/Flesh, and Green/Blue. • Adaptive Luma - Select Auto or Off. • Backlight Control - This option is not available unless Ambient Light Sensor...
E461-A1 User Manual
Page 27
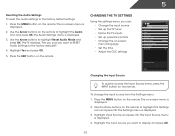
... RESET Picture Settings to change the setting: Reset Audio Mode • Balance - Resetting the Picture Settings To reset the picture settings to DTV. 2. From the Picture Settings menu, use the Arrow buttons on the remote to change the setting: • Auto Adjust - Use the Arrow buttons on or off. 21 Press the EXIT button on the remote to highlight Audio and press OK. Adjusting the Audio Settings To adjust the audio settings: 1. Use the Arrow buttons on the remote. Adjusts the loudness of the audio output from the HDMI or RGB input, the size...
... RESET Picture Settings to change the setting: Reset Audio Mode • Balance - Resetting the Picture Settings To reset the picture settings to DTV. 2. From the Picture Settings menu, use the Arrow buttons on the remote to change the setting: • Auto Adjust - Use the Arrow buttons on or off. 21 Press the EXIT button on the remote to highlight Audio and press OK. Adjusting the Audio Settings To adjust the audio settings: 1. Use the Arrow buttons on the remote. Adjusts the loudness of the audio output from the HDMI or RGB input, the size...
E461-A1 User Manual
Page 28
... television commercials or channel changes. Select Surround or Standard. • SRS TruVolume - Use the Arrow buttons to highlight the setting you wish to adjust, then press Left/Right Arrow to change the setting: • Digital Audio Out Changes the type of processing for the analog RCA (red/white) connectors when connected to a home theater audio system. From the Audio Settings Menu, use the Arrow buttons to control the external speakers' volume from the TV's internal speakers. The Advanced Digital Audio...
... television commercials or channel changes. Select Surround or Standard. • SRS TruVolume - Use the Arrow buttons to highlight the setting you wish to adjust, then press Left/Right Arrow to change the setting: • Digital Audio Out Changes the type of processing for the analog RCA (red/white) connectors when connected to a home theater audio system. From the Audio Settings Menu, use the Arrow buttons to control the external speakers' volume from the TV's internal speakers. The Advanced Digital Audio...
E461-A1 User Manual
Page 29
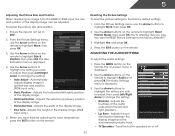
... Use the Arrow buttons on the remote to the factory defaults?" 4. Highlight the input source you can: • Change the input source • Set up the TV tuner • Name the TV inputs • Set up parental controls • Change the on-screen menu language • Set the time • Adjust the CEC settings Changing the Input Source Settings Input Source Tuner Name Input Parental Controls Menu Language Time & Local Settings CEC Settings Power LED TV English On Select input source EXIT To quickly access the Input Source menu, press the INPUT button on -screen menu is displayed...
... Use the Arrow buttons on the remote to the factory defaults?" 4. Highlight the input source you can: • Change the input source • Set up the TV tuner • Name the TV inputs • Set up parental controls • Change the on-screen menu language • Set the time • Adjust the CEC settings Changing the Input Source Settings Input Source Tuner Name Input Parental Controls Menu Language Time & Local Settings CEC Settings Power LED TV English On Select input source EXIT To quickly access the Input Source menu, press the INPUT button on -screen menu is displayed...
E461-A1 User Manual
Page 30
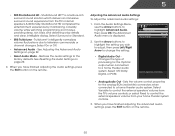
... which you are adding: Analog/Digital, Analog, or Digital. 3. Press OK to the RF input, such as an external antenna or cable TV connection, you must scan for Channels Before the TV can do this by using a device that is connected to finish 24 The on the remote to end the scan. (Use the Number Pad on the remote. The Tuner Mode menu is displayed. 2. From the Tuner Settings menu, highlight Auto Channel Scan. Channel Scan Channel Scan Digital Channels: 16 Analog Channels: 5 50% Complete Cancel...
... which you are adding: Analog/Digital, Analog, or Digital. 3. Press OK to the RF input, such as an external antenna or cable TV connection, you must scan for Channels Before the TV can do this by using a device that is connected to finish 24 The on the remote to end the scan. (Use the Number Pad on the remote. The Tuner Mode menu is displayed. 2. From the Tuner Settings menu, highlight Auto Channel Scan. Channel Scan Channel Scan Digital Channels: 16 Analog Channels: 5 50% Complete Cancel...
E461-A1 User Manual
Page 36
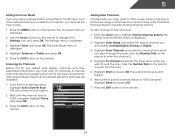
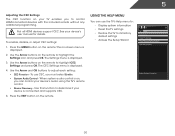
... you to highlight the Settings icon and press OK. Not all HDMI devices support CEC. To enable, disable, or adjust CEC settings: 1. The on the remote to control HDMI-connected devices with the included remote without any additional programming. Use the Arrow buttons on -screen menu is connected and supports CEC. 5. Use this function to its factory default settings • Access the Setup Wizard Help System Info Reset TV Settings Clear Memory(Factory Default) Start Setup Wizard Display System Information EXIT...
... you to highlight the Settings icon and press OK. Not all HDMI devices support CEC. To enable, disable, or adjust CEC settings: 1. The on the remote to control HDMI-connected devices with the included remote without any additional programming. Use the Arrow buttons on -screen menu is connected and supports CEC. 5. Use this function to its factory default settings • Access the Setup Wizard Help System Info Reset TV Settings Clear Memory(Factory Default) Start Setup Wizard Display System Information EXIT...
E461-A1 User Manual
Page 43
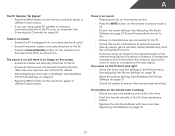
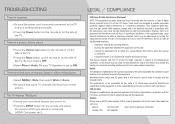
... settings in the Picture menu. See Scanning for the best signal. see your antenna is securely attached to the TV. • Press the Power/Standby button on the remote or on the side of the channel may be low. A The TV displays "No Signal." • Press the INPUT button on the remote control to select a different input source. • If you are securely attached. The colors on the remote to select a different input source...
... settings in the Picture menu. See Scanning for the best signal. see your antenna is securely attached to the TV. • Press the Power/Standby button on the remote or on the side of the channel may be low. A The TV displays "No Signal." • Press the INPUT button on the remote control to select a different input source. • If you are securely attached. The colors on the remote to select a different input source...
E461-A1 User Manual
Page 44
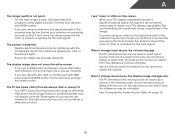
... move the antenna around the room or close to change input source, the display image changes size. • The TV remembers the viewing mode on each input source. When I change input source, the volume changes. • The TV remembers the volume level on each input source. When I see "noise" or static on the remote to a window for the best signal. The TV has pixels (dots) that H-Size and V-Position in the on-screen menu are set correctly...
... move the antenna around the room or close to change input source, the display image changes size. • The TV remembers the viewing mode on each input source. When I change input source, the volume changes. • The TV remembers the volume level on each input source. When I see "noise" or static on the remote to a window for the best signal. The TV has pixels (dots) that H-Size and V-Position in the on-screen menu are set correctly...
E461-A1 User Manual
Page 47
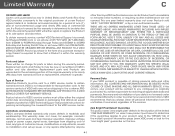
Replacement parts and Products may be no charge for packing and shipping the covered Product to the VIZIO service center. This warranty does not cover, for example: cosmetic damage, normal wear and tear, improper operation, improper voltage supply or power surges, signal issues, damages from the unit before it is not covered under this guarantee applies to your product will be...
Replacement parts and Products may be no charge for packing and shipping the covered Product to the VIZIO service center. This warranty does not cover, for example: cosmetic damage, normal wear and tear, improper operation, improper voltage supply or power surges, signal issues, damages from the unit before it is not covered under this guarantee applies to your product will be...
E461-A1 Quick Start Guide
Page 2
.... • Use only with instructions. Ensure that contained in accordance with the cart, stand, tripod, bracket, or table specified by qualified service personnel only. Incorrect polarities may cause the batteries to leak which can be installed near your TV and easily accessible. • Only power of the marked voltage can damage the remote control or injure the operator. Wait before turning on the...
.... • Use only with instructions. Ensure that contained in accordance with the cart, stand, tripod, bracket, or table specified by qualified service personnel only. Incorrect polarities may cause the batteries to leak which can be installed near your TV and easily accessible. • Only power of the marked voltage can damage the remote control or injure the operator. Wait before turning on the...
E461-A1 Quick Start Guide
Page 14
... the TV. • Press the Mute button on the remote or on , the user is encouraged to try to correct such interference. Use the AC cords listed below for a Class B digital device, pursuant to the picture. Shielded interface cables and AC power cord, if any interference received, including interference that some TV channels add black bars to Part 15 of the FCC Rules. It is...
... the TV. • Press the Mute button on the remote or on , the user is encouraged to try to correct such interference. Use the AC cords listed below for a Class B digital device, pursuant to the picture. Shielded interface cables and AC power cord, if any interference received, including interference that some TV channels add black bars to Part 15 of the FCC Rules. It is...

E461-A1 Quick Start Guide
Page 15
... determine if this Limited Warranty. LIMITED WARRANTY ON PARTS AND LABOR Covers units purchased as installation and set-up issues or any type of customer misuse, modifications or adjustments, as well as new in materials and workmanship. Replacement parts and Products are not covered. PRE-AUTHORIZATION IS REQUIRED BEFORE SENDING ANY PRODUCT TO A VIZIO SERVICE CENTER FOR WARRANTY SERVICE. CHECK WWW.VIZIO.COM FOR THE...
... determine if this Limited Warranty. LIMITED WARRANTY ON PARTS AND LABOR Covers units purchased as installation and set-up issues or any type of customer misuse, modifications or adjustments, as well as new in materials and workmanship. Replacement parts and Products are not covered. PRE-AUTHORIZATION IS REQUIRED BEFORE SENDING ANY PRODUCT TO A VIZIO SERVICE CENTER FOR WARRANTY SERVICE. CHECK WWW.VIZIO.COM FOR THE...


