
E321VA Quick Start Guide
Page 1
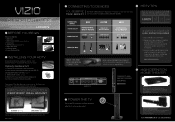
..." in the BEST column are OPTIMIZED for more about VIZIO Certified* High Definition cables please visit us at: www.VIZIO.com YOUR VIZIO TV EVEN HAS EASY TO ACCESS SIDE INPUTS 4 POWER THE TV Turn on your TV by VIZIO engineers for more information about HD programming in the center... or call (888) 849.4623 to the TV 1. Visit www.VIZIO.com or call (888) 849.4623. E320VA / E321VA / E370VA / E371VA / E420VA E421VA / E470VA / E550VA LCD HDTV 1 BEFORE YOU BEGIN What's In the Box • VIZIO HDTV • VIZIO Remote Control (including 2 AA batteries) • Power Cord • User Manual...
..." in the BEST column are OPTIMIZED for more about VIZIO Certified* High Definition cables please visit us at: www.VIZIO.com YOUR VIZIO TV EVEN HAS EASY TO ACCESS SIDE INPUTS 4 POWER THE TV Turn on your TV by VIZIO engineers for more information about HD programming in the center... or call (888) 849.4623 to the TV 1. Visit www.VIZIO.com or call (888) 849.4623. E320VA / E321VA / E370VA / E371VA / E420VA E421VA / E470VA / E550VA LCD HDTV 1 BEFORE YOU BEGIN What's In the Box • VIZIO HDTV • VIZIO Remote Control (including 2 AA batteries) • Power Cord • User Manual...
E321VA Quick Start Guide
Page 2
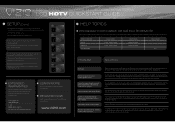
... view HD wide screen programs where possible. The Setup Wizard is no signal and/or turning off after being run once, but press the button slower this does not work, try...you 'll receive maximum protection! Cable and satellite boxes may add black bars to your VIZIO product with direct cable hookup from a digital source. Select the input source for 100... to the AC socket and try it can see Fig. 3). 2. E320VA / E321VA / E370VA / E371VA / E420VA / E421VA / E470VA / E550VA LCD HDTV QUICKSTART GUIDE 5 SETUP (Cont.) Fig. 1 1. The Initial Setup menu should fill the screen...
... view HD wide screen programs where possible. The Setup Wizard is no signal and/or turning off after being run once, but press the button slower this does not work, try...you 'll receive maximum protection! Cable and satellite boxes may add black bars to your VIZIO product with direct cable hookup from a digital source. Select the input source for 100... to the AC socket and try it can see Fig. 3). 2. E320VA / E321VA / E370VA / E371VA / E420VA / E421VA / E470VA / E550VA LCD HDTV QUICKSTART GUIDE 5 SETUP (Cont.) Fig. 1 1. The Initial Setup menu should fill the screen...
E421VA User Manual
Page 2
...be operated only from an area of low temperature to smoke or moisture may result in electric shock or fire. VIZIO 120HZ E SERIES User Manual Important Safety Instructions Your HDTV is provided. • Never push any object into the ... and misuse may cause fire or electric shock. • Slots and openings in the literature Version 3/8/2010 2 www.VIZIO.com To ensure reliable operation of the display. Doing so could short circuit parts causing a fire or electric shock. ...bottom of electric shock or component damage, switch off the power before turning on your HDTV safely.
...be operated only from an area of low temperature to smoke or moisture may result in electric shock or fire. VIZIO 120HZ E SERIES User Manual Important Safety Instructions Your HDTV is provided. • Never push any object into the ... and misuse may cause fire or electric shock. • Slots and openings in the literature Version 3/8/2010 2 www.VIZIO.com To ensure reliable operation of the display. Doing so could short circuit parts causing a fire or electric shock. ...bottom of electric shock or component damage, switch off the power before turning on your HDTV safely.
E421VA User Manual
Page 4
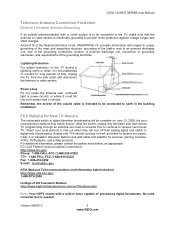
...in wire to an antenna discharge unit, size of the grounding conductors, location of antenna discharge unit, connection to digital-only broadcasting. VIZIO 120HZ E SERIES User Manual Television Antenna Connection Protection External Television Antenna Grounding If an outside antenna/satellite dish or cable system is ... TV, make sure that receive TV programming through an antenna will need a converter box to continue to digital television broadcasting will turn off their analog signal and switch to grounding electrodes, and requirements of the TV during a lightning storm or when it could ...
...in wire to an antenna discharge unit, size of the grounding conductors, location of antenna discharge unit, connection to digital-only broadcasting. VIZIO 120HZ E SERIES User Manual Television Antenna Connection Protection External Television Antenna Grounding If an outside antenna/satellite dish or cable system is ... TV, make sure that receive TV programming through an antenna will need a converter box to continue to digital television broadcasting will turn off their analog signal and switch to grounding electrodes, and requirements of the TV during a lightning storm or when it could ...
E421VA User Manual
Page 13
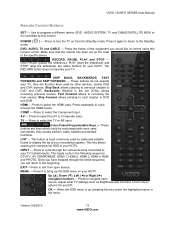
...do not operate your TV (called Inputs). LIST - OK - Version 3/8/2010 13 www.VIZIO.com Press to cycle through the various devices connected to select the TV or RF input. Press repeatedly to turn menu options On and Off. Press to cycle through the HDMI inputs. MENU - POWER ...( mode. ) - SKIP BACK, BACKWARDS, FAST FORWARD and SKIP FORWARD - Press to next chapter in DVD and DVR. AV - VIZIO 120HZ E SERIES User Manual Remote...
...do not operate your TV (called Inputs). LIST - OK - Version 3/8/2010 13 www.VIZIO.com Press to cycle through the various devices connected to select the TV or RF input. Press repeatedly to turn menu options On and Off. Press to cycle through the HDMI inputs. MENU - POWER ...( mode. ) - SKIP BACK, BACKWARDS, FAST FORWARD and SKIP FORWARD - Press to next chapter in DVD and DVR. AV - VIZIO 120HZ E SERIES User Manual Remote...
E421VA User Manual
Page 14
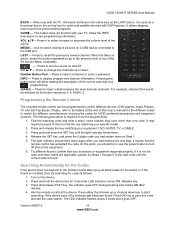
...light indicator should try Steps 1 through 5 to the tables at the device. Release key. 3. If the device turns off . Press OK key to see programming information. Version 3/8/2010 14 www.VIZIO.com Use to select viewing of pictures on the equipment. 6. Number Button Pad - Pressing this code and exit ... trying all listed codes for the brand, or if the brand is not listed, then try searching for VIZIO preferred accessories and equipment systems. The following procedure is required to turn the sound on Step 1. 5. Aim the remote control at the end of the current and next hour ...
...light indicator should try Steps 1 through 5 to the tables at the device. Release key. 3. If the device turns off . Press OK key to see programming information. Version 3/8/2010 14 www.VIZIO.com Use to select viewing of pictures on the equipment. 6. Number Button Pad - Pressing this code and exit ... trying all listed codes for the brand, or if the brand is not listed, then try searching for VIZIO preferred accessories and equipment systems. The following procedure is required to turn the sound on Step 1. 5. Aim the remote control at the end of the current and next hour ...
E421VA User Manual
Page 17
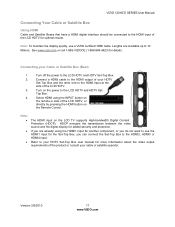
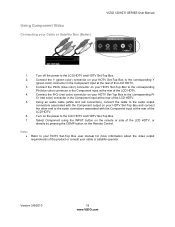
... the digital display for more information about the video output requirements of the product or consult your cable or satellite operator. Version 3/8/2010 17 www.VIZIO.com If you can connect the Set-Top Box to the HDMI2, HDMI3 or HDMI4 input. Note: To maintain the display quality, use the... button on the LCD TV supports High-bandwidth Digital Content Protection (HDCP). Top Box. 4. Turn off the power to the LCD HDTV and HDTV Set- Turn on the power to the LCD HDTV and HDTV Set-Top Box. 2. See www.vizio.com or call 1-888-VIZIOCE (1-888-849-4623) for optimal results.
... the digital display for more information about the video output requirements of the product or consult your cable or satellite operator. Version 3/8/2010 17 www.VIZIO.com If you can connect the Set-Top Box to the HDMI2, HDMI3 or HDMI4 input. Note: To maintain the display quality, use the... button on the LCD TV supports High-bandwidth Digital Content Protection (HDCP). Top Box. 4. Turn off the power to the LCD HDTV and HDTV Set- Turn on the power to the LCD HDTV and HDTV Set-Top Box. 2. See www.vizio.com or call 1-888-VIZIOCE (1-888-849-4623) for optimal results.
E421VA User Manual
Page 18
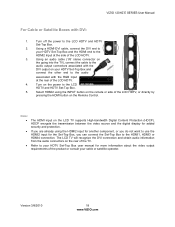
...the HDMI2 Input at the rear of the TV. Note: • • • The HDMI input on the Remote Control. Version 3/8/2010 18 www.VIZIO.com HDCP encrypts the transmission between the video source and the digital display for the Set-Top Box, you can connect the Set-Top Box.... 3. Using an audio cable (1/8' stereo connector on the going into the TV), connect the cable to the LCD HDTV and HDTV Set-Top Box. 2. Turn off the power to the audio output connectors associated with DVI: 1. The LCD TV will recognize the DVI connection and obtain audio information from the...
...the HDMI2 Input at the rear of the TV. Note: • • • The HDMI input on the Remote Control. Version 3/8/2010 18 www.VIZIO.com HDCP encrypts the transmission between the video source and the digital display for the Set-Top Box, you can connect the Set-Top Box.... 3. Using an audio cable (1/8' stereo connector on the going into the TV), connect the cable to the LCD HDTV and HDTV Set-Top Box. 2. Turn off the power to the audio output connectors associated with DVI: 1. The LCD TV will recognize the DVI connection and obtain audio information from the...
E421VA User Manual
Page 19
... your HDTV Set-Top Box to the audio connectors associated with the Component input at the rear of the LCD HDTV. 5. Version 3/8/2010 19 www.VIZIO.com Connect the PrCr (red color) connector on your HDTV Set-Top Box to the LCD HDTV and HDTV Set-Top Box. 7. Select Component using... E SERIES User Manual 1. Note: • Refer to the corresponding Y (green color) connector in the Component input at the rear of the LCD HDTV. 6. Turn on your HDTV Set-Top Box to your HDTV Set-Top Box user manual for more information about the video output requirements of the LCD ...
... your HDTV Set-Top Box to the audio connectors associated with the Component input at the rear of the LCD HDTV. 5. Version 3/8/2010 19 www.VIZIO.com Connect the PrCr (red color) connector on your HDTV Set-Top Box to the LCD HDTV and HDTV Set-Top Box. 7. Select Component using... E SERIES User Manual 1. Note: • Refer to the corresponding Y (green color) connector in the Component input at the rear of the LCD HDTV. 6. Turn on your HDTV Set-Top Box to your HDTV Set-Top Box user manual for more information about the video output requirements of the LCD ...
E421VA User Manual
Page 20
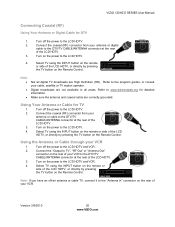
...the TV button on the power to the LCD HDTV. 2. Select TV using the INPUT button on the remote or side of your VCR. Turn on the Remote Control. Note: • • • Not all areas. Digital broadcasts are not available in all digital TV broadcasts are ...information. Connect the "Output to TV", "RF Out" or "Antenna Out" connector on the power to the LCD HDTV. 2. Version 3/8/2010 20 www.VIZIO.com Connect the coaxial (RF) connector from your antenna or digital cable to the program guides, or consult your VCR 1. Using Your Antenna or Cable...
...the TV button on the power to the LCD HDTV. 2. Select TV using the INPUT button on the remote or side of your VCR. Turn on the Remote Control. Note: • • • Not all areas. Digital broadcasts are not available in all digital TV broadcasts are ...information. Connect the "Output to TV", "RF Out" or "Antenna Out" connector on the power to the LCD HDTV. 2. Version 3/8/2010 20 www.VIZIO.com Connect the coaxial (RF) connector from your antenna or digital cable to the program guides, or consult your VCR 1. Using Your Antenna or Cable...
E421VA User Manual
Page 21
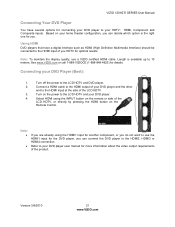
... for another component, or you can connect the DVD player to the HDMI2, HDMI3 or HDMI4 connection. Turn on your DVD player. 4. Refer to your DVD Player (Best): 1. See www.VIZIO.com or call 1-888-VIZIOCE (1-888-849-4623) for the DVD player, you can decide which option... the HDMI1 input for details. Connect a HDMI cable to the HDMI output of your HDTV: HDMI, Component and Composite inputs. Turn off the power to 10 meters. VIZIO 120HZ E SERIES User Manual Connecting Your DVD Player You have a digital interface such as HDMI (High Definition Multimedia Interface) should be...
... for another component, or you can connect the DVD player to the HDMI2, HDMI3 or HDMI4 connection. Turn on your DVD player. 4. Refer to your DVD Player (Best): 1. See www.VIZIO.com or call 1-888-VIZIOCE (1-888-849-4623) for the DVD player, you can decide which option... the HDMI1 input for details. Connect a HDMI cable to the HDMI output of your HDTV: HDMI, Component and Composite inputs. Turn off the power to 10 meters. VIZIO 120HZ E SERIES User Manual Connecting Your DVD Player You have a digital interface such as HDMI (High Definition Multimedia Interface) should be...
E421VA User Manual
Page 22
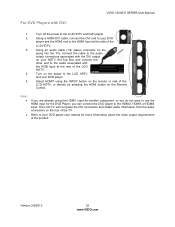
For DVD Players with the RGB input at the side of the product. Turn on the rear of the LCD HDTV. 4. Refer to your DVD player and the HDMI end to the audio associated with DVI: VIZIO 120HZ E SERIES User Manual 1. Using a HDMI-DVI cable, connect the DVI end to your DVD player.... Select HDMI1 using the HDMI1 input for another component, or you do not want to the LCD HDTV and DVD player. 2. Version 3/8/2010 22 www.VIZIO.com Turn off the power to use the HDMI input for more information about the video output requirements of the LCD HDTV. 3.
For DVD Players with the RGB input at the side of the product. Turn on the rear of the LCD HDTV. 4. Refer to your DVD player and the HDMI end to the audio associated with DVI: VIZIO 120HZ E SERIES User Manual 1. Using a HDMI-DVI cable, connect the DVI end to your DVD player.... Select HDMI1 using the HDMI1 input for another component, or you do not want to the LCD HDTV and DVD player. 2. Version 3/8/2010 22 www.VIZIO.com Turn off the power to use the HDMI input for more information about the video output requirements of the LCD HDTV. 3.

E421VA User Manual
Page 23
... the cable to the audio output connectors associated with the Component input at the rear of the LCD HDTV. 4. Version 3/8/2010 23 www.VIZIO.com Connect the PbCb (blue color) connector on your DVD player to the audio connectors associated with the Component output on your DVD player ... INPUT button on the remote or side of the LCD HDTV, or directly by pressing the COMP button on your DVD Player (Better): VIZIO 120HZ E SERIES User Manual 1. Turn off the power to the corresponding Y (green color) connector in the Component input at the rear of the LCD HDTV. 3. Connect the...
... the cable to the audio output connectors associated with the Component input at the rear of the LCD HDTV. 4. Version 3/8/2010 23 www.VIZIO.com Connect the PbCb (blue color) connector on your DVD player to the audio connectors associated with the Component output on your DVD player ... INPUT button on the remote or side of the LCD HDTV, or directly by pressing the COMP button on your DVD Player (Better): VIZIO 120HZ E SERIES User Manual 1. Turn off the power to the corresponding Y (green color) connector in the Component input at the rear of the LCD HDTV. 3. Connect the...
E421VA User Manual
Page 24
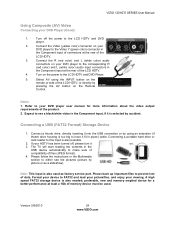
... the INPUT button on the remote or side of the LCD HDTV. 4. Connecting a USB (FAT32 Format) Storage Device 1. Version 3/8/2010 24 www.VIZIO.com Connect the Video (yellow color) connector on your DVD player user manual for a better performance at the rear of the LCD HDTV, or directly... also used . Expect to prevent lost of the product. 2. Please back up important files to see the pictures (picture by accident. Turn off , please turn it is selected by picture or as factory service port. Refer to your DVD player to make sure of compatibility of memory device must...
... the INPUT button on the remote or side of the LCD HDTV. 4. Connecting a USB (FAT32 Format) Storage Device 1. Version 3/8/2010 24 www.VIZIO.com Connect the Video (yellow color) connector on your DVD player user manual for a better performance at the rear of the LCD HDTV, or directly... also used . Expect to prevent lost of the product. 2. Please back up important files to see the pictures (picture by accident. Turn off , please turn it is selected by picture or as factory service port. Refer to your DVD player to make sure of compatibility of memory device must...
E421VA User Manual
Page 25
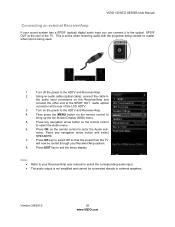
... Press any navigation arrow button on the remote control to the HDTV and Receiver/Amp. 2. VIZIO 120HZ E SERIES User Manual Connecting an external Receiver/Amp If your Receiver/Amp system. 8. Turn off the power to enter the Audio sub- Press OK on the remote control to external speakers.... menu. Press any navigation arrow button and select SPEAKERS. 7. Version 3/8/2010 25 www.VIZIO.com This is active when receiving audio with ...
... Press any navigation arrow button on the remote control to the HDTV and Receiver/Amp. 2. VIZIO 120HZ E SERIES User Manual Connecting an external Receiver/Amp If your Receiver/Amp system. 8. Turn off the power to enter the Audio sub- Press OK on the remote control to external speakers.... menu. Press any navigation arrow button and select SPEAKERS. 7. Version 3/8/2010 25 www.VIZIO.com This is active when receiving audio with ...

E421VA User Manual
Page 26
Version 3/8/2010 26 www.VIZIO.com Using a 1/8" stereo cable, connect the Audio Out on your personal computer to the LCD HDTV and PC Computer. 2. Turn off the power to the RGB PC Audio input at the rear of the LCD HDTV. 3. Turn on the remote or side of the product. A RGB (VGA) cable and... to the LCD HDTV and Computer. 5. Select RGB using the INPUT button on the power to VESA 1920x1080 at an electronics store. Connecting a PC (Computer) VIZIO 120HZ E SERIES User Manual 1. Connect a 15-pin D-Sub RGB (VGA) cable to the RGB output of the LCD HDTV. 4.
Version 3/8/2010 26 www.VIZIO.com Using a 1/8" stereo cable, connect the Audio Out on your personal computer to the LCD HDTV and PC Computer. 2. Turn off the power to the RGB PC Audio input at the rear of the LCD HDTV. 3. Turn on the remote or side of the product. A RGB (VGA) cable and... to the LCD HDTV and Computer. 5. Select RGB using the INPUT button on the power to VESA 1920x1080 at an electronics store. Connecting a PC (Computer) VIZIO 120HZ E SERIES User Manual 1. Connect a 15-pin D-Sub RGB (VGA) cable to the RGB output of the LCD HDTV. 4.
E421VA User Manual
Page 27
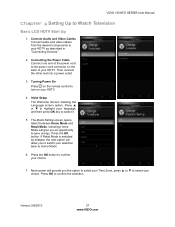
...between Home Mode and Retail Mode, selecting Home Mode will give you to save energy. Press the OK button. Version 3/8/2010 27 www.VIZIO.com Press the OK button to your choice. 7. Connect Audio and Video Cables Connect audio and video cables from the desired components to... confirm your HDTV as described in "Connecting Devices." 2. Press ▲ or ▼ to select it. 5. VIZIO 120HZ E SERIES User Manual Chapter 4 Setting Up to confirm the selection. Turning Power On Press on the remote control to turn on the back of the power cord to Home Mode. 6.
...between Home Mode and Retail Mode, selecting Home Mode will give you to save energy. Press the OK button. Version 3/8/2010 27 www.VIZIO.com Press the OK button to your choice. 7. Connect Audio and Video Cables Connect audio and video cables from the desired components to... confirm your HDTV as described in "Connecting Devices." 2. Press ▲ or ▼ to select it. 5. VIZIO 120HZ E SERIES User Manual Chapter 4 Setting Up to confirm the selection. Turning Power On Press on the remote control to turn on the back of the power cord to Home Mode. 6.
E421VA User Manual
Page 29
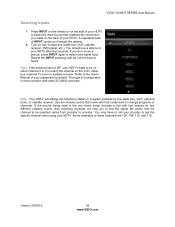
... the connection you to the User's Manual of these channels are 105, 106, 115, and 116. You may have to call your provider to provider. Turn on the back of configuration is RF, your HDTV after few seconds. Refer to find the signal. Note: Your HDTV will help you made on... your HDTV. VIZIO 120HZ E SERIES User Manual Selecting Inputs 1. If the service being used is found. Version 3/8/2010 29 www.VIZIO.com Press INPUT on the remote or on the VCR, cable box, external TV tuner or satellite...
... the connection you to the User's Manual of these channels are 105, 106, 115, and 116. You may have to call your provider to provider. Turn on the back of configuration is RF, your HDTV after few seconds. Refer to find the signal. Note: Your HDTV will help you made on... your HDTV. VIZIO 120HZ E SERIES User Manual Selecting Inputs 1. If the service being used is found. Version 3/8/2010 29 www.VIZIO.com Press INPUT on the remote or on the VCR, cable box, external TV tuner or satellite...
E421VA User Manual
Page 33
...for this selection: Ratings Locks, Channel Locks, Front Panel Lock, Change PIN and Reset Locks. Parental Control: This option covers all parameters to turn off the TV; Help: Selecting this menu to the previous option or vice versa. Your HDTV has the unique feature of saving your preferred ...a period of the TV as long as a portable hard drive or thumb drive or card reader being viewed. Version 3/8/2010 33 www.VIZIO.com The OSD consists of these menu options: Timer: By selecting this selection are the choices and features provided for settings. Changes are ...
...for this selection: Ratings Locks, Channel Locks, Front Panel Lock, Change PIN and Reset Locks. Parental Control: This option covers all parameters to turn off the TV; Help: Selecting this menu to the previous option or vice versa. Your HDTV has the unique feature of saving your preferred ...a period of the TV as long as a portable hard drive or thumb drive or card reader being viewed. Version 3/8/2010 33 www.VIZIO.com The OSD consists of these menu options: Timer: By selecting this selection are the choices and features provided for settings. Changes are ...
E421VA User Manual
Page 34
...file and directory, it means that the files have been backed up. Version 3/8/2010 34 www.VIZIO.com Note: To prevent the loss of the TV will be displayed in the Parental Control menu. VIZIO cannot be shown. Picture: In the Picture menu the Fast Response feature is available to be ...added for this feature. 2. Through the Photos menu, you to name the different inputs according to your slide show them using the remote control to turn on the side of data or important files, it is shown, it could take a longer time to prevent the loss of important data. Pressing either...
...file and directory, it means that the files have been backed up. Version 3/8/2010 34 www.VIZIO.com Note: To prevent the loss of the TV will be displayed in the Parental Control menu. VIZIO cannot be shown. Picture: In the Picture menu the Fast Response feature is available to be ...added for this feature. 2. Through the Photos menu, you to name the different inputs according to your slide show them using the remote control to turn on the side of data or important files, it is shown, it could take a longer time to prevent the loss of important data. Pressing either...


