User Manual (English)
Page 3
...at plugs, convenience receptacles, and the point where they exit from being damaged, the following safety instructions before using your investment beyond the standard warranty, VIZIO offers on-site extended warranty service plans. Install in electric shock or fire. A grounding type plug has two...the most out of mind, and to ensure there are provided for the installation, use this apparatus near any ventilation openings. Welcome THANK YOU FOR CHOOSING VIZIO IMPORTANT SAFETY INSTRUCTIONS And congratulations on your safety. Read the following instructions should be ...
...at plugs, convenience receptacles, and the point where they exit from being damaged, the following safety instructions before using your investment beyond the standard warranty, VIZIO offers on-site extended warranty service plans. Install in electric shock or fire. A grounding type plug has two...the most out of mind, and to ensure there are provided for the installation, use this apparatus near any ventilation openings. Welcome THANK YOU FOR CHOOSING VIZIO IMPORTANT SAFETY INSTRUCTIONS And congratulations on your safety. Read the following instructions should be ...
User Manual (English)
Page 4
..., consult your dealer or local power company. • Do not apply pressure or throw objects at least three feet should be replaced when using different voltage than the specified voltage may cause fire or electric shock. • Slots and openings in a bookcase or cabinet unless proper ventilation...improper installations. • The power cord must be operated only from an area of low temperature to qualified service personnel. This may be used , use caution when moving your TV from the type of your TV. When a cart is always flowing into the slots and openings on the top...
..., consult your dealer or local power company. • Do not apply pressure or throw objects at least three feet should be replaced when using different voltage than the specified voltage may cause fire or electric shock. • Slots and openings in a bookcase or cabinet unless proper ventilation...improper installations. • The power cord must be operated only from an area of low temperature to qualified service personnel. This may be used , use caution when moving your TV from the type of your TV. When a cart is always flowing into the slots and openings on the top...
User Manual (English)
Page 5
... your TV. To reduce the risk of electrical shock to do not perform any servicing other moisture. - When your dealer for use by qualified service personnel only. If any of uninsulated DANGEROUS VOLTAGE within the product's enclosure that may be placed on the power cord...8226; The mains plug or appliance coupler is damaged, the internal components may result in fire or electric shock. • Do not use of your dealer immediately. Liquid sprays or any abnormality occurs. These servicing instructions are unplugged before moving your TV in environments with heavy ...
... your TV. To reduce the risk of electrical shock to do not perform any servicing other moisture. - When your dealer for use by qualified service personnel only. If any of uninsulated DANGEROUS VOLTAGE within the product's enclosure that may be placed on the power cord...8226; The mains plug or appliance coupler is damaged, the internal components may result in fire or electric shock. • Do not use of your dealer immediately. Liquid sprays or any abnormality occurs. These servicing instructions are unplugged before moving your TV in environments with heavy ...
User Manual (English)
Page 7
...ARC 22 Connecting to your Network 23 Connecting to a Wired Network (Best 23 Connecting to a Wireless Network 23 Completing the First-Time Setup 24 Using the On-Screen Menu 26 Navigating the On-Screen Menu 26 Changing the Input Source 26 Changing the Screen Aspect Ratio 27 Viewing Video with... Setting Timers 39 Setting the Sleep Timer 39 Setting the Auto Power Off Feature 39 Enabling the Screen Saver 39 Blanking the Screen 40 Using the Network Connection Menu 41 Connecting to a Wireless Network 41 Changing the Manual Setup Settings 41 Finding MAC Addresses for Network Setup 42 ...
...ARC 22 Connecting to your Network 23 Connecting to a Wired Network (Best 23 Connecting to a Wireless Network 23 Completing the First-Time Setup 24 Using the On-Screen Menu 26 Navigating the On-Screen Menu 26 Changing the Input Source 26 Changing the Screen Aspect Ratio 27 Viewing Video with... Setting Timers 39 Setting the Sleep Timer 39 Setting the Auto Power Off Feature 39 Enabling the Screen Saver 39 Blanking the Screen 40 Using the Network Connection Menu 41 Connecting to a Wireless Network 41 Changing the Manual Setup Settings 41 Finding MAC Addresses for Network Setup 42 ...
User Manual (English)
Page 8
...57 Enabling and Disabling Smart Interactivity 57 Using the Guided Setup Menu 58 Using the Info Window 59 Using the USB Media Player 60 Using the USB Media Player 60 Preparing your USB drive to the My Apps Tab 67 Deleting an App from the TV 60 Using VIZIO Internet Apps Plus® (V.I .A.... Plus Apps Window 65 Fullscreen V.I .A. Plus App Dock 64 Using the App Launcher Keys 64 Using the Fullscreen V.I .A. Plus Apps Window 67 Adding an App to display USB Media ...
...57 Enabling and Disabling Smart Interactivity 57 Using the Guided Setup Menu 58 Using the Info Window 59 Using the USB Media Player 60 Using the USB Media Player 60 Preparing your USB drive to the My Apps Tab 67 Deleting an App from the TV 60 Using VIZIO Internet Apps Plus® (V.I .A.... Plus Apps Window 65 Fullscreen V.I .A. Plus App Dock 64 Using the App Launcher Keys 64 Using the Fullscreen V.I .A. Plus Apps Window 67 Adding an App to display USB Media ...

User Manual (English)
Page 9
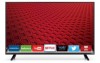
VIZIO LED HDTV Remote Control with Batteries 2 x Quick Start Guides (1 x English, 1 x French/Spanish) TV Stands Power Cord 9 4 x Phillips Screws PACKAGE CONTENTS Installing the TV 1 INSPECTING THE PACKAGE CONTENTS Before installing your new TV, take a moment to ensure nothing is missing or damaged. Use the images below to inspect the package contents.
VIZIO LED HDTV Remote Control with Batteries 2 x Quick Start Guides (1 x English, 1 x French/Spanish) TV Stands Power Cord 9 4 x Phillips Screws PACKAGE CONTENTS Installing the TV 1 INSPECTING THE PACKAGE CONTENTS Before installing your new TV, take a moment to ensure nothing is missing or damaged. Use the images below to inspect the package contents.
User Manual (English)
Page 10
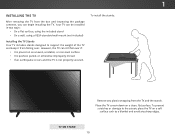
... any plastic wrapping from the box and inspecting the package contents, you can be installed in two ways: • On a flat surface, using the included stand • On a wall, using a VESA-standard wall mount (not included) Installing the TV Stands Your TV includes stands designed to support the weight of the TV...
... any plastic wrapping from the box and inspecting the package contents, you can be installed in two ways: • On a flat surface, using the included stand • On a wall, using a VESA-standard wall mount (not included) Installing the TV Stands Your TV includes stands designed to support the weight of the TV...
User Manual (English)
Page 11
When you are identical.) Secure each stand to the TV with two Phillips screws (included). Insert the screws into the base of the TV and tighten them using a Phillips screwdriver. 1 Insert the left and right stands into the back of the TV. (The stands are finished, place the TV on a stable, level surface. 11
When you are identical.) Secure each stand to the TV with two Phillips screws (included). Insert the screws into the base of the TV and tighten them using a Phillips screwdriver. 1 Insert the left and right stands into the back of the TV. (The stands are finished, place the TV on a stable, level surface. 11

User Manual (English)
Page 12
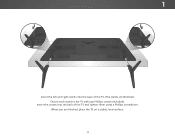
... removing the screws. 4. Use only with your TV. 2. Consult the information below to help you can scratch or damage the TV. 3. To prevent injury or damage to the TV, ask someone to find the appropriate mount for the weight/load of this TV. E40-C2 E40x-C2 E43-C2 E48-C2 E55-C2 E65x-C2 Screw Size: M6...
... removing the screws. 4. Use only with your TV. 2. Consult the information below to help you can scratch or damage the TV. 3. To prevent injury or damage to the TV, ask someone to find the appropriate mount for the weight/load of this TV. E40-C2 E40x-C2 E43-C2 E48-C2 E55-C2 E65x-C2 Screw Size: M6...
User Manual (English)
Page 13
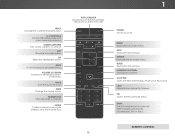
1 REMOTE SENSOR & POWER INDICATOR When using the remote, point it directly at this sensor. The power indicator flashes on when the TV turns on page 56. 13 FRONT PANEL To keep the power indicator on as long as the TV is on, see Turning the Power Indicator On or Off on , then goes out after several seconds.
1 REMOTE SENSOR & POWER INDICATOR When using the remote, point it directly at this sensor. The power indicator flashes on when the TV turns on page 56. 13 FRONT PANEL To keep the power indicator on as long as the TV is on, see Turning the Power Indicator On or Off on , then goes out after several seconds.
User Manual (English)
Page 15
ENTER Confirm channel or passcode entered using the Number Pad. APP LAUNCHER Quickly launch the pictured App. (Also turns on the TV if it is off.)...MENU Display the on -screen menu. GUIDE Display the info window. Plus) dock. PIC Opens the Picture Mode menu. V BUTTON Open the VIZIO Internet Apps Plus® (V.I.A. CLOSED CAPTIONS Turn closed captions on . EXIT Close the on -screen menu. ARROW Navigate the on -screen ... the audio off or on and off . NUMBER PAD Manually enter a channel. INFO Display the info window. DASH Use with number pad to the channel last viewed.
ENTER Confirm channel or passcode entered using the Number Pad. APP LAUNCHER Quickly launch the pictured App. (Also turns on the TV if it is off.)...MENU Display the on -screen menu. GUIDE Display the info window. Plus) dock. PIC Opens the Picture Mode menu. V BUTTON Open the VIZIO Internet Apps Plus® (V.I.A. CLOSED CAPTIONS Turn closed captions on . EXIT Close the on -screen menu. ARROW Navigate the on -screen ... the audio off or on and off . NUMBER PAD Manually enter a channel. INFO Display the info window. DASH Use with number pad to the channel last viewed.
User Manual (English)
Page 17
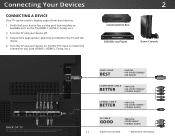
Turn the TV and your device has a video port that your device off. 3. The actual number of ports and their locations may be used (HDMI-1, HDMI-2, Comp, etc.). 2 Cable/Satellite Box DVD/Blu-ray Player Game Console BACK OF TV Note: The image shown here is for ... and may vary, depending on . Turn the TV and your device on the model. Connect the appropriate cable (not included) to match the connection you used to display output from most devices. 1. HDMI CABLE* BEST • DIGITAL • HD VIDEO (1080p)** • HD AUDIO COMPONENT CABLE* • ANALOG BETTER •...
Turn the TV and your device has a video port that your device off. 3. The actual number of ports and their locations may be used (HDMI-1, HDMI-2, Comp, etc.). 2 Cable/Satellite Box DVD/Blu-ray Player Game Console BACK OF TV Note: The image shown here is for ... and may vary, depending on . Turn the TV and your device on the model. Connect the appropriate cable (not included) to match the connection you used to display output from most devices. 1. HDMI CABLE* BEST • DIGITAL • HD VIDEO (1080p)** • HD AUDIO COMPONENT CABLE* • ANALOG BETTER •...
User Manual (English)
Page 19
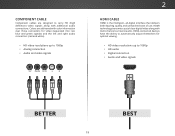
... signals COMPONENT VIDEO Y/V Pb/Cb Pr/Cr L R 2 HDMI CABLE HDMI is the intelligent, all-digital interface that delivers both dazzling quality and unmatched ease of use. HDMI technology transmits crystal-clear digital video along with additional audio connections.
... signals COMPONENT VIDEO Y/V Pb/Cb Pr/Cr L R 2 HDMI CABLE HDMI is the intelligent, all-digital interface that delivers both dazzling quality and unmatched ease of use. HDMI technology transmits crystal-clear digital video along with additional audio connections.

User Manual (English)
Page 23
... or modem broadcasting as high-speed wireless signal (802.11n recommended). 2. The actual number of the TV. See below. 2. Use the Guided Network Setup to a Wireless Network 1. See Using the Guided Setup Menu on page 58. 2 Connecting to configure the TV. It can be connected to the Ethernet port on...to change. Connect an Ethernet cable to your router and to your home network with a Wired or Wireless connection. Use the Guided Network Setup to a Wired Network (Best) 1. See Using the Guided Setup Menu on page 58. Connecting to configure the TV. CONNECTING TO YOUR NETWORK Your TV is ...
... or modem broadcasting as high-speed wireless signal (802.11n recommended). 2. The actual number of the TV. See below. 2. Use the Guided Network Setup to a Wireless Network 1. See Using the Guided Setup Menu on page 58. 2 Connecting to configure the TV. It can be connected to the Ethernet port on...to change. Connect an Ethernet cable to your router and to your home network with a Wired or Wireless connection. Use the Guided Network Setup to a Wired Network (Best) 1. See Using the Guided Setup Menu on page 58. Connecting to configure the TV. CONNECTING TO YOUR NETWORK Your TV is ...
User Manual (English)
Page 24
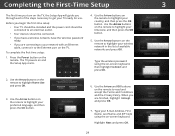
... pour Démonstration en Magasin. Highlight Next and press OK. 24 Select Store Demo for in -home use . Select Home Use for use . Use the Arrow and OK buttons on the remote. Use the Arrow buttons on the remote to highlight your wireless network in the list of the steps necessary to ... highlight your TV ready for in -store display. The TV powers on the TV. Before you are finished, highlight I Accept and press OK. 7. Use the Arrow buttons on the remote to an electrical outlet. • Your devices should be connected. • If you have a wireless network, have ...
... pour Démonstration en Magasin. Highlight Next and press OK. 24 Select Store Demo for in -home use . Select Home Use for use . Use the Arrow and OK buttons on the remote. Use the Arrow buttons on the remote to highlight your wireless network in the list of the steps necessary to ... highlight your TV ready for in -store display. The TV powers on the TV. Before you are finished, highlight I Accept and press OK. 7. Use the Arrow buttons on the remote to an electrical outlet. • Your devices should be connected. • If you have a wireless network, have ...
User Manual (English)
Page 25
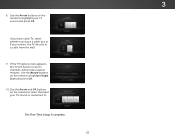
Use the Arrow buttons on the remote to highlight Begin Scan and press OK. 10. 3 8. Use the Arrow and OK buttons on the remote to select the input your TV source and press OK. If the TV Signal screen appears, the TV will need to a cable from the wall. 9. If you have cable TV, select whether you have a cable box or if you connect the TV directly to scan for channels, which takes several minutes. The First-Time Setup is connected to highlight your TV source is complete. 25 Use the Arrow buttons on the remote to .
Use the Arrow buttons on the remote to highlight Begin Scan and press OK. 10. 3 8. Use the Arrow and OK buttons on the remote to select the input your TV source and press OK. If the TV Signal screen appears, the TV will need to a cable from the wall. 9. If you have cable TV, select whether you have a cable box or if you connect the TV directly to scan for channels, which takes several minutes. The First-Time Setup is connected to highlight your TV source is complete. 25 Use the Arrow buttons on the remote to .
User Manual (English)
Page 26
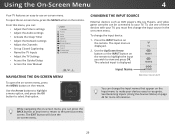
...; Set up Closed Captioning • Name the TV Inputs • Adjust the TV Settings • Access the Guided Setup • Access the User Manual VIZIO TV SETTINGS Picture Audio Timers Network Channels CC Closed Captions Devices System Guided Setup User Manual External devices such as DVD players, Blu-ray Players..., and video game consoles can be connected to the previous menu screen. To use on page 49 for more information. The input menu is displayed. You can press the BACK button at any time to return to your ...
...; Set up Closed Captioning • Name the TV Inputs • Adjust the TV Settings • Access the Guided Setup • Access the User Manual VIZIO TV SETTINGS Picture Audio Timers Network Channels CC Closed Captions Devices System Guided Setup User Manual External devices such as DVD players, Blu-ray Players..., and video game consoles can be connected to the previous menu screen. To use on page 49 for more information. The input menu is displayed. You can press the BACK button at any time to return to your ...
User Manual (English)
Page 27
... the TV is already formatted for widescreen viewing (1.85:1 or 2.35:1), then black bars will still appear on the top and bottom of the screen. Use the Arrow buttons to highlight the aspect ratio you are added to fit the screen. 27 Each mode displays the picture differently. If you wish...
... the TV is already formatted for widescreen viewing (1.85:1 or 2.35:1), then black bars will still appear on the top and bottom of the screen. Use the Arrow buttons to highlight the aspect ratio you are added to fit the screen. 27 Each mode displays the picture differently. If you wish...
User Manual (English)
Page 28
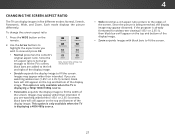
...Input Wide CC • Centered Overlay - The entire picture is resized to fit into the space to cycle through the three display methods. 3. Use the Arrow buttons on the remote to the menu. Press OK to the right of the picture while the on-screen menu is displayed: 1.... User Manual Wide Zoom Normal Panoramic Exit 2D 3D ABC Input Wide CC Sleep Timer Picture Audio Network Settings Help OVERLAY Wide Zoom VIZIO TV SETTINGS Picture Audio Timers Network Channels CC Closed Captions Devices System GNuidoedrmSetuap l User Manual Wide Zoom Normal Panoramic Exit 2D 3D ...
...Input Wide CC • Centered Overlay - The entire picture is resized to fit into the space to cycle through the three display methods. 3. Use the Arrow buttons on the remote to the menu. Press OK to the right of the picture while the on-screen menu is displayed: 1.... User Manual Wide Zoom Normal Panoramic Exit 2D 3D ABC Input Wide CC Sleep Timer Picture Audio Network Settings Help OVERLAY Wide Zoom VIZIO TV SETTINGS Picture Audio Timers Network Channels CC Closed Captions Devices System GNuidoedrmSetuap l User Manual Wide Zoom Normal Panoramic Exit 2D 3D ...

User Manual (English)
Page 29
The on the remote to highlight Picture and press OK. Use the Arrow buttons on the remote to highlight that does not otherwise exist. 5. Tint - Select from some picture modes. To manually change the picture mode: VIZIO PICTURE Picture Mode Auto Brightness Control Backlight - Select Low ... edge sharpness of the picture. It can be adjusted to adjust the setting: • Auto Brightness Control - When this setting is useful in NetworkadSjeuttsintgins g tHheelpflesh tones in dark or bright areas of the picture. The PICTURE menu is too low, the picture may appear ...
The on the remote to highlight Picture and press OK. Use the Arrow buttons on the remote to highlight that does not otherwise exist. 5. Tint - Select from some picture modes. To manually change the picture mode: VIZIO PICTURE Picture Mode Auto Brightness Control Backlight - Select Low ... edge sharpness of the picture. It can be adjusted to adjust the setting: • Auto Brightness Control - When this setting is useful in NetworkadSjeuttsintgins g tHheelpflesh tones in dark or bright areas of the picture. The PICTURE menu is too low, the picture may appear ...


