User Manual (English)
Page 5
... which can damage the remote control or injure the operator. Do not expose your TV yourself. • Avoid using dropped or damaged appliances. Continuous use in this case may result in any way. Operating your dealer immediately. Do not expose batteries to constitute a risk of your TV, hold the AC/DC power adapter, not the cord. Liquid sprays or...
... which can damage the remote control or injure the operator. Do not expose your TV yourself. • Avoid using dropped or damaged appliances. Continuous use in this case may result in any way. Operating your dealer immediately. Do not expose batteries to constitute a risk of your TV, hold the AC/DC power adapter, not the cord. Liquid sprays or...
User Manual (English)
Page 6
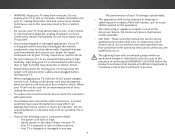
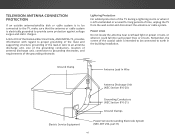
...; TELEVISION ANTENNA CONNECTION PROTECTION If an outside antenna/satellite dish or cable system is to be connected to the TV, make sure that the antenna or cable system is intended to be connected to earth in wire to an antenna discharge unit, size of the grounding conductors, location of antenna discharge unit, connection to grounding electrodes, and requirements of time, unplug the TV from the wall...
...; TELEVISION ANTENNA CONNECTION PROTECTION If an outside antenna/satellite dish or cable system is to be connected to the TV, make sure that the antenna or cable system is intended to be connected to earth in wire to an antenna discharge unit, size of the grounding conductors, location of antenna discharge unit, connection to grounding electrodes, and requirements of time, unplug the TV from the wall...
User Manual (English)
Page 7
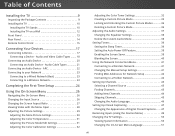
... Channels 44 Skipping Channels 45 Changing the Audio Language 46 Setting Up Closed Captioning 47 Changing the Appearance of Contents Installing the TV 9 Inspecting the Package Contents 9 Installing the TV 10 Installing the TV Stands 10 Installing the TV on a Wall 12 Front Panel 13 Rear Panel 14 Remote Control Front 15 Connecting Your Devices 17 Connecting A Device 17 Connecting a Device - Audio Cable Types 21 Connecting an Audio Device - Table of Digital Closed Captions........ 47 Renaming Inputs (Using the Devices Menu 49 Changing the TV Settings...
... Channels 44 Skipping Channels 45 Changing the Audio Language 46 Setting Up Closed Captioning 47 Changing the Appearance of Contents Installing the TV 9 Inspecting the Package Contents 9 Installing the TV 10 Installing the TV Stands 10 Installing the TV on a Wall 12 Front Panel 13 Rear Panel 14 Remote Control Front 15 Connecting Your Devices 17 Connecting A Device 17 Connecting a Device - Audio Cable Types 21 Connecting an Audio Device - Table of Digital Closed Captions........ 47 Renaming Inputs (Using the Devices Menu 49 Changing the TV Settings...
User Manual (English)
Page 8
... 53 Changing the Parental Control Passcode 53 Resetting the Content Locks 53 Changing the View Mode Settings 54 Adjusting the Wide Mode (Aspect Ratio 54 Changing Your TV's DLNA Name 55 Controlling Other Devices with CEC 55 Turning the Power Indicator On or Off 56 Restoring the TV to Factory Default Settings 57 Enabling and Disabling Smart Interactivity 57 Using the Guided Setup Menu 58 Using the Info Window 59 Using the USB Media Player 60 Using the USB Media Player 60...
... 53 Changing the Parental Control Passcode 53 Resetting the Content Locks 53 Changing the View Mode Settings 54 Adjusting the Wide Mode (Aspect Ratio 54 Changing Your TV's DLNA Name 55 Controlling Other Devices with CEC 55 Turning the Power Indicator On or Off 56 Restoring the TV to Factory Default Settings 57 Enabling and Disabling Smart Interactivity 57 Using the Guided Setup Menu 58 Using the Info Window 59 Using the USB Media Player 60 Using the USB Media Player 60...

User Manual (English)
Page 12
... mount for your mount. To prevent injury or damage to the TV, ask someone to your TV on a wall, you . Disconnect any cables connected to help you will need a wall mount. Remove the base by loosening and removing the screws. 4. Be sure the surface is capable of supporting the weight of this TV. Place the TV face-down on a clean, flat, stable surface. 1 Installing the TV on a Wall...
... mount for your mount. To prevent injury or damage to the TV, ask someone to your TV on a wall, you . Disconnect any cables connected to help you will need a wall mount. Remove the base by loosening and removing the screws. 4. Be sure the surface is capable of supporting the weight of this TV. Place the TV face-down on a clean, flat, stable surface. 1 Installing the TV on a Wall...
User Manual (English)
Page 28
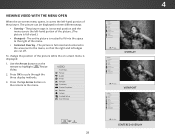
...-sized.) ABC • Viewport - Press the Up Arrow button on the remote to the menu, so that the right and left edges are cut off. Sleep Timer Picture Audio To change the position of the picture. Use the Arrow buttons on the remote to cycle through the three display methods. 3. The picture stays in three different ways: • Overlay - VIZIONetwork Settings TV SETTINGS Picture Audio Timers Network Channels CC Closed Captions Devices System Guided Setup User Manual Help VIZIO TV SETTINGS Picture Audio Timers Network Channels...
...-sized.) ABC • Viewport - Press the Up Arrow button on the remote to the menu, so that the right and left edges are cut off. Sleep Timer Picture Audio To change the position of the picture. Use the Arrow buttons on the remote to cycle through the three display methods. 3. The picture stays in three different ways: • Overlay - VIZIONetwork Settings TV SETTINGS Picture Audio Timers Network Channels CC Closed Captions Devices System Guided Setup User Manual Help VIZIO TV SETTINGS Picture Audio Timers Network Channels...

User Manual (English)
Page 29
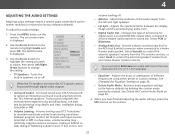
... remote to adjust the setting: • Auto Brightness Control - Brightness - To manually change the picture mode: VIZIO PICTURE Picture Mode Auto Brightness Control Backlight - When this setting is too high or too low, detail may appear dark. Press the MENU button on the remote. 29 Use the Arrow buttons on the remote to highlight that produce a brighter, more vivid picture. • Game mode reduces throughput delays and optimizes the picture settings for displaying game console output. • Computer mode optimizes the picture settings...
... remote to adjust the setting: • Auto Brightness Control - Brightness - To manually change the picture mode: VIZIO PICTURE Picture Mode Auto Brightness Control Backlight - When this setting is too high or too low, detail may appear dark. Press the MENU button on the remote. 29 Use the Arrow buttons on the remote to highlight that produce a brighter, more vivid picture. • Game mode reduces throughput delays and optimizes the picture settings for displaying game console output. • Computer mode optimizes the picture settings...
User Manual (English)
Page 37
... digital audio outputs. • Surround Sound - Press the MENU button on -screen menu is displayed. 3. The AUDIO menu is displayed. 2. VIZIO AUDIO TV Speakers Surround Sound Volume Leveling Balance - Surround sound uses DTS TruSurround™ to factory defaults (deleted). In a few cases, volume leveling may artificially suppress volume increases, making it difficult to a home theater audio system. Changes the type of different Sleep Timer frePqicutuerencieAsuduiosing either preset or custom settings. Sets the volume control properties for the RCA (red & white...
... digital audio outputs. • Surround Sound - Press the MENU button on -screen menu is displayed. 3. The AUDIO menu is displayed. 2. VIZIO AUDIO TV Speakers Surround Sound Volume Leveling Balance - Surround sound uses DTS TruSurround™ to factory defaults (deleted). In a few cases, volume leveling may artificially suppress volume increases, making it difficult to a home theater audio system. Changes the type of different Sleep Timer frePqicutuerencieAsuduiosing either preset or custom settings. Sets the volume control properties for the RCA (red & white...
User Manual (English)
Page 55
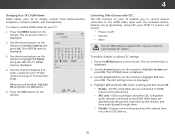
... smartphones. CC 2. VIZIO sound bars and other CEC-compatible audio systems connected to HDMI inputs can control: • Power on -screen menu is displayed. 3. The on /off • Volume • Wide MZuotoem Normal Panoramic Not all HDMI devices support CEC. AlHleClpEC-compatible devices connected to the HDMI (ARC) input are automatically discovered, controlled by the remote, and have audio played through them. • Disable - To create a custom DLNA name for your device's user manual for your TV...
... smartphones. CC 2. VIZIO sound bars and other CEC-compatible audio systems connected to HDMI inputs can control: • Power on -screen menu is displayed. 3. The on /off • Volume • Wide MZuotoem Normal Panoramic Not all HDMI devices support CEC. AlHleClpEC-compatible devices connected to the HDMI (ARC) input are automatically discovered, controlled by the remote, and have audio played through them. • Disable - To create a custom DLNA name for your device's user manual for your TV...
User Manual (English)
Page 58
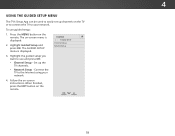
... button on the TV or to connect the TV to your network. 4. Highlight the guided setup you want to use guided setup: 1. 4 USING THE GUIDED SETUP MENU The TV's Setup App can be used to easily set up the TV channels. • Network Setup - The GUIDED SETUP menu is displayed. 2. Wide Zoom Normal Panoramic Exit 2D 3D ABC Input Wide CC Sleep Timer Picture Audio Network Settings Help 58 To use and press OK: • Channel Setup - VIZIO GUIDED SETUP Channel Setup Network Setup 3. The on-screen menu is displayed. Set up channels on the remote...
... button on the TV or to connect the TV to your network. 4. Highlight the guided setup you want to use guided setup: 1. 4 USING THE GUIDED SETUP MENU The TV's Setup App can be used to easily set up the TV channels. • Network Setup - The GUIDED SETUP menu is displayed. 2. Wide Zoom Normal Panoramic Exit 2D 3D ABC Input Wide CC Sleep Timer Picture Audio Network Settings Help 58 To use and press OK: • Channel Setup - VIZIO GUIDED SETUP Channel Setup Network Setup 3. The on-screen menu is displayed. Set up channels on the remote...
User Manual (English)
Page 70
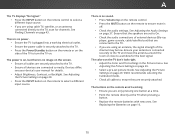
...'s user manual for channels. The colors on page 16. 70 See Replacing the Batteries on the TV don't look right. • Adjust the Color and Tint settings in the Picture menu. See Finding Channels on page 37. See Adjusting the Audio Settings on page 43. A The TV displays "No Signal." • Press the INPUT button on the remote control to select a different input source. • If you are using cable TV, satellite, or an antenna connected...
...'s user manual for channels. The colors on page 16. 70 See Replacing the Batteries on the TV don't look right. • Adjust the Color and Tint settings in the Picture menu. See Finding Channels on page 37. See Adjusting the Audio Settings on page 43. A The TV displays "No Signal." • Press the INPUT button on the remote control to select a different input source. • If you are using cable TV, satellite, or an antenna connected...
User Manual (English)
Page 71
..., or Component with HDMI cables. • If you switch from the one on page 27. 71 A I change the screen mode. Ensure your TV's display capabilities. This up -converted (improved) to match your antenna is connected securely to the TV and move the antenna around the room or close to change input source, the display image changes size. • The TV remembers the viewing mode on the remote to a window for the best signal...
..., or Component with HDMI cables. • If you switch from the one on page 27. 71 A I change the screen mode. Ensure your TV's display capabilities. This up -converted (improved) to match your antenna is connected securely to the TV and move the antenna around the room or close to change input source, the display image changes size. • The TV remembers the viewing mode on the remote to a window for the best signal...
User Manual (English)
Page 74
... operation, improper voltage supply or power surges, signal issues, damages from 7:00AM to 11:00PM Monday through Friday and 9:00AM to 6:00PM Saturday and Sunday, Pacific Time, or visit www.VIZIO.com. This warranty does not cover, for parts or labor during the warranty period. PRE-AUTHORIZATION MUST BE OBTAINED BEFORE SENDING ANY PRODUCT TO A VIZIO SERVICE CENTER. Product returns to VIZIO's service centers...
... operation, improper voltage supply or power surges, signal issues, damages from 7:00AM to 11:00PM Monday through Friday and 9:00AM to 6:00PM Saturday and Sunday, Pacific Time, or visit www.VIZIO.com. This warranty does not cover, for parts or labor during the warranty period. PRE-AUTHORIZATION MUST BE OBTAINED BEFORE SENDING ANY PRODUCT TO A VIZIO SERVICE CENTER. Product returns to VIZIO's service centers...

Quickstart Guide (English)
Page 2
...operating your TV that produce heat. • Do not defeat the safety purpose of the display. Changing the factory default picture settings or enabling other than the specified voltage may be used for the installation, use of time. Continued use , and maintenance of uninsulated DANGEROUS VOLTAGE within an equilateral triangle is used for ventilation. The power cord... easily accessible. • Only power of electric shock or component damage, switch off the power before connecting other . This will be used as power-supply cord or plug is the setting in ...
...operating your TV that produce heat. • Do not defeat the safety purpose of the display. Changing the factory default picture settings or enabling other than the specified voltage may be used for the installation, use of time. Continued use , and maintenance of uninsulated DANGEROUS VOLTAGE within an equilateral triangle is used for ventilation. The power cord... easily accessible. • Only power of electric shock or component damage, switch off the power before connecting other . This will be used as power-supply cord or plug is the setting in ...

Quickstart Guide (English)
Page 3
...) Ground Clamps Electric Service Equipment Power Service Grounding Electrode System (NEC ART 250, part H) • If an outside antenna/satellite dish or cable system is to be connected to earth in the building installation. Remember, the screen of time, unplug the TV from the wall outlet and disconnect the antenna or cable system. • Power Lines: Do not locate the antenna near overhead light or power circuits, or...
...) Ground Clamps Electric Service Equipment Power Service Grounding Electrode System (NEC ART 250, part H) • If an outside antenna/satellite dish or cable system is to be connected to earth in the building installation. Remember, the screen of time, unplug the TV from the wall outlet and disconnect the antenna or cable system. • Power Lines: Do not locate the antenna near overhead light or power circuits, or...

Quickstart Guide (English)
Page 16
... Internet connection SSID (Wireless network name) Network Password 2 VIZIO TV SETTINGS Picture Audio Timers Network Channels CC Closed Captions Devices System Guided Setup User Manual Wide VIZIO GUIDED SETUP ZoComhanneNl Soermtuapl Panoramic Network Setup Exit 2D 3D ABC Input Wide CC Sleep Timer Picture Audio Network Settings Help Wide Exit Input Sleep Timer Networ For streaming video, your Internet Service Provider (ISP). To connect to a wireless network you can skip this section. Use the Arrow Buttons to display the TV SETTINGS menu. The GUIDED SETUP menu is displayed...
... Internet connection SSID (Wireless network name) Network Password 2 VIZIO TV SETTINGS Picture Audio Timers Network Channels CC Closed Captions Devices System Guided Setup User Manual Wide VIZIO GUIDED SETUP ZoComhanneNl Soermtuapl Panoramic Network Setup Exit 2D 3D ABC Input Wide CC Sleep Timer Picture Audio Network Settings Help Wide Exit Input Sleep Timer Networ For streaming video, your Internet Service Provider (ISP). To connect to a wireless network you can skip this section. Use the Arrow Buttons to display the TV SETTINGS menu. The GUIDED SETUP menu is displayed...

Quickstart Guide (English)
Page 20
... that some television channels add black bars to the picture. Select the type of your router/modem and the TV. • If you need and press OK. There is securely connected to your settings will begin. If you have changed the default Parental Control Passcode, enter it is no sound. • Press the VOLUME UP button on the remote. • Press the MUTE button on -screen menu has guided setup. Remember...
... that some television channels add black bars to the picture. Select the type of your router/modem and the TV. • If you need and press OK. There is securely connected to your settings will begin. If you have changed the default Parental Control Passcode, enter it is no sound. • Press the VOLUME UP button on the remote. • Press the MUTE button on -screen menu has guided setup. Remember...

Quickstart Guide (English)
Page 21
... tear, improper operation, improper voltage supply or power surges, signal issues, damages from shipping, acts of God, any type of customer misuse, modifications or adjustments, as well as installation and set-up issues or any repairs attempted by anyone other information, ALL CONTENTS AND INFORMATION WILL BE DELETED IN THE COURSE OF SOME IN-HOME AND ALL SHIP-IN WARRANTY SERVICE. Replacement parts and Products...
... tear, improper operation, improper voltage supply or power surges, signal issues, damages from shipping, acts of God, any type of customer misuse, modifications or adjustments, as well as installation and set-up issues or any repairs attempted by anyone other information, ALL CONTENTS AND INFORMATION WILL BE DELETED IN THE COURSE OF SOME IN-HOME AND ALL SHIP-IN WARRANTY SERVICE. Replacement parts and Products...

Quickstart Guide (English)
Page 22
... the required part number. VIZIO will cover return shipping to the VIZIO service center. VIZIO is needed on select new product purchases. VIZIO technical support will provide instructions for transportation costs to the service center, but are not limited to protect your product will be defective, within the warranty period. In order to cosmetic damage, normal wear and tear, misuse, signal issues, power surges, and...
... the required part number. VIZIO will cover return shipping to the VIZIO service center. VIZIO is needed on select new product purchases. VIZIO technical support will provide instructions for transportation costs to the service center, but are not limited to protect your product will be defective, within the warranty period. In order to cosmetic damage, normal wear and tear, misuse, signal issues, power surges, and...

Quickstart Guide (English)
Page 23
... example: cosmetic damage, normal wear and tear, improper operation, improper voltage supply or power surges, signal issues, damages from whom you may be sent to the service center, but VIZIO Sales & Marketing México S. de. Type of repair and/or replacement services. R.L. de. de. de. R.L. Technical Support will cover return shipping to protect your VIZIO Sales & Marketing México S. R.L. R.L. de C.V.'S NEGLIGENCE, ALLEGED DAMAGE...
... example: cosmetic damage, normal wear and tear, improper operation, improper voltage supply or power surges, signal issues, damages from whom you may be sent to the service center, but VIZIO Sales & Marketing México S. de. Type of repair and/or replacement services. R.L. de. de. de. R.L. Technical Support will cover return shipping to protect your VIZIO Sales & Marketing México S. R.L. R.L. de C.V.'S NEGLIGENCE, ALLEGED DAMAGE...


