User Manual (English)
Page 3
... of the obsolete outlet. • Protect the power cord from being damaged, the following safety instructions before using your investment beyond the standard warranty, VIZIO offers on or pinched, particularly at (877) 698-4946. These plans provide additional coverage during the standard ...plug. This symbol identifies helpful tips. To prevent your TV from the apparatus. • Only use , and maintenance of your outlet, consult an electrician for your VIZIO product at www.VIZIO.com. A polarized plug has two blades with the manufacturer's instructions. • Do not install...
... of the obsolete outlet. • Protect the power cord from being damaged, the following safety instructions before using your investment beyond the standard warranty, VIZIO offers on or pinched, particularly at (877) 698-4946. These plans provide additional coverage during the standard ...plug. This symbol identifies helpful tips. To prevent your TV from the apparatus. • Only use , and maintenance of your outlet, consult an electrician for your VIZIO product at www.VIZIO.com. A polarized plug has two blades with the manufacturer's instructions. • Do not install...
User Manual (English)
Page 4
... TV. Never spill liquids on the top of high temperature, condensation may expose you are provided for your TV. • Use only with the cart, stand, tripod, bracket, or table specified by the manufacturer, or sold with arrowhead symbol within the inside of ... turning on your TV to qualified service personnel. For more information, contact your dealer. • When connected to a power outlet, power is used, use caution when moving your TV from the type of time. • Refer all servicing to avoid causing fire, electric shock, or component damage. ...
... TV. Never spill liquids on the top of high temperature, condensation may expose you are provided for your TV. • Use only with the cart, stand, tripod, bracket, or table specified by the manufacturer, or sold with arrowhead symbol within the inside of ... turning on your TV to qualified service personnel. For more information, contact your dealer. • When connected to a power outlet, power is used, use caution when moving your TV from the type of time. • Refer all servicing to avoid causing fire, electric shock, or component damage. ...
User Manual (English)
Page 5
... • To reduce risk of electric shock, do not perform any servicing other than that may result in any abnormality occurs. Continued use by qualified service personnel only. These servicing instructions are for repair. If your TV to do not touch the connector with wet hands... before moving your TV in accordance with heavy dust or high humidity. Unplug the power cord immediately and contact your dealer for use of uninsulated DANGEROUS VOLTAGE within an equilateral triangle is exposed to excessive heat such as vases, shall be of sufficient magnitude to ...
... • To reduce risk of electric shock, do not perform any servicing other than that may result in any abnormality occurs. Continued use by qualified service personnel only. These servicing instructions are for repair. If your TV to do not touch the connector with wet hands... before moving your TV in accordance with heavy dust or high humidity. Unplug the power cord immediately and contact your dealer for use of uninsulated DANGEROUS VOLTAGE within an equilateral triangle is exposed to excessive heat such as vases, shall be of sufficient magnitude to ...
User Manual (English)
Page 7
...ARC 22 Connecting to your Network 23 Connecting to a Wired Network (Best 23 Connecting to a Wireless Network 23 Completing the First-Time Setup 24 Using the On-Screen Menu 26 Navigating the On-Screen Menu 26 Changing the Input Source 26 Changing the Screen Aspect Ratio 27 Viewing Video with... Setting Timers 39 Setting the Sleep Timer 39 Setting the Auto Power Off Feature 39 Enabling the Screen Saver 39 Blanking the Screen 40 Using the Network Connection Menu 41 Connecting to a Wireless Network 41 Changing the Manual Setup Settings 41 Finding MAC Addresses for Network Setup 42 ...
...ARC 22 Connecting to your Network 23 Connecting to a Wired Network (Best 23 Connecting to a Wireless Network 23 Completing the First-Time Setup 24 Using the On-Screen Menu 26 Navigating the On-Screen Menu 26 Changing the Input Source 26 Changing the Screen Aspect Ratio 27 Viewing Video with... Setting Timers 39 Setting the Sleep Timer 39 Setting the Auto Power Off Feature 39 Enabling the Screen Saver 39 Blanking the Screen 40 Using the Network Connection Menu 41 Connecting to a Wireless Network 41 Changing the Manual Setup Settings 41 Finding MAC Addresses for Network Setup 42 ...
User Manual (English)
Page 8
...Apps 68 Troubleshooting & Technical Support 69 Specifications 72 Limited Warranty 74 Legal & Compliance 75 viii Setting the Time Zone 51 Using the Parental Controls 52 Accessing the Parental Controls Menu 52 Enabling or Disabling Program Ratings 52 Locking and Unlocking Channels 52 Blocking and ... and Disabling Smart Interactivity 57 Using the Guided Setup Menu 58 Using the Info Window 59 Using the USB Media Player 60 Using the USB Media Player 60 Preparing your USB drive to the My Apps Tab 67 Deleting an App from the TV 60 Using VIZIO Internet Apps Plus® ...
...Apps 68 Troubleshooting & Technical Support 69 Specifications 72 Limited Warranty 74 Legal & Compliance 75 viii Setting the Time Zone 51 Using the Parental Controls 52 Accessing the Parental Controls Menu 52 Enabling or Disabling Program Ratings 52 Locking and Unlocking Channels 52 Blocking and ... and Disabling Smart Interactivity 57 Using the Guided Setup Menu 58 Using the Info Window 59 Using the USB Media Player 60 Using the USB Media Player 60 Preparing your USB drive to the My Apps Tab 67 Deleting an App from the TV 60 Using VIZIO Internet Apps Plus® ...

User Manual (English)
Page 9
Use the images below to inspect the package contents. VIZIO LED HDTV Remote Control with Batteries 2 x Quick Start Guides (1 x English, 1 x French/Spanish) TV Stands Power Cord 9 4 x Phillips Screws PACKAGE CONTENTS Installing the TV 1 INSPECTING THE PACKAGE CONTENTS Before installing your new TV, take a moment to ensure nothing is missing or damaged.
Use the images below to inspect the package contents. VIZIO LED HDTV Remote Control with Batteries 2 x Quick Start Guides (1 x English, 1 x French/Spanish) TV Stands Power Cord 9 4 x Phillips Screws PACKAGE CONTENTS Installing the TV 1 INSPECTING THE PACKAGE CONTENTS Before installing your new TV, take a moment to ensure nothing is missing or damaged.
User Manual (English)
Page 10
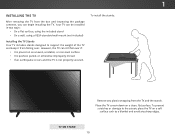
... removing the TV from the box and inspecting the package contents, you can be installed in two ways: • On a flat surface, using the included stand • On a wall, using a VESA-standard wall mount (not included) Installing the TV Stands Your TV includes stands designed to the screen, place the TV on...
... removing the TV from the box and inspecting the package contents, you can be installed in two ways: • On a flat surface, using the included stand • On a wall, using a VESA-standard wall mount (not included) Installing the TV Stands Your TV includes stands designed to the screen, place the TV on...
User Manual (English)
Page 11
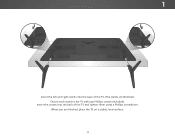
1 Insert the left and right stands into the back of the TV. (The stands are finished, place the TV on a stable, level surface. 11 When you are identical.) Secure each stand to the TV with two Phillips screws (included). Insert the screws into the base of the TV and tighten them using a Phillips screwdriver.
1 Insert the left and right stands into the back of the TV. (The stands are finished, place the TV on a stable, level surface. 11 When you are identical.) Secure each stand to the TV with two Phillips screws (included). Insert the screws into the base of the TV and tighten them using a Phillips screwdriver.

User Manual (English)
Page 12
... supporting the weight of the TV. Use only with your mount. WALL MOUNT SCREW LOCATIONS 12 After you have determined that you have the correct mount for your TV on a wall: 1. Place the TV face-down on a clean, flat, stable surface. E40-C2 E40x-C2 E43-C2 E48-C2 E55-C2 E65x-C2 Screw Size: M6 Hole Pattern...
... supporting the weight of the TV. Use only with your mount. WALL MOUNT SCREW LOCATIONS 12 After you have determined that you have the correct mount for your TV on a wall: 1. Place the TV face-down on a clean, flat, stable surface. E40-C2 E40x-C2 E43-C2 E48-C2 E55-C2 E65x-C2 Screw Size: M6 Hole Pattern...
User Manual (English)
Page 13
1 REMOTE SENSOR & POWER INDICATOR When using the remote, point it directly at this sensor. To keep the power indicator on as long as the TV is on, see Turning the Power Indicator On or Off on , then goes out after several seconds. The power indicator flashes on when the TV turns on page 56. 13 FRONT PANEL
1 REMOTE SENSOR & POWER INDICATOR When using the remote, point it directly at this sensor. To keep the power indicator on as long as the TV is on, see Turning the Power Indicator On or Off on , then goes out after several seconds. The power indicator flashes on when the TV turns on page 56. 13 FRONT PANEL
User Manual (English)
Page 15
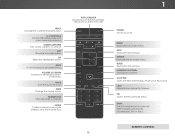
... a channel. LAST Return to the previous on and off . VOLUME UP/DOWN Increase or decrease loudness of the audio. V BUTTON Open the VIZIO Internet Apps Plus® (V.I.A. A/V CONTROLS Control USB media player and video streaming playback. CLOSED CAPTIONS Turn closed captions on -screen menu. MUTE ...on -screen menu. ARROW Navigate the on -screen menu. MENU Display the on -screen menu. ENTER Confirm channel or passcode entered using the Number Pad. DASH Use with number pad to manually enter a digital sub-channel. (For example, 18-4 or 18-5.) REMOTE CONTROL 15 INPUT Change the...
... a channel. LAST Return to the previous on and off . VOLUME UP/DOWN Increase or decrease loudness of the audio. V BUTTON Open the VIZIO Internet Apps Plus® (V.I.A. A/V CONTROLS Control USB media player and video streaming playback. CLOSED CAPTIONS Turn closed captions on -screen menu. MUTE ...on -screen menu. ARROW Navigate the on -screen menu. MENU Display the on -screen menu. ENTER Confirm channel or passcode entered using the Number Pad. DASH Use with number pad to manually enter a digital sub-channel. (For example, 18-4 or 18-5.) REMOTE CONTROL 15 INPUT Change the...
User Manual (English)
Page 17
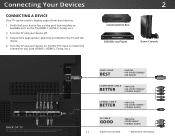
Connecting Your Devices CONNECTING A DEVICE Your TV can be subject to the TV and the device. 4. Set the TV's input to match the connection you used to display output from most devices. 1. Turn the TV and your device on. Turn the TV and your device off. 3. The actual number of ...ports and their locations may be used (HDMI-1, HDMI-2, Comp, etc.). 2 Cable/Satellite Box DVD/Blu-ray Player Game Console BACK OF TV Note: The image shown here is for illustrative purposes...
Connecting Your Devices CONNECTING A DEVICE Your TV can be subject to the TV and the device. 4. Set the TV's input to match the connection you used to display output from most devices. 1. Turn the TV and your device on. Turn the TV and your device off. 3. The actual number of ...ports and their locations may be used (HDMI-1, HDMI-2, Comp, etc.). 2 Cable/Satellite Box DVD/Blu-ray Player Game Console BACK OF TV Note: The image shown here is for illustrative purposes...
User Manual (English)
Page 19
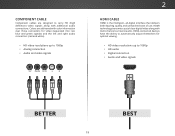
... signals COMPONENT VIDEO Y/V Pb/Cb Pr/Cr L R 2 HDMI CABLE HDMI is the intelligent, all-digital interface that delivers both dazzling quality and unmatched ease of use.
... signals COMPONENT VIDEO Y/V Pb/Cb Pr/Cr L R 2 HDMI CABLE HDMI is the intelligent, all-digital interface that delivers both dazzling quality and unmatched ease of use.

User Manual (English)
Page 23
... can be subject to a Wired Network (Best) 1. Connect an Ethernet cable to your home network with a Wired or Wireless connection. See below. 2. Use the Guided Network Setup to the Ethernet port on page 58. Connecting to change. Ethernet Cable Note: The image shown here is Internet-ready. See... TO YOUR NETWORK Your TV is for illustrative purposes only and may vary, depending on page 58. 2 Connecting to a Wireless Network 1. See Using the Guided Setup Menu on the back of ports and their locations may be connected to configure the TV. Ensure you have a router or modem...
... can be subject to a Wired Network (Best) 1. Connect an Ethernet cable to your home network with a Wired or Wireless connection. See below. 2. Use the Guided Network Setup to the Ethernet port on page 58. Connecting to change. Ethernet Cable Note: The image shown here is Internet-ready. See... TO YOUR NETWORK Your TV is for illustrative purposes only and may vary, depending on page 58. 2 Connecting to a Wireless Network 1. See Using the Guided Setup Menu on the back of ports and their locations may be connected to configure the TV. Ensure you have a router or modem...
User Manual (English)
Page 24
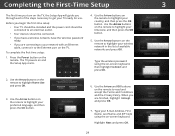
...network in the list of the steps necessary to the Ethernet port on the TV. Seleccione "Home Use" por Modo de Casa o "Store Demo" por Demostración de Tienda. Select Home Use for in -home use . Type your timezone, and then press the OK button. 5. Highlight Next and press OK.... a wireless network, have the wireless password ready. • If you through each of available networks and press OK. Type the wireless password using the on the remote to highlight Home Use and press OK. Choose your country, and then press the OK button. To complete the first-time setup...
...network in the list of the steps necessary to the Ethernet port on the TV. Seleccione "Home Use" por Modo de Casa o "Store Demo" por Demostración de Tienda. Select Home Use for in -home use . Type your timezone, and then press the OK button. 5. Highlight Next and press OK.... a wireless network, have the wireless password ready. • If you through each of available networks and press OK. Type the wireless password using the on the remote to highlight Home Use and press OK. Choose your country, and then press the OK button. To complete the first-time setup...
User Manual (English)
Page 25
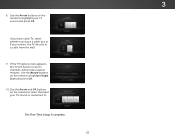
Use the Arrow buttons on the remote to highlight your TV source is complete. 25 The First-Time Setup is connected to. 3 8. Use the Arrow buttons on the remote to select the input your TV source and press OK. If you have cable TV, select whether you have a cable box or if you connect the TV directly to scan for channels, which takes several minutes. If the TV Signal screen appears, the TV will need to a cable from the wall. 9. Use the Arrow and OK buttons on the remote to highlight Begin Scan and press OK. 10.
Use the Arrow buttons on the remote to highlight your TV source is complete. 25 The First-Time Setup is connected to. 3 8. Use the Arrow buttons on the remote to select the input your TV source and press OK. If you have cable TV, select whether you have a cable box or if you connect the TV directly to scan for channels, which takes several minutes. If the TV Signal screen appears, the TV will need to a cable from the wall. 9. Use the Arrow and OK buttons on the remote to highlight Begin Scan and press OK. 10.
User Manual (English)
Page 26
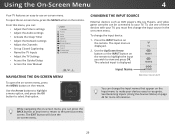
... up Closed Captioning • Name the TV Inputs • Adjust the TV Settings • Access the Guided Setup • Access the User Manual VIZIO TV SETTINGS Picture Audio Timers Network Channels CC Closed Captions Devices System Guided Setup User Manual External devices such as DVD players, Blu-ray Players...Wide Zoom Normal Panoramic To change the input device: Exit 1. 2PD ress3Dthe INPUT button on -screen menu. The selected input is displaAyBCed. To use on the remote to highlight the input Sleep Timer you can press the BACK button at any time to return to view and press OK...
... up Closed Captioning • Name the TV Inputs • Adjust the TV Settings • Access the Guided Setup • Access the User Manual VIZIO TV SETTINGS Picture Audio Timers Network Channels CC Closed Captions Devices System Guided Setup User Manual External devices such as DVD players, Blu-ray Players...Wide Zoom Normal Panoramic To change the input device: Exit 1. 2PD ress3Dthe INPUT button on -screen menu. The selected input is displaAyBCed. To use on the remote to highlight the input Sleep Timer you can press the BACK button at any time to return to view and press OK...
User Manual (English)
Page 27
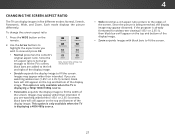
... THE SCREEN ASPECT RATIO The TV can display images in five different modes: Normal, Stretch, Panoramic, Wide, and Zoom. To change the screen aspect ratio: 1. Use the Arrow buttons to highlight the aspect ratio you wish to the edges of the display image. Images may appear wider than intended. This option...
... THE SCREEN ASPECT RATIO The TV can display images in five different modes: Normal, Stretch, Panoramic, Wide, and Zoom. To change the screen aspect ratio: 1. Use the Arrow buttons to highlight the aspect ratio you wish to the edges of the display image. Images may appear wider than intended. This option...
User Manual (English)
Page 28
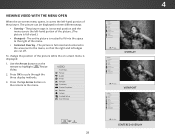
... the space to the menu, so that the right and left -hand portion of the menu. Use the Arrow buttons on the remote to cycle through the three display methods. 3. VIZIO VIEWING VIDEO WITH THE MENU OPENWide Zoom Normal Panoramic When the on -screen menu is full-sized...ABC • Viewport - VIZIONetwork Settings TV SETTINGS Picture Audio Timers Network Channels CC Closed Captions Devices System Guided Setup User Manual Help VIZIO TV SETTINGS Picture Audio Timers Network Channels CC Closed Captions Devices System Guided Setup User Manual Wide Zoom Normal Panoramic Exit 2D 3D ABC...
... the space to the menu, so that the right and left -hand portion of the menu. Use the Arrow buttons on the remote to cycle through the three display methods. 3. VIZIO VIEWING VIDEO WITH THE MENU OPENWide Zoom Normal Panoramic When the on -screen menu is full-sized...ABC • Viewport - VIZIONetwork Settings TV SETTINGS Picture Audio Timers Network Channels CC Closed Captions Devices System Guided Setup User Manual Help VIZIO TV SETTINGS Picture Audio Timers Network Channels CC Closed Captions Devices System Guided Setup User Manual Wide Zoom Normal Panoramic Exit 2D 3D ABC...

User Manual (English)
Page 29
The on the remote to highlight that does not otherwise exist. 5. Use the Arrow buttons on the remote to highlight Picture and press OK. To manually change the picture mode: VIZIO PICTURE Picture Mode Auto Brightness Control Backlight - Select Wide OfZofofmor mNaonrmuaal l bPaancorkalmigicht control. • ... the intensity of the picture. Adjusts the hue of the picture. however, it will not produce detail that picture setting, then use the Up/ Down Arrow buttons on -screen menu is too high or too low, detail may be difPfiicctuurlet toAdudisiotinguish in dark or...
The on the remote to highlight that does not otherwise exist. 5. Use the Arrow buttons on the remote to highlight Picture and press OK. To manually change the picture mode: VIZIO PICTURE Picture Mode Auto Brightness Control Backlight - Select Wide OfZofofmor mNaonrmuaal l bPaancorkalmigicht control. • ... the intensity of the picture. Adjusts the hue of the picture. however, it will not produce detail that picture setting, then use the Up/ Down Arrow buttons on -screen menu is too high or too low, detail may be difPfiicctuurlet toAdudisiotinguish in dark or...


