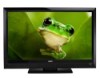

E390VL User Manual
Page 2
... TruVolume are trademarks of HDMI Licensing LLC. Manufactured under license from Dolby Laboratories. Changing the factory default picture settings or enabling other features will increase power consumption that could exceed the limits necessary to qualify for ENERGY STAR in the "factory default" setting and this is the setting in which...
... TruVolume are trademarks of HDMI Licensing LLC. Manufactured under license from Dolby Laboratories. Changing the factory default picture settings or enabling other features will increase power consumption that could exceed the limits necessary to qualify for ENERGY STAR in the "factory default" setting and this is the setting in which...

E390VL User Manual
Page 3
...registration card Extended Warranties For peace of the polarized or grounding-type plug. To purchase an extended warranty service plan, visit www.VIZIO.com. Important Safety Instructions Your TV is intended to protect your product and retain them for future reference. Read the following ...for the installation, use, and maintenance of the obsolete outlet. • Protect the power cord from being damaged, the following safety instructions before using your investment beyond the standard warranty, VIZIO offers on-site extended warranty service plans. If the provided plug does not fit ...
...registration card Extended Warranties For peace of the polarized or grounding-type plug. To purchase an extended warranty service plan, visit www.VIZIO.com. Important Safety Instructions Your TV is intended to protect your product and retain them for future reference. Read the following ...for the installation, use, and maintenance of the obsolete outlet. • Protect the power cord from being damaged, the following safety instructions before using your investment beyond the standard warranty, VIZIO offers on-site extended warranty service plans. If the provided plug does not fit ...

E390VL User Manual
Page 4
... oven, amplifier etc. Do not place your TV close to smoke. The manufacturer's warranty does not cover user abuse or improper installations. • The power cord must be maintained between your TV and any objects on your TV yourself. This is used for long periods of time. • Refer all... when the apparatus has been damaged in the back and bottom of the cabinet are provided for long period of electric shock to a power outlet, power is intended to alert the user to the presence of un-isolated, dangerous voltage within the inside of your TV and to protect it...
... oven, amplifier etc. Do not place your TV close to smoke. The manufacturer's warranty does not cover user abuse or improper installations. • The power cord must be maintained between your TV and any objects on your TV yourself. This is used for long periods of time. • Refer all... when the apparatus has been damaged in the back and bottom of the cabinet are provided for long period of electric shock to a power outlet, power is intended to alert the user to the presence of un-isolated, dangerous voltage within the inside of your TV and to protect it...

E390VL User Manual
Page 5
...not expose batteries to excessive heat such as sunshine, fire or the like. • If any smoke or odor becomes apparent, unplug the power cord and contact your TV yourself. • Avoid using dropped or damaged appliances. If water penetrates into your dealer for use of electrical .... • WARNING: Keep your TV to rain or moisture. h• The lightning flash with arrowhead symbol within the product's enclosure that the power cord and any way. - Do not expose your TV away from moisture. Opening or removing the back cover may expose you are ...
...not expose batteries to excessive heat such as sunshine, fire or the like. • If any smoke or odor becomes apparent, unplug the power cord and contact your TV yourself. • Avoid using dropped or damaged appliances. If water penetrates into your dealer for use of electrical .... • WARNING: Keep your TV to rain or moisture. h• The lightning flash with arrowhead symbol within the product's enclosure that the power cord and any way. - Do not expose your TV away from moisture. Opening or removing the back cover may expose you are ...

E390VL User Manual
Page 6
... switch to digital-only broadcasting. Analog-only television sets that receive TV programming through an antenna now need a converter box to continue to receive low power, Class A or translator television stations and with a built-in tuner capable of US Television Stations www.high-techproductions.com/usTVstations.htm Your TV comes with...
... switch to digital-only broadcasting. Analog-only television sets that receive TV programming through an antenna now need a converter box to continue to receive low power, Class A or translator television stations and with a built-in tuner capable of US Television Stations www.high-techproductions.com/usTVstations.htm Your TV comes with...

E390VL User Manual
Page 7
... Clamp Antenna Lead In Wire Electric Service Equipment Antenna Discharge Unit (NEC Section 810-20) Grounding Conductors (NEC Section 810-21) Ground Clamps Power Service Grounding Electrode System (NEC ART 250, part H) Television Antenna Connection Protection If an outside antenna/satellite dish or cable system is..., grounding of time, unplug the TV from the wall outlet and disconnect the antenna or cable system. Power Lines Do not locate the antenna near overhead light or power circuits, or where it is electrically grounded to the TV, make sure that the antenna or cable system...
... Clamp Antenna Lead In Wire Electric Service Equipment Antenna Discharge Unit (NEC Section 810-20) Grounding Conductors (NEC Section 810-21) Ground Clamps Power Service Grounding Electrode System (NEC ART 250, part H) Television Antenna Connection Protection If an outside antenna/satellite dish or cable system is..., grounding of time, unplug the TV from the wall outlet and disconnect the antenna or cable system. Power Lines Do not locate the antenna near overhead light or power circuits, or where it is electrically grounded to the TV, make sure that the antenna or cable system...

E390VL User Manual
Page 8
... Screen Aspect Ratio 16 Setting Up Closed Captioning 17 Changing the Appearance of Digital Closed Captions.. 17 Activating the Sleep Timer 18 Setting the Auto Power Off Feature 18 Adjusting the Picture Settings 18 Adjusting the Advanced Picture Settings 19 Adjusting the Color Temperature 20 Adjusting the Picture Size and Position...
... Screen Aspect Ratio 16 Setting Up Closed Captioning 17 Changing the Appearance of Digital Closed Captions.. 17 Activating the Sleep Timer 18 Setting the Auto Power Off Feature 18 Adjusting the Picture Settings 18 Adjusting the Advanced Picture Settings 19 Adjusting the Color Temperature 20 Adjusting the Picture Size and Position...

E390VL User Manual
Page 14
CHANNEL UP/DOWN - INPUT - Change input source. Turn TV off or on -screen menu. HDMI - USB - Increase or decrease volume level. Connect HDMI device. Connect USB thumb drive to view photo slideshow. 7 2 Side Panel Open the on . MENU - Change the channel. Side Panel POWER - VOLUME UP/DOWN -
CHANNEL UP/DOWN - INPUT - Change input source. Turn TV off or on -screen menu. HDMI - USB - Increase or decrease volume level. Connect HDMI device. Connect USB thumb drive to view photo slideshow. 7 2 Side Panel Open the on . MENU - Change the channel. Side Panel POWER - VOLUME UP/DOWN -

E390VL User Manual
Page 16
... Select the highlighted menu option. Arrow Navigate the on . Dash Use with number pad to the previous on -screen menu. WIDE Switch the display mode. 9 2 Power Turn TV on -screen menu. Menu Display the on or off or on -screen menu. Guide Display the info window. Volume Up/Down Increase or...
... Select the highlighted menu option. Arrow Navigate the on . Dash Use with number pad to the previous on -screen menu. WIDE Switch the display mode. 9 2 Power Turn TV on -screen menu. Menu Display the on or off or on -screen menu. Guide Display the info window. Volume Up/Down Increase or...

E390VL User Manual
Page 21
To complete the first-time setup: 1. The TV powers on the remote. Press the Power/Standby button on and the Setup App starts. 4. Use the Up/Down Arrow buttons on the remote to turn on the remote to highlight Home ... Exit to highlight Start the Channel Scan and press OK. 8. Before you begin the first-time setup: • Your TV should be installed and the power cord should be connected to an electrical outlet. • Your devices should be connected. The First-Time Setup is complete. 14 Answer the on-screen...
To complete the first-time setup: 1. The TV powers on the remote. Press the Power/Standby button on and the Setup App starts. 4. Use the Up/Down Arrow buttons on the remote to turn on the remote to highlight Home ... Exit to highlight Start the Channel Scan and press OK. 8. Before you begin the first-time setup: • Your TV should be installed and the power cord should be connected to an electrical outlet. • Your devices should be connected. The First-Time Setup is complete. 14 Answer the on-screen...

E390VL User Manual
Page 25
... OK. Use the Up/Down Arrow buttons on the screen. The Auto Power-Off menu is displayed. 2. This is being displayed on the remote to highlight the period of time.... Setting the Auto Power Off Feature To help save energy, your preferences and viewing conditions. Use the Up/Down...the picture settings for displaying game console output. • Vivid mode sets the picture settings to highlight Auto Power Off and press OK. Press the MENU button on the remote. The on the remote to values that will...
... OK. Use the Up/Down Arrow buttons on the screen. The Auto Power-Off menu is displayed. 2. This is being displayed on the remote to highlight the period of time.... Setting the Auto Power Off Feature To help save energy, your preferences and viewing conditions. Use the Up/Down...the picture settings for displaying game console output. • Vivid mode sets the picture settings to highlight Auto Power Off and press OK. Press the MENU button on the remote. The on the remote to values that will...

E390VL User Manual
Page 41
... the USB thumb drive while the TV is not designed to display. Highlight the Media App and press OK. Press the Power/Standby button on the remote or touch the Power control on the side of the TV to the USB port on the side of the TV. 2. The Media App launches...
... the USB thumb drive while the TV is not designed to display. Highlight the Media App and press OK. Press the Power/Standby button on the remote or touch the Power control on the side of the TV to the USB port on the side of the TV. 2. The Media App launches...

E390VL User Manual
Page 44
...; Adjust Brightness, Contrast, or Backlight. See Resetting the Picture Settings on page 21 • Check all devices are connected correctly. see your antenna is no power. • Ensure the TV is plugged into a working . • Ensure you are securely attached. See Scanning for Channels on page 24 There is no image... Up on the remote control. • Press the MUTE button on the remote to ensure mute is securely attached to the TV. • Press the Power/Standby button on the remote or on the side of the TV to turn the TV on. There is no headphones are connected to the...
...; Adjust Brightness, Contrast, or Backlight. See Resetting the Picture Settings on page 21 • Check all devices are connected correctly. see your antenna is no power. • Ensure the TV is plugged into a working . • Ensure you are securely attached. See Scanning for Channels on page 24 There is no image... Up on the remote control. • Press the MUTE button on the remote to ensure mute is securely attached to the TV. • Press the Power/Standby button on the remote or on the side of the TV to turn the TV on. There is no headphones are connected to the...
E390VL User Manual
Page 46
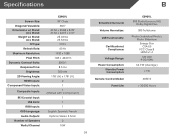
...Component Video Inputs: Composite Inputs: RF/Coaxial Input: USB Ports: RGB Inputs: OSD Language: Audio Outputs: Number of Speakers Watts/Channel E390VL 39" Class 38.5" 37.36 x 25.85 x 8.99" 37.36 x 24.07 x 4.31" 25.04 lbs 23.34... Spanish, French Optical, Stereo 3.5mm 2 10W 39 Simulated Surround: Volume Normalizer: USB Functionality: Certifications/ Compliance: Voltage Range: Power Consumption: Standby Power Consumption: Remote Control Model: Panel Life: E390VL SRS StudioSurround HD, Dolby Digital Plus SRS TruVolume Photo (Individual Photo), Photo Slideshow Energy Star CSA-US FCC Class B HDMI ...
...Component Video Inputs: Composite Inputs: RF/Coaxial Input: USB Ports: RGB Inputs: OSD Language: Audio Outputs: Number of Speakers Watts/Channel E390VL 39" Class 38.5" 37.36 x 25.85 x 8.99" 37.36 x 24.07 x 4.31" 25.04 lbs 23.34... Spanish, French Optical, Stereo 3.5mm 2 10W 39 Simulated Surround: Volume Normalizer: USB Functionality: Certifications/ Compliance: Voltage Range: Power Consumption: Standby Power Consumption: Remote Control Model: Panel Life: E390VL SRS StudioSurround HD, Dolby Digital Plus SRS TruVolume Photo (Individual Photo), Photo Slideshow Energy Star CSA-US FCC Class B HDMI ...

E390VL User Manual
Page 47
...LOST PROFITS, OR OTHER INCIDENTAL OR CONSEQUENTIAL DAMAGES. Proof of Service Defective Products must utilize either repair or replace the Product at VIZIO's option and sole discretion. Type of purchase in materials and workmanship for example: cosmetic damage, normal wear and tear, improper ...operation, improper voltage supply or power surges, signal issues, damages from 6:00AM to 9:00PM Monday through Friday and 8:00AM to the service center, but VIZIO will either the original carton box and shipping material or packaging that you...
...LOST PROFITS, OR OTHER INCIDENTAL OR CONSEQUENTIAL DAMAGES. Proof of Service Defective Products must utilize either repair or replace the Product at VIZIO's option and sole discretion. Type of purchase in materials and workmanship for example: cosmetic damage, normal wear and tear, improper ...operation, improper voltage supply or power surges, signal issues, damages from 6:00AM to 9:00PM Monday through Friday and 8:00AM to the service center, but VIZIO will either the original carton box and shipping material or packaging that you...

E390VL User Manual
Page 48
... relocate the receiving antenna. 2. The manufacturer is encouraged to try to correct the interference by unauthorized modification to this equipment. Shielded interface cables and AC power cord, if any radio or TV interference caused by one or more of the following two conditions: (1) this device may cause harmful interference to radio...
... relocate the receiving antenna. 2. The manufacturer is encouraged to try to correct the interference by unauthorized modification to this equipment. Shielded interface cables and AC power cord, if any radio or TV interference caused by one or more of the following two conditions: (1) this device may cause harmful interference to radio...

E390VL Quick Start Guide
Page 2
..., contact your dealer and refer all servicing to rain or moisture, does not operate normally or has been dropped. • Unplug the power cord before cleaning your TV. • When moving your TV yourself. • Avoid using different voltage than the specified voltage may function... near water. • Clean only with the manufacturer's instructions. • Do not install near your TV and easily accessible. • Only power of your dealer. • Your TV is designed and manufactured to do not touch the connector with wet hands. • Insert batteries in accordance...
..., contact your dealer and refer all servicing to rain or moisture, does not operate normally or has been dropped. • Unplug the power cord before cleaning your TV. • When moving your TV yourself. • Avoid using different voltage than the specified voltage may function... near water. • Clean only with the manufacturer's instructions. • Do not install near your TV and easily accessible. • Only power of your dealer. • Your TV is designed and manufactured to do not touch the connector with wet hands. • Insert batteries in accordance...

E390VL Quick Start Guide
Page 5
... off or on -screen menu. DASH Use with number pad to the channel last viewed. VOLUME UP/DOWN Increase or decrease loudness of the audio. POWER Turn TV on -screen menu. OK Select the highlighted menu option. MUTE Turn the audio off . CHANNEL UP/DOWN Change the channel. GUIDE Display the...
... off or on -screen menu. DASH Use with number pad to the channel last viewed. VOLUME UP/DOWN Increase or decrease loudness of the audio. POWER Turn TV on -screen menu. OK Select the highlighted menu option. MUTE Turn the audio off . CHANNEL UP/DOWN Change the channel. GUIDE Display the...

E390VL Quick Start Guide
Page 7
Its wireless subwoofer fits nearly anywhere in a new sleeker, slimmer design - UPGRADE TO POWERFUL DIGITAL AUDIO The VIZIO Home Theater Sound Bar with Wireless Subwoofer delivers exceptional audio performance in your home theater up to 60 ft. Available at www.VIZIO.com This Product Sold Separately away, and the sound bar offers either a table-stand or wall-mount option. This powerful sound system is also remarkably versatile. a perfect complement for a 40" HDTV and larger.
Its wireless subwoofer fits nearly anywhere in a new sleeker, slimmer design - UPGRADE TO POWERFUL DIGITAL AUDIO The VIZIO Home Theater Sound Bar with Wireless Subwoofer delivers exceptional audio performance in your home theater up to 60 ft. Available at www.VIZIO.com This Product Sold Separately away, and the sound bar offers either a table-stand or wall-mount option. This powerful sound system is also remarkably versatile. a perfect complement for a 40" HDTV and larger.

E390VL Quick Start Guide
Page 8
Insert the included batteries. Plug the power cord into place. Connect the power cord to the back of the TV. Gently slide the battery cover back into an electrical outlet. FIRST-TIME SETUP 1 2 Remove the battery cover by pressing gently on the arrow and sliding away from the remote.
Insert the included batteries. Plug the power cord into place. Connect the power cord to the back of the TV. Gently slide the battery cover back into an electrical outlet. FIRST-TIME SETUP 1 2 Remove the battery cover by pressing gently on the arrow and sliding away from the remote.


