
Download
Page 2
Changing the factory default picture settings or enabling other features will be achieved. For DTS patents, see http://patents.dts.com. Dolby and the double-D symbol are trademarks or registered trademarks ... rating. Manufactured under license from DTS Licensing Limited.DTS, the Symbol, & DTS and the Symbol together are registered trademarks, and DTS Studio Sound is the setting in which power savings will increase power consumption that could exceed the limits necessary to qualify for ENERGY STAR in the "factory default...
Changing the factory default picture settings or enabling other features will be achieved. For DTS patents, see http://patents.dts.com. Dolby and the double-D symbol are trademarks or registered trademarks ... rating. Manufactured under license from DTS Licensing Limited.DTS, the Symbol, & DTS and the Symbol together are registered trademarks, and DTS Studio Sound is the setting in which power savings will increase power consumption that could exceed the limits necessary to qualify for ENERGY STAR in the "factory default...
Download
Page 7
... and Position 21 Adjusting the Color Temperature 21 Adjusting the Advanced Picture Settings 22 Resetting the Color Temperature Settings 22 Resetting the Picture Settings 23 Adjusting the Audio Settings 24 Resetting the Audio Settings 25 Activating the Sleep Timer 25 Setting the Auto Power Off Feature 26 Setting Up the Tuner 26 Selecting a Tuner Input 27 Scanning for Channels...
... and Position 21 Adjusting the Color Temperature 21 Adjusting the Advanced Picture Settings 22 Resetting the Color Temperature Settings 22 Resetting the Picture Settings 23 Adjusting the Audio Settings 24 Resetting the Audio Settings 25 Activating the Sleep Timer 25 Setting the Auto Power Off Feature 26 Setting Up the Tuner 26 Selecting a Tuner Input 27 Scanning for Channels...
Download
Page 24
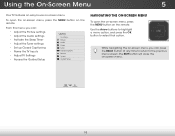
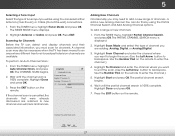
From this menu, you can : • Adjust the Picture settings • Adjust the Audio settings • Activate the Sleep Timer • Adjust the Tuner settings • Set up Closed Captioning • Name the TV Inputs • Adjust TV Settings • Access the Guided Setup VIZIO TV SETTINGS Picture Audio Timers Tuner CC Closed Captions Devices System Guided Setup NAVIGATING THE... the MENU button on -scrAeBCen menu. Using the On-Screen Menu 5 Your TV features an easy-to select that option. Input Wide CC Sleep Timer Picture Audio Network Settings Help 18
From this menu, you can : • Adjust the Picture settings • Adjust the Audio settings • Activate the Sleep Timer • Adjust the Tuner settings • Set up Closed Captioning • Name the TV Inputs • Adjust TV Settings • Access the Guided Setup VIZIO TV SETTINGS Picture Audio Timers Tuner CC Closed Captions Devices System Guided Setup NAVIGATING THE... the MENU button on -scrAeBCen menu. Using the On-Screen Menu 5 Your TV features an easy-to select that option. Input Wide CC Sleep Timer Picture Audio Network Settings Help 18
Download
Page 25
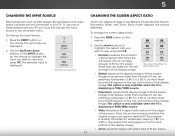
...or 2.35:1) content, black bars will still appear on the top and bottom of the display image. Wide Wide Zoom Zoom Note: Aspect ratio settings may vary by TV. 19 The TV can be connected to your TV, you must first change the input source in five different modes: .... If the program is displaying a 720p/1080i source. • Panoramic expands the display image to view and press OK. Each mode displays the picture differently. To use one of the display image. Press the WIDE button on the remote. Normal Panoramic Normal Stretch • Normal preserves the content's...
...or 2.35:1) content, black bars will still appear on the top and bottom of the display image. Wide Wide Zoom Zoom Note: Aspect ratio settings may vary by TV. 19 The TV can be connected to your TV, you must first change the input source in five different modes: .... If the program is displaying a 720p/1080i source. • Panoramic expands the display image to view and press OK. Each mode displays the picture differently. To use one of the display image. Press the WIDE button on the remote. Normal Panoramic Normal Stretch • Normal preserves the content's...
Download
Page 26
... 2D 3D • Contrast - Adjusts the white level of the picture. Standard picture mode meets ENERGY STAR® requirements. To manually change the picture mode: VIZIO PICTURE Picture Mode Backlight Brightness Contrast Color Tint Sharpness Advanced Standard - + 50 - + 50 - + 50 - + 50 - +0 - +0 • Standard mode sets the various picture settings to values that does not otherwise exist. 5. The on the...
... 2D 3D • Contrast - Adjusts the white level of the picture. Standard picture mode meets ENERGY STAR® requirements. To manually change the picture mode: VIZIO PICTURE Picture Mode Backlight Brightness Contrast Color Tint Sharpness Advanced Standard - + 50 - + 50 - + 50 - + 50 - +0 - +0 • Standard mode sets the various picture settings to values that does not otherwise exist. 5. The on the...
Download
Page 27
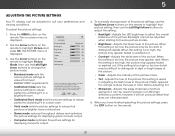
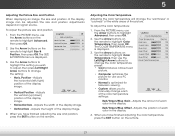
...the Color Temperature Adjusting the color temperature will change the color temperature Inppuret set:Wide CC • Cool produces a blue-hued picture. • Computer optimizes the Sleep Timer picPitcuturree forAuudsioe monitor. To adjust ...PICTURE menu, use the Left/Right ArrAoBwC buttons to highlight Color Temperature, then press OK. Green Offset Blue Offset - Use the Arrow buttons to highlight the setting you to change each color in the display. 4. The COLOR TEMPERATURE menu is displayed. 3. Adjusts the height of the color temperature settings: VIZIO...
...the Color Temperature Adjusting the color temperature will change the color temperature Inppuret set:Wide CC • Cool produces a blue-hued picture. • Computer optimizes the Sleep Timer picPitcuturree forAuudsioe monitor. To adjust ...PICTURE menu, use the Left/Right ArrAoBwC buttons to highlight Color Temperature, then press OK. Green Offset Blue Offset - Use the Arrow buttons to highlight the setting you to change each color in the display. 4. The COLOR TEMPERATURE menu is displayed. 3. Adjusts the height of the color temperature settings: VIZIO...
Download
Page 28
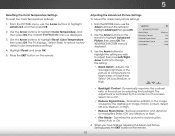
... Reset and press OK. 5. Select On or Off. • Reduce Signal Noise - Adjusting the Advanced Picture Settings To adjust the advanced picture settings: 1. Dynamically improves the contrast ratio of the picture by the digitizing of brightness. Select Off, Low, Medium, or High. • Reduce Block Noise -...Use the Arrow buttons to highlight Advanced, then press OK. 2. Press the EXIT button on the remote. 22 VIZIO ADVANCED PICTURE Black Detail Backlight Control Reduce Signal Noise Reduce Block Noise Film Mode Medium On Low Low Auto 3. Reduces pixelation and...
... Reset and press OK. 5. Select On or Off. • Reduce Signal Noise - Adjusting the Advanced Picture Settings To adjust the advanced picture settings: 1. Dynamically improves the contrast ratio of the picture by the digitizing of brightness. Select Off, Low, Medium, or High. • Reduce Block Noise -...Use the Arrow buttons to highlight Advanced, then press OK. 2. Press the EXIT button on the remote. 22 VIZIO ADVANCED PICTURE Black Detail Backlight Control Reduce Signal Noise Reduce Block Noise Film Mode Medium On Low Low Auto 3. Reduces pixelation and...
Download
Page 29
From the PICTURE menu, use the Arrow buttons to restore factory default picture settings.". 3. The TV displays, "Select Reset to highlight Advanced, then press OK. 2. Highlight Reset and press OK. 4. Press the EXIT button on the remote to the factory default settings: 1. Use the Arrow buttons on the remote. 23 5 Resetting the Picture Settings To reset the picture settings to highlight Reset Picture Mode, then press OK.
From the PICTURE menu, use the Arrow buttons to restore factory default picture settings.". 3. The TV displays, "Select Reset to highlight Advanced, then press OK. 2. Highlight Reset and press OK. 4. Press the EXIT button on the remote to the factory default settings: 1. Use the Arrow buttons on the remote. 23 5 Resetting the Picture Settings To reset the picture settings to highlight Reset Picture Mode, then press OK.
Download
Page 33
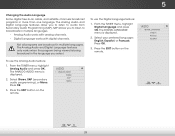
... the TUNER menu, highlight Auto Channel Scan, and press OK. VIZIO CHANNEL SCAN Channel Scan Digital Channels: 0 Analog Channels: 0 13% Complete Cancel If the channel scan is displayed. 2. Highlight Start and press OK. Input Wide CC Sleep Timer Picture Audio Network Settings Help 27 Use the Number Pad on the remote to backspace...
... the TUNER menu, highlight Auto Channel Scan, and press OK. VIZIO CHANNEL SCAN Channel Scan Digital Channels: 0 Analog Channels: 0 13% Complete Cancel If the channel scan is displayed. 2. Highlight Start and press OK. Input Wide CC Sleep Timer Picture Audio Network Settings Help 27 Use the Number Pad on the remote to backspace...
Download
Page 35
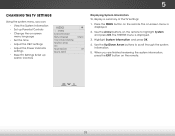
...; Analog Audio works with analog channels. • Digital Language works with digital channels. The ANALOG AUDIO menu is being viewed is displayed. 2. VIZIO ANALOG AUDIO Stereo SAP Mono To use the Analog Audio feature: 1. From the TUNER menu, highlight Digital Language and press OK. 5 Changing the...in more than one language. Wide Zoom Normal Panoramic Exit 2D 3D ABC Input Wide CC VIZIO DIGITAL LANGUAGE English Français Español Sleep Timer Picture Audio Network Settings Help 29 Press the EXIT button on the remote. The Analog Audio and Digital Language ...
...; Analog Audio works with analog channels. • Digital Language works with digital channels. The ANALOG AUDIO menu is being viewed is displayed. 2. VIZIO ANALOG AUDIO Stereo SAP Mono To use the Analog Audio feature: 1. From the TUNER menu, highlight Digital Language and press OK. 5 Changing the...in more than one language. Wide Zoom Normal Panoramic Exit 2D 3D ABC Input Wide CC VIZIO DIGITAL LANGUAGE English Français Español Sleep Timer Picture Audio Network Settings Help 29 Press the EXIT button on the remote. The Analog Audio and Digital Language ...
Download
Page 38
... have a DVD player connected to the Component input, you want to use a preset input label, highlight Input Labels and press OK. 5 SETTING UP DEVICES To make it easier to recognize the different devices attached to the inputs on your 3iDnput, press the EXIT button on the remote... sing the on the remote. The on-screen menu is displayed. 4. If you wish to name and press OK. VIZIO DEVICES HDMI-1 HDMI-2 COMP Blu-ray 3. ABC Input Wide CC Sleep Timer Picture Audio VIZIO NAME INPUT Input Labels Blu-ray_ HDMI-1 abc def ghi j k l mn o p q r s t u v wx y z 0 123456789 .@# ....
... have a DVD player connected to the Component input, you want to use a preset input label, highlight Input Labels and press OK. 5 SETTING UP DEVICES To make it easier to recognize the different devices attached to the inputs on your 3iDnput, press the EXIT button on the remote... sing the on the remote. The on-screen menu is displayed. 4. If you wish to name and press OK. VIZIO DEVICES HDMI-1 HDMI-2 COMP Blu-ray 3. ABC Input Wide CC Sleep Timer Picture Audio VIZIO NAME INPUT Input Labels Blu-ray_ HDMI-1 abc def ghi j k l mn o p q r s t u v wx y z 0 123456789 .@# ....
Download
Page 39
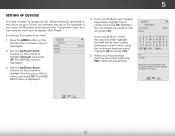
Use the Arrow buttons on the remote to scroll through the system information. 5. Input Wide CC Sleep Timer Picture Audio Network Settings Help 33 Press the MENU button on the remote. Highlight System Information and press OK. 4. ExUitse th2eD ...Controls • Change the on-screen menu language • Set the time • Adjust the CEC settings • Adjust the Power Indicator settings • Reset TV Settings & Set up Admin Controls VIZIO SYSTEM System Information Menu Language Time and Local Settings Parental Controls CEC Power Indicator Reset & Admin English Off ...
Use the Arrow buttons on the remote to scroll through the system information. 5. Input Wide CC Sleep Timer Picture Audio Network Settings Help 33 Press the MENU button on the remote. Highlight System Information and press OK. 4. ExUitse th2eD ...Controls • Change the on-screen menu language • Set the time • Adjust the CEC settings • Adjust the Power Indicator settings • Reset TV Settings & Set up Admin Controls VIZIO SYSTEM System Information Menu Language Time and Local Settings Parental Controls CEC Power Indicator Reset & Admin English Off ...
Download
Page 44
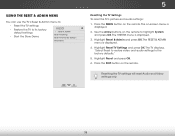
... You can use the TV's Reset & Admin menu to: • Reset the TV settings • Restore the TV to its factory default settings • Start the Store Demo VIZIO RESET & ADMIN Reset TV Settings Reset TV to the factory defaulAtBsC." 5. Press the EXIT button on -screen menu is ...displayed. 2. Sleep Timer Picture Audio Resetting the TV settings will reset Audio and Video settings only. Highlight Reset & ...
... You can use the TV's Reset & Admin menu to: • Reset the TV settings • Restore the TV to its factory default settings • Start the Store Demo VIZIO RESET & ADMIN Reset TV Settings Reset TV to the factory defaulAtBsC." 5. Press the EXIT button on -screen menu is ...displayed. 2. Sleep Timer Picture Audio Resetting the TV settings will reset Audio and Video settings only. Highlight Reset & ...
Download
Page 50
... page 10. 44 See Replacing the Batteries on page 24. Ensure the speakers are set to On. • Ensure no headphones are connected to the TV. • Check...; Replace the remote batteries with new ones. The power is on, but there is off. • Check the audio settings. There is no sound. • Press Volume Up on the remote control. • Press the MUTE button on the... If you are using an antenna, the signal strength of the channel may be low. See Adjusting the Picture Settings on page 20. • Press the INPUT button on the remote to the TV, scan for Channels on page...
... page 10. 44 See Replacing the Batteries on page 24. Ensure the speakers are set to On. • Ensure no headphones are connected to the TV. • Check...; Replace the remote batteries with new ones. The power is on, but there is off. • Check the audio settings. There is no sound. • Press Volume Up on the remote control. • Press the MUTE button on the... If you are using an antenna, the signal strength of the channel may be low. See Adjusting the Picture Settings on page 20. • Press the INPUT button on the remote to the TV, scan for Channels on page...
Download
Page 14
... and used in accordance with the limits for compliance could void the user's authority to the picture. • Set the TV image mode so that is filled, and then press OK. • Adjust the video settings of the following two conditions: (1) this device may cause undesired operation. Caution Always use an... is encouraged to try plugging the power cord into an outlet on the TV and to which the receiver is set to Part 15 of the picture. • Note that mute is a picture, but no power. • Be sure the power cord is securely connected to the AC socket on a circuit ...
... and used in accordance with the limits for compliance could void the user's authority to the picture. • Set the TV image mode so that is filled, and then press OK. • Adjust the video settings of the following two conditions: (1) this device may cause undesired operation. Caution Always use an... is encouraged to try plugging the power cord into an outlet on the TV and to which the receiver is set to Part 15 of the picture. • Note that mute is a picture, but no power. • Be sure the power cord is securely connected to the AC socket on a circuit ...


