Download
Page 5
... is dropped and the housing is damaged, the internal components may function abnormally. If any way. - Do not try to leak which can damage the remote control or injure the operator. Unplug the power cord immediately and contact your dealer for moving your TV. • When unplugging your TV yourself. •...
... is dropped and the housing is damaged, the internal components may function abnormally. If any way. - Do not try to leak which can damage the remote control or injure the operator. Unplug the power cord immediately and contact your dealer for moving your TV. • When unplugging your TV yourself. •...
Download
Page 7
... Contents Installing the TV 3 Inspecting the Package Contents 3 Installing the TV 3 Installing the TV Stand 3 Installing the TV on a Wall 4 Controls and Connections 5 Front Panel 7 Remote Control 8 Replacing the Batteries 9 Connecting Your Devices 10 Connecting A Device 10 Connecting a Device - Table of the Inputs 32 Changing the On-Screen Menu Language 32...
... Contents Installing the TV 3 Inspecting the Package Contents 3 Installing the TV 3 Installing the TV Stand 3 Installing the TV on a Wall 4 Controls and Connections 5 Front Panel 7 Remote Control 8 Replacing the Batteries 9 Connecting Your Devices 10 Connecting A Device 10 Connecting a Device - Table of the Inputs 32 Changing the On-Screen Menu Language 32...
Download
Page 9
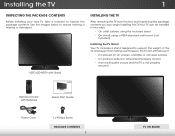
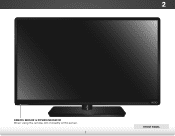
... ensure nothing is not properly secured INPUT EXIT BACK OK VOL VOL 1 2 4 5 7 8 WIDE 0 MENU GUIDE CH CH 3 6 9 - VIZIO LED HDTV with Batteries VIZIO Quick Start Guide Quick Start Guide Power Cord 1 x Phillips Screw Package Contents 3 TV on an uneven, unstable, or non-level surface • It... is pushed, pulled, or otherwise improperly moved • If an earthquake occurs and the TV is missing or damaged. Remote ...
... ensure nothing is not properly secured INPUT EXIT BACK OK VOL VOL 1 2 4 5 7 8 WIDE 0 MENU GUIDE CH CH 3 6 9 - VIZIO LED HDTV with Batteries VIZIO Quick Start Guide Quick Start Guide Power Cord 1 x Phillips Screw Package Contents 3 TV on an uneven, unstable, or non-level surface • It... is pushed, pulled, or otherwise improperly moved • If an earthquake occurs and the TV is missing or damaged. Remote ...
Download
Page 13
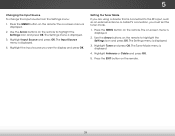
2 Front Panel REMOTE SENSOR & POWER INDICATOR When using the remote, aim it directly at this sensor. 7 Front Panel
2 Front Panel REMOTE SENSOR & POWER INDICATOR When using the remote, aim it directly at this sensor. 7 Front Panel
Download
Page 14
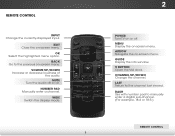
... loudness of the audio. Menu Display the on -screen menu. Dash Use with number pad to the previous on or off or on -screen menu. 2 Remote Control Input Change the currently-displayed input. Number Pad Manually enter a channel. Arrow Navigate the on -screen menu. V Button Open the VIA dock. Exit Close... mode. Channel Up/Down Change the channel. Guide Display the info window. Back Go to manually enter a digital sub-channel. (For example, 18-4 or 18-5.) Remote Control 8 Power Turn TV on -screen menu. Last Return to the channel last viewed. Ok Select the highlighted menu option.
... loudness of the audio. Menu Display the on -screen menu. Dash Use with number pad to the previous on or off or on -screen menu. 2 Remote Control Input Change the currently-displayed input. Number Pad Manually enter a channel. Arrow Navigate the on -screen menu. V Button Open the VIA dock. Exit Close... mode. Channel Up/Down Change the channel. Guide Display the info window. Back Go to manually enter a digital sub-channel. (For example, 18-4 or 18-5.) Remote Control 8 Power Turn TV on -screen menu. Last Return to the channel last viewed. Ok Select the highlighted menu option.
Download
Page 15
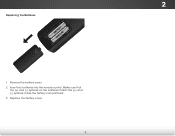
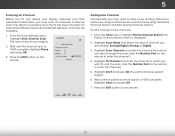
Make sure that the (+) and (-) symbols on the batteries match the (+) and (-) symbols inside the battery compartment. 3. Insert two batteries into the remote control. 2 Replacing the Batteries 1. Replace the battery cover. 9 Remove the battery cover. 2.
Make sure that the (+) and (-) symbols on the batteries match the (+) and (-) symbols inside the battery compartment. 3. Insert two batteries into the remote control. 2 Replacing the Batteries 1. Replace the battery cover. 9 Remove the battery cover. 2.

Download
Page 21
...Your TV should be installed and the power cord should be connected to highlight your time zone and press OK. 5. The TV powers on the remote to highlight your preferred language and press OK. INPUT EXIT MENU 2. Use the OK and Arrow Up/ Down buttons on and the Setup App..., the Setup App will guide you through each of the steps necessary to get your TV connection using the Arrow and OK buttons on the remote to highlight Home mode Setup and press OK. 1 2 3 4 5 6 7 8 9 WIDE 0 - 4. Before you have finished the channel scan, highlight Exit to highlight Start the Channel ...
...Your TV should be installed and the power cord should be connected to highlight your time zone and press OK. 5. The TV powers on the remote to highlight your preferred language and press OK. INPUT EXIT MENU 2. Use the OK and Arrow Up/ Down buttons on and the Setup App..., the Setup App will guide you through each of the steps necessary to get your TV connection using the Arrow and OK buttons on the remote to highlight Home mode Setup and press OK. 1 2 3 4 5 6 7 8 9 WIDE 0 - 4. Before you have finished the channel scan, highlight Exit to highlight Start the Channel ...
Download
Page 22
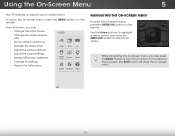
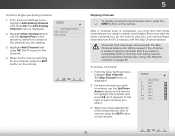
... 16 The menu. EXIT MENU Use the Arrow buttons to highlight a menu option, and press the OK MENU/OK button to -use on the remote. Using the On-Screen Menu 5 Your TV features an easy-to select that option. From this menu, you can : • Change the input source...8226; Adjust the picture settings • Adjust the audio settings • Access USB photo slideshow • Change TV settings • Access the help menu VIZIO ABC Input Wide CC Sleep Timer Picture Audio Media Settings Help Navigating the On-Screen Menu To open the on-screen menu, press the MENU...
... 16 The menu. EXIT MENU Use the Arrow buttons to highlight a menu option, and press the OK MENU/OK button to -use on the remote. Using the On-Screen Menu 5 Your TV features an easy-to select that option. From this menu, you can : • Change the input source...8226; Adjust the picture settings • Adjust the audio settings • Access USB photo slideshow • Change TV settings • Access the help menu VIZIO ABC Input Wide CC Sleep Timer Picture Audio Media Settings Help Navigating the On-Screen Menu To open the on-screen menu, press the MENU...
Download
Page 23
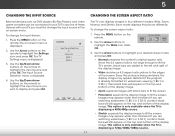
VIZIO Input Source Selection TV Comp/AV HDMI-1 HDMI-2 4. Since the picture is displaying a ... four different modes: Wide, Zoom, Normal, and Stretch. Press the MENU button on the remote. Use the Up/Down Arrow buttons on the remote to highlight the input source you are watching widescreen (1.85:1 or 2.35:1) content, black ...watching widescreen (1.85:1 or 2.35:1) content, black bars will still appear on -screen menu. Press WiOdeK. The on the remote to highlight the Settings icon and press OK. Use the Arrow buttons on -screen menu is displayed. 3. 5 Changing the ...
VIZIO Input Source Selection TV Comp/AV HDMI-1 HDMI-2 4. Since the picture is displaying a ... four different modes: Wide, Zoom, Normal, and Stretch. Press the MENU button on the remote. Use the Up/Down Arrow buttons on the remote to highlight the input source you are watching widescreen (1.85:1 or 2.35:1) content, black ...watching widescreen (1.85:1 or 2.35:1) content, black bars will still appear on -screen menu. Press WiOdeK. The on the remote to highlight the Settings icon and press OK. Use the Arrow buttons on -screen menu is displayed. 3. 5 Changing the ...
Download
Page 24
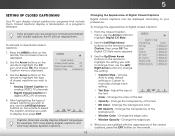
...'s dialogue. Change the edge color. • Window Opacity - To activate or deactivate closed captions: 1. Use the Arrow buttons on the remote to select the caption channel you are viewing is displayed. 3. ChAaudnioge the color of the background. • Window Color - Change the ... Closed Caption menu, use the Left/ Right Arrow buttons to highlight Digital CC Style. 2. The Digital CC Style menu appears. VIZIO Digital CC Style Caption Style Custom Text Size As Broadcast Color As Broadcast Opacity As Broadcast 3. Use the Up/Down Arrow WibdeuttoZnoosmon...
...'s dialogue. Change the edge color. • Window Opacity - To activate or deactivate closed captions: 1. Use the Arrow buttons on the remote to select the caption channel you are viewing is displayed. 3. ChAaudnioge the color of the background. • Window Color - Change the ... Closed Caption menu, use the Left/ Right Arrow buttons to highlight Digital CC Style. 2. The Digital CC Style menu appears. VIZIO Digital CC Style Caption Style Custom Text Size As Broadcast Color As Broadcast Opacity As Broadcast 3. Use the Up/Down Arrow WibdeuttoZnoosmon...
Download
Page 25
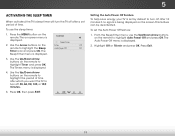
...displayed. 3. The Sleep Timer menu is VIZIO displayed. Setting the Auto Power Off Feature To help save energy, your TV is set by default to turn off after 10 minutes if no signal is displayed. 4. Sleep Timer 2. Use the Arrow buttons on the remote to highlight the period of time. ..., the TV's sleep timer will turn the TV off after a set the Auto Power Off feature: 1. The Timers menu is being displayed on the remote to highlight Timer and press OK. The WiAdeuto ZPooomwer-NOorfmf aml ePnaunoriasmdicisplayed. 2. Press OK, then press EXIT. From the Sleep Timer menu, use the...
...displayed. 3. The Sleep Timer menu is VIZIO displayed. Setting the Auto Power Off Feature To help save energy, your TV is set by default to turn off after 10 minutes if no signal is displayed. 4. Sleep Timer 2. Use the Arrow buttons on the remote to highlight the period of time. ..., the TV's sleep timer will turn the TV off after a set the Auto Power Off feature: 1. The Timers menu is being displayed on the remote to highlight Timer and press OK. The WiAdeuto ZPooomwer-NOorfmf aml ePnaunoriasmdicisplayed. 2. Press OK, then press EXIT. From the Sleep Timer menu, use the...

Download
Page 26
...hue of the picture settings: Wide Exit Input Sleep Timer Backlight - Sharpness - Use the Up/Down Arrow buttons on the remote. See Zoo"Am djuNsotrimnagl thPaenoAradmvicanced Picture Settings" on -screen menu is too high, the picture may appear dark. When this ... Game mode optimizes the picture settings for displaying game console output. • Vivid mode sets the picture settings to values perfect for their respective sports. VIZIO Picture Settings Picture Mode Backlight Brightness Contrast Color Tint Sharpness Custom - + 50 - + 50 - + 50 - + 50 - +0 - +0 ...
...hue of the picture settings: Wide Exit Input Sleep Timer Backlight - Sharpness - Use the Up/Down Arrow buttons on the remote. See Zoo"Am djuNsotrimnagl thPaenoAradmvicanced Picture Settings" on -screen menu is too high, the picture may appear dark. When this ... Game mode optimizes the picture settings for displaying game console output. • Vivid mode sets the picture settings to values perfect for their respective sports. VIZIO Picture Settings Picture Mode Backlight Brightness Contrast Color Tint Sharpness Custom - + 50 - + 50 - + 50 - + 50 - +0 - +0 ...
Download
Page 27
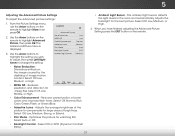
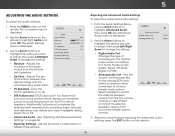
...- Reduces oversaturation of image motion content. Select Off, Low, Middle, or High. • Color Enhancement - Use the Arrow buttons on the remote. 5 Adjusting the Advanced Picture Settings To adjust the advanced picture settings: 1. Select Off or DCR (Dynamic Contrast Ratio). • Ambient Light... light sensor detects the light levels in the image caused by the digitizing of some colors and improves flesh tones. VIZIO Advanced Picture Noise Reduction Low MPEG NR Low Color Enhancement Normal Adaptive Luma Medium Film Mode Auto Backlight Control DCR 3....
...- Reduces oversaturation of image motion content. Select Off, Low, Middle, or High. • Color Enhancement - Use the Arrow buttons on the remote. 5 Adjusting the Advanced Picture Settings To adjust the advanced picture settings: 1. Select Off or DCR (Dynamic Contrast Ratio). • Ambient Light... light sensor detects the light levels in the image caused by the digitizing of some colors and improves flesh tones. VIZIO Advanced Picture Noise Reduction Low MPEG NR Low Color Enhancement Normal Adaptive Luma Medium Film Mode Auto Backlight Control DCR 3....
Download
Page 28
..., then press OK. Use the Arrow buttons on the remote. 22 Adjusting the Picture Size and Position When displaying an image from the HDMI input, the size and position of the color temperature settings: VIZIO Color Temperature Color Temperature Red Gain - Blue Offset - ...Adjusts the position of each of the display image can be adjusted. When you have finished adjusting the color temperature, press the EXIT button on the remote to highlight Color Temperature...
..., then press OK. Use the Arrow buttons on the remote. 22 Adjusting the Picture Size and Position When displaying an image from the HDMI input, the size and position of the color temperature settings: VIZIO Color Temperature Color Temperature Red Gain - Blue Offset - ...Adjusts the position of each of the display image can be adjusted. When you have finished adjusting the color temperature, press the EXIT button on the remote to highlight Color Temperature...
Download
Page 29
Press the EXIT button on the remote to highlight More, then press OK. 2. From the Picture Settings menu, use the Arrow buttons to highlight Reset Picture Mode, then press OK. Use the Arrow buttons on the remote. 23 5 Resetting the Picture Settings To reset the picture settings to the factory defaults?" 3. Highlight Yes and press OK. 4. The TV displays, "Are you sure you want to RESET Picture Settings to the factory default settings: 1.
Press the EXIT button on the remote to highlight More, then press OK. 2. From the Picture Settings menu, use the Arrow buttons to highlight Reset Picture Mode, then press OK. Use the Arrow buttons on the remote. 23 5 Resetting the Picture Settings To reset the picture settings to the factory defaults?" 3. Highlight Yes and press OK. 4. The TV displays, "Are you sure you want to RESET Picture Settings to the factory default settings: 1.
Download
Page 30
...volume controls, or select Fixed to control the external speakers' volume from the left and right speakers. • Lip Sync - VIZIO Audio Audio Mode Balance - Turns the built-in speakers on page 24. • Equalizer Settings - Additionally, TruSurround completes the entertainment...1. Changes the type of different frequencies. When you have finished adjusting the advanced audio settings, press the EXIT button on the remote to change the setting: • Digital AudABiCo Out - Adjusts the synchronization between the display image and the accompanying audio track. ...
...volume controls, or select Fixed to control the external speakers' volume from the left and right speakers. • Lip Sync - VIZIO Audio Audio Mode Balance - Turns the built-in speakers on page 24. • Equalizer Settings - Additionally, TruSurround completes the entertainment...1. Changes the type of different frequencies. When you have finished adjusting the advanced audio settings, press the EXIT button on the remote to change the setting: • Digital AudABiCo Out - Adjusts the synchronization between the display image and the accompanying audio track. ...
Download
Page 31
...the Arrow buttons to highlight the Audio icon and press OK. Press the MENU button on the remote. The Audio Settings menu is displayed. 2. Press the EXIT button on the remote. Changing the TV Settings Using the settings menu, you want to RESET Audio Settings to the ...displayed. 3. The on -screen menu language • Set the time • Adjust the CEC settings • Adjust the Power Indicator settings VIZIO Settings Input Source Tuner Name Input Parental Controls Menu Language Time & Local Settings CEC Settings Power Indicator TV English On 25 Highlight Yes and press...
...the Arrow buttons to highlight the Audio icon and press OK. Press the MENU button on the remote. The Audio Settings menu is displayed. 2. Press the EXIT button on the remote. Changing the TV Settings Using the settings menu, you want to RESET Audio Settings to the ...displayed. 3. The on -screen menu language • Set the time • Adjust the CEC settings • Adjust the Power Indicator settings VIZIO Settings Input Source Tuner Name Input Parental Controls Menu Language Time & Local Settings CEC Settings Power Indicator TV English On 25 Highlight Yes and press...
Download
Page 32
... to the RF input, such as an external antenna or cable TV connection, you must set the tuner mode. 1. Use the Arrow buttons on the remote. Highlight Antenna or Cable and press OK. 5. The on-screen menu is displayed. 4. Press the MENU button on the... Settings icon and press OK. Highlight Tuner and press OK. Press the MENU button on the remote. 26 The Input Source menu is displayed. 2. The Settings menu is displayed. 2. Press the EXIT button on the remote. Use the Arrow buttons on -screen menu is displayed. 3. Highlight the input source you are using...
... to the RF input, such as an external antenna or cable TV connection, you must set the tuner mode. 1. Use the Arrow buttons on the remote. Highlight Antenna or Cable and press OK. 5. The on-screen menu is displayed. 4. Press the MENU button on the... Settings icon and press OK. Highlight Tuner and press OK. Press the MENU button on the remote. 26 The Input Source menu is displayed. 2. The Settings menu is displayed. 2. Press the EXIT button on the remote. Use the Arrow buttons on -screen menu is displayed. 3. Highlight the input source you are using...
Download
Page 33
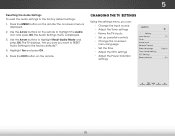
...type of channel you Wide Zoom Normal Panoramic are available. 1. Highlight Start and press OK. Press the EXIT button on the remote. Highlight From Channel and enter the channel from which you must scan for channels. A channel scan may need to end thABeC...free-to enter the channel.) Input Wide CC 5. STliWHm eeieagpr iht luigPnichttuitlrDethoenApeudaaiorntidal channel search press OK. The auto channel scan begins. 2. VIZIO Channel Scan Channels found Digital: 0 Analog: 19 18% Complete Cancel Adding New Channels Occasionally, you want to add a new analog ...
...type of channel you Wide Zoom Normal Panoramic are available. 1. Highlight Start and press OK. Press the EXIT button on the remote. Highlight From Channel and enter the channel from which you must scan for channels. A channel scan may need to end thABeC...free-to enter the channel.) Input Wide CC 5. STliWHm eeieagpr iht luigPnichttuitlrDethoenApeudaaiorntidal channel search press OK. The auto channel scan begins. 2. VIZIO Channel Scan Channels found Digital: 0 Analog: 19 18% Complete Cancel Adding New Channels Occasionally, you want to add a new analog ...
Download
Page 34
If you wish to remove, press the EXIT button on the remote to highlight the channel and press OK. NeTtwhoerk SSkeitptingCs haHnenlpel menu is completed, you may also be viewed if the channel is done scanning for the channel. 4. VIZIO Skip Channel 0 Test 0 x 0-1 Test 1 x 0-1 Test 2 x 0 ... may find that have selected all of the channels you wish to view. See "Using the Parental Controls" on the remote. VIZIO Add Analog Channel Enter Channel # __ Add Channel 3. Channels that some channels you select. 3. To STrlim eeeempr ovPeicaturechaAnudnioel:...
If you wish to remove, press the EXIT button on the remote to highlight the channel and press OK. NeTtwhoerk SSkeitptingCs haHnenlpel menu is completed, you may also be viewed if the channel is done scanning for the channel. 4. VIZIO Skip Channel 0 Test 0 x 0-1 Test 1 x 0-1 Test 2 x 0 ... may find that have selected all of the channels you wish to view. See "Using the Parental Controls" on the remote. VIZIO Add Analog Channel Enter Channel # __ Add Channel 3. Channels that some channels you select. 3. To STrlim eeeempr ovPeicaturechaAnudnioel:...


