

E190VA Quick Start Guide
Page 3
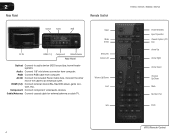
... (-): Use with Number Pad to to manually enter a channel. Power/Standby: Turn the TV on or off . Exit: Close the on -screen menu or select highlighted menu option. When mute is activated, the TV's audio is turned off . Info: Display the Info Window. Wide: Change the displayed aspect ratio. Menu/OK: Display the on -screen menu. Channel Up/ Change the channel. Input (Specific): Change the input device. With each press of the button, the sleep timer's duration will display a different input. Arrow...
... (-): Use with Number Pad to to manually enter a channel. Power/Standby: Turn the TV on or off . Exit: Close the on -screen menu or select highlighted menu option. When mute is activated, the TV's audio is turned off . Info: Display the Info Window. Wide: Change the displayed aspect ratio. Menu/OK: Display the on -screen menu. Channel Up/ Change the channel. Input (Specific): Change the input device. With each press of the button, the sleep timer's duration will display a different input. Arrow...
E190VA Quick Start Guide
Page 7
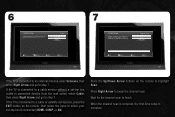
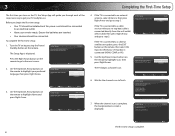
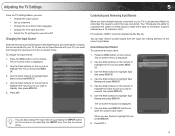
... Setup Please select your input source: Tuner Antenna Cable Back Select Next EXIT Exit 7 Initial Setup Please connect your set-top box is connected (HDMI, COMP, or AV). If the TV is connected to a cable service without a set -top box, press the EXIT button on the remote to begin the channel scan. Wait for the channel scan to step 7. If the TV is connected to a cable or satellite set -top box (cable is connected directly from the wall outlet) select Cable...
... Setup Please select your input source: Tuner Antenna Cable Back Select Next EXIT Exit 7 Initial Setup Please connect your set-top box is connected (HDMI, COMP, or AV). If the TV is connected to a cable service without a set -top box, press the EXIT button on the remote to begin the channel scan. Wait for the channel scan to step 7. If the TV is connected to a cable or satellite set -top box (cable is connected directly from the wall outlet) select Cable...
E190VA Quick Start Guide
Page 10
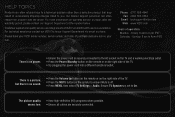
...; Press MENU, then select TV Settings > Audio. The picture quality • View high-definition (HD) programs when possible. Please have your VIZIO model number, serial number, and date of operation: Monday - There is a picture, but there is no power. • Ensure the power cord is securely connected to 4pm (PST) There is set to service excellence. Sunday: 8 am to you. seems low. • Ensure all cables are integral parts of VIZIO's commitment...
...; Press MENU, then select TV Settings > Audio. The picture quality • View high-definition (HD) programs when possible. Please have your VIZIO model number, serial number, and date of operation: Monday - There is a picture, but there is no power. • Ensure the power cord is securely connected to 4pm (PST) There is set to service excellence. Sunday: 8 am to you. seems low. • Ensure all cables are integral parts of VIZIO's commitment...
E190VA Quick Start Guide
Page 11
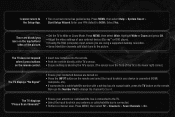
...; or DVD player). • If using a supported desktop resolution. • Some television channels add black bars to 3 or 4. Press MENU, then select Help > System Reset > the Setup App. There are using the RGB (computer) input, ensure you are black/gray bars on the top/bottom/ sides of your device is connected (HDMI, Composite, etc). • If connected to a cable/satellite service with a set-top box via coaxial cable, press the TV button on -screen menu has guided setup...
...; or DVD player). • If using a supported desktop resolution. • Some television channels add black bars to 3 or 4. Press MENU, then select Help > System Reset > the Setup App. There are using the RGB (computer) input, ensure you are black/gray bars on the top/bottom/ sides of your device is connected (HDMI, Composite, etc). • If connected to a cable/satellite service with a set-top box via coaxial cable, press the TV button on -screen menu has guided setup...
E261VA User Manual
Page 5
... the remote control or injure the operator. E190VA / E220VA / E260VA / E261VA • Do not overload power strips and extension cords. Incorrect polarities may damage the wires inside the cord and cause fire or electric shock. These servicing instructions are unplugged before moving your TV during lightning. Your TV is required, contact your TV and easily accessible. • Only power of...
... the remote control or injure the operator. E190VA / E220VA / E260VA / E261VA • Do not overload power strips and extension cords. Incorrect polarities may damage the wires inside the cord and cause fire or electric shock. These servicing instructions are unplugged before moving your TV during lightning. Your TV is required, contact your TV and easily accessible. • Only power of...
E261VA User Manual
Page 6
... fall into such power lines or circuits. No extra converter box is electrically grounded to provide some protection against voltage surges and static charges. Remember, the screen of time, unplug the TV from the wall outlet and disconnect the antenna or cable system. Analog-only television sets that the antenna or cable system is needed. Analog-only TVs should continue to work as appropriate: FCC...
... fall into such power lines or circuits. No extra converter box is electrically grounded to provide some protection against voltage surges and static charges. Remember, the screen of time, unplug the TV from the wall outlet and disconnect the antenna or cable system. Analog-only television sets that the antenna or cable system is needed. Analog-only TVs should continue to work as appropriate: FCC...
E261VA User Manual
Page 7
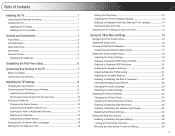
... the TV Stand 1 Installing the TV on a Wall 2 Controls and Connections 3 Front Panel 3 Left Side Panel 3 Right Side Panel 3 Rear Panel 4 Remote Control 4 Replacing the Batteries 5 Completing the First-Time Setup 6 Connecting Your Devices to the TV 7 Before You Begin 7 Connecting Your Devices 7 Adjusting the TV Settings 9 Changing the Input Source 9 Customizing and Removing Input Names 9 Customizing Input Names 9 Removing Unused Inputs from the Input List 10 Setting Up Channels 10 Changing the Signal Source 10 Customizing the Master Channel List 11 Scanning for New...
... the TV Stand 1 Installing the TV on a Wall 2 Controls and Connections 3 Front Panel 3 Left Side Panel 3 Right Side Panel 3 Rear Panel 4 Remote Control 4 Replacing the Batteries 5 Completing the First-Time Setup 6 Connecting Your Devices to the TV 7 Before You Begin 7 Connecting Your Devices 7 Adjusting the TV Settings 9 Changing the Input Source 9 Customizing and Removing Input Names 9 Customizing Input Names 9 Removing Unused Inputs from the Input List 10 Setting Up Channels 10 Changing the Signal Source 10 Customizing the Master Channel List 11 Scanning for New...
E261VA User Manual
Page 8
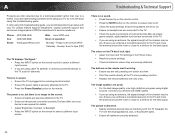
... Locks 27 Viewing System Info and Resetting to Factory Defaults 28 Displaying System Information 28 Restoring the TV to the Factory Default Settingss 28 Restarting the Setup App 28 Setting Up Closed Captioning 29 Changing the Appearance of Digital Closed Captions 29 Troubleshooting & Technical Support 30 The TV displays "No Signal 30 There is no power 30 The power is on, but there is no image on the screen 30 There is no sound...
... Locks 27 Viewing System Info and Resetting to Factory Defaults 28 Displaying System Information 28 Restoring the TV to the Factory Default Settingss 28 Restarting the Setup App 28 Setting Up Closed Captioning 29 Changing the Appearance of Digital Closed Captions 29 Troubleshooting & Technical Support 30 The TV displays "No Signal 30 There is no power 30 The power is on, but there is no image on the screen 30 There is no sound...
E261VA User Manual
Page 9
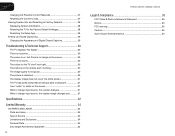
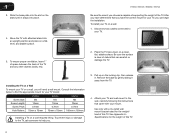
... VIZIO Razor LED LCD HDTV with Stand Your TV comes in two ways: • On a flat surface, using the included stand • On a wall, using a VESA-standard wall mount (not included) Installing the TV Stand Your TV includes a stand designed to the screen, place the TV on a clean, flat surface. Your TV can begin installing the TV. To prevent scratches or damage to support the weight of the TV. When you need...
... VIZIO Razor LED LCD HDTV with Stand Your TV comes in two ways: • On a flat surface, using the included stand • On a wall, using a VESA-standard wall mount (not included) Installing the TV Stand Your TV includes a stand designed to the screen, place the TV on a clean, flat surface. Your TV can begin installing the TV. To prevent scratches or damage to support the weight of the TV. When you need...
E261VA User Manual
Page 10
... help you choose is clear of the TV and any cables connected to the wall, carefully following the instructions that came with your TV. 5. Attach your TV and wall mount to your mount. Disconnect any other objects (walls, etc). 2. Place the TV face-down on the locking clip, then release it. 1 3. Move the TV with a UL-listed wall mount bracket rated for your TV model: Screw Size: Screw...
... help you choose is clear of the TV and any cables connected to the wall, carefully following the instructions that came with your TV. 5. Attach your TV and wall mount to your mount. Disconnect any other objects (walls, etc). 2. Place the TV face-down on the locking clip, then release it. 1 3. Move the TV with a UL-listed wall mount bracket rated for your TV model: Screw Size: Screw...
E261VA User Manual
Page 11
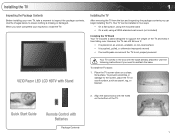
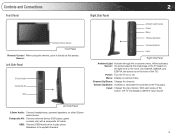
...: Display on -screen menu. With each press of the TVs audio. Composite AV: Connect external device (DVD player, game console, etc) with a composite AV cable. Channel Up/Down: Change the channel. Sensor: Left Side Panel 3.5mm Audio Composite AV USB 2 Right Side Panel Ambient Light Sensor Power Menu Channel Up/Down Volume Up/Down Input Right Side Panel Ambient Light Activate through the on -screen menu. USB: Connect USB thumb drive to play photo slideshow or to update firmware. 3 Controls and Connections Front Panel Remote Control Sensor Front Panel Remote Control When using...
...: Display on -screen menu. With each press of the TVs audio. Composite AV: Connect external device (DVD player, game console, etc) with a composite AV cable. Channel Up/Down: Change the channel. Sensor: Left Side Panel 3.5mm Audio Composite AV USB 2 Right Side Panel Ambient Light Sensor Power Menu Channel Up/Down Volume Up/Down Input Right Side Panel Ambient Light Activate through the on -screen menu. USB: Connect USB thumb drive to play photo slideshow or to update firmware. 3 Controls and Connections Front Panel Remote Control Sensor Front Panel Remote Control When using...
E261VA User Manual
Page 12
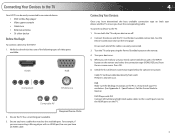
... (VIZIO sound bar, home theater system). HDMI (1,2): Connect external device (Blu-Ray/DVD player, game console, etc). Audio: Connect 1/8" mini stereo connector from computer. AC IN: Connect the included Power Cable here. 2 Rear Panel Remote Control Optical Audio RGB AC IN HDMI (1,2) Component Cable/Antenna Rear Panel Optical: Connect to an electrical outlet. Input Wide Sleep Menu/OK Arrow Left Volume Up/Down Last Info 4 E190VA / E220VA / E260VA / E261VA Power/Standby Input (Specific) Closed Caption (CC) Exit Arrow Up Arrow Right Arrow Down Channel Up/Down Mute Number Pad...
... (VIZIO sound bar, home theater system). HDMI (1,2): Connect external device (Blu-Ray/DVD player, game console, etc). Audio: Connect 1/8" mini stereo connector from computer. AC IN: Connect the included Power Cable here. 2 Rear Panel Remote Control Optical Audio RGB AC IN HDMI (1,2) Component Cable/Antenna Rear Panel Optical: Connect to an electrical outlet. Input Wide Sleep Menu/OK Arrow Left Volume Up/Down Last Info 4 E190VA / E220VA / E260VA / E261VA Power/Standby Input (Specific) Closed Caption (CC) Exit Arrow Up Arrow Right Arrow Down Channel Up/Down Mute Number Pad...
E261VA User Manual
Page 14
... Setup Channel Scan will guide you tune your cable or antenna to complete. Initial Setup Please select your input location: Mode Setting Home Retail Back Select Next EXIT Exit 4. Back Select Next EXIT Exit Initial Setup Please select your language: Language English Español Français 3. Turn the TV on by pressing the Power/ Standby button on the remote. If the TV is connected to a cable service without a set...
... Setup Channel Scan will guide you tune your cable or antenna to complete. Initial Setup Please select your input location: Mode Setting Home Retail Back Select Next EXIT Exit 4. Back Select Next EXIT Exit Initial Setup Please select your language: Language English Español Français 3. Turn the TV on by pressing the Power/ Standby button on the remote. If the TV is connected to a cable service without a set...
E261VA User Manual
Page 15
... the INPUT button on the remote and select the connection type (HDMI, RGB, etc) from wall) Perform a channel scan. For example, if you are off. 2. When you have the corresponding cable. See the Device Connection Chart on -screen menu. Turn the TV on by pressing the Power/Standby button on the TV. 7 DVD Player with an HDMI port, be easily connected to an external device: • DVD or Blu-Ray player • Video game console • Cable box • External antenna...
... the INPUT button on the remote and select the connection type (HDMI, RGB, etc) from wall) Perform a channel scan. For example, if you are off. 2. When you have the corresponding cable. See the Device Connection Chart on -screen menu. Turn the TV on by pressing the Power/Standby button on the TV. 7 DVD Player with an HDMI port, be easily connected to an external device: • DVD or Blu-Ray player • Video game console • Cable box • External antenna...
E261VA User Manual
Page 17
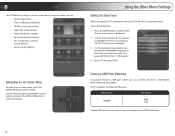
... input source in the on-screen menu. To change the input device by pressing the INPUT button on the remote or by selecting the INPUT icon from the input list, making selection of these devices with a PC Changing the Input Source External devices such as DVD players, Blu-Ray Players, and video game consoles can also change the input device: 1. Use the Arrow buttons to highlight Input Naming and press MENU/OK. Press the MENU button on -screen keyboard is displayed. 2. Use...
... input source in the on-screen menu. To change the input device by pressing the INPUT button on the remote or by selecting the INPUT icon from the input list, making selection of these devices with a PC Changing the Input Source External devices such as DVD players, Blu-Ray Players, and video game consoles can also change the input device: 1. Use the Arrow buttons to highlight Input Naming and press MENU/OK. Press the MENU button on -screen keyboard is displayed. 2. Use...
E261VA User Manual
Page 24
... a USB port where you must first save your photos. The Timer menu is displayed. 2. Use the Up/Down Arrow buttons on the remote to highlight the Timer icon and press OK. The TV supports the following file types: Media Type File Types Images .jpeg .jpg To play USB media, you can : • Set the sleep timer • View a USB photo slideshow • Set the screen aspect ratio • Adjust the audio settings • Adjust the picture settings • Set up the parental controls...
... a USB port where you must first save your photos. The Timer menu is displayed. 2. Use the Up/Down Arrow buttons on the remote to highlight the Timer icon and press OK. The TV supports the following file types: Media Type File Types Images .jpeg .jpg To play USB media, you can : • Set the sleep timer • View a USB photo slideshow • Set the screen aspect ratio • Adjust the audio settings • Adjust the picture settings • Set up the parental controls...
E261VA User Manual
Page 32
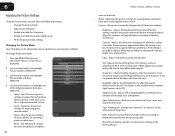
... exist. Sets the picture settings to distinguish details. When this setting is the recommended setting. • Game - When this setting is set to values perfect for the best picture quality. Sharpness - Color Temperature - Changes the "warmness" or "coolness" of the white areas of picture elements. Sets the picture settings to OFF. Backlight - Use the Arrow buttons to the factory defaults. Use the Arrow buttons to affect the overall brilliance of the picture colors. Adjusts the LED brightness...
... exist. Sets the picture settings to distinguish details. When this setting is the recommended setting. • Game - When this setting is set to values perfect for the best picture quality. Sharpness - Color Temperature - Changes the "warmness" or "coolness" of the white areas of picture elements. Sets the picture settings to OFF. Backlight - Use the Arrow buttons to the factory defaults. Use the Arrow buttons to affect the overall brilliance of the picture colors. Adjusts the LED brightness...
E261VA User Manual
Page 38
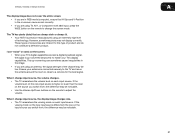
... the audio connections of external devices (Blu-ray player, game console, cable/satellite box) that are connected to the TV. • Press the Power/Standby button on the TV don't look right. • Adust the Color and Tint settings in the Picture menu. • Reset the picture settings. • Check all cables are still experiencing an issue with new ones. Separate the TV from electrical appliances, cars, or flourescent lights. •...
... the audio connections of external devices (Blu-ray player, game console, cable/satellite box) that are connected to the TV. • Press the Power/Standby button on the TV don't look right. • Adust the Color and Tint settings in the Picture menu. • Reset the picture settings. • Check all cables are still experiencing an issue with new ones. Separate the TV from electrical appliances, cars, or flourescent lights. •...
E261VA User Manual
Page 39
... buttons on the remote to adjust the volume. The TV has pixels (dots) that H-Size and V-Position in the on the screen. • When your antenna is up -converting can sometimes cause irregularities in the image. • If you are using an antenna, the signal strength of the channel may be low. I change the screen mode. Ensure your TV's digital capabilities exceed a digital broadcast signal, the signal is connected...
... buttons on the remote to adjust the volume. The TV has pixels (dots) that H-Size and V-Position in the on the screen. • When your antenna is up -converting can sometimes cause irregularities in the image. • If you are using an antenna, the signal strength of the channel may be low. I change the screen mode. Ensure your TV's digital capabilities exceed a digital broadcast signal, the signal is connected...
E261VA User Manual
Page 42
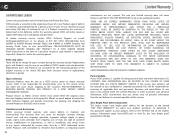
...OF SOME IN-HOME AND ALL SHIP-IN WARANTY SERVICE. Type of protection. This warranty does not cover, for example: cosmetic damage, normal wear and tear, improper operation, improper voltage supply or power surges, signal issues, damages from the unit before it is greater.... service center, but VIZIO will provide instructions for restoring all personal information from shipping, acts of God, any type of customer misuse, modifications or adjustments, as well as originally purchased. VIZIO Technical Support will cover return shipping to the customer. THIS WARRANTY GIVES YOU SPECIFIC ...
...OF SOME IN-HOME AND ALL SHIP-IN WARANTY SERVICE. Type of protection. This warranty does not cover, for example: cosmetic damage, normal wear and tear, improper operation, improper voltage supply or power surges, signal issues, damages from the unit before it is greater.... service center, but VIZIO will provide instructions for restoring all personal information from shipping, acts of God, any type of customer misuse, modifications or adjustments, as well as originally purchased. VIZIO Technical Support will cover return shipping to the customer. THIS WARRANTY GIVES YOU SPECIFIC ...


