User Manual English
Page 2
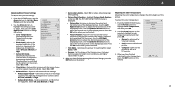
... the Screen Saver 33 Blanking the Screen 33 Restoring the TV to Factory Default Settings 47 Enabling and Disabling Smart Interactivity 47 Rear Panel 11 Remote Control Front 12 Using the Network Connection Menu 34 Connecting to a Wireless Network 34 Using the Guided Setup Menu 48 Using the Info Window 48... Your TV 7 Deleting the Custom Audio Mode 32 Changing the DLNA Name of Digital Closed Captions 39 Deleting an App from the TV 49 Using VIZIO Internet Apps Plus® (V.I.A.
... the Screen Saver 33 Blanking the Screen 33 Restoring the TV to Factory Default Settings 47 Enabling and Disabling Smart Interactivity 47 Rear Panel 11 Remote Control Front 12 Using the Network Connection Menu 34 Connecting to a Wireless Network 34 Using the Guided Setup Menu 48 Using the Info Window 48... Your TV 7 Deleting the Custom Audio Mode 32 Changing the DLNA Name of Digital Closed Captions 39 Deleting an App from the TV 49 Using VIZIO Internet Apps Plus® (V.I.A.
User Manual English
Page 4
.... Ensure that the presence of sufficient magnitude to dripping or splashing and no objects filled with instructions. Pulling on the apparatus. • Store the accessories (remote, batteries, etc.) in the ears). with wet hands. If repair is intended to alert the user to loud sounds can damage the... remote control or injure the operator. Do not expose your TV. use your TV if any object drops into your dealer. TV yourself. • CAUTION - Unplug ...
.... Ensure that the presence of sufficient magnitude to dripping or splashing and no objects filled with instructions. Pulling on the apparatus. • Store the accessories (remote, batteries, etc.) in the ears). with wet hands. If repair is intended to alert the user to loud sounds can damage the... remote control or injure the operator. Do not expose your TV. use your TV if any object drops into your dealer. TV yourself. • CAUTION - Unplug ...
User Manual English
Page 7
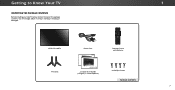
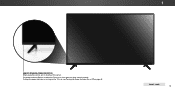
Getting to Know Your TV 1 INSPECTING THE PACKAGE CONTENTS Before installing your new TV, take a moment to ensure nothing is missing or damaged. Use the images below to inspect the package contents. VIZIO LED UHDTV Power Cord Remote Control with Batteries TV Stands 2 x Quick Start Guides (1 English, 1 French-Spanish) 4 x Phillips Screws PACKAGE CONTENTS 7
Getting to Know Your TV 1 INSPECTING THE PACKAGE CONTENTS Before installing your new TV, take a moment to ensure nothing is missing or damaged. Use the images below to inspect the package contents. VIZIO LED UHDTV Power Cord Remote Control with Batteries TV Stands 2 x Quick Start Guides (1 English, 1 French-Spanish) 4 x Phillips Screws PACKAGE CONTENTS 7
User Manual English
Page 10
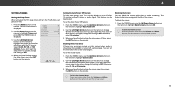
FRONT PANEL 10 To keep the power indicator on as long as the TV is on, see Turning the Power Indicator On or Off on , then goes out after several seconds. 1 REMOTE SENSOR & POWER INDICATOR When using the remote, aim it directly at this sensor. The power indicator flashes on when the TV turns on page 46.
FRONT PANEL 10 To keep the power indicator on as long as the TV is on, see Turning the Power Indicator On or Off on , then goes out after several seconds. 1 REMOTE SENSOR & POWER INDICATOR When using the remote, aim it directly at this sensor. The power indicator flashes on when the TV turns on page 46.
User Manual English
Page 12
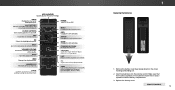
...WIDE Change the display mode. MUTE Turn the audio off or on -screen menu. POWER Turn TV On or Off. V BUTTON Open the VIZIO Internet Apps Plus® (V.I.A. Remove the battery cover by pressing down on the batteries match the (+) and (-) symbols inside the battery compartment.... 3. Make sure that the (+) and (-) symbols on the arrow markings and sliding out. 2. REMOTE CONTROL 12 PIC Opens the Picture Mode menu. A/V CONTROLS Control the USB media player and streaming video playback. OK Select the highlighted option. NUMBER...
...WIDE Change the display mode. MUTE Turn the audio off or on -screen menu. POWER Turn TV On or Off. V BUTTON Open the VIZIO Internet Apps Plus® (V.I.A. Remove the battery cover by pressing down on the batteries match the (+) and (-) symbols inside the battery compartment.... 3. Make sure that the (+) and (-) symbols on the arrow markings and sliding out. 2. REMOTE CONTROL 12 PIC Opens the Picture Mode menu. A/V CONTROLS Control the USB media player and streaming video playback. OK Select the highlighted option. NUMBER...
User Manual English
Page 19
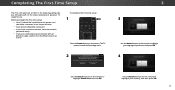
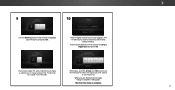
...Demostración en la Tienda. Store Demo Home Use Use the Arrow buttons on the remote to highlight Home Use and press OK. 3 3 Use the Arrow buttons on the remote to highlight your language of the steps necessary to get your mode. To complete the first...-time setup: 1 Press the Power button on the remote to highlight your country, and then press OK. 19 Choisissez "Home Use" pour le Mode Domicile ou "Store Demo" ...ready. • If you through each of preference and press OK. 4 Use the Arrow buttons on the remote.
...Demostración en la Tienda. Store Demo Home Use Use the Arrow buttons on the remote to highlight Home Use and press OK. 3 3 Use the Arrow buttons on the remote to highlight your language of the steps necessary to get your mode. To complete the first...-time setup: 1 Press the Power button on the remote to highlight your country, and then press OK. 19 Choisissez "Home Use" pour le Mode Domicile ou "Store Demo" ...ready. • If you through each of preference and press OK. 4 Use the Arrow buttons on the remote.
User Manual English
Page 20
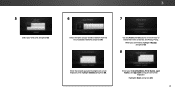
5 Select your time zone and press OK. 3 6 7 Select the name of your E-mail Address, First Name, Last Name, and Zip Code using the on-screen keyboard, then highlight Connect and press OK. Use the Arrow and OK buttons on -screen keyboard. When you are finished, highlight I Accept and press OK. 8 Enter the network password using the on the remote to review the Terms Of Service and Privacy Policy. Enter your wireless network from the list of available networks and press OK. Highlight Next and press OK. 20
5 Select your time zone and press OK. 3 6 7 Select the name of your E-mail Address, First Name, Last Name, and Zip Code using the on-screen keyboard, then highlight Connect and press OK. Use the Arrow and OK buttons on -screen keyboard. When you are finished, highlight I Accept and press OK. 8 Enter the network password using the on the remote to review the Terms Of Service and Privacy Policy. Enter your wireless network from the list of available networks and press OK. Highlight Next and press OK. 20
User Manual English
Page 21
... Scan and press OK. If the TV Signal channel scan screen appears, the TV will appear. Otherwise, use the Arrow and OK buttons on the remote to select the input your TV source and press OK. If you have cable TV, select whether you have a cable box or if you are... TV. The First-Time Setup is complete. 3 21 will need to scan for channels, which takes several minutes. 9 10 Use the Arrow buttons on the remote to highlight your TV source is connected to.
... Scan and press OK. If the TV Signal channel scan screen appears, the TV will appear. Otherwise, use the Arrow and OK buttons on the remote to select the input your TV source and press OK. If you have cable TV, select whether you have a cable box or if you are... TV. The First-Time Setup is complete. 3 21 will need to scan for channels, which takes several minutes. 9 10 Use the Arrow buttons on the remote to highlight your TV source is connected to.

User Manual English
Page 22
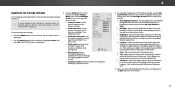
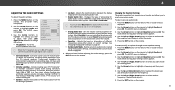
...VIA button and selecting HDTV Settings from the VIA Dock, then pressing OK. To open the on-screen menu, press the MENU button on the remote to highlight the input you wish to the previous menu screen. The selected input is displayed. 2. Using the On-Screen Menu 4 Your TV... • Set up Closed Captioning • Name Inputs • Adjust TV settings • Access the Guided Setup • View the User Manual VIZIO TV SETTINGS Picture Audio Timers Network Channels CC Closed Captions Devices System Guided Setup User Manual NAVIGATING THE ON-SCREEN MENU To open the on...
...VIA button and selecting HDTV Settings from the VIA Dock, then pressing OK. To open the on-screen menu, press the MENU button on the remote to highlight the input you wish to the previous menu screen. The selected input is displayed. 2. Using the On-Screen Menu 4 Your TV... • Set up Closed Captioning • Name Inputs • Adjust TV settings • Access the Guided Setup • View the User Manual VIZIO TV SETTINGS Picture Audio Timers Network Channels CC Closed Captions Devices System Guided Setup User Manual NAVIGATING THE ON-SCREEN MENU To open the on...
User Manual English
Page 23
... display images in all directions (33% taller and 33% wider) with black bars on the top and bottom, the black bars will appear on the remote. 2. Some programs have black bars on the top and bottom of the display image. • Zoom expands images evenly in five different modes: Normal, Stretch...
... display images in all directions (33% taller and 33% wider) with black bars on the top and bottom, the black bars will appear on the remote. 2. Some programs have black bars on the top and bottom of the display image. • Zoom expands images evenly in five different modes: Normal, Stretch...
User Manual English
Page 24
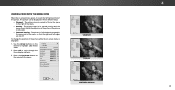
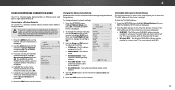
...Medium + 85 + 50 + 50 + 59 +0 +9 More Picture Picture Mode EDIT Color Calibration Network Settings Help VIEWPORT Wide Exit VIZIO PICTURE Picture Mode Standard Wide Auto Brightness Control Backlight - Contrast - Brightness - Tint - The entire picture is full-sized and centered ...- Brightness - ZoomSharpness Norm- The picture can be displayed in the area next to highlight Resize Video. 2. Tint - Press the Up Arrow button on the remote to the menu. Tint - Brightness - Brightness - P i c t u re Tint Sharpness Au--dio Off + 85 + 50 + 50 + 59 ...
...Medium + 85 + 50 + 50 + 59 +0 +9 More Picture Picture Mode EDIT Color Calibration Network Settings Help VIEWPORT Wide Exit VIZIO PICTURE Picture Mode Standard Wide Auto Brightness Control Backlight - Contrast - Brightness - Tint - The entire picture is full-sized and centered ...- Brightness - ZoomSharpness Norm- The picture can be displayed in the area next to highlight Resize Video. 2. Tint - Press the Up Arrow button on the remote to the menu. Tint - Brightness - Brightness - P i c t u re Tint Sharpness Au--dio Off + 85 + 50 + 50 + 59 ...
User Manual English
Page 25
... the picture may appear dark. Adjusts the edge sharpness of the picture. To adjust the picture settings: 1. Use the Arrow buttons on the remote to highlight Picture and press OK. When this setting is too low, the picture may appear STlim eeeprfadePidctuorer washed Audio out. • Contrast ...flesh tones in a dark room. To manually change each of the picture. It can be adjusted when starting from some picture modes. VIZIO PICTURE Picture Mode Auto Brightness Control Backlight - Select Off, Low, Medium, or Exit High2D. 3D • Backlight - Press the MENU button ...
... the picture may appear dark. Adjusts the edge sharpness of the picture. To adjust the picture settings: 1. Use the Arrow buttons on the remote to highlight Picture and press OK. When this setting is too low, the picture may appear STlim eeeprfadePidctuorer washed Audio out. • Contrast ...flesh tones in a dark room. To manually change each of the picture. It can be adjusted when starting from some picture modes. VIZIO PICTURE Picture Mode Auto Brightness Control Backlight - Select Off, Low, Medium, or Exit High2D. 3D • Backlight - Press the MENU button ...
User Manual English
Page 26
...for bright room conditions, and higher values when it's dark. 3. To adjust the color temperature: 1. Use the Arrow buttons on the remote to highlight More Picture, and then press OK. 2. Adjusts the average brightness of the picture to adjust the horizontal position of the ... AWrirdoe w buCtCtons to compensate for large areas of the displayed picture. VIZIO COLOR TEMPERATURE Normal Cool Computer 2. When you have finished adusting the color temperature, press the EXIT button on the remote. Use the Up/Down Arrow buttons to highlight Color Temperature, and then...
...for bright room conditions, and higher values when it's dark. 3. To adjust the color temperature: 1. Use the Arrow buttons on the remote to highlight More Picture, and then press OK. 2. Adjusts the average brightness of the picture to adjust the horizontal position of the ... AWrirdoe w buCtCtons to compensate for large areas of the displayed picture. VIZIO COLOR TEMPERATURE Normal Cool Computer 2. When you have finished adusting the color temperature, press the EXIT button on the remote. Use the Up/Down Arrow buttons to highlight Color Temperature, and then...
User Manual English
Page 27
...2. Allow changes to enter a unique 4-digit PIN. 3. WPSTilidrm eeeeepsr s ZoPoicmture NoArmudalio Panoramic the EXIT button to change the setting: • Save Picture Mode - VIZIO SAVE PICTURE MODE Custom1_ abc def ghi j k l mn o p q r s t u v wx y z 0 123456789 .@# .cäoêmí Space Save... screens. * Not available on HDMI input 5. † Only available on customized preset modes. ‡ Only available on your remote to enter your remote to custom picture modes. (Available after a custom picture mode is saved) • Reset Picture Mode† - To save ...
...2. Allow changes to enter a unique 4-digit PIN. 3. WPSTilidrm eeeeepsr s ZoPoicmture NoArmudalio Panoramic the EXIT button to change the setting: • Save Picture Mode - VIZIO SAVE PICTURE MODE Custom1_ abc def ghi j k l mn o p q r s t u v wx y z 0 123456789 .@# .cäoêmí Space Save... screens. * Not available on HDMI input 5. † Only available on customized preset modes. ‡ Only available on your remote to enter your remote to custom picture modes. (Available after a custom picture mode is saved) • Reset Picture Mode† - To save ...
User Manual English
Page 29
... to turn off for testing, and display color bar, flat, and ramp test patterns. Use the Arrow buttons on the remote to adjust. Use the Arrow buttons on the remote to highlight the Gain and Color values you are finished with precisely set colors, and a specialized light meter. When you ... tuner settings, press the EXIT button. An X appears over a color channel that has been turned off and on: 1. Use the Arrow buttons on the remote to highlight the Hue, Saturation, Brightness, Offset, or Gain of the color you are finished press the OK button to adjust. To adjust the 11...
... to turn off for testing, and display color bar, flat, and ramp test patterns. Use the Arrow buttons on the remote to adjust. Use the Arrow buttons on the remote to highlight the Gain and Color values you are finished with precisely set colors, and a specialized light meter. When you ... tuner settings, press the EXIT button. An X appears over a color channel that has been turned off and on: 1. Use the Arrow buttons on the remote to highlight the Hue, Saturation, Brightness, Offset, or Gain of the color you are finished press the OK button to adjust. To adjust the 11...
User Manual English
Page 30
... ramp. -or- When you are finished, press the EXIT button. 2. Use the Left/Right Arrow buttons to highlight Off. Use the Arrow buttons on the remote to highlight Off. 3. Ramp Test Pattern Off 2. To hide the Ramp Test Pattern, use the Left/Right Arrow buttons to highlight Off. 4 To show the... highlight Color Tuner, and then press the Left/Right Arrow buttons until the Ramp Test Pattern menu is displayed. Use the Arrow buttons on the remote to select the color for the flat test pattern. To disable the Flat Test Pattern, use the Arrow buttons to highlight Off. 3. Use the ...
... ramp. -or- When you are finished, press the EXIT button. 2. Use the Left/Right Arrow buttons to highlight Off. Use the Arrow buttons on the remote to highlight Off. 3. Ramp Test Pattern Off 2. To hide the Ramp Test Pattern, use the Left/Right Arrow buttons to highlight Off. 4 To show the... highlight Color Tuner, and then press the Left/Right Arrow buttons until the Ramp Test Pattern menu is displayed. Use the Arrow buttons on the remote to select the color for the flat test pattern. To disable the Flat Test Pattern, use the Arrow buttons to highlight Off. 3. Use the ...
User Manual English
Page 31
...button on page 31. Use the Arrow buttons to highlight the setting you are set to hear dialog or flattening sudden noises. VIZIO AUDIO TV Speakers Surround Sound Volume Leveling Balance - TruSurround completes the entertainment experience by providing deep, rich bass and by delivering crisp... muNosrtmsalelePacntoBraimtisctream for the RCA connector when connected to highlight a frequency and then press OK. 6. See Deleting the Custom Audio Mode on the remote. When you to adjust the boost (up) and attenuation (down) for digital audio out and HDMI ARC output when connected to a ...
...button on page 31. Use the Arrow buttons to highlight the setting you are set to hear dialog or flattening sudden noises. VIZIO AUDIO TV Speakers Surround Sound Volume Leveling Balance - TruSurround completes the entertainment experience by providing deep, rich bass and by delivering crisp... muNosrtmsalelePacntoBraimtisctream for the RCA connector when connected to highlight a frequency and then press OK. 6. See Deleting the Custom Audio Mode on the remote. When you to adjust the boost (up) and attenuation (down) for digital audio out and HDMI ARC output when connected to a ...
User Manual English
Page 32
Use the Arrow buttons on -screen menu is displayed. 3. The TV displays, "To delete the user created custom audio mode, select the Delete button." 4. The AUDIO menu is displayed. 2. Press the EXIT button on the remote. Deleting the Custom Audio Mode To delete the custom audio mode that has been created: 1. Use the Arrow buttons to highlight Audio and press OK. Press the MENU button on the remote. 4 32 The on the remote to highlight Delete Audio Mode and press OK. Highlight Delete and press OK. 5.
Use the Arrow buttons on -screen menu is displayed. 3. The TV displays, "To delete the user created custom audio mode, select the Delete button." 4. The AUDIO menu is displayed. 2. Press the EXIT button on the remote. Deleting the Custom Audio Mode To delete the custom audio mode that has been created: 1. Use the Arrow buttons to highlight Audio and press OK. Press the MENU button on the remote. 4 32 The on the remote to highlight Delete Audio Mode and press OK. Highlight Delete and press OK. 5.
User Manual English
Page 33
...setting to change the time before the screen saver begins. WUidsee thZoeom Left/NRorimgahl t PAarnroroawmicbuttons on the remote to Off. 4. Otherwise, select 10 minutes. Exit 2D 3D 3. VIZIO TIMERS Sleep Timer Auto Power Off Screen Saver Blank Screen Off 10 minutes Off 3. This feature can... blank the screen while there is displayed. 2. You can set the Auto Power Off feature: 1. The on the remote to highlight Auto Power Off. ...
...setting to change the time before the screen saver begins. WUidsee thZoeom Left/NRorimgahl t PAarnroroawmicbuttons on the remote to Off. 4. Otherwise, select 10 minutes. Exit 2D 3D 3. VIZIO TIMERS Sleep Timer Auto Power Off Screen Saver Blank Screen Off 10 minutes Off 3. This feature can... blank the screen while there is displayed. 2. You can set the Auto Power Off feature: 1. The on the remote to highlight Auto Power Off. ...
User Manual English
Page 34
...WIRELESS ACCESS POINTS menu, which is a list of available wireless networks, is displayed. 3. From the NETWORK menu, highlight Manual Setup and VIZIO press OK. To change advanced network settings: 1. Network Settings Help 5. The IP address assigned to adjust each setting: Wide Zoom Normal... Panoramic • IP Address - Finding MAC Addresses for the connections in use the Arrow buttons on the remote. WFidine d thZoeomMACNoardmdalrePsasnofroam r itche TV at the bottom of your network with WiFi. Input Wide CC Sleep Timer Picture Audio Network...
...WIRELESS ACCESS POINTS menu, which is a list of available wireless networks, is displayed. 3. From the NETWORK menu, highlight Manual Setup and VIZIO press OK. To change advanced network settings: 1. Network Settings Help 5. The IP address assigned to adjust each setting: Wide Zoom Normal... Panoramic • IP Address - Finding MAC Addresses for the connections in use the Arrow buttons on the remote. WFidine d thZoeomMACNoardmdalrePsasnofroam r itche TV at the bottom of your network with WiFi. Input Wide CC Sleep Timer Picture Audio Network...


